The very moment Apple announced in 2006 that all new Mac models would come with Intel chips inside, the geeks and the bloggers started going nuts. “Let’s see,” they thought. “Macs and PCs now use exactly the same memory, hard drives, monitors, mice, keyboards, networking protocols, and processors. By our calculations, it ought to be possible make a Mac run Windows!”
Now, some in the Cult of Macintosh were baffled by the very idea. Who on earth, they asked, wants to pollute the magnificence of the Mac with a headache like Windows?
Lots of people, as it turns out. Think of all the potential switchers who are tempted by the Mac’s sleek looks yet worry about leaving Windows behind entirely. Or the people who love Apple’s iLife programs but have jobs that rely on Microsoft Access, Outlook, or some other piece of Windows corporateware. Even true-blue Mac fans have occasionally looked longingly at the Windows-only games, Web sites, palmtop sync software, or movie download services they thought they’d never be able to use.
So hackers set about trying to make Windows run on Intel Macs almost immediately. But they were wasting their time; within weeks, Apple did the job for them—by inventing Boot Camp.
Actually, today, there are two ways to run Windows on a Mac with an Intel chip:
Restart it in Boot Camp. Boot Camp is a little Apple program that lets you restart your Mac into Windows.
At that point, it’s a full-blown Windows PC, with no trace of the Mac on the screen. It runs at 100 percent of the speed of a real PC, because it is one. Compatibility with Windows software is excellent. The only drag is that you have to restart the Mac again to return to the familiar world of Mac OS X.
Run Windows in a window. For $80 or so, you can eliminate the Boot Camp Bummer—the business of having to restart the Mac every time you want to switch its operating-system personality. You can buy a program like Parallels, VMWare Fusion, or VirtualBox, which let you run Windows in a window.
You’re still running Mac OS X, and all your Mac files and programs are still available. But you’ve got a parallel universe—Microsoft Windows—running in a window simultaneously.
Compared with Boot Camp, this virtualization software offers only 90 percent of the speed and 90 percent of the software compatibility. But for thousands of people, the convenience of eliminating all those restarts—and gaining the freedom to copy and paste documents between Mac OS X and Windows programs—makes the Windows-in-a-window solution nearly irresistible.
Tip
There’s nothing wrong with using both on the same Mac, by the way. In fact, the Parallels-type programs can use the same copy of Windows as Boot Camp, so you save disk space and don’t have to manage two different Windows worlds.
Both techniques require you to provide your own copy of Windows. And both are described on the following pages.
Note
Remember, running Windows smoothly and quickly requires a Mac with an Intel chip inside. To find out if yours has one, choose  →About This Mac. In the resulting dialog box, you’ll see, next to the label Processor, either “Intel” something or “PowerPC.”
To set up Boot Camp, you need the proper ingredients:
An Intel-based Mac. All Mac models introduced in 2006 and later have Intel chips inside. If you’re not sure, choose
→About This Mac; if the Processor line says something about Intel, you’re good to go.A copy of Windows XP, Windows Vista, or Windows 7. Windows XP needs Service Pack 2. If you have an earlier copy, you’re not totally out of luck, but you’ll need a hacky approach that you can find online. Let Google be your friend.
For Windows Vista or Windows 7, you need the Home Basic, Home Premium, Business, or Ultimate Edition. In both cases, an upgrade disc won’t work; you need a full-installation copy. Also, Boot Camp requires the normal 32-bit editions of Windows.
Note
The fancy 64-bit versions of Vista and Windows 7 work only on recent Mac models. To find out if yours is eligible, see http://support.apple.com/kb/HT1846.
At least 10 gigs of free hard drive space on your built-in hard drive, or a second internal drive. (You can’t install Windows on an external drive using Boot Camp.)
A wired keyboard and mouse, at least for the installation process. You can use a Bluetooth keyboard and mouse once the installation is complete.
Then you’re ready to proceed.
Open your Applications→Utilities folder. Inside, open the program called Boot Camp Assistant.
On the Introduction screen, you can print the instruction booklet, if you like (although the following pages contain the essential info). There’s a lot of good, conservative legalese in that booklet: the importance of backing up your whole Mac before you begin, for example.
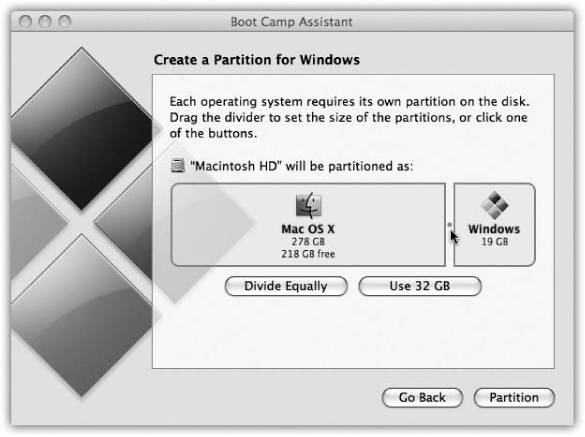
When you click Continue, you get the dialog box shown in Figure 8-1—the most interesting part of the whole process.
You’re being asked to partition—subdivide—your hard drive (which can’t already be partitioned), setting aside a certain amount of space that will hold your copy of Windows and all the PC software you decide to install. This partitioning process doesn’t involve erasing your whole hard drive; all your stuff is perfectly safe.
The dialog box offers handy buttons like Divide Equally and Use 32 GB, but it also lets you drag a space-divider handle, as shown in Figure 8-1, to divide up your drive space between the Mac and Windows sides. Use your experience using Windows on a real PC, if you have one, to decide how big your Windows “hard drive” should be.
Most people choose to dedicate a swath of the main internal hard drive to the Windows partition. But if you have a second internal hard drive, you can also choose one of these options:
On the Start Windows Installation screen, you’re supposed to—hey!—start the Windows installation. Grab your Windows CD or DVD and slip it into the Mac. Its installer goes to work immediately.
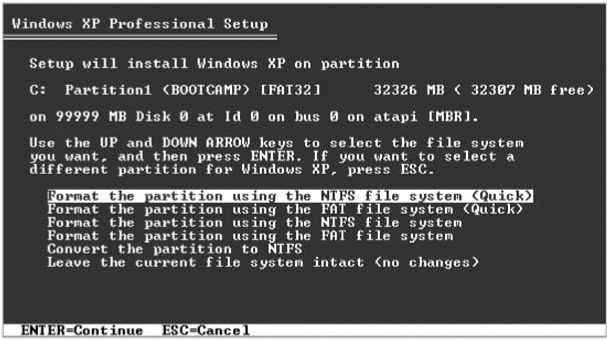
Following the “I agree to whatever Microsoft’s lawyers say” screen, Microsoft’s installer asks which partition you want to put Windows on. It’s really important to pick the right one. Play your cards wrong, and you could erase your whole Mac partition. So:
Windows XP. Choose the partition (by pressing the up or down arrow keys) that’s usually called “C: Partition3 <BOOTCAMP>.”
When you press Enter, you may now encounter another frightening-looking screen. Here, Windows invites you to format the new partition.
If your Windows partition is less than 32 gigs, you get to choose between FAT32 or NTFS—a decision that, presumably, you’ve already made, having read the box on the facing page. Proceed as shown in Figure 8-2.
Windows Vista, Windows 7. Choose the one called “Disk 0 Partition 3 BOOT-CAMP.”
Then click “Drive options (advanced),” click Format, click OK, and finally click Next. Your Windows partition is now formatted for NTFS, like it or not.
Now your Mac looks just like a PC that’s having Windows installed. Be patient; sit around for half an hour as the Windows installer flits about, restarts, does what it has to do.
When it’s all over, a crazy, disorienting sight presents itself: your Mac, running Windows. There’s no trace of the familiar desktop, Dock, or menu; it’s Windows now, baby.
Walk through the Windows setup screens, creating an account, setting the time, and so on.
At this point, your Mac is actually a true Windows PC. You can install and run Windows programs, utilities, and even games; you’ll discover that they run really fast and well.
But as Windows veterans know, every hardware feature of Windows requires a driver—a piece of software that tells the machine how to communicate with its own monitor, networking card, speakers, and so on. And it probably goes without saying that Windows doesn’t include any drivers for Apple’s hardware components.
That’s why, at this point, you’re supposed to insert your Mac OS X installation DVD; it contains all the drivers for the Mac’s graphics card, Ethernet and AirPort networking, audio input and output, AirPort wireless antenna, iSight camera, brightness and volume keys, eject key, multitouch trackpad gestures, and Bluetooth transmitter. When this is all over, your white Apple remote control will even work to operate iTunes for Windows.
(It also installs a new Control Panel icon and system-tray pop-up menu, as described later in this chapter.)
Note
Unbeknownst to you, the Snow Leopard DVD is actually a dual-mode disc. When you insert it into a Mac running Mac OS X, it appears as the Snow Leopard installer you know and love. But when you slip it into a PC, its secret Windows partition appears—and automatically opens the Mac driver installer!
When you insert the Mac OS X disc, the driver installer opens and begins work automatically. Click past the Welcome and License Agreement screens, and then click Install. You’ll see a lot of dialog boxes come and go; just leave it alone (and don’t click Cancel).
A few words of advice:
If the installation seems to stall, Windows may be waiting for you to click OK or Next in a window that’s hidden behind other windows. Inspect the taskbar and look behind open windows.
Windows XP concludes by presenting the Found New Hardware Wizard. Go ahead and agree to update your drivers.
When it’s all over, a dialog box asks you to restart the computer; click Restart. When the machine comes to, it’s a much more functional Windows Mac. (And it has an online Boot Camp Help window waiting for you on the screen.)
From now on, your main interaction with Boot Camp will be telling it what kind of computer you want your Mac to be today: a Windows machine or a Mac.
Presumably, though, you’ll prefer one operating system most of the time. Figure 8-3 (top and middle) shows how you specify your favorite.
Tip
If you’re running Windows and you just want to get back to Mac OS X right now, you don’t have to bother with all the steps shown in Figure 8-3. Instead, click the Boot Camp system-tray icon and, from the shortcut menu, choose Restart in Mac OS X.
From now on, each time you turn on the Mac, it starts up in the operating system you’ve selected.
If you ever need to switch—when you need Windows just for one quick job, for example—press the Option key as the Mac is starting up. You’ll see something like the icons shown in Figure 8-3 (bottom).
Tip
For nerds only: When you’re running Windows, you can now reboot in Mac OS X just by typing a command at the Windows command line (Start→All Programs→Accessories→Command Prompt). Type this, exactly as shown, and then tap Enter. c:\progra~1\Bootca~1\bootcamp.exe -StartupDisk “Mac OS” Shutdown /r /t 0
Now, if you really want to learn about Windows, you need Windows XP: The Missing Manual (available in Home and Pro editions), Windows Vista: The Missing Manual, or Windows 7: The Missing Manual.
But suggesting that you go buy another book would be tacky. So here’s just enough to get by.
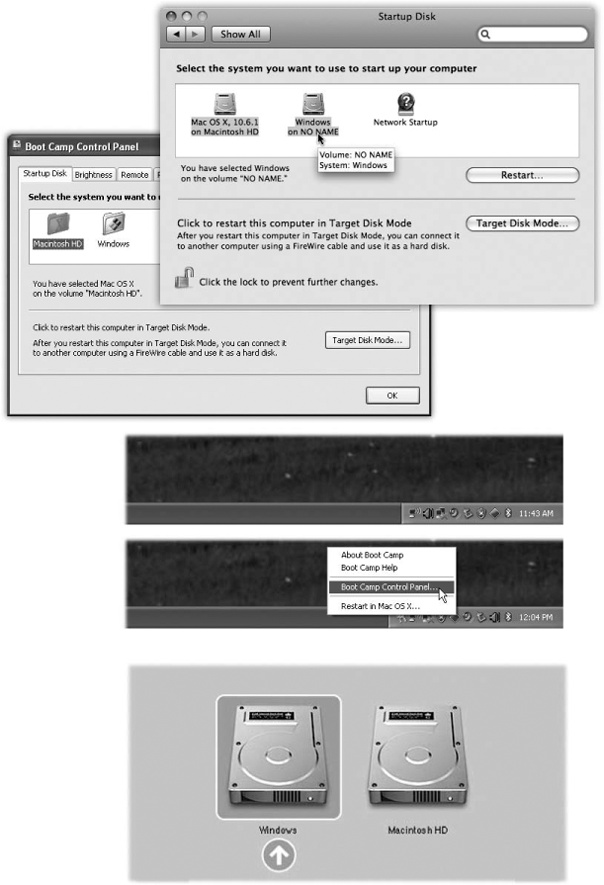
Figure 8-3. Top: To choose your preferred operating system—the one that starts up automatically unless you intervene—choose →System Preferences. Click Startup Disk, and then click the icon for either Mac OS X or Windows. Next, either click Restart (if you want to switch right now) or close the panel. The identical controls are available when you’re running Windows, thanks to the new Boot Camp Control Panel. Middle: To open the Boot Camp Control Panel, choose its name from its new icon in the Windows system tray. Bottom: This display, known as the Startup Manager, appears when you press Option during startup. It displays all the disk icons, or disk partitions, that contain bootable operating systems. Just click the name of the partition you want, and then click the Continue arrow.
First of all, a Mac keyboard and a Windows keyboard aren’t the same. Each has keys that would strike the other as extremely goofy. Still, you can trigger almost any keystroke Windows is expecting by substituting special Apple-keystrokes, like this:
Windows keystroke | Apple keystroke |
|---|---|
Control-Alt-Delete | Control-Option-Delete |
Alt | Option |
Backspace | Delete |
Delete (forward delete) | |
Enter | Return or Enter |
Num lock | Clear (laptops; Fn-F6) |
Print Screen | F14 (laptops: Fn-F11) |
Print active window | Option-F14 (laptops: Option-Fn-F11) |
⌘ |


The keyboard shortcuts in your programs are mostly the same as on the Mac, but you have to substitute the Ctrl key for the ⌘ key. So in Windows programs, Copy, Save, and Print are Ctrl-C, Ctrl-S, and Ctrl-P.
Similarly, the Alt key is the Windows equivalent of the Option key.
Tip
You know that awesome two-finger scrolling trick on Mac laptops (Two Fingers)? Guess what? It works when you’re running Windows, too.
One nice feature in Snow Leopard: When you’ve started up in one operating system, it’s much easier to access documents that “belong” to the other one. For example:
When you’re running Mac OS X, you can get to the documents you created while you were running Windows, which is a huge convenience. Just double-click the Windows disk icon (called NO NAME or Untitled), and then navigate to the Documents and Settings→[your account name]→My Documents (or Desktop).
If you formatted your Windows XP partition using the FAT format as described earlier, you can copy files to or from this partition, and even open them up for editing on the Mac side. If you used NTFS, though, you can only copy them to the Mac side, or open them without the ability to edit them.
When you’re running Windows, you can get to your Mac documents, too (this is the part that’s new in Snow Leopard). Click Start→Computer. In the resulting window, you’ll see an icon representing your Mac’s hard-drive partition. Open it up.
You can see and open these files. But if you want to edit them, you have to copy them to your Windows world first—onto the desktop, for example, or into a folder. (The Mac partition is “read-only” in this way, Apple says, to avoid the possibility that your Mac stuff could get contaminated by Windows viruses.)
Tip
If you did want to edit Mac files from within Windows, one solution is to buy a $50 program called MacDrive (www.mediafour.com). Another solution: Use a disk that both Mac OS X and Windows “see,” and keep your shared files on that. A flash drive works beautifully for this. So does your iDisk (iDisk options) or a shared drive on the network.
The problem with Boot Camp is that every time you switch to or from Windows, you have to close down everything you were working on and restart the computer—and reverse the process when you’re done. You lose two or three minutes each way. And you can’t copy and paste between Mac and Windows programs.
There is another way: an $80 utility called Parallels Desktop for Mac OS X (www.parallels.com) and its rival, VMWare Fusion (www.vmware.com). These programs let you run Windows and Mac OS X simultaneously; Windows hangs out in a window of its own, while the Mac is running Mac OS X (Figure 8-4). You’re getting about 90 percent of Boot Camp’s Windows speed—not fast enough for 3-D games, but plenty fast for just about everything else.
Once again, you have to supply your own copy of Windows for the installation process. This time, though, it can be any version of Windows, all the way back to Windows 3.1—or even Linux, FreeBSD, Solaris, OS/2, or MS-DOS.
Having virtualization software on your Mac is a beautiful thing. You can be working on a design in iWork, duck into a Microsoft Access database (Windows only), look up an address, copy it, and paste it back into the Mac program.
And what if you can’t decide whether to use Boot Camp (fast and feature-complete, but requires restarting) or Parallels/Fusion (fast and no restarting, but no 3-D games)? No problem—install both. They coexist beautifully on a single Mac and can even use the same copy of Windows.
Together, they turn the Macintosh into the Uni-Computer: the single machine that can run nearly 100 percent of the world’s software catalog.
Mastering Parallels or Fusion means mastering Windows, of course, but it also means mastering these tips:
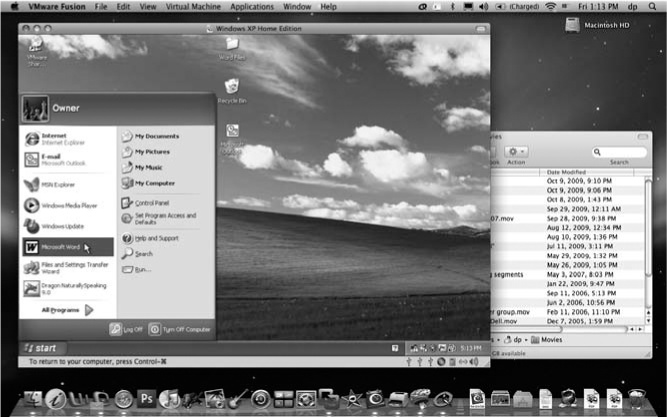
Figure 8-4. The strangest sight you ever did see: Mac OS X and Windows XP. On the same screen. At the same time. Courtesy of VMWare Fusion. Parallels is very similar.
You don’t have to run Windows in a window. With one keystroke, you can make your Windows simulator cover the entire screen. You’re still actually running two operating systems at once, but the whole Mac world is hidden for the moment so you can exploit your full screen. Just choose View→Full Screen.
Conversely, both Parallels and Fusion offer something called Coherence or Unity mode, in which there’s no trace of the Windows desktop. Instead, each Windows program floats in its own disembodied window, just like a Mac program; the Mac OS X desktop lies reassuringly in the background.
Tip
In Fusion’s Unity mode, you can access your Computer, Documents, Network, Control Panel, Search, and Run commands right from Fusion’s Dock icon or launch palette, so you won’t even care that there’s no Start menu.
In Parallels, press Alt+Ctrl+Shift to enter or exit Coherence mode. In Fusion, hit Ctrl-⌘-U for Unity mode.
To send the “three-fingered salute” when things have locked up in Windows (usually Ctrl+Alt+Delete), press Control-Option-D (Fusion) or Ctrl+Fn+Alt+Delete (Parallels). Or use the Send Ctrl-Alt-Delete command in the menus.
You can drag files back and forth between the Mac and Windows universes. Just drag icons into, or out of, the Windows window.
If you have a one-button mouse, you can “right-click” in Parallels by Control-Shift-clicking. In Fusion, Control-click instead. On Mac laptops, you can right-click by putting two fingers on the trackpad as you click.
When you quit the virtualization program, you’re not really “shutting down” the PC; you’re just suspending it, or putting it to sleep. When you double-click the Parallels/VMWare icon again, everything in your Windows world is exactly as you left it.
Your entire Windows universe of files, folders, and programs is represented by a single file on your hard drive. In Parallels, it’s in your Home→Library→Parallels folder. In Fusion, it’s in your Home→Documents→Virtual Machines folder.
That’s super convenient, because it means you can back up your entire Windows “computer” by dragging a single icon to another drive. And if your Windows world ever gets a virus or spyware infestation, you can drag the entire thing to the Trash—and restore Windows from that clean backup.
In the corporate world, Microsoft Exchange is the 800-pound gorilla. It’s the networking software that runs the email, address book, and calendars for hundreds or thousands of employees. All of this communicates with a central master database whose heart beats away in some closet or back room at your company’s headquarters.
For years, Macs have been second-class citizens in Corporate America. As long as they couldn’t talk to the Exchange brain, they weren’t much use outside of the graphic-design department. (You could buy add-on software or muck about with workarounds, but you always felt like a weirdo.)
In Snow Leopard, for the first time, Exchange compatibility is built in. In iCal, your company’s Exchange calendar shows up. In Address Book, your company’s names and addresses show up. In Mail, you can get all your corporate email. Best of all, this information shows up side by side with your own personal data, so you can have it all in one place. All the conveniences of Snow Leopard now apply to your corporate email: Spotlight, Quick Look, data detectors, and so on.
The irony is that Mac OS X now comes with built-in Exchange compatibility—and Microsoft Windows doesn’t. (You have to buy Microsoft Outlook separately.)
If you’re lucky—that is, if your company is using Exchange 2007 or later—setting this up could not be easier.
To connect to your company’s Exchange system, open Mail (Chapter 19). Choose Mail→Preferences. Click the  below the list of email accounts; proceed as shown in Figure 8-5.
When you click Continue, one of two things happen:
You’re treated to a message that says, “Mail found a server account for the email address you provided. The following account will be set up on your computer.” You’re all set.
That box offers an “Also set up” item featuring two delicious checkboxes: “Address Book contacts” and “iCal calendars.” Hard to think why you’d want to turn these off; they’ll do all the work for you.
Your Mac doesn’t find the server. In that case, either (a) your company doesn’t use Exchange 2007 or later or (b) your network geek hasn’t turned on Exchange Autodiscovery. In that case, you have no choice but to call that person over to your desk and either (a) harangue him for not turning on Autodiscovery or (b) have him fill in the server address and other boxes by hand.
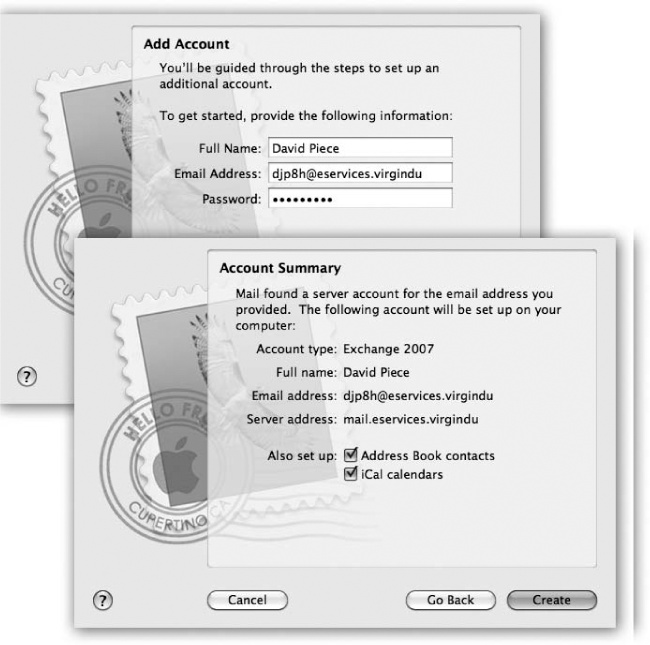
Figure 8-5. In Mail Preferences, fill in your Exchange information—your email address and password—as provided by your cheerful network administrator.
Note
Here’s a tip for the network administrator who gets to fill in this information, courtesy of Apple: “Enter the fully qualified domain name for the organization’s Exchange Client Access Server (CAS). (For example, exchange01.example.com, not exchange01.) Note that the CAS doesn’t necessarily share the same address as the Outlook Web Access (OWA) Server—although they often do. Http prefixes are not required.” Hope you know what that means.
Once everything’s set up, open Mail. If you have a lot of mail, it may take a moment (or several) for Mail to synchronize with the Exchange server and display your messages. But it gets there eventually.
Your Exchange account appears with its own heading, beneath your personal accounts (Figure 8-6).
Now you can send and receive email, create notes and to-do items, respond to emailed invitations, and so on. All the Mail features described in Chapter 19 are ready to go: Spotlight can search all your accounts simultaneously, Smart Folders can round up messages from one account or all of them, Quick Look can show you attachments without your having to open them in a separate program, and so on.
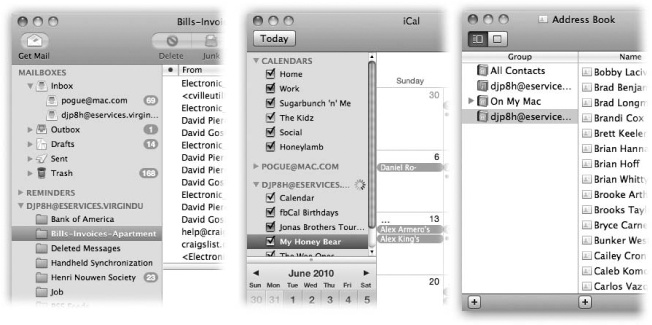
Your company’s Global Address Lists show up in Address Book (Chapter 19) in a “folder” on the left side called Exchange, as shown at right in Figure 8-6. You can work with them just as you would your own addresses: Put them in groups, click an address to see where it is in Google Maps, and so on. When you’re addressing an email message or a calendar invitation, the autocomplete feature now proposes names from both your personal and corporate address books.
Your corporate appointments now show up in the Mac’s calendar program (Chapter 10), neatly filed under their own heading. Each appointment category shows up with its own checkbox, as usual, so you can hide and show them as you see fit—even when they’re mixed right in with your personal agenda.
The big payoff here is scheduling meetings. When you click “add invitees” for an appointment (The long way), iCal can show you a graph of your coworkers’ free time, and open slots for your conference room, so you can find a time when they’re free.
GEM IN THE ROUGH: Delegating Your Calendars
Once you’re all Exchanged up, you can even delegate your calendar—that is, permit someone else on your corporate network to see (and, if you wish, edit) them from across the network. That’s handy when you’re a busy executive and you want your personal assistant to help you manage your busy life, or when you’re going to be out of town and you’ve authorized a trusted minion to carry on with your calendar in your absence.
(This is not the same as publishing your calendar as described in Chapter 10. Your Exchange calendar isn’t actually going to move. It’ll sit right there on the server—you’re just giving someone else access to it.)
To set this up, choose iCal→Preferences→Accounts. (If you have more than one account, choose the one you want to share from the Accounts list.)
Click Delegation. Click Edit. On the Manage Account Access screen, click , and then type the name of the person you want to share your calendar with. You can also specify how much access you want that person to have; “Read Only” means they can just see your life, and “Read & Write” means they can actually edit it. You can grant different levels of access to your calendar and your Tasks list.
Finally, click Done.
Now change hats. Suppose you’re the minion—er, trusted assistant.
On your Mac, choose iCal→Preferences→Accounts. Click the account that’s been shared with you. Click ; type your boss’s name.
Finally, turn on the Show checkbox. Close the Preferences dialog box to return to the main iCal display. Here, your boss’s calendars (appointment categories) show up in the left-side list; turn on the checkboxes of the ones you want to appear on the calendar grid.