Whether it’s a car engine or an operating system, anything with several thousand parts can develop the occasional technical hiccup. Mac OS X is far more resilient than its predecessors, but it’s still a complex system with the potential for occasional glitches.
Most freaky little glitches go away if you just try these two steps, one at a time:
Quit and restart the wayward program.
Log out and log back in again.
It’s the other problems that’ll drive you batty.
All kinds of glitches may befall you, occasionally, in Mac OS X. Your desktop picture doesn’t change when you change it in System Preferences. A menulet doesn’t open when you click it. A program won’t open—it just bounces in the Dock a couple of times and then stops.
When a single program is acting up like this, but quitting and restarting it does no good, try the following steps, in the following sequence.
An amazing number of mysterious glitches arise because the permissions of either that item or something in your System folder—that is, the complex mesh of interconnected Unix permissions described in Chapter 12—have become muddled.
When something doesn’t seem to be working right, therefore, open your Applications→Utilities folder and open Disk Utility. Proceed as shown in Figure B-1.
This is a really, really great trick to know.
Note
Snow Leopard Spots: The Repair Permissions routine is a lot faster and more solid-feeling than before. For starters, the “Estimated time” remaining readout is much more accurate than it used to be.
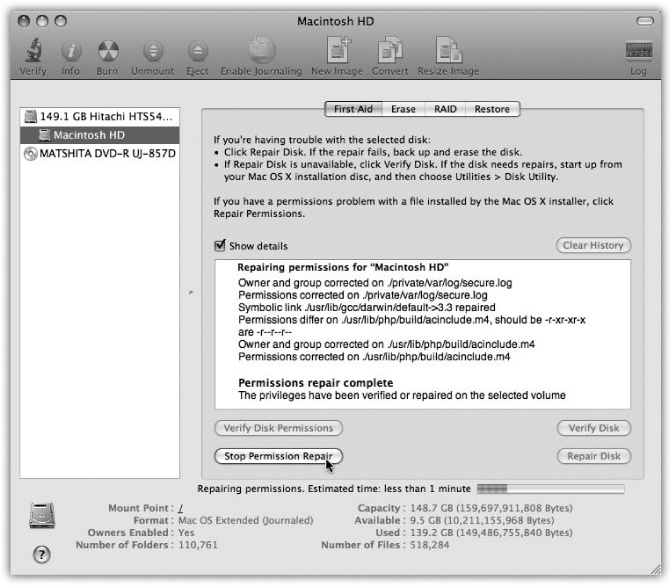
Figure B-1. Click your hard drive’s name in the left-side list; click the First Aid tab; click Repair Disk Permissions; and then read an article while the Mac checks out your disk. If the program finds anything amiss, you’ll see messages like these. Among the text, you may recognize some Unix shorthand for read, write, and execute privileges (Chapter 16).
If a program starts acting up immediately after you’ve installed Mac OS X 10.6, chances are good that it has some minor incompatibility. Chances are also good that you’ll find an updated version on the company’s Web site.
A corrupted preference file can bewilder the program that depends on it.
Before you go on a dumpfest, however, take this simple test. Log in using a different account (perhaps a dummy account that you create just for testing purposes). Run the problem program. Is the problem gone? If so, then the glitch exists only when you are logged in—which means it’s a problem with your copy of the program’s preferences.
Return to your own account. Open your Home folder→Library→Preferences folder, where you’ll find neatly labeled preference files for all the programs you use. Each ends with the file name suffix .plist. For example, com.apple.finder.plist is the Finder’s preference file, com.apple.dock.plist is the Dock’s, and so on.
Put the suspect preference file into the Trash, but don’t empty it. The next time you run the recalcitrant program, it will build itself a brand-new preference file that, if you’re lucky, lacks whatever corruption was causing your problems.
If not, quit the program. You can reinstate its original .plist file from the Trash, if you’d find that helpful as you pursue your troubleshooting agenda.
Remember, however, that you actually have three Preferences folders. In addition to your own Home folder’s stash, there’s a second one in the Library folder in the main hard drive window (which administrators are allowed to trash), and a third in the System→Library folder in the main hard drive window (which nobody is allowed to trash—at least not without one of the security-bypass methods described in the box on the next page).
In any case, the next time you log in, the Mac creates fresh, virginal preference files.
Sometimes you can give Mac OS X or its programs a swift kick by restarting the Mac. It’s an inconvenient step, but not nearly as time-consuming as what comes next. And it can fix problems that cropped up when you started up the computer.
Sometimes reinstalling the problem program clears up whatever the glitch was.
First, however, throw away all traces of it. Open the Applications folder and drag the program’s icon (or its folder) to the Trash. In most cases, the only remaining pieces to discard are its .plist file (or files) in your Home→Library→Preferences folder, and any scraps bearing the program’s name in your Library→Application Support folder. (You can do a quick Spotlight search to round up any other pieces.)
Then reinstall the program from its original disc or installer—after first checking the company’s Web site to see if there’s an updated version, of course.
The occasional unresponsive application has become such a part of Mac OS X life that, among the Mac cognoscenti online, the dreaded, endless “please wait” cursor has been given its own acronym: SBOD (Spinning Beachball of Death). When the SBOD strikes, no amount of mouse clicking and keyboard pounding will get you out of the recalcitrant program.
Here are the different ways you can go about force quitting a stuck program (the equivalent of pressing Ctrl-Alt-Delete in Windows), in increasing order of desperation:
Force quit the usual way. Choose
 →Force Quit to terminate the stuck program, or use one of the other force-quit methods described on Quitting Programs.
Force quit the sneaky way. Some programs, including the Dock, don’t show up at all in the usual Force Quit dialog box. Your next attempt, therefore, should be to open the Activity Monitor program (in Applications→Utilities), which shows everything that’s running. Double-click a program and then, in the resulting dialog box, click Quit to force quit it. (Unix hounds: You can also use the kill command in Terminal, as described on 20 Useful Unix Utilities.)
Tip
If you find yourself having to quit the Dock more than once, here’s an easier way: Make yourself a little AppleScript (Chapter 7) consisting of a single line: tell application “Dock” to quit. Save it as an application. Whenever you feel that the Dock (or Spaces or Exposé, which technically belong to the Dock) needs a good kick in the rear, double-click your little AppleScript.
Force quit remotely. If the Finder itself has locked up, you can’t very well get to Activity Monitor (unless it occurred to you beforehand to stash its icon in your Dock—not a bad idea). At this point, you may have to abort the locked program from another computer across the network, if you’re on one, by using the SSH (secure shell) command. The end of Chapter 22 offers a blow-by-blow description of how you might terminate a program by remote control in this way, either from elsewhere on the office network or even from across the Internet.
If you’re not allowed to drag an icon somewhere, the error message that appears almost always hits the nail on the head: You’re trying to move a file or folder that isn’t yours. The box on the facing page explains the solutions to this problem.
If a program won’t open (if its icon bounces merrily in the Dock for a few seconds, for instance, but then nothing happens), begin by trashing its preference file, as described on Second Resort: Look for an Update. If that doesn’t solve it, reinstalling the program, or installing the Snow Leopard-compatible update for it, usually does.
Not every problem you encounter is related to running applications. Sometimes trouble strikes before you even get that far. The following are examples.
When you see the cheerful, multilingual dialog box shown in Figure B-2, you’ve got yourself a kernel panic—a Unix nervous breakdown.
(In such situations, user panic might be the more applicable term, but that’s programmers for you.)
If you experience a kernel panic, it’s almost always the result of a hardware glitch—most often a bad memory (RAM) board, but possibly an accelerator card, graphics card, SCSI gadget, or USB hub that Mac OS X doesn’t like. A poorly seated AirPort card can bring on a kernel panic, too, and so can a bad USB or FireWire cable.
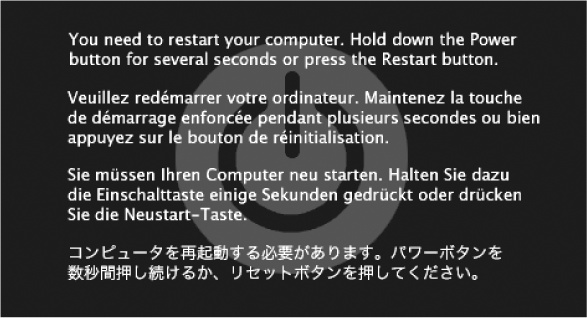
Figure B-2. A kernel panic is almost always related to some piece of add-on hardware. And look at the bright side: At least you get this handsome dialog box in Snow Leopard. That’s a lot better than the Mac OS X 10.0 and 10.1 effect—random text gibberish superimposing itself on your screen.
If simply restarting the machine doesn’t help, detach every shred of gear that didn’t come from Apple. Restore these components to the Mac one at a time until you find out which one was causing Mac OS X’s bad hair day. If you’re able to pinpoint the culprit, seek its manufacturer (or its Web site) on a quest for updated drivers, or at least try to find out for sure whether the add-on is compatible with Mac OS X.
Tip
This advice goes for your Macintosh itself. Apple periodically updates the Mac’s own“drivers” in the form of a firmware update. You download these updates from the Support area of Apple’s Web site (if indeed Mac OS X’s own Software Update mechanism doesn’t alert you to their existence).
There’s one other cause for kernel panics, by the way, and that’s moving, renaming, or changing the access permissions for Mac OS X’s essential system files and folders—the Applications or System folder, for example. (See Chapter 12 for more on permissions.) This cause isn’t even worth mentioning, of course, because nobody would be that foolish.
In times of troubleshooting, Windows fans press an F-key to start up in Safe Mode. That’s how you turn off all nonessential system-software nubbins in an effort to get a sick machine at least powered up.
Although not one person in a hundred knows it, Mac OS X offers the same kind of emergency keystroke. It can come in handy when you’ve just installed some new piece of software and find that you can’t even start up the machine, or when one of your fonts is corrupted, or when something you’ve designated as a Login Item turns out to be gumming up the works. With this trick, you can at least turn on the computer so that you can uninstall the cranky program.
The trick is to press the Shift key as the machine is starting up. Hold it down from the startup chime until you see the words “Safe Boot,” in red lettering, on the login screen.
Welcome to Safe Mode.
What have you accomplished?
Checked your hard drive. The Shift-key business makes the startup process seem to take a very long time; behind that implacable Apple logo, Mac OS X is actually scanning your entire hard drive for problems.
Brought up the login screen. When you do a safe boot, you must click your name and enter your password, even if you normally have Automatic Login turned on.
Turned off your kernel extensions. All kinds of software nuggets load during the startup process. Some of them, you choose yourself: icons you add to the Login Items list in the System Preferences→Accounts pane. Others are normally hidden: a large mass of kernel extensions, which are chunks of software that add various features to the basic operating system. (Apple’s kernel extensions live in your System→Library→Extensions folder; others may be in your Library→StartupItems folder.)
If you’re experiencing startup crashes, some non-Apple installer may have given you a kernel extension that doesn’t care for Mac OS X 10.6—so in Safe Mode, they’re all turned off.
Turned off your fonts. Corrupted fonts are a chronic source of trouble—and because you can’t tell by looking, they’re darned difficult to diagnose. So just to make sure you can at least get into your computer, Safe Mode turns them all off (except the authorized, Apple-sanctioned ones that it actually needs to run, which are in your System→Library→Fonts folder).
Trashed your font cache. The font cache is a speed trick. Mac OS X stores the visual information for each of your fonts on the hard drive so the system won’t have to read every single typeface off your hard drive when you open your Font menus or the Font panel.
When these files get scrambled, startup crashes can result. That’s why a Safe Boot moves all these files into the Trash. (You’ll even see them sitting there in the Trash after the startup process is complete, although there’s not much you can do with them except walk around holding your nose and pointing.)
Turned off your login items. Safe Mode also prevents any Finder windows from opening and prevents your own handpicked startup items from opening—that is, whatever you’ve asked Snow Leopard to auto-open by adding them to the System Preferences→Accounts→Login Items list.
This, too, is a troubleshooting tactic. If some login item crashes your Mac every time it opens, you can squelch it just long enough to remove it from your Login Items list.
Tip
If you don’t hold down the Shift key until you click the Log In button (after entering your name and password at the login screen), you squelch only your login items but not the fonts and extensions.
Once you reach the desktop, you’ll find a long list of standard features inoperable. You can’t use DVD Player, capture video in iMovie, use a wireless network, use certain microphones and speakers, or use your modem. (The next time you restart, all this goodness will be restored, assuming you’re no longer clutching the Shift key in a sweaty panic.)
In any case, the beauty of Safe Mode is that it lets you get your Mac going. You have access to your files, so at least the emergency of crashing-on-startup is over. And you can start picking through your fonts and login items to see if you can spot the problem.
Confirm that your Mac has the latest firmware, as described earlier. Detach and test all your non-Apple add-ons. Finally, perform a disk check (see Disk Utility, the hard drive repair program).
Most of the troubleshooting steps for this problem (which is usually accompanied by the Spinning Beachball of Death cursor) are the same as those described under Kernel Panic on page 827.
If you or one of the other people who use your Mac have forgotten the corresponding account password, no worries: Just read the box on The Case of the Forgotten Password.
The beauty of Mac OS X’s design is that the operating system itself is frozen in its perfect, pristine state, impervious to conflicting system extensions, clueless Mac users, and other sources of disaster.
That’s the theory, anyway. But what happens if something goes wrong with the complex software that operates the hard drive itself?
Fortunately, Mac OS X comes with its own disk-repair program. In the familiar Mac universe of icons and menus, it takes the form of a program in Applications→Utilities called Disk Utility. In the barren world of Terminal and the command line interface, there’s a utility that works just as well but bears a different name: fsck (for file system check).
In any case, running Disk Utility or its alter ego fsck is a powerful and useful troubleshooting tool that can cure all kinds of strange ills, including these problems, among others:
Your Mac freezes during startup, either before or after the Login screen.
The startup process interrupts itself with the appearance of the text-only command line.
You get the “applications showing up as folders” problem.
The easiest way to check your disk is to use the Disk Utility program. Use this method if your Mac can, indeed, start up. (See Method 2 if you can’t even get that far.)
Disk Utility can’t fix the disk it’s on (except for permissions repairs, described at the beginning of this appendix). That’s why you have to restart the computer from the Snow Leopard installation disc (or another startup disk), and run Disk Utility from there. The process goes like this:
Start up the Mac from the Mac OS X DVD.
The best way to do that is to insert the disc and then restart the Mac while holding down the C key.
You wind up, after some time, at the Mac OS X Installer screen. Don’t be fooled—installing Mac OS X is not what you want to do here. Don’t click Continue!
Click Utilities. Then choose Utilities→Disk Utility.
That’s the unexpected step. After a moment, the Disk Utility screen appears.
Click the disk or disk partition you want to fix, click the First Aid tab, and then click Repair Disk.
The Mac whirls into action, checking a list of very technical disk-formatting parameters.
If you see the message, “The volume ‘Macintosh HD’ appears to be OK,” that’s meant to be good news. Believe it or not, that cautious statement is as definitive an affirmation as Disk Utility is capable of making about the health of your disk.
Disk Utility may also tell you that the disk is damaged but that it can’t help you. In that case, you need a more heavy-duty disk-repair program like DiskWarrior (www.alsoft.com).
Disk Utility isn’t of much use when you can’t find the Snow Leopard DVD, when your DVD drive isn’t working, or when you’re in a hurry to get past the startup problems that are plaguing your machine. In those cases, you’ll be glad you can boot into the Mac’s raw Unix underlayer to perform some diagnostic (and healing) commands.
Specifically, you’ll be glad that you can run the Unix program fsck, for which Disk Utility is little more than a pretty faceplate.
Like any Unix program, fsck runs at the command line. You launch it from the all-text, black Unix screen by typing fsck and pressing Return. (You can also use fsck -f.)
You can’t, however, just run fsck in Terminal. You have to run it when the usual arsenal of graphic-interface programs—like the Finder and its invisible suite of accessory programs—isn’t running.
The Terminal program is the best known form of Mac OS X’s command line, but it’s not the only one. In fact, there are several other ways to get there.
In general, you don’t hear them mentioned except in the context of troubleshooting, because the Terminal program offers many more convenient features for doing the same thing. And because it’s contained in a Mac OS X–style window, Terminal is not as disorienting as the three methods you’re about to read.
All these techniques take you into console mode, shown in Figure B-3. In console mode, Unix takes over your screen completely, showing white type against black, no windows or icons in sight. Abandon the mouse, all ye who enter here; in console mode, you can’t do anything but type commands.
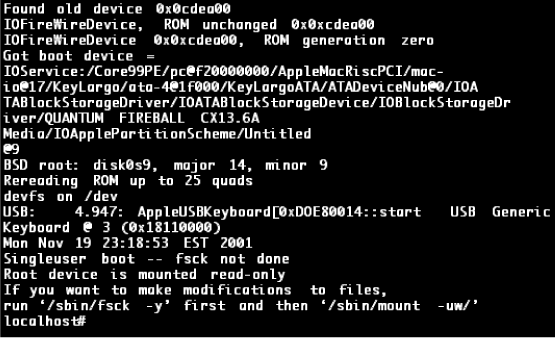
Figure B-3. In console mode, your entire screen is a command line interface. Unix jockeys can go to town here. Everyone else can timidly type fsck -y after the localhost:/ root # prompt—see this prompt on the very last line?—and hope for the best.
To get there in times of startup troubleshooting, press ⌘-S while the Mac is starting up. (If you’re stuck at the frozen remnants of a previous startup attempt, you may first have to force restart your Mac; hold down the  button for five seconds.)
Instead of arriving at the usual desktop, you see technical-looking text scrolling up a black screen as the Mac runs its various startup routines. When it finally stops at the localhost # prompt, you’re ready to type commands. You’re now in what’s called single-user mode, meaning that the Unix multiple-accounts software has yet to load. You won’t be asked to log in.
At the localhost # prompt, type fsck -y (note the space before the hyphen) and press Return. (The y means “yes,” as in “yes, I want you to fix any problems automatically.”) If the Mac refuses because journaling is turned on (The Erase & Install Option), you can also type fsck -fy to force the disk check.
Tip
Even though you’ve gone to all this trouble for the sake of running fsck, you can also use ls, cd, rm, or any of the other Unix commands described in Chapter 16 while you’re here.
Now the file system check program takes over, running through five sets of tests. When it’s complete, you’ll see one of two messages:
The volume Macintosh HD appears to be OK. All is well. Type exit and press Return to proceed to the usual Login screen and desktop.
File system was modified. A good sign, but just a beginning. You need to run the program again. One fsck pass often repairs only one layer of problems, leaving another to be patched in the next pass. Type fsck -y a second time, a third time, and so on, until you finally arrive at a “disk appears to be OK” message.
Type exit at the prompt and press Return to get back to the familiar world of icons and windows.
If the basic steps described in this chapter haven’t helped, the universe is crawling with additional help sources. In general, this is the part in any Mac book where you’re directed to Apple’s Support Web site, to various discussion forums, and so on—and, indeed, those help sources are listed below.
But the truth is, the mother of all troubleshooting resources is not any of those—it’s Google. You’ll find more answers faster using Google than you ever will using individual help sites. That’s because Google includes all those help sites in its search!
Suppose, for example, that you’ve just installed the 10.6.1 software update for Snow Leopard, and it’s mysteriously turned all your accounts (including your own) into Standard accounts. And without any Administrator account, you can’t install new programs, change network settings, add or edit other accounts, and so on.
You could go to one Web site after another, hunting for a fix, repeating your search—or you could just type Leopard 10.6.1 standard accounts into Google and hit Enter. You’ll get your answers after just a few more seconds of clicking and exploring the results.
These Web sites contain nothing but troubleshooting discussions, tools, and help:
Apple Discussion Groups (http://discussions.apple.com). The volume and quality of question-and-answer activity here dwarfs any other free source. If you’re polite and concise, you can post questions to the multitudes here and get more replies from them than you’ll know what to do with.
Apple’s help site (www.apple.com/support). Apple’s help site includes downloadable manuals, software updates, frequently asked questions, and many other resources.
It also has a Search box. It’s your ticket to the Knowledge Base, a collection of 100,000 individual technical articles, organized in a searchable database, that the Apple technicians themselves consult when you call for help. You can search it either by typing in keywords or by using pop-up menus of question categories.
MacFixIt (www.macfixit.com). The world’s one-stop resource for Mac troubleshooting advice; alas, you have to pay to access the good stuff.
Finally, consider contacting whoever sold you the component that’s making your life miserable: the printer company, scanner company, software company, or whatever.
If it’s a Mac OS problem, you can call Apple at 800-275-2273 (that’s 800-APL-CARE). For the first 90 days after your purchase of Mac OS X, the technicians will answer your questions for free.
After that, unless you’ve paid for AppleCare for your Mac (a 3-year extended warranty program), Apple will charge you to answer your questions. Fortunately, if the problem turns out to be Apple’s fault, they won’t charge you.