
Spinal Stenosis
Spinal stenosis is a condition in which the spinal canal—the space inside the bony ring of the backbone—narrows. When it involves low back pain, this narrowing generally occurs at the lower end of the lumbar spine, in the central canal, not the exit point of the nerves that serve the entire body below. If these nerves (called nerve rootlets in the lumbar spine) are compressed in a space that is uncomfortably narrow or a tight fit, there is pain.
This pain is neurological in character. That is, it’s tingling, shooting, and/or burning. There is frequently numbness, a pinching feeling, or strange sensations—feelings of hot and cold and other unpleasant sensations far away from the root of the nerve that is injured. For example, a nerve root that exits the spine at L5 and is compressed above may cause burning at the outside of the calf and pain between the first and second toes.
The causes of spinal stenosis include arthritis, where the bones become thicker with the accumulation of years, reducing the space inside the spine. Herniated disc is also a cause of stenosis. In that case the room inside the spinal canal is occupied by disc material and the inflammation it brings. Horizontal sliding of the vertebrae, spondylolisthesis, is a third cause of this condition. Actually, anything that narrows the space within the spine produces stenosis, which means “narrowing.”
To complicate matters, there’s a large ligament just behind these nerves, called the Ligamentum Flavum, which can swell for a variety of reasons, including overactivity, arthritis, autoimmune disease, and other reasons we don’t yet understand. Some experts believe that when blood volume goes up quite a bit and hormones change during pregnancy, stenosis can also occur.
You might think that the pain or sensations or lack of them would always be symmetrical because when the space inside your spinal canal is too narrow, everything inside it should be equally compressed. That’s generally true. If you have numbness in your left calf, you might very well also have it in your right calf. But it isn’t always the case. A disc may herniate to one side and not the other, arthritis can be worse on that side than the other, and inflammation can also take place in localized areas. So, if symptoms hit only one leg, that doesn’t necessarily rule out stenosis.
Stenosis is one of those conditions that develops and worsens with age, but there are treatment options. Yoga works in several ways. The first set of poses I’ve included in this chapter do the same basic thing: they increase the diameter of the lower lumbar spine by reducing the spine’s backward curve. This has the effect of stretching and thinning the ligamentum flavum and equalizing the pressures, and therefore the bulging, of the intervertebral discs. In addition, it tends to reduce any jutting arthritic bones or spondylolistheses.
Many such poses appear elsewhere in the other chapters before or after this one. They should be practiced in the order in which they are given below. All are flexion. However, about 5 to 10 percent of the time, extension is therapeutic in spinal stenosis. There is an explanation for this puzzling state of affairs. Extension poses stretch out the nerves. Increasing the length of the course of a nerve by arching the back, for example, thins the nerves just as stretching a rubber band thins it. Stretching the nerves and all the accompanying adjacent membranes helps them fit better into the spinal canal.1
One of the poses here, the headstand, also shunts the blood supply from the abdomen and lower back up toward the chest and head. The main thing this does is draw the blood away from your lower back, where there may be too much, especially in pregnancy. But it also has many other benefits, including improving awareness and increasing balance and producing calm.
The poses that follow help the nerves stretch by keeping the back a little less arched. Since the shortest distance between two points is a straight line, curving the lower back less reduces the distance the nerves must span. The poses shorten the distance the nerves have to travel, effectively giving them slack, so they fit better in the limited space available. Physically unstretching the nerves also promotes movement within the canal, reducing the effects of any pressure on them. This is good in itself as well as affording this nervous tissue more mobility to enable it to wriggle out of harm’s way in a tight situation.
Surgery is often needed for severe spinal stenosis, but I find that medicines—oral and injected steroids and others—in conjunction with yoga are extremely valuable. The poses in this chapter are safe but may produce some inflammation at first, because of their efficacy: moving bones, mobilizing joints, and stretching nervous tissue. If inflammation should occur, mild over-the-counter anti-inflammatory or prescription medicines, including indomethacin suppositories for people with gastritis, ulcers, or allergies, will likely be helpful. They will probably be unnecessary after a week or two. The flexion postures are helpful for all but a few people with spinal stenosis. My advice is to try them for a few days, and if they do not have recognizable ill effects, then within two or three weeks they will be beneficial. If they have adverse effects, move quickly but cautiously to the extension poses that follow them. If these, too, give you problems, seek a physician, preferably a physiatrist.
The flexion poses have other good effects, which, of course, is why they have been included in the other chapters. Start with Viparita Karani (page 72), then carefully do Supta Padangusthasana (page 129), then Janusirsasana (page 74), and finish the first day with Paschimottanasana (page 76). Do not be hard on yourself, but do each pose to cause the hamstrings to stretch some, and stay in each pose for at least twenty seconds, working up to a minute on each side over the first two weeks. Use a belt if you need to.
After a few days, add Ardha Padma Paschimottanasana (page 105) and Trianga Mukhaikapada Paschimottanasana (page 128), putting them in just before Paschimottanasana, and Marichyasana (page 82) just after Paschimottanasana.
Continue to do these poses for another week, attempting to get up to one full minute with each pose on each side. After that, begin the next day with a new pose, Parsvottanasana (page 78), and move Viparita Karani to the tail end of the list.
Finally, after another five to seven days, add in the version of Halasana on page 173 and Sirsasana, putting them just before Viparita Karani. Sirsasana is pictured and described later in the chapter.
So after about three weeks, you will have a program like this:
• Parsvottanasana, page 78
• Supta Padangusthasana, page 129
• Janusirsasana, page 74
• Ardha Padma Paschimottanasana, page 105
• Trianga Mukhaikapada Paschimottanasana, page 128
• Paschimottanasana, page 76
• Halasana, page 173
• Sirsasana, this chapter, page 143
• Viparita Karani, page 72
The entire set may take fifteen minutes. Some of these poses are difficult, and progress may be slow. But be patient and be careful, especially if you have osteoporosis or osteopenia, not to slouch forward. It is only the hips and very lowest spine that we are trying to flex forward. For more information on this topic, see Ellen Saltonstall’s and my book Yoga for Osteoporosis.
The next pose is usually helpful for those individuals who benefit from flexion and those who need extension.
1. SALABHASANA I
Locust
BENEFITS: Strengthens extensor muscles, stretches and thins nerves; excellent for keeping spine elastic and abdominal muscles strong.
WARNING: Do not do this pose if you are pregnant or if you have gastroesophageal reflux disorder (GERD).
SALABHASANA I MODIFIED Lie facedown on the floor. Your arms are at your sides, palms facing inward. In this version, the legs are separated and the knees are bent so the shins are vertical. Elevate your thighs and head, using the backs of your hands to help attain more elevation. Then stretch your arms out behind you horizontally and parallel to each other. Press your pubic bone down.
This pose is good for acute back pain. Hold for fifteen seconds. Oppose the tendency to take short, shallow breaths. Breathe slowly and deeply, filling the lungs with air.
To come out of the pose, lower your head and thighs at the same time.
Poses for People Benefitting from Extension
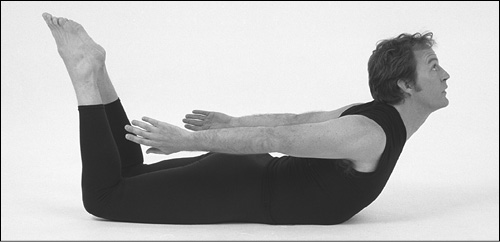
SALABHASANA I REGULAR Lie face down on the floor. Your arms are at your sides, palms facing inward. Legs are together. Raise your head and heels equally from the floor as high as possible. Look up. Arms and hands rise with shoulders and are horizontal.
Hold this pose for fifteen seconds, breathing slowly and deeply, drawing air into the bottom, front, back, and top of both lungs.
Exhale as you slowly lower your feet, head, and arms to their original positions.
2. SALABHASANA II
Locust
BENEFITS: Intensive strengthening of spinal muscles; increased abdominal control.
WARNING: Same as Salabhasana I.
PROP: Folded blanket.
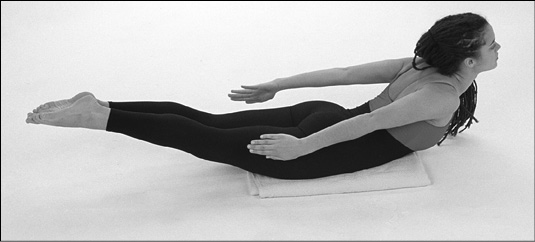
SALABHASANA II MODIFIED Lie on the floor on your stomach with your palms beneath your shoulders, facing down. Press gently on your palms. Keeping your knees straight, raise your thighs, chest and head as high as possible off the floor. Extend your arms in front of you as far and as high as possible, palms down. Breathe quietly and deeply for ten to fifteen seconds.
To exit the pose, exhale as you bring your hands to their original position beneath the shoulders. Smoothly lower your chest and thighs, then head and legs, using your hands for support.
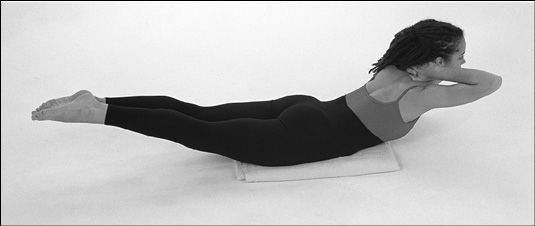
SALABHASANA II REGULAR Lie on the floor on your stomach. Interlock your fingers behind your head. As you inhale, raise your straight legs, head, and chest as high as possible. Breathe quietly and deeply for ten to fifteen seconds.
To get out of the pose, lower your chest, head and legs. Then bring your hands to your sides.
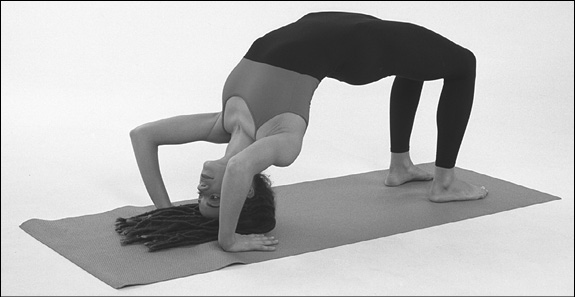
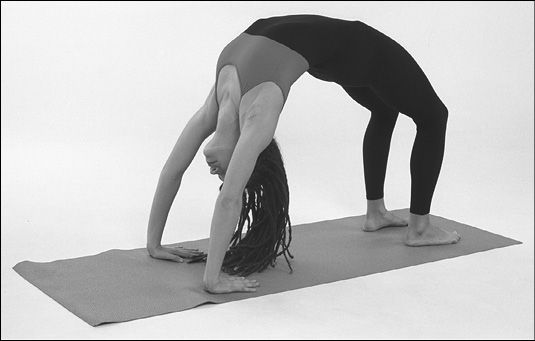
3. URDHVA DHANURASANA
Upward Bow
BENEFITS: Lengthens lumbar nerve rootlets, thinning them so they are less compressed by the spinal canal. Strengthens extensor muscles of the entire back. Increases facet (joints of vertebrae) flexibility.
CAUTION: Do not do this pose if you are pregnant or have spondylolisthesis or severe cervical arthritis.
PROPS: Two pillows or cushions and a mat for the modified version of this pose.
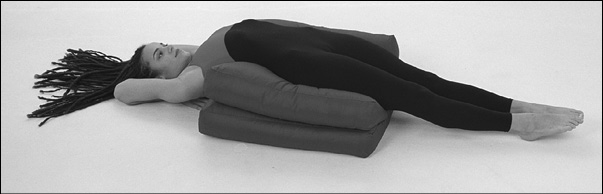
URDHVA DHANURASANA MODIFIED Lie on two pillows or cushions supporting only the lower tips of your shoulder blades. Open your hips, straighten your knees, point your toes. Fold your arms under your head. Each of these movements should progressively bring your shoulder blades back, together, and downward toward your pelvis. Breathe quietly and slowly for ten to fifteen seconds.
To leave the pose, first unfold your arms and bring your hands to the floor, then relax your legs, bend your right knee, and gently turn over to the left.
URDHVA DHANURASANA REGULAR Begin in the modified position, but without the cushions. Then press down with your palms, straighten your elbows a little, and press down with your feet, straightening the knees somewhat. Arch your back, lift up your chest and pelvis, and arch your back and neck further, so that the top of your head comes to rest on the floor. Hold for fifteen seconds, breathing softly, with your mouth closed.
To leave the pose, bend your knees, tuck in your chin, and bring your head and neck to their normal resting position.
URDHVA DHANURASANA (ADVANCED) The regular pose can be extended by straightening your elbows fully and your knees somewhat, elevating your head, chest, and navel. Arch your thoracic spine, bring your shoulder blades together, extend your knees as much as possible. Hold this position for fifteen seconds, breathing slowly.
To exit the pose, bend your knees, let your head come down to a resting position, and bring your hands to your sides.
KAPOTASANA REGULAR This begins by straddling a card-table chair. Place your hands on top of the back of the chair; bend your right knee and place your right foot into the space between the back and the seat of the chair. Then move to the right side of the chair seat, bend the left knee, and insert the left foot into the same space as the right. Place both feet stably on the floor behind the chair, but do not put too much weight on them.
NOTE: If the chair begins to tip, then sit out farther from the chair’s back. If this still seems unstable, do the pose with a partner who can stabilize the chair for you until you are flexible enough to enter and leave the chair safely. Do not slide your torso farther into the space between the back and seat. Your buttocks should be on the chair, not behind it.
Hold the chair back, slowly sliding both hands farther down the sides as you slowly, carefully recline; shoulder blades are well beyond the edge of the seat of the chair. Slowly, symmetrically relax the muscles of your throat as you lower your head to the floor and curve it back toward your feet as much as possible.
Release the back of the chair; place your palms in front of your brow on the floor, fingers pointing toward your heels. Gradually creep back toward your feet with your fingers while you bend your knees and bring your feet and toes forward toward your head. Breathe slowly and evenly with mouth closed for ten to fifteen seconds.
To exit the pose, walk your hands back to where they were before, and straighten your knees to ninety degrees in order to place your feet flat on the floor again. Slide your torso farther into the space between the chair back and seat. Keep your head and neck extended as you grasp the chair back with both hands and pull your torso up to vertical. Then straighten the head and neck.
Slide your hips back some distance out of the chair, but remain sitting in a stable position. Carefully move your hips to the right and bend your left knee. Hold on with the right hand and raise your left leg; pull it back from between the back and seat of the chair, placing it on the floor beside the chair. Stand on the left foot, now holding on to the back of the chair with your left hand.
Bring your right foot back until you can put the foot or the knee on the seat of the chair. First regain full balance, pause to overcome possible dizziness, then bring your right foot to the floor.
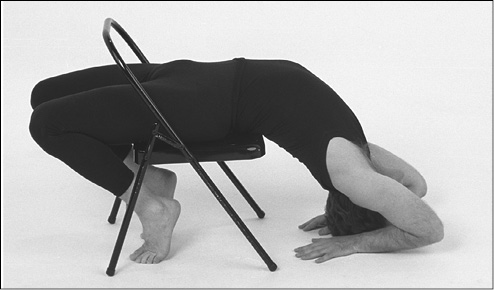
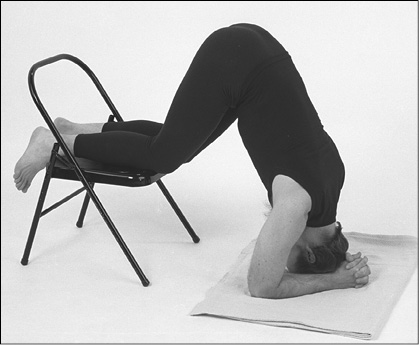
Headstand
BENEFIT: Relocates venous pool from abdomen to chest and head.
CAUTION: Do not do this pose if you have glaucoma, high blood pressure, cervical disorders or central nervous system vascular dysfunction.
PROPS: Stable card-table and a blanket.
BASIS OF POSE: Go down on all fours. Place your hands directly under your shoulders. Knees are together. This position is the basis of the next two variations.
SIRSASANA MODIFIED (VERSION 1) Place your elbows on the blanket about as far apart as your shoulders. Interlock your fingers. It is also important to bring the heels of your hands close together. Put the crown of your head down at the center of the triangle formed by your elbows and hands. Stand up on your toes, straightening the knees. Put some weight on your elbows in order to raise your shoulders. Most of the weight will be on your head.
Walk your feet as close to your head as possible without losing your balance. Breathe carefully and slowly through your nose for fifteen seconds.
To exit this pose, slowly walk your feet away from your head. Bring your knees to the floor. Supporting your weight on your elbows, bring your head up. Put one palm and then the other on the floor, returning to all fours.

SIRSASANA MODIFIED (VERSION 2) Begin standing on a carpet with the backs of your knees a few inches from a chair or couch. Balance your weight evenly on your feet. Move your right leg behind you, bend the knee and put it on the couch or chair seat. Then bend down, also bending your left knee slightly until your hands reach the floor.
Continue to come forward until your palms are on the floor about shoulder width apart. Raise your left leg onto the chair seat. Now both your knees are on the chair or couch behind you. Bend elbows slowly and rest your forearms on the floor. Interlock your fingers so that the heels of your hands are in contact. Rest the top of your head (not your forehead) at the center of the triangle formed by your elbows and hands. Bring your knees forward until your back is vertical. Breathe quietly for ten to fifteen seconds, gradually extending the time over a period of months to five or six minutes.
To exit this pose, release your hands, and one by one replace your palms on the floor just below your shoulders. Then push down with your hands; bring your head up. Slide or creep forward with your hands until there is enough space to bring your left foot down to the floor. Standing on the left foot, slide your hands farther away from the chair until you can bring your right foot to the floor. With knees bent, raise your torso toward vertical. Another way out of this pose is to slide both hands away from the chair, raise the head, and bring the knees one by one off the chair onto the floor. You will be on all fours.
When you no longer have back pain, you will be ready to advance to the full headstand.
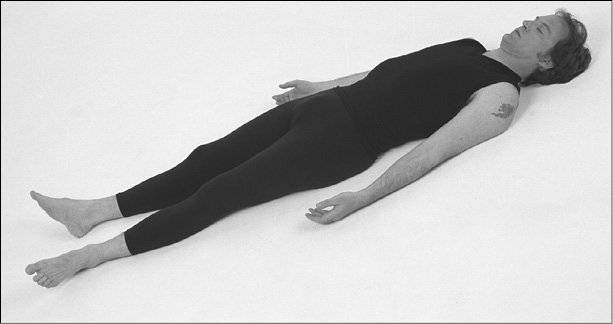
6. SAVASANA
Corpse Pose
BENEFITS: Relaxation of all muscles; mental repose.
CAUTION: As Ram Das commented, “One thing about dying, it’s completely safe.”
PROP: You can use a blanket under your back if it is more comfortable for you than the floor
NOTE: Mr. Iyengar once told me he believes this is the most difficult pose of all.
SAVASANA Lie flat on your back, arms at your sides, palms up. Slide the backs of your hands toward your ankles, bringing your shoulder blades back, down, and together. Stretch your heels away from your hips. Elongate the back of your neck, moving your head as far away from your shoulders as possible. Relax the soft and hard palates inside your mouth. Close your eyes. Breathe smoothly. Hold this pose for one to ten minutes.
This pose can also be done lying on the floor with the calves supported by the seat of a chair. This way of doing it is invaluable not only for back pain but also for chronic venous insufficiency.
To get out of the pose, open your eyes. Bend your left knee, and roll slowly to the right.
There are some poses that are described and pictured elsewhere in the book for other diagnoses that may also be helpful for spinal stenosis. These poses are, in order of acute to chronic pain:
VIRASANA—Hero Pose
PASCHIMOTTANASANA—West Posture
UTKATASANA—Intense Stretch