
Willys supply Jeep of the 82nd Airborne Division, Normandy, June 1944.
| Normandy | 5 |
ON 6 JUNE 1944 the forces of the Allied nations launched an invasion along an 80km (50 mile) stretch of the Normandy coast divided into five beaches. This was codenamed Operation Neptune but became more widely known as D-Day.
Prior to the assault from the sea, three parachute divisions were dropped behind the coast of Normandy. These were the British 6th Airborne Division, which landed in the Orne basin near Ranville to secure the Allied left flank, the 82nd ‘All American’ and the 101st ‘Screaming Eagles’ Division. The two American divisions landed behind the American beaches and were tasked with securing a number of bridges and towns to prevent the Germans sending reinforcements to the beach defenders, as well as launching counter-attacks directly onto the beaches. The American drops into Normandy, however, did not go as well as those of their British counterparts. Both divisions had units that were either lost or became mixed up with other units when pilots mistook drop zones or tried to avoid heavy anti-aircraft fire.

Willys supply Jeep of the 82nd Airborne Division, Normandy, June 1944.
The Germans had also flooded large areas behind the coast and many were dropped into sometimes quite deep water. Weighed down by their heavy kit, some sadly drowned. Nevertheless, these elite soldiers soon grouped together and, despite depleted numbers, they achieved their assigned objectives, even defeating much larger enemy units in the process.
The assault beaches on D-Day were codenamed Sword, Gold, Juno, Omaha and Utah. Omaha and Utah were designated for the Americans. The landings on Omaha were in doubt until quite late in the day due to very strong German resistance, which caused large casualties to the first waves of assaulting infantry. The units that assaulted Omaha were the 29th Infantry Division and 1st ’Big Red One’ Infantry Division, as well as nine companies of Rangers. H hour was set at 06.30 hours and the casualties in the first wave were horrendous. The second fared little better, but at 07.35 small groups of American Infantry and Rangers started to find gaps in the defences. At Draw F1 at Fox Green Beach, near Vierville, the 3rd Battalion of Grenadier Regiment 725 reported that up to 200 American infantrymen from Regimental Combat Team 116 of the 29th Infantry Division had penetrated the German defences. While this was going on, companies A and B of the 2nd Rangers, led by Lieutenant Colonel James Rudder, attacked Pointe du Hoc where the 155mm battery posed a serious danger to the landings at Omaha some 5km (3 miles) away. This assault was made famous through the 1962 film The Longest Day. The 5th Ranger Battalion was also intended to support this assault, but after a 40-minute delay this unit was diverted to Omaha to help with the landings there. Had it not done so more casualties would have resulted.
The assault forces that attacked Pointe du Hoc lost half their number to German fire on the run in to the beach. They were landed by British landing craft and used 100ft ladders requisitioned from the London Fire Brigade to scale the cliffs. Cover was provided by fire from two destroyers, USS Satterlee and HMS Talybont, which kept the German defenders from the cliff tops as the Rangers made their climb. They soon found that the ladders were short but they persevered and made their way to the top. There they carried out the assault on the concrete emplacements, only to find that the guns had been moved. They were later found and put out of action a few miles from Pointe du Hoc by a patrol of Rangers. This action was one of the most daring carried out on D-Day and was the scene of extreme bravery both during and after the assault as the Germans launched a series of counter-attacks.
At the same time, some sixteen teams of engineers were being landed in areas where there were no soldiers or tanks to provide cover, and they set about clearing beach obstacles and looking for mines while under heavy fire in order to make the beach safe for the following waves of soldiers and vehicles. These men showed extreme bravery and steadfastness to duty under very difficult conditions as they helped to ensure the success of the landings on 6 June 1944.
After the landings, the Allies drove inland across wide open fields, near Caen in the British Sector, that provided fine ‘tank country’. In the central sector, however, the landscape was marked by the bocage field system, in which the sides of the fields are often made from hedges 2 metres thick set on banks mixed with mature trees, which had developed over centuries. The medieval hedges were a defender’s paradise and an attacker’s hell: the two sides slugged it out field by field for days or even weeks, sometimes changing hands as many as three times a day. Among the problems the American and other Allied armies faced in Normandy was how best to deal with the bocage, employing infantry to operate in close coordination with the armoured forces to prevent ambushes, which were commonplace given the numerous places for concealment.

M16 anti-aircraft half-track in Normandy, June 1944.

US Airborne troops in Normandy, 8 June 1944.

A Sherman tank fitted with a Culin prong leads the way through the Normandy bocage.
The Panzerfaust was an inexpensive, but much-feared, one-shot anti-tank rocket that could take out any Allied tank with a single shot. The firer could then move to another position, pick up a second Panzerfaust and lie in wait for another tank to come within the 60m range. It was difficult for tanks, even a Sherman, to move directly through a bocage hedge as this exposed the thin armour on the belly of the tank, presenting an easy target for a Panzerfaust. Many tanks were lost in this way.
Sergeant Curtis G. Culin, however, after a conversation with a fellow tanker called ‘Roberts’, both of the 2nd Armored Division and from Tennessee, came up with the idea of fitting knives to the front of a tank that would then cut through the banks and hedges. This allowed tanks to drive through, rather than over, the bocage and turned the Sherman into a bulldozer/hedge cutter, while protecting the underside of the tank from attack. A prototype made from scrap iron was shown to General Omar Bradley, who was so impressed that he ordered it to be fitted to as many tanks as possible for the upcoming Operation Cobra, which was to enable the breakout from the Normandy bocage. Up to 60 per cent of the tanks were then fitted with the so-called ‘Culin prong’, which aided the American breakout in late July.
This chapter deals with the GI as he appeared both on D-Day and during the fighting in Normandy until the breakout in late July. Infantry, Engineers and paratroopers, as well as the uniforms they wore, will be covered here together with a variety of armoured vehicles.

This photo shows actual WWII uniforms worn by the GI in Europe from 1944 to 1945.
This 20mm metal figure of an officer from June 1944, produced by AB Miniatures, provides an example of the uniform worn by the infantry. He will be painted wearing regulation uniform as used in Normandy, the M1941 jacket and the M1938 woollen trousers, as seen in films such as Saving Private Ryan.
Step 1. Check for any mould lines and clean them. Attach the figure to a base (here a 20mm round base has been used) and then prime the figure. When this is dry the figure is ready to paint.
Step 2. Paint the jacket using AK3075 ‘US Field Drab’. When this is dry, lighten the paint by adding a little Vallejo 819 ‘Iraqi Sand’ and gently paint over the raised areas.
Step 3. The trousers should be painted in Vallejo 921 ‘English Uniform’. When dry, mix the paint with a little ‘Iraqi Sand’ to make a highlighter and apply to the raised areas. Do not overwork the effect as in reality the trousers should still look darker than the jacket.
Step 4. Now paint the flesh areas as described in Chapter 3. The weapon, which in this case is a Thompson sub-machine gun, is next: start with black, and then brush over with dark grey. Gunmetal is not actually silver but a black/blue colour. Then paint the wooden parts with Vallejo 311 ‘New Wood’ as the base, and lightened with a little white for a highlight. Then paint the straps and any webbing with AK3076 ‘Canvas Tone’ from the AK US Army paint set. Highlight these with the same colour, but with a little white added. Now paint the boots a red-brown colour: Vallejo 846 ‘Mahogany Brown’ is a good choice.
Step 5. Now attend to the other details, such as the bayonet. Even officers carried a bayonet, which could be used as a fighting knife during close combat. This should be painted as for the weapons, as they had metal scabbards with wooden hand grips. Now highlight the jackets and belts again, using the same colours as before, but add a little more white paint to achieve a balanced effect. Also paint the buttons and caps on the top of the canteens in gunmetal. Once the painting and highlighting on the uniform is satisfactory, paint the divisional insignia on the left shoulder of the figure. This officer has been given one from the 29th Infantry Division, which landed on Omaha beach on D-Day. The figure should now be matt varnished for protection.
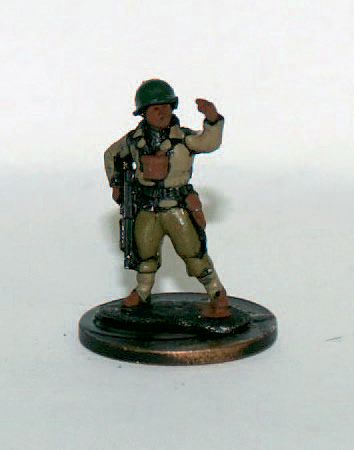
The basic uniform has been painted and a start made on the flesh areas.
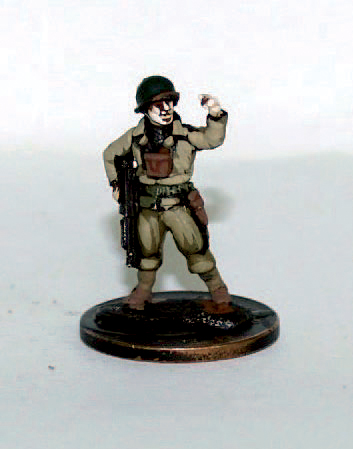
The figure’s uniform and equipment are now complete.
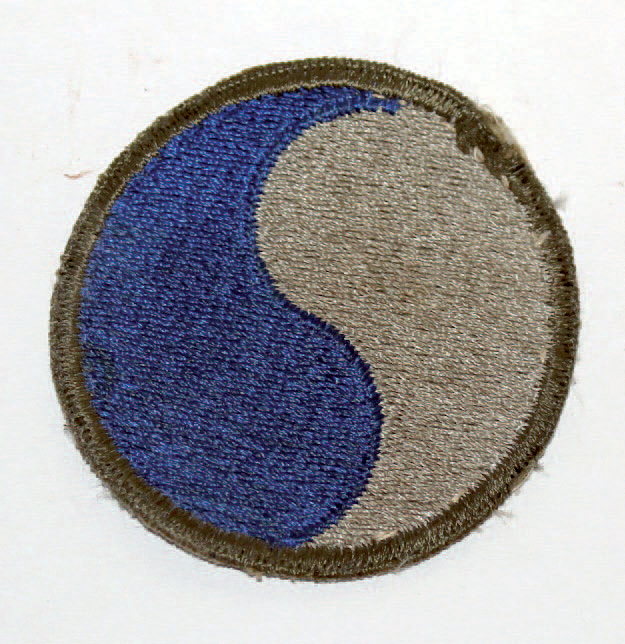
The shoulder flash of the 29th Infantry Division, also known as the ‘Blue and Grey’, which landed on Omaha beach and fought its way throughout the Normandy campaign, finally reaching Bremen at the end of the war.
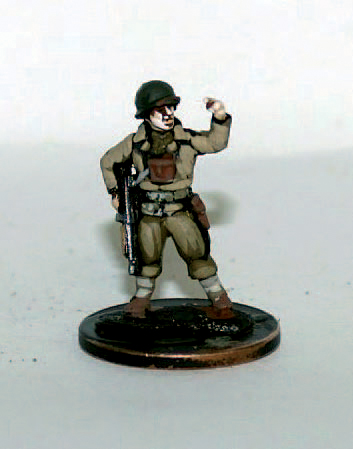
The division’s 116th Regiment was attached to the 1st Infantry Division, ‘The Big Red One’, and was in the first assault wave on D-Day.

The completed officer.

The set of 1:35 scale figures from which a Ranger will be chosen to paint as an example.
At the time of writing there were no 20mm or 28mm WWII Rangers models of sufficient quality to use for a painting demonstration. Instead, the 1:35 scale Dragon set of Rangers has been used. These are similar to the 1:32 scale American infantryman on Okinawa (see Chapter 2) and are also multi-part figures. They are superbly detailed and illustrate Rangers very well. They also wear the Assault Vest, modelled on the British battle jerkin, as used on D-Day by specialist assault troops such as combat engineers and Rangers. Soldiers liked the vest as there were several useful pockets to hold equipment and ammunition. The vests were replaced after D-Day in favour of standard webbing.
The demonstration model will also carry a Bangalore torpedo section, which was used to clear wire obstacles by joining together metal tubes filled with explosives that could then be detonated. A famous scene in Saving Private Ryan shows a Bangalore torpedo being used to clear the wire and open up a way off the beach for Tom Hanks and his men.

Attach the model to a temporary base and fill any gaps using Green Stuff.
The Dragon kit comes with all that is needed to construct five Rangers.
Step 1. Start by constructing the body and arms: any small gaps between the parts may be filled with Green Stuff putty. Although some of these may subsequently be covered by equipment, never leave anything to chance.
Step 2. Next add the equipment, following the instructions, and then the head and helmet. Make sure they are all correctly fitted. The instructions provided are good but check against photo references to ensure accuracy. Add a rifle sling made from thin paper glued in the correct position. Bases are not supplied with the kit, these should be added.

The primed figure is ready to be painted and is now on a permanent base.

Start by applying the relevant base colours for the uniform.
Step 3. Prime the figure. This figure wears the assault vest and the M-1943 HBT trousers, which had large pockets on both sides that were useful for carrying equipment such as explosives. Base coat the assault vest with Vallejo 924 ‘Russian Uniform’, then paint with AK3076 ‘Canvas Tone’, and finally lighten some ‘Canvas Tone’ with a little white and use this for the highlights.
Step 4. Paint the jacket with AK3075 ‘US Field Drab’. Once this base coat is dry, add a little white to the paint and start to highlight. Repeat the process until a pleasing result, not too light in colour, is achieved.
Step 5. Base coat the trousers with Vallejo 921 ‘English Uniform’. Then highlight these with the ‘US Field Drab’ and ‘English Uniform’ mixed 50:50. M-1943 HBT trousers were a dark olive colour, so use AK3071 ‘Dark Olive Green/M-43 Uniform Green Olive’, diluted with water at a ratio of 7:3. If the first coat is not enough, apply another. The work already done will help to soften the effect of the olive paint, and the thinned paint will gather in the creases and give a pleasing shaded effect.

Once the base colours have been applied, the model is allowed to dry.
Step 6. Paint the gaiters with ‘US Field Drab’ and the boots, rifle and sling with AK3073 ‘Red Brown Leather’. Paint the hands and face as well, following the instructions given for the GI in Chapter 2.
Step 7. Paint the helmet with Vallejo 889 ‘Olive Brown’. Then paint the spade handle and the wooden parts of the gun with Vallejo 311 ‘New Wood’. The Bangalore torpedo section is painted ‘Olive Brown’. Mix some gunmetal paint with just a little black and paint any buttons on the assault vest as well as the buttons on the gaiters. Paint the bayonet’s scabbard ‘Brown Olive’. The chinstrap is painted using ‘Canvas Tone’, and the strap at the front peak of the helmet, which holds the metal helmet shell onto the helmet liner, is painted ‘Red Brown Leather’. Leave the figure to dry for a hour, then wash the uniform with dark brown ink, thinned 50/50 with acrylic thinner. Then leave to dry before matt coating and finally basing.

Paint the gaiters, boots, rifle and sling. Then paint the hands and face.

Paint in the insignia. The Ranger badge goes on the left shoulder. The orange Ranger patch is painted on the rear of the helmet.

The painted Ranger on its completed base. Apply some dry sand and paint it with MIG ‘Beach Sand’, working it into the surface to create a realistic finish.
These soldiers played a prominent and important role during the Normandy campaign assisting the advance of the US Army through the Normandy bocage. They cleared obstacles from the beaches and made safe the various mines and booby traps left behind by German forces. This model shows a mine-clearing team of six men, with a Sergeant in command equipped with two mine detectors. The other members of the team are searching for mines with a bayonet, a practice widely used by infantry and taught as part of their training, and carrying away a German Teller mine. The NCO is giving instructions to search for more.
Step 1. Engineers and their officers, for the most part, wore the same dress as the infantry (see above). Any webbing and backpacks should be painted with AK3076 ‘Canvas Tone’, and then a lighter tone with some white added should be used for highlighting.
Step 2. The equipment carried by combat engineers was largely the same as that issued to the infantry. Follow the steps outlined above for painting the 29th Infantry Division officer. The mine detectors are painted Vallejo 887 ‘Brown Violet’ and highlighted with this paint to which a little white has been added. Again, these are painted as belonging to the 29th Infantry Division, so paint as before, including the NCO who is a Sergeant. Finish by basing the model, as described in Chapter 8.

A group of US combat engineers undertaking mine detection and clearance.
On the evening of D-Day, some 13,000 paratroopers of the two American airborne divisions, the 82nd and 101st, boarded their aircraft and set out for Normandy. For many it would be their first time in combat, while others, especially those of the 82nd Airborne who had fought in Sicily, were no less uncertain as what would happen when they landed in enemy-occupied France. The full story of what followed the landings may be found elsewhere, but their impact was to confuse the German forces and help the seaborne forces get inland.
A US Paratrooper on D-Day would have worn the M-1942-type uniform, the design of which was developed by Captain William P. Yarborough, Test Officer of the Provisional Parachute Group. The M-1942 Jump Uniform consisted of trousers and jacket made from a tan lightweight cotton material. The jacket had a zip on the front as well as four large pockets; the back had bi-swing pleats. A belt was also sewn into the jacket. The trousers had two large thigh pockets. The uniform gave little protection from the weather, unlike the later M-1943 olive drab jacket and trousers (see Chapter 6).
This is an Elhiem 20mm Paratrooper in authentic colours to represent a US Paratrooper as he looked during D-Day and in the subsequent fighting in Normandy in June 1944. Elhiem make a specific range of US airborne figures for the Normandy campaign and the detail is first class.
Step 1. Inspect the figures for mould lines and blemishes and remove them with a file and sharp craft knife. Then mount the figures, in this case on to round 20mm bases. Once the superglue is cured, paint PVA glue onto the bases and around the figures’ feet, and then sprinkle on dried builders’ sand and leave to dry. Once dry, prime the figures using grey car primer.
Step 2. Now paint the entire figure with the authentic tan colour for the M-1942 uniform. Add a little white to the base colour and brush this over the earlier coat, which will help with the final finish of the uniform.
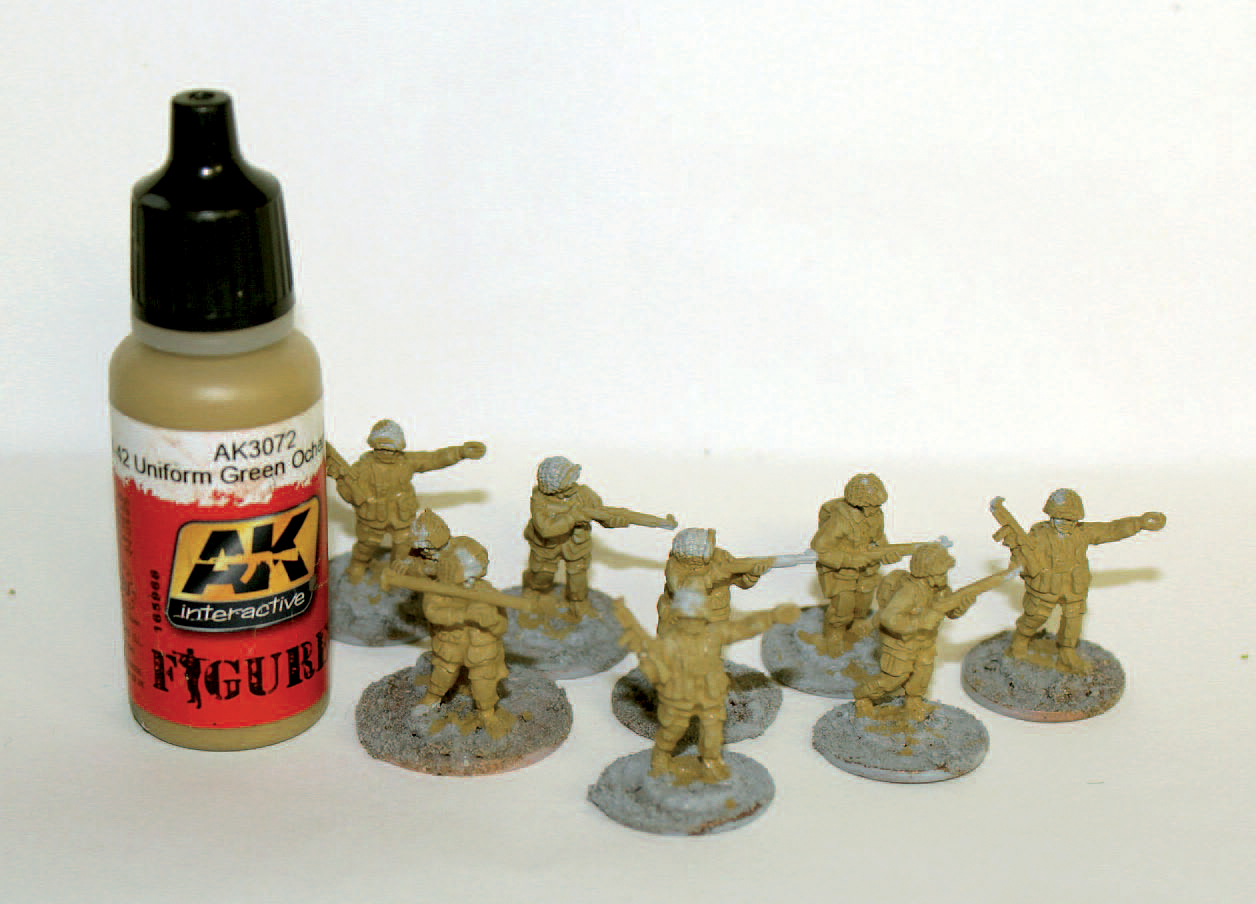
A unit of Paratroopers. These 20mm figures from AB Miniatures have been primed and base coated, ready for the next stage.

The base painting is now complete.
Step 3. Paint the webbing and backpacks with Vallejo 924 ‘Russian Uniform’. The weapons should be painted with dark brown. Paint the faces and boots with Vallejo 818 ‘Red Leather’. Doing this now will help speed up the process of painting the figures.
Step 4. Using AK3076 ‘Canvas Tone’, paint the webbing again, but leave some of the base colour showing through at creases and joints, as this helps create shade. Paint the faces and hands as previously laid out, going from dark to light and leaving a little of the previous shade so that it creates depth as well as interest to the face and hands.
Step 5. Next paint the weapons: first the metal parts with a dark gunmetal, then the wooden parts using Vallejo 311 ‘New Wood’, then add white to this and carefully highlight the wooden parts, but do not overdo this stage. These Elhiem figures were designed for use in D-Day and as such wear the M-1942 uniform with olive reinforcing patches on the knees: paint these with ‘Russian Uniform’.

After the uniforms and equipment have been highlighted, and the areas of flesh completed, the figures are nearly ready.
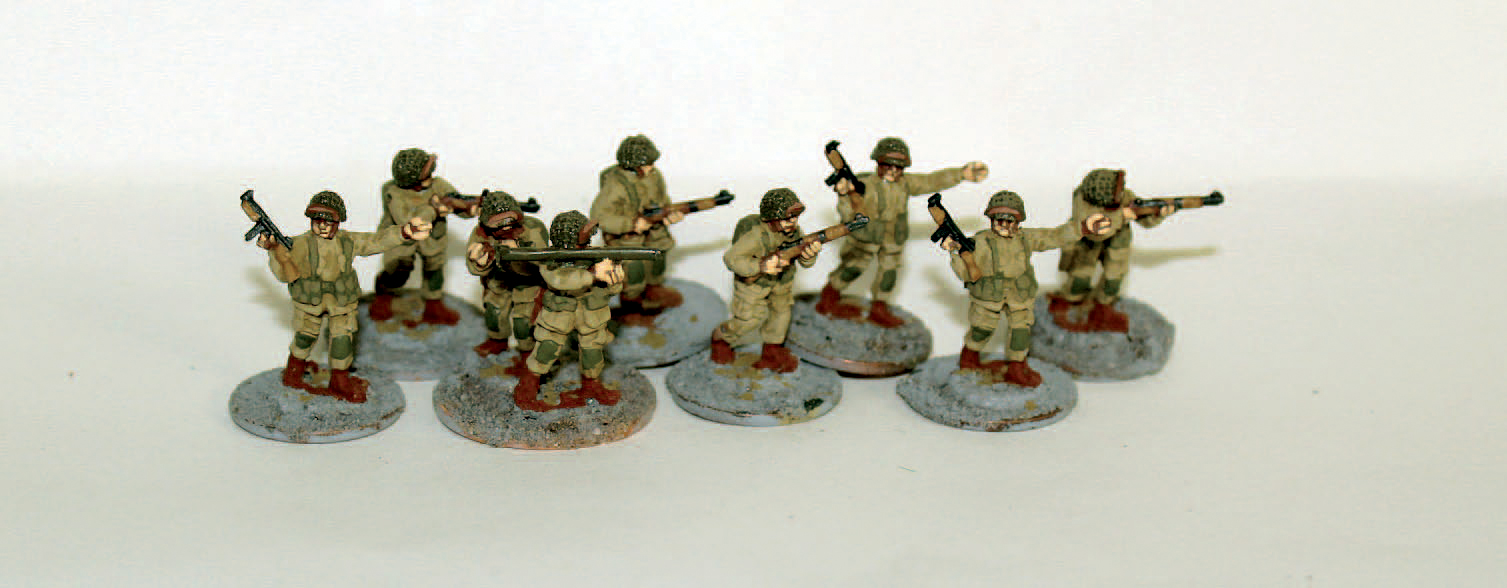
The knee and elbow patches, which were added to protect the suit from wear, have been painted with Vallejo ‘Russian Uniform’ and the figures are ready for the dark brown wash.

The completed figures, all based and ready to game with.
Step 6. Apply a dark brown wash over the entire figure. When this dries it will pick out creases and other details that otherwise would be hard to see on such a small figure. The wash will also help everything that has been painted to blend in and give a more ‘on campaign’ look, rather than an overly bright finish. Once dry, coat the figures with a good matt varnish for protection and then complete the bases.
The M10 Tank Destroyer came into being when the US Army saw the need for a fully tracked tank destroyer with a rotating turret that would give improved manoeuvrability (the T12 half-track was lacking in both requirements). The prototype was produced in early 1942. After some changes the 3-inch Motor Carriage M10 went into production in June 1943. The M10 was based on the modified hull of a M4A2 Sherman and mounted a 3-inch M7 gun in an open turret. M10s based on the M4A3 were designated M10A1. General Motors’ Fisher Arsenal in Michigan produced some 4,993 M10s and 375 M10A1s from September 1942 to December 1943.

This 1:72 scale M10 from the author’s collection is based on a commercially available ready-painted model. A lot of stowage has been added and the model repainted.
The M10 tank destroyers were first deployed in small numbers in Tunisia in 1943. The crews liked them as they allowed good all-round visibility, which is vital in armoured warfare, and they were easier to escape from when disabled than the Shermans. The M10 was still in use during 1945, even after it had been superseded by the M18 Hellcat and the M36 Jackson.
There are a few detailed kits of the M10. The Ukrainian company UM Models (Uni-Model) produces kits of both the early and late (Wolverine) versions, but at the time of writing these are getting hard to find. The Armourfast kit is the only option for a plastic model. Although it lacks a lot of detail, this can be overcome to a large extent by using aftermarket add-on sets, such as those used with the M35 Jackson (see Chapter 7). There are also resin kits of the M10 produced by Milicast and metal kits by SHQ Miniatures of a similar type to the M15 featured in Chapter 4.
The M4 Sherman modelled here is one of the best-known tank commanders’ tanks from WWII. It was used by Lt Col Creighton Abrams Jr, who was in command of the 4th Armored Division’s 37th Tank Battalion, the motto of which was ‘Courage Conquers’. He used his tanks to great advantage by leveraging their speed and reliability, taking on the better-armed and armoured Panzers and coming out on top. He always led from the front and could be found at the toughest part of a battle. He also cared about the wellbeing of his men. General Patton called him the best tank commander in WWII after only himself, which was high praise indeed.
The Milicast kit chosen here is an M4 Sherman of the type used by Creighton Abrams in France in August 1944. The decals are from an Aleran Miniatures set of ‘US Sherman Aces’, which has markings for several well-known Shermans.
Step 1. As always, lay out the parts as it helps to identify them and where they go. These simple kits seldom come with plans, so a good reference source will help. Next, build the kit and decide whether to leave the commander’s hatch open, as was done with this model. Add a little stowage to the rear deck, if desired. Once built, wash in mild detergent and warm water and leave to dry, ready for painting.
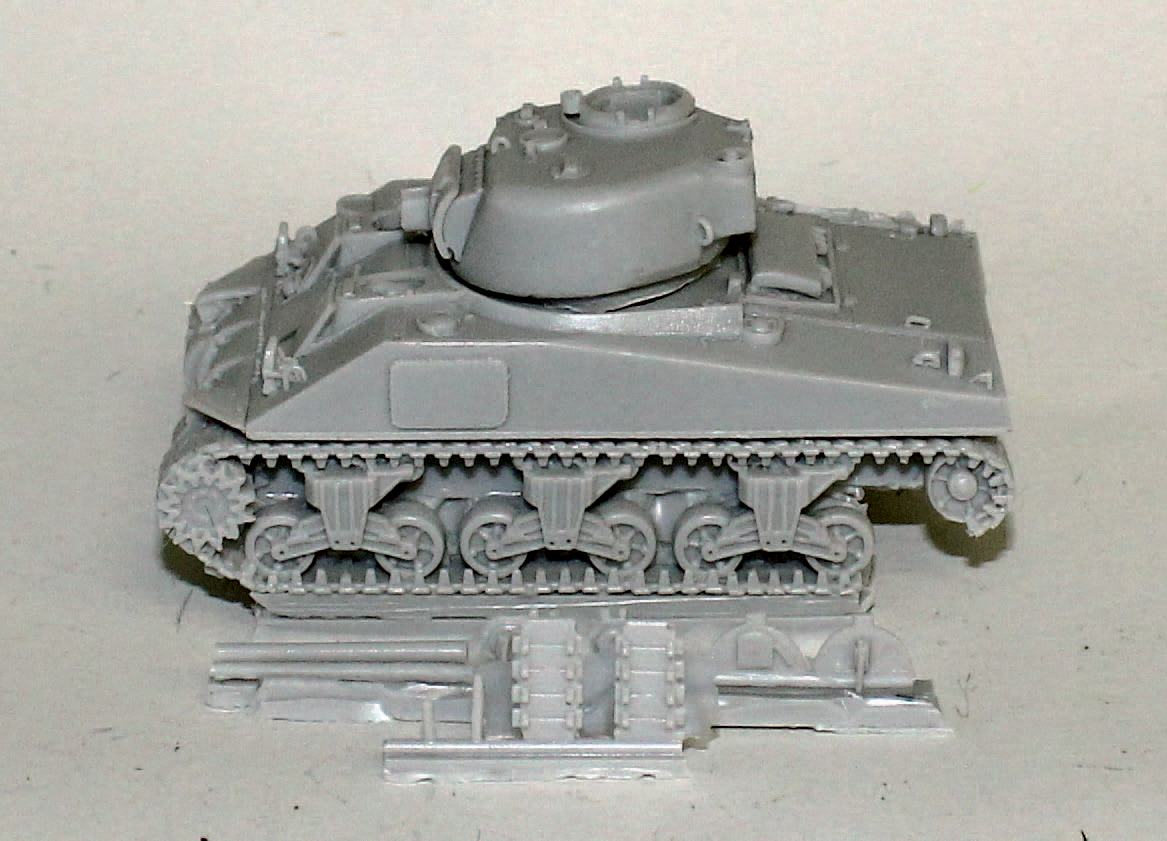
The kit as it comes from Milicast.
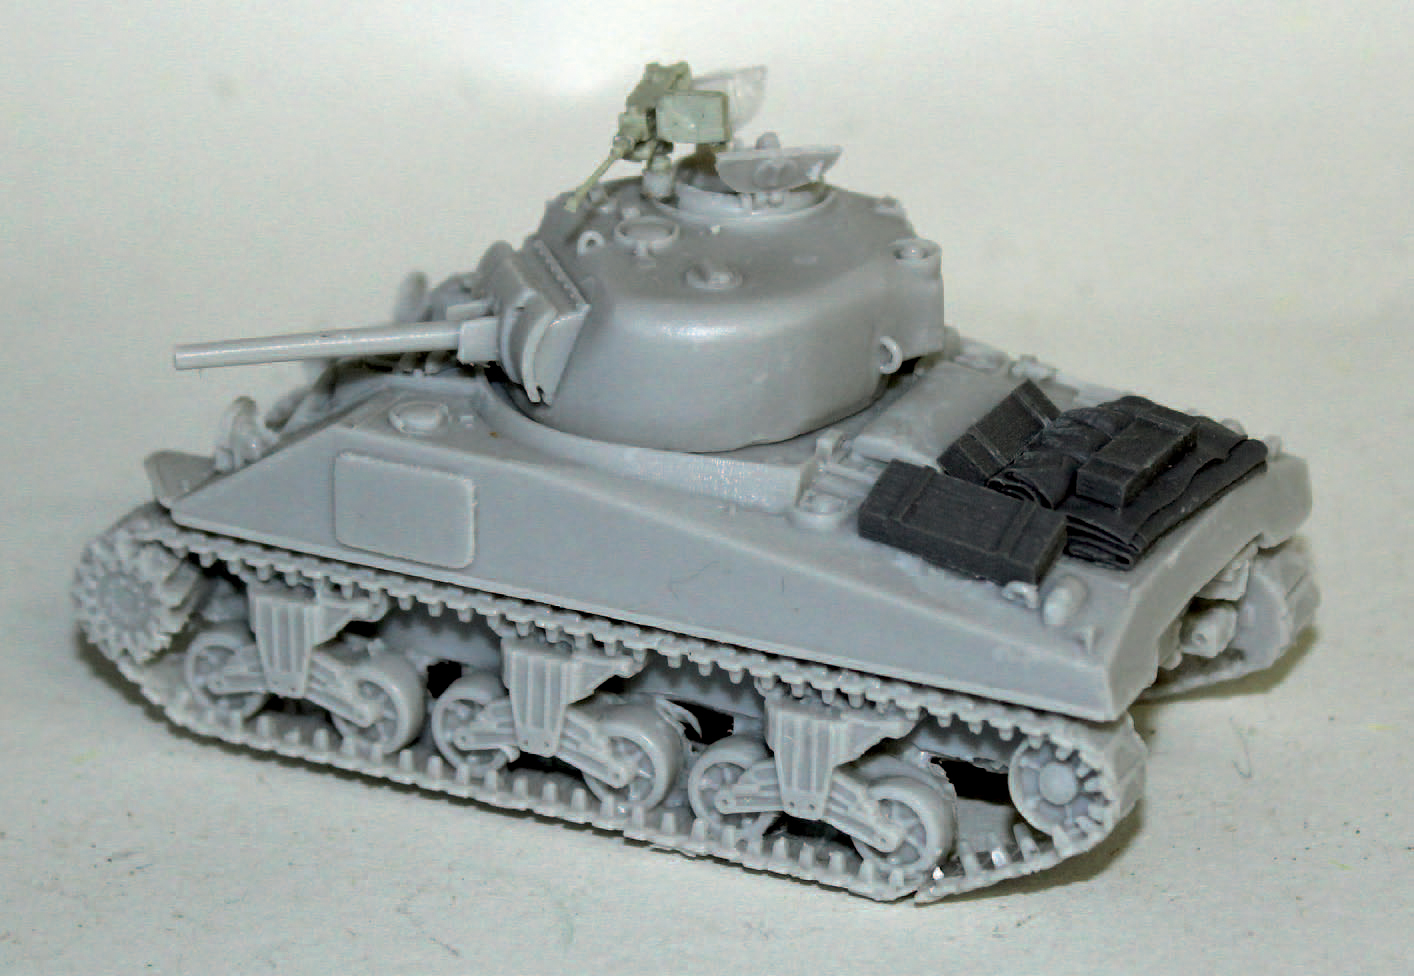
The new stowage has been added.

Paint the model with acrylic MIG ‘Olive Drab’.
Step 2. The Thunderbolt IV had a .50 calibre heavy machine gun, and this needs to be added to the commander’s hatch from the spares box. It is better to add this now, rather than earlier, because delicate details could be damaged when the model is cleaned. The model may now be primed with grey car paint.
Step 3. Using an airbrush, paint the model with acrylic MIG 926 ‘Olive Drab’. Follow the steps described previously for the M15 Anti-aircraft Half-track (see Chapter 4).
Step 4. Weather this model with MIG P232 ‘Dry Mud’ and P028 ‘Europe Dust’ for the upper areas.
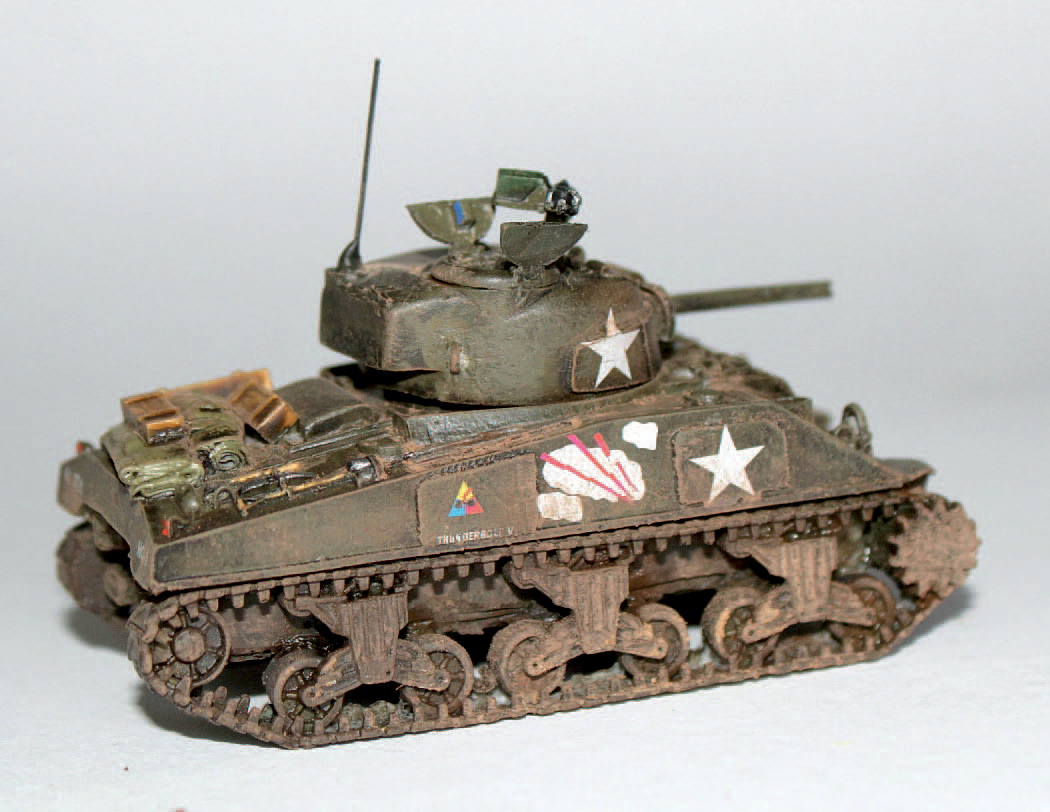
The completed model.
The Culin prong came in several forms as no set pattern ever existed for it. The first examples were constructed from girders taken from beach defences and cut with the aid of a blowtorch into pieces that, when assembled and fitted to the front of a tank, created forked prongs. These were a feature of American tanks but were also used by British tanks in Normandy from July 1944.
This project will need 39 thou plasticard, a ruler, sharp knife, a fine file and a pencil. Measure the distance between the tracks on the front of the model. This is an Italeri 1:72 scale M4A3 Sherman and the distance is 20mm. Mark out a rectangle on the card measuring 20 × 12mm and draw the shape of the actual cutters onto this with a pencil. Match this up to the area between the track to check that the marked teeth look good and are neatly distanced apart.
Cut them out and then mark out another set using these original teeth as a guide. When all the prongs are cut out, file them to shape so that both sets are the same. Align them and glue them together so that only four teeth are showing.
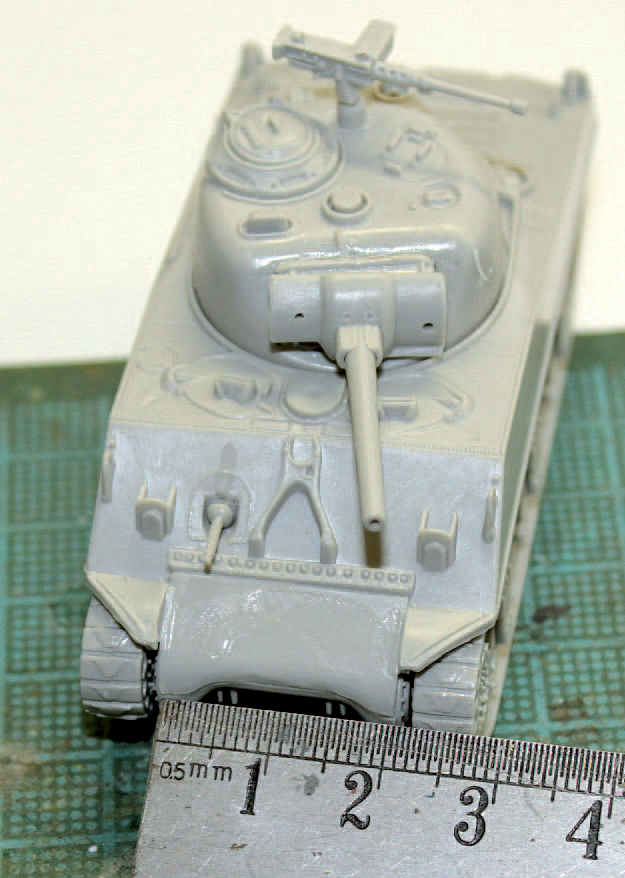
Measure between the tracks.

The teeth have been marked out.

Both sets should be the mirror image of the other. Use a fine file to remove any excess plastic.

Note how the teeth should be placed and assembled along with the back piece.

The prong being assembled.
To create the rear of the prong, measure a piece of card 20 × 4mm and cut it out. Attach the four teeth to it with glue. Start with the two outside teeth and work into the two inner teeth.
Fit this to the Sherman with some liquid polystyrene cement.

Once glued to the Sherman, the prong is ready for some paint.