Lagerstroemia, crape myrtle. Deciduous, summer-flowering trees or shrubs.
Description: Lagerstroemia indica, crape myrtle, flowers on new growth in white, pink, or watermelon red. When grown as a tree, it has an upright, narrowly vase-shaped, multitrunked form, and a mature height of about 20 feet. Some cultivars feature dark bark that peels away to expose lighter patches. When grown as a shrub, plants may reach 2 to 12 feet in a season. Northern gardeners grow dwarf forms of crape myrtle as semiwoody perennials that sprout from the roots each year. Fall color varies. Zones 7–9.
How to grow: Give lagerstroemias full sun and good drainage. Shade promotes powdery mildew, which can be a serious problem. A National Arboretum breeding program produced many mildew-resistant cultivars; look for these selections when buying crape myrtles. Prune in winter to promote vigorous growth for good flowering. Cut shrub forms entirely to the ground level. Shape tree forms by pruning out sucker shoots, water-sprouts, and rubbing branches. Prune away spent flowers and seed heads. In Zones 8–9, midsummer deadheading results in a second bloom in fall.
Landscape uses: Lagerstroemias work beautifully as screens, street trees, or focal points.
Lamium, dead nettle. Trailing perennial groundcovers.
Description: Lamium maculatum, spotted lamium or spotted dead nettle, has 1- to 2-inch-long, heart-shaped, trailing leaves. Cultivars have beautiful white- or silver-variegated foliage. The small, hooded, pink, magenta, or white flowers open in whorls on stalks 6 to 8 inches high. Plants bloom from April through June and again in September. Zones 3–9.
L. galeobdolon, yellow archangel, is a yellow-flowered species, sometimes listed as Lamiastrum galeobdolon, that has a reputation as an aggressive spreader. Selections with clump-forming habits may be somewhat better behaved but still should be used judiciously. Zones 4–8.
How to grow: Spotted lamium prefers partial shade and average, moist soil. It tolerates full sun and even poor soil. Don’t fertilize these plants, or they may spread too extensively. Propagate by seeds, cuttings, or root division in spring.
Landscape uses: Spotted lamium is prized for its lengthy flower display and for its interesting silvery foliage. It’s an excellent choice for a shady site and looks attractive under trees and shrubs, in rock gardens, with larger perennials, or in drifts. Members of the mint family, lamiums possess the ability to run, especially in moist soil conditions, but they are prized for their ability to tolerate dry shade. Despite their rambling tendencies, most are easily controlled by pulling or mowing should they escape their intended spot in the garden.
Mowing, watering, weeding, and other chores are an essential part of keeping your landscape looking its best. Fortunately, there’s a rhythm to the work a garden requires, and the more gardening experience you gain, and the more familiar you become with your own landscape, the easier it will be to maintain.
To stay on top of landscape maintenance, get in the habit of walking around your yard every few days and looking carefully at your plants. Keeping on top of chores helps minimize maintenance, since you can often correct problems with a minute or two of timely attention.
There’s a best season to tackle most gardening tasks, which makes it easy to spread maintenance throughout the year. Consult with local experts to determine the best time to tackle gardening chores—gardeners, staff at local botanic gardens, your extension office, and local nurseries are good sources of information. You’ll find information on maintenance on the Internet as well, but be sure to look for local, or at least regional, advice, since the best time to prune or plant varies widely from Maine to Florida or Minnesota to California. Make a note of tasks and the ideal times to tackle them, so you can start a calendar for essential maintenance. Here are some tasks to include:
 Sharpen and recondition garden tools. Sharp blades cut and dig more smoothly than blunt ones do, making gardening tasks easier. Give tools a protective coating of light oil.
Prune trees and shrubs.
Order seeds and begin seed-starting activity, so you’ll have plants to move to the garden once the weather warms.
Weed garden beds during warm spells. Many weeds appear in winter and have set seed by the time spring arrives.
Watch for perennials and other plants that have heaved out of the ground because of cycles of freezing and thawing. Replant and mulch them.
In the South and West, clean out garden beds and cut back perennials that have been damaged by winter weather.
Outdoor activity really heats up from spring through summer. Begin tackling these tasks once the weather has warmed in your region.
The best season for planting will depend on your spring frost dates, so check before you uncover beds or begin planting. Be sure to test the soil to make sure it’s dry enough to work before you dig. It should crumble when you squeeze a handful. Also don’t walk on the garden soil, especially when it is wet, because you will compact it.
In the South and West, by early spring the weather is usually perfect for preparing new garden beds and amending the soil with organic matter.
Divide summer- and fall-blooming perennials in early spring, but wait until later in the season in the North.
Keep weeding garden beds to eliminate weeds before they take over.
Prune spring-blooming shrubs and trees, if necessary, as soon as they have finished flowering. Remove diseased or dead wood anytime.
Water transplants regularly. In general, flower gardens should receive 1 inch of rain a week, either from rainfall or watering. To prevent disease problems and use water efficiently, water deeply and apply the water directly to the soil or mulch, not on plant foliage.
In late spring or early summer, side-dress perennials with organic matter or a balanced organic fertilizer.
Begin installing stakes and supports for perennials, before they grow so large that corralling them is difficult or impossible.
Fertilize lawn grass with a balanced organic fertilizer or well-rotted compost. Warm-season grass needs feeding in late spring, then again a few weeks later. Feed cool-season grass in mid-spring when it begins to grow.
Attend to flowers by removing spent blooms and cutting back perennials that benefit from a postflowering haircut.
Edge lawn to keep grass from invading flower-beds. Install edging strips to eliminate this chore from your list.
If you plan to plant new areas in fall, prepare the soil in those areas in late summer.
In the South, once searing summer temperatures subside, it’s time to cut back flowers and vegetables and replant for the long, cool fall season.
Prepare soil and beds for spring planting and also catch up on weeding.
Divide spring- and early-summer-blooming perennials.
Plant spring-flowering bulbs.
Feed lawns planted with cool-season grasses like bluegrass with a balanced organic fertilizer or compost.
Fall is a great time of year to prepare new garden beds, either by digging them or by smothering existing vegetation with layers of newspaper and organic matter. Smothered beds will be ready to plant in spring.
Collect tools, hoses, stakes, and other gardening equipment and bring it inside for winter storage.
Mulch gardens once the soil freezes.
While many chores are enjoyable, few gardeners want to increase the amount of time they spend working in their gardens, unless that means adding a new flowerbed or vegetable plot. Use these tips to reduce the amount of routine maintenance your garden requires. You’ll also find more detailed maintenance information in many other entries in this book (refer to the Quick Reference Guide for a list).
Use mulch: Keeping the soil covered with mulch suppresses weeds and reduces the need to water. Apply a generous layer—2 to 4 inches—of shredded leaves, bark, or other organic material around perennials, groundcovers, and annuals, as well as around trees and shrubs. Keep the mulch an inch or two away from plant stems to prevent problems with pests and diseases. See the Mulch entry for more on how it can save time in the garden.
Choose the right tool for the job: A good tool can make a tiresome chore a pleasure. Buy good-quality tools and keep them sharp and well maintained. Sharp blades make landscape maintenance much easier. See the Tools and Equipment entry for more on how to select good-quality tools and the best tools to add to your collection.
Tour your garden regularly: Walk through your garden daily or every few days, if possible, to keep an eye on plants and see what tasks need doing—shrubs that need pruning, perennials that are overgrown, or vines that need trellising, for example. Tend to tasks on the spot, or keep notes about what chores you need to make time for before they get out of hand.
Weed a bit at a time: Keep up with yard maintenance chores like weeding by spending a little bit of time every day. Fifteen minutes a day can take the place of a grueling once-a-week weeding session. If you don’t have time to completely weed your garden, walk through and pull off weed flowers to reduce the number of seeds and future weed populations. Or if the soil moisture conditions are just right for pulling a particular weed—dandelions or wild onions, for example—devote yourself exclusively to eliminating that particular weed and ignore the others. See the Weeds entry for more information on controlling weeds.
Reduce the size of your lawn: Replacing lawn grass with groundcovers or other plants cuts the time it takes to mow, plus it reduces time spent watering, trimming, fertilizing, and spraying. You’re best off replacing sparse, weedy grass under trees and shrubs with beds of shade-loving ground-covers, perennials, and other plants. Also eliminate awkward spots that are slow or difficult to mow. See the Groundcovers and Lawn entries for more ideas for reducing the time spent on your lawn.
Add organic matter: Soil improvement isn’t a once-and-done chore. Every time you replant your vegetable garden or add a new perennial to your flower garden, add organic matter to the soil. If you’re not disturbing the soil by planting or tilling a crop under, mulch with organic matter—anything from grass clippings or finished compost to chopped leaves. Earthworms and soil-dwelling insects will gradually carry it down into the soil for you.
Pick your plants carefully: Matching the plants you choose to the soil, sun, and other conditions that exist naturally on your site ensures that your garden will grow well with minimal effort from you. Selecting native plants is a good place to start (see the Native Plants or Wildflowers entries for more information) but you can also find many nonnative species that will thrive.
Avoid invasives: Fast-growing plants that spread widely and invade native habitats, like English ivy (Hedera helix), may seem like a good thing at first, but eventually they’ll require constant pruning and other maintenance to keep them in check. Avoid growing species that have been deemed invasive in your area.
You don’t have to be an artist to create a beautiful and enjoyable outdoor environment around your home. Landscaping is a form of personal expression, an outward extension of the care you put into arranging the inside of your house. A well-designed landscape provides outdoor spaces you and your family can use, whether that means you want shady, secluded areas for sitting or space for touch football. It also looks attractive all year round and ideally requires a minimum of maintenance. There is no “right” landscape; what works for your neighbor may not suit your needs or look good on your site.
Having a beautiful and unique landscape depends on four basic steps: gathering ideas, creating a design, installing plants and structures, and maintaining the landscape. Attractive landscaping will help you enjoy your home and increase its value as well.
Before putting anything on paper, start the design process by looking around for ideas. Great landscaping ideas are all around you. Look at homes in your community and take note of landscapes that catch your eye. See if a garden club in your area sponsors tours of local gardens; these “open gardens” are a great way to get a close view of plants and design ideas that are appropriate for your area. Public parks and botanical gardens can also give you planting ideas.
Consider a design that will encourage birds and local wildlife to share your space by creating a habitat that provides them with food, water, shelter, and a place to raise their young. For more information on attracting native creatures, see the Birds and the Wildlife Gardening entries. Also check out the wide variety of gardening books available on landscape design as well as sites on the Internet devoted to landscaping; see Recommended Reading. You’ll find a wealth of photographs and tips about other people’s success stories.
As you develop your ideas, you’ll want to decide which of the basic garden design styles—formal or informal—most suits your property and your personality. Formal gardens are symmetrical, with rectangular, round, or oval beds and other features, while informal designs feature free-form shapes. See the Garden Design entry for more on these two styles.
Creating a design starts with a wish list, based on the ideas you’ve gathered from books and neighboring properties. This list should include design ideas, garden structures, and specific plants. This is the time for thinking big, so go ahead and put down anything that you’d like to see in your yard—the sky’s the limit.
The next step is figuring out what you really need in your landscape, and making a list for that as well. If you have children, a play area may be the most important use of the yard. If you do a lot of entertaining, a shady arbor might be just the place for parties. For a large family, parking may be a major consideration. Besides play areas, entertaining, and parking, think about privacy, security, noise reduction, food production, pets, and flowers.
Pare down the lists: Compare your wish list with your needs list. Some things will probably appear on both lists. The rose hedge on your wish list, for example, may match your need to keep romping pets out of the vegetable garden. Other wants and needs may be totally incompatible. If your yard is a popular place for neighborhood football or volleyball games, a delicate rock garden might be out of the question. Discuss the lists with your family, and decide which elements are acceptable to everyone. Also, don’t forget to consider maintenance needs. A lovely perennial border can quickly deteriorate into a tangled mess if you don’t have time to take care of it. The list in Design for Low Maintenance offers suggestions on creating a design that will require minimal care.
Determine a style: Your site will determine some of your choices. The style of your home may influence the feel of the design. If you have a brick house, the landscape might include formal brick paths and clipped evergreen hedges. A house with natural wood siding lends itself to wood-chip paths and rail fencing. You’ll also need to plan access, such as paths, steps, and ramps.
Take note of wet, shady, and rocky spots, and try to take advantage of them. A wet spot may not be a desirable play area, but it could be a good place for a group of moisture-loving plants. Also, think of the landscape as it changes through the seasons. Evergreens and berried shrubs, along with a bench in a sunny spot, can make your yard a pleasant winter retreat. A little careful planning can give the landscape four-season appeal. Don’t forget details like specimen plants, interesting rocks, or sculpture to give the garden character. Refer to the Quick Reference Guide for a list of other entries in this book that offer tips and ideas on landscape elements, theme gardens, and specific plant choices.
Draw a plan: Start the actual design by making a basic plan of your property using a landscaping app or design software or plotting it on paper. Nothing will inspire you to look more closely and critically at your landscape. Make as accurate a plan as possible, and include all your garden’s features—paths, trees, buildings, fences, and walkways. Draw it to scale, measuring distances with a 100-foot tape measure and transferring this information to graph paper. A scale of ¼ inch = 1 foot is workable; tape sheets together if your property is large. This will make a valuable permanent record you can work from and give you the best idea of where your landscape is heading.
Use sheets of thin tracing paper as overlays to sketch in ideas and see how they fit while you work on the design. That way, you can use your master plan again and again until you decide on the best arrangement of pathways, flowerbeds, and other landscape features. You can then transfer the final design to your master plan.
Whether you design your home landscape yourself or leave it to a professional, make sure that the finished plan fits your needs. Don’t add a deck just because all your neighbors have them if what you really want is a dooryard herb garden. And while you don’t want to copy your neighbors exactly, try to keep the general theme of the region in your design. A woodland garden in the Southwest would look as out of place as a cactus garden in New England.
To create a landscape that’s intriguing, intimate, pleasing, and useful, try to visualize it as a series of garden “rooms.” Like a room in a house, each outdoor room has walls, a floor, and a ceiling. The walls could be a hedge, a row of trees, a fence, a trellis, or some combination of these elements. The walls don’t have to be tall; they just need to mark off the space. The floor might be turf, mulch, groundcovers, crushed stone, stone pavers, or wooden decking; tree branches, an arbor, or even the sky itself may serve as the ceiling.
Think about the types of rooms you would like to use outdoors. A patio or deck for gatherings may be one room, a secluded sitting area another. You may also want a play area for kids or dogs, a utility area for composting, and an area set aside for the vegetable garden. These rooms need doorways, too—don’t forget to think about gates or openings in the walls so you can move from one to another.
Breaking a landscape down into rooms makes it easier to identify the elements (plantings, structures, and hardscaping) you need to add or change. For example, if you want to separate the vegetable garden from the rest of your yard, you need to plan some sort of wall, such as a hedge or a wood fence. If you are enclosing the garden to protect it from animals, you might try a woven wire fence planted with attractive vines.
When you view your landscape as a combination of these elements, the whole process of planning a design is much more manageable. If you see a landscape that you particularly like, try to figure out what makes it special. Is there an attractive fence that sets off an area, or has your neighbor come up with a clever way to screen the front yard from the street? You may not want to copy any of these ideas exactly, but they will give you some idea of what is possible for your own home. The unlimited combinations of these elements make it easy to create a landscape that is unique to your property.

Work from a plan. Start your landscape design process with a basic site plan (1) of your yard. Sketch ideas on an overlay (2) to help visualize the finished result (3).
If you are starting with an existing landscape rather than a bare lot, you’ll no doubt have trees, shrubs, and other plantings to deal with before you start creating a design. Try to identify the plants already growing in your yard, determine when (and if!) they have flowers or other features, and also evaluate how healthy they are. Common garden wisdom states that you should wait a year, watching what comes up and what flowers when, before making changes. That’s good advice to follow, if you can wait that long. However, there may be features you want to change right away—overgrown hedges, dead or dying trees, or unattractive plantings that are located in the wrong place. In this case, eliminate unwanted plants, and transplant ones that can be moved either to a holding bed or to a final location while you create a design. Here are some other suggestions for dealing with existing plantings.
Cover unattractive shrubs with annual vines for a year while you plan your design.
Reduce the size of overgrown shrubs like forsythias by renewal pruning (which often entails cutting them to the ground after they bloom in spring). Most evergreens will not tolerate renewal pruning, but many flowering shrubs will.
Cut down and dig out overgrown shrubs or trees that block windows and walkways. Or thin out the older stems and cut them back hard to encourage more-attractive growth.
Salvage what you can from weedy, overgrown beds: Dig up remnants of perennials and bulbs you’d like to save for another spot and plant them in a holding bed. Then cut down the remaining growth in the bed and cover everything with a thick layer of newspaper (10 sheets at least) topped with organic mulch. Replant once you have developed a design.
Replace disease- or insect-prone shrubs and trees with more tolerant selections.
One of the best inspirations for landscape design is nature, and gardeners can use natural wild landscapes as inspiration for their designs. This means visiting the woods—or the prairie, or the Alaskan tundra, or whatever natural scene appeals to you most—and bringing back ideas. When you design a natural garden, you’re not trying to make an exact copy of a natural scene. Instead, you want to reproduce the feel of a favorite place. Follow these points to successfully translate nature’s lessons to your garden.
Understanding your site: Sun, shade, soil, moisture, and exposure will determine the kind of landscape you create and the plants you grow there. Watch the movement of the sun across your yard and check for wet spots after a good rain. It’s best to choose plants adapted to the soil, sun, and other conditions that exist naturally. Otherwise, you’ll need to amend your soil and make other changes necessary to accommodate the plants you wish to grow.
Organize garden spaces: Next, decide how large an area to develop. Start small! A few choice trees, shrubs, and groundcovers can be the beginning of a woodland garden; a small pond can be a focal point for a future bog garden. Decide where to place the beds and where the paths will go. Keep the paths under 4 feet wide to maintain intimacy. In a prairie or meadow, a 3-foot path allows the plants to brush you as you pass, providing a direct experience of the landscape.
Create the illusion of depth by layering the vegetation away from the path. Place low plants close for easy inspection. Use shrubs to close off views or to fill empty spaces. If your yard is small, borrow views from your neighbors.
Plant placement: Place plants in the garden as they would grow in nature based on what the plants require for best growth. Try to space the plants randomly—after all, plants tend to grow in clumps in nature, not in uniform rows or singly. When grouping, place plants close together at the center of the planting and more loosely at the edges. Add a small clump or single plants in a separate spot from the main planting to give the look of a chance seedling.
Punctuate low plantings and groundcovers with vase-shaped ferns or upright plants like grasses. Accent straight tree trunks with the arching stems of wildflowers like Solomon’s seal (Polygonatum spp.). Also combine plants with different textures to make your natural landscape interesting and appealing.
Plant selection: Choose plants to match the conditions of the site and the requirements of your design. If you are using only natives, base your plant selection on the natural site your design is modeled on. (See the Native Plants entry for more on gardening with natives.) In a mixed planting, select harmonious colors, forms, and textures. Foliage is more important than flowers because it is effective all season. Design around desirable plants already on your site.
Look toward maturity: As conditions change in the garden, the composition will also change. Trees will produce more dense shade as they grow; if a tree dies, that will open up a sunny spot. Plants will grow too large and need division. Seedlings will come up at random. Nature is always at work. Enjoy and use the opportunities she provides.
Once you actually have a plan, the next step is to carry it out. The first consideration in installation is often the cost. If you can’t or don’t want to do everything at once, consider carrying out the plan over several years. It’s usually best to start with structures, such as fences and buildings as well as major pathways—the hardscape portion of the landscape. See the Stonescaping entry for information on using stone and pavers to create pathways, terraces, or other structures. Next, add the trees and hedges. Eventually, add smaller shrubs, flowers, and groundcovers. This approach makes it fairly easy to install the landscape on your own.
If you do want to carry out the plan all at once, it may be best to hire a professional; this is especially true if the plan includes grading and drainage changes or irrigation and lighting systems. For your protection, get three bids for large projects, and make sure you have signed contracts before work begins. Also, don’t forget to check local regulations and acquire necessary permits before starting.
After you have spent all this time developing and installing your landscape, you’ll certainly want to take good care of it. In new landscapes, watering is probably the most important task. Regular watering for the first year or two helps plants settle in. After that, water your plants less frequently to encourage strong root systems. For more information on landscape care, see the Landscape Maintenance entry.
Keep these time-saving pointers in mind when designing your landscape.
•On a steep, hard-to-mow slope, build terraces to break the slope into steps or plant the incline with groundcovers.
•Plan on installing brick or stone mowing strips around trees and flowerbeds to keep out grass and make mowing easier.
•Avoid using sharp angles or fussy curves when laying out flowerbeds; mowing around them is more difficult than along straight lines and smooth curves.
•Reduce lawn area and cut down on mowing time by installing decking or low-maintenance groundcovers.
•Minimize obstacles that make you stop and start. Group the obstacles you want to keep—the birdbath, lawn furniture, and the pool, and arrange them so the lawnmower can cut around them easily. Consider keeping the furniture on a patio or deck, putting the birdbath on a mulched surface, or using sawdust or sand under the swing set. If you can mow without stopping, backing, and turning, it’s less wear and tear on you and the machine. Less gas, too. One other benefit—there may be no need at all for a weed whacker because you can get at everything with the mower.
•If you want to grow fruit, but don’t have time for crops that need extensive pruning or training, try easy-to-grow bush cherries, blueberries, strawberries, or raspberries.
•Minimize fall leaf-raking chores by planting small-leaved trees such as black locust (Robinia pseudoacacia).
•Plant slow- and smaller-growing trees and shrubs to reduce pruning chores.
•Plan on informal hedges, which rely on natural shrub shapes; formal hedges require repeated shearing to keep their shape.
•Choose disease- and insect-resistant plants to reduce pest problems.
See Consolida
Sweet pea. Cool-weather annuals.
Description: Sweet peas (Lathyrus odoratus and others) bear short spikes of butterfly-like 1-inch blooms in white, pink, red, orange, cream, or purple, plus bi- and tricolors. The flowers appear on weak 6-foot vines or 15-inch mounds of pealike foliage. Some, but not all, cultivars feature fragrant flowers.
How to grow: Sweet peas grow and bloom best in cool weather. Plant seeds outdoors 2 inches deep in late fall or early spring, in a sunny spot with rich, moist, slightly alkaline soil. Provide support for vining cultivars. Pick flowers often for more bloom. Control aphid infestations with soap spray.
Landscape uses: Vines make temporary screens. Bushy plants brighten edges, beds, pots, and window boxes.
Lavender. Evergreen, summer-blooming perennial herbs.
Description: The species most commonly grown for its fragrant oil is common lavender, Lavandula angustifolia (also sold as English lavender, and under the botanical names L. officinalis, L. spica, and L. vera). Common lavender bears narrow, grayish to sea green, aromatic leaves on woody stems growing 1 to 3 feet tall. In summer, 2-inch-long spikes of fragrant, lavender-blue flowers appear above the foliage. ‘Munstead’ and ‘Hidcote’ are the best-known cultivars. Zones 5–9.
L. × intermedia, lavandin, grows 18 to 24 inches tall and has a long bloom season. Cultivars in this group, including ‘Grosso’ (lavandin) and ‘Provence’, are grown commercially for lavender oil for the perfume industry. Zones 5 (with protection) and 6–9.
L. stoechas, French or Spanish lavender, produces pinecone-shaped pink or purple flower heads topped by a few larger, sterile bracts that give it a “bunny ears” appearance. Plants reach 12 to 36 inches tall. Showy and aromatic, L. stoechas is less cold-hardy than common lavender and is often treated as an annual in northern regions. Zones 7–10.
How to grow: Lavender needs a sunny site with good drainage and average soil. It is drought tolerant once established but must have excellent drainage to survive. Take stem cuttings to renew plants that are getting too woody. Prune regularly to promote bushy growth and remove winter damage.
Landscape uses: Plant in containers, borders, or rock gardens. Use low-growing cultivars to outline beds in herb gardens, and taller plants as specimens or as an herbal “hedge.” Planting lavender along paths will allow garden visitors to brush against the plants and release their distinctive fragrance.
Harvesting: Dry the flowers for use in crafts such as potpourri, sachets, sleep pillows, and wreaths, or add them to herb teas. (To dry lavender, cut the stems when the flower spikes just begin to color up.) The fresh flowers add a beautiful, flavorful touch to salads, fruit dishes, and iced cakes, especially when used with other edible flowers such as nasturtiums.
Lush green lawns are a standard feature of yards large and small all across North America. Lawns have their good points and their drawbacks, too. A carpet of green grass adds a pleasing, unifying element to a landscape and makes a great place to play or relax. A nice-looking lawn can enhance the value of your home.
On the other hand, lawns are not low maintenance or very friendly to the environment. Taking steps to reduce the amount of lawn in your yard is one of the best ways to become a more “green” gardener. Eliminating lawn saves water, since keeping lawn grasses green requires from two to four times more water than groundcovers or other landscape plants need for good growth. Watering lawns can be a major drain on precious water resources in arid climates. Keeping grass mowed and trimmed uses precious fuel, contributes greenhouse gasses to the atmosphere, and simply takes time. Finally, a well-tended lawn requires fertilizing, pest control, and other time-consuming care.
If you have an area under mature trees where moss seems to be the only thing that will grow, celebrate it instead of fighting it. After all, it’s green and lush, and it doesn’t need watering, mowing, or trimming. It never needs fertilizer, since it absorbs nutrients directly from the air and rainwater. It’s a zero fossil-fuel proposition. If there isn’t any moss growing naturally in your yard, you can find specialty companies that sell moss starter kits.
While you probably don’t want to eliminate every square inch of lawn, there are steps you can take to reduce the size of your lawn and to cut down on the amount of maintenance it requires. Start by evaluating how much lawn you need and want. Lawn is an ideal surface for play areas for children, adults, and dogs, and it is also a good choice for relaxing, barbecuing, and other activities. Then use the tips below to eliminate lawn on sites where it isn’t essential and reduce maintenance on sites where you want to keep your lawn.
Consider the size and shape of your lawn. Rounded shapes with curved edges are most pleasing to look at, and they also can be mowed in a series of continuous loops, making them quickest and easiest to mow.
Replace lawn under and around trees and shrubs with beds of groundcovers or mulch.
Use groundcovers, not lawn, in awkward, hard-to-mow corners.
Cover slopes and other difficult-to-mow sites with groundcovers or shrubs.
Eliminate lawn on shady sites, where it does not grow well. Replace it with shade-loving groundcovers, perennials, or shrubs.
Replace aggressive old strains of lawn grass with improved cultivars or mixtures to increase disease resistance and adaptability.
Use edging strips spaced along the lawn to keep grasses from invading mulched areas as well as the flowerbeds.
Accept clovers as beneficial nitrogen-fixers in your lawn, not weeds.
During droughts, water modestly once a week. Provide sufficient water to keep your grass alive, but not enough to coax it out of heat-induced dormancy.
Grandpa did it, and during the energy crisis of the 1970s, lots of people tried mowing the old-fashioned way, with a person-powered reel mower. Modern reel mowers are things of precision and beauty, designed to cut smoothly and push easily. A good one may cost as much as a gas- or electric-powered mower but will repay your investment in energy savings and clean air.
Reel mowers are not for every lawn. They work best on relatively flat ground and can be difficult to use on sloped land. Do research and definitely try before you buy to make sure you are up to the physical requirements of pushing a reel mower’s whirling cutting blades over the area covered by your lawn. If you can, go for it—it’s good for you and for the environment. You’ll feel closely in touch with your lawn, and you can even hear the birds. (And it may really give you the incentive to cut back on the lawn!)
Whether your lawn is large or small, it needs regular care to look its best. The biggest time requirement is weekly mowing during the growing season, but lawn grass also requires regular feeding, edging, and other attention to stay green and healthy.
Mowing: Sharpen your mower blade at the beginning of each season to make sure the grass blades are cut, rather than torn, when you mow. Remove only one-third of the grasses’ topgrowth each time you mow to keep grass healthy and vigorous. The best height for mowing depends on the species of grass, but in general, the higher you cut your grass, the deeper its roots will grow, increasing its tolerance of heat and drought. Cut low-growing grasses, such as Bermuda grass and zoysia grass, no shorter than 1 inch; 1½ inches is better. Cut taller grasses, such as bluegrass and tall fescue, no shorter than 2 inches; 2½ to 3 inches is better. Mow high during summer droughts. To cut very tall grass, set your mower blade at its highest setting. In the course of the next two mowings, lower the blade until you are cutting at the usual height.
If you mow regularly, let your grass clippings lie where they fall. They will eventually rot and add organic matter to the soil beneath. Large mats of cut grass sitting on your lawn block sunlight and promote disease. Rake them up and use as mulch in other parts of your yard or add them to the compost pile.
Fertilizing: The first step in growing a well-fed lawn is to use a mulching lawn mower and let nitrogen-rich grass clippings remain where they fall when cut. You’ll also want to apply compost or other organic material to feed your grass. (Relying on high-nitrogen chemical fertilizers can lead to problem-prone, shallow-rooted turf that needs mowing more often.)
The most important thing to note is the time of year when the grass begins to grow rapidly. This is the ideal time to apply a good organic fertilizer. In the North, where cool-season grasses have a growth spurt in spring and another in fall, plan to fertilize twice. For warm-season grasses, fertilize in late spring, just as your lawn greens up, and again a few weeks later.
Choose a finely pulverized, weed-free organic fertilizer, such as processed manure or sifted compost, and spread evenly over the lawn just before rain is expected. Mow the grass about a week after you fertilize. For more ideas on what to feed your grass, see the Fertilizers entry. Corn gluten meal is a natural fertilizer that also prevents many types of weed seeds from germinating. To learn more about this double-duty substance, see the Weeds entry.
Dethatching: All lawns have thatch, a layer of clippings and stems that gradually decomposes and feeds the roots. There’s no need to remove it if the layer is no thicker than about ¼ inch. Thatch problems often start with overuse of synthetic chemical fertilizers, which make grass grow fast and lush. As clippings build up into a thick layer of thatch, grass plants are unable to get enough air for healthy growth. Use a thatch rake to break up thatch in a small lawn; rent a vertical mower to dethatch a larger area.
Aerating: Since lawns often bear heavy foot traffic, the soil below them becomes compacted over time. Grass roots have trouble growing down and out and instead concentrate their growth at the surface. Prevent or fix compacted lawns by aerating every 2 to 3 years. Aerating a turf consists of poking tiny holes through the turf into the soil below. Use a step-on core cultivator for small areas; rent a power aerator machine for larger lawns. Mow the lawn and spread a thin layer of organic fertilizer. Aerate in one direction; repeat crosswise. Water deeply.
Cool-season grass. A grass that grows strongly in spring and fall, often remaining green in winter but tending to go dormant when the hot days of summer come. Examples: Kentucky bluegrass, fine fescues.
Warm-season grass. A grass that grows well in summer, even in hot, dry climates, and is usually dormant in winter. Examples: Bermuda grass, centipede grass, zoysia grass.
Stolon. A specialized stem that creeps below the surface of the soil, rooting and sprouting new plants along the way.
Sod. Strips of living grass that have been peeled, roots and all, from the soil.
Plugs. Small pieces of sod used to start a lawn of creeping types of grass such as zoysia grass. Plant plugs in scooped-out holes, 6 to 12 inches apart.
Sprigs. Pieces of rooted grass stem or stolon, extricated from shredded sod. Plant sprigs 6 inches apart to start a lawn of creeping types of grass.
Thatch. A layer of grass clippings and other dead plant parts that accumulates in a lawn.
Ruts left by heavy vehicles or scars created when shrubs or trees are removed call for prompt spot repairs. If damage occurs in winter, prepare the soil and cover it with a mulch until spring.
Loosen the soil in the damaged site, setting aside any grass plants that seem healthy. Keep them damp and shaded as you work. Add a ½-inch layer of compost or other organic matter to condition the soil, along with enough good topsoil to raise the level of the damaged area 1 inch above the surrounding soil level, and fill in any holes or low places. Reseed or replant, matching the primary species in your yard. Water regularly for a month.
Sometimes you will want to plant an area with lawn, such as around a newly laid patio area, or if you’re moving into a newly built home that’s surrounded by bare earth. To get your lawn off to the right start, choose grasses carefully to match your conditions.
Build a strong lawn by using grass species adapted to your climate. Hybridizers are constantly introducing new cultivars that exhibit improved disease and pest resistance, as well as improved drought tolerance. These are some of the most widely grown lawn grasses.
Bermuda grass (Cynodon dactylon), which is a fine-textured, drought-resistant grass popular in warmer climates. Becomes buff brown in winter. Numerous runners create a wear-resistant turf. Open-pollinated strains are extremely aggressive; modern hybrids are much easier to keep from invading flowerbeds.
Buffalo grass (Bouteloua dactyloides), a creeping, warm-season grass. Tolerates drought and will grow in alkaline soil. Good wear tolerance. Brown in midsummer and fall.
Centipede grass (Eremochloa ophiuroides), a coarser-leaved, warm-season, creeping grass with good drought tolerance. Plant in low-wear areas.
Fine fescues (Festuca spp.), which is dark green, fine-textured, creeping, cool-season grasses with good shade tolerance, often mixed with Kentucky bluegrass.
Kentucky bluegrass (Poa pratensis), a lush dark green turfgrass with narrow blades that requires substantial sunshine. Favored cool-season lawn grass. May become dormant during summer droughts or during winter freezes. Creeping stolons knit a tough turf.
Turf-type tall fescue (Schedonorus arundinaceus), a coarse, medium green grass good for sun or shade, increasingly popular in the central United States. Updated cultivars remain green most of the year. Drought resistant. Grows in low clumps and doesn’t creep, so is often mixed with other grasses.
Zoysia grasses (Zoysia spp.), medium green, creeping, fine-textured grasses for full sun. Green in warm weather, tan in winter.
All lawn grasses require at least 4 inches of good topsoil in which to stretch their roots. If your new yard has been scraped down to the subsoil, you will have to spread new topsoil. Site preparation is the same whether you plan to begin with seed or sod: Cultivate new or existing topsoil thoroughly, adding a 1-inch layer of compost or other organic matter. Rake out all weeds and roots, cultivate again, and rake smooth. Use a roller to evenly compact the site and make it level.
Seeding: Be picky when shopping for grass seed. Improved cultivars of the best lawn grasses cost more than their open-pollinated cousins, but they offer superior performance. Choose named cultivars that have been specially bred for drought tolerance, insect and disease resistance, or other traits. Use a mechanical seeder for even distribution. Roll after seeding and keep the site constantly moist for 2 weeks. Start mowing 3 weeks after seeding.
Laying sod: Sod is the fastest way to an attractive lawn, although the cost is higher than seed. It’s ideal for spot repairs, especially in high-traffic areas or on slopes. Plant cool-season species in early spring or from late summer to early fall; plant warm-season grasses in late spring to early summer. Use only fresh, green strips. Keep them shaded and damp until planted. Groundcovers are the best choice for slopes, but if you decide to plant grass on a slope, be sure to work crosswise along the slope. Roll or walk on the strips after planting to push the roots into the soil. After planting, water every 2 to 3 days for 3 weeks.
Plugs and sprigs: Some types of lawn grasses—including rhizomatous warm-season grasses such as St. Augustine, zoysia, and centipede—are planted using plugs or sprigs, as well as sod. Plugs and sprigs are less expensive than sod, but you have to wait while they grow together to form a dense lawn. To use these, prepare the soil as you would for sod, and be sure to keep the plugs or sprigs moist and cool until they are planted. Plant plugs individually, in rows. Sprigs, which are the runners or stolons of the grass can also be planted in rows or they can be broadcast over the planting area and then individually pressed down into the soil surface. (You can buy sprigs by the bushel or tear up sheets of sod to make your own.) With both plugs and sprigs, it’s important to keep the soil evenly moist, but not too wet, until they are established and growing actively. This can take 4 weeks or more.
The lawn mower, the leaf blower, and the weed whacker add up to a noisy, fuel-hungry trio that many gardeners feel are a necessary evil. But have you calculated how much gasoline you use each year to maintain your home landscape? What can you do to reduce the use of power tools in the garden? Try these power-saving tips to use your lawn mower less and dispense with most of the other noisemakers.
Give up some of the lawn. How much lawn do you really need? Could some of it be groundcovers, perennial beds, or islands of mixed plantings (trees/shrubs/perennials) surrounded by groundcovers or mulch? If the front has to have a manicured lawn, could the backyard have some mown paths, play areas, and the rest be meadow grasses or naturalized woodland plantings? Make a commitment to reduce the size of your lawn every growing season. As your lawn shrinks, you’ll have reduced the amount of fuel you use each time you mow.
Cut the grass taller. It’s not just to get you out of the lawn-mowing habit, it’s about healthy grass. Especially in the heat of summer, cutting a lawn short over and over stresses the plants. They have to put all that effort (with little water to fuel them) into growing up to reach the sunlight—and then here you come again! Taller lawns also have fewer weeds, since the grass itself denies the sunlight from ground-clinging weeds.
Sharpen the blades. Sharp blades and a tuned-up lawn mower cut more efficiently. Plus, dull blades leave uneven grass and make jagged cuts in the grass blades, permitting diseases to enter the plant tissue.
Stop watering your lawn in summer. That means less mowing because there is less growing. Turfgrass specialists have shown that in the Northeast, for instance, most lawns can endure 6 weeks with only ¼ inch of water and survive. Yes, they will turn brown. That’s normal summer dormancy for many kinds of grasses. When fall rains arrive, the green returns.
Part with your string trimmer. If you plan your landscape carefully, with all its edges and obstacles, you can dispense with weed whacking altogether. String trimmers (and lawn mowers) are one of the causes of death for trees, anyway. (They don’t do much for the furniture legs you bump, either, not to mention the perennials.) So keep the plants mulched, or surrounded by groundcovers, so you don’t have to cut anywhere near the trunks.
Make easier edges. Two kinds of edges are sensible, easy to live with, and cut down on mowing time and weed cutting: flat stone edging and V-trenches. Pavers, bricks, or stones laid flat and placed at or just below the soil level allow mower wheels to ride right over them, so there’s no tall edge of grass left that requires trimming with a weed whacker. A V-shaped trench with sides 3 to 5 inches deep and the opening 4 to 6 inches wide also serves well as an edging.
Let your shrubs meet. Instead of using a gas- or electric-powered hedge trimmer to carve shrubs into individual meatballs or gumdrops, and maintaining mulch-covered ground between them, let shrubs retain a more natural shape and grow together to cover the soil and eliminate those empty spaces. Not only will you reduce the amount of shearing plants require, once they grow together you won’t have to mulch nearly as often. Underplanting with groundcovers also helps fill those empty gaps between shrubs.
A healthy lawn is naturally more resistant to weed, insect, or disease problems. A tight cover of vigorous grass will outcompete weeds. Loose, well-drained soil helps prevent disease problems. Proper fertilization goes a long way toward preventing lawn problems since it encourages growth of strong, healthy turf. Most updated turfgrass cultivars offer genetically improved resistance to diseases and some insects. If you have lawn areas that are chronically problematic, consider replanting them with an improved cultivar or trying an alternative to lawn grass. See the Groundcovers entry for suggestions of plants that work well as substitutes for lawns.
There are a few simple steps to take if your lawn develops weed or pest problems. Use a small, sharp knife to slice off any established weeds about 1 inch below the soil surface. If more than half of the plants in your lawn are weeds, it is best to renovate the lawn by replanting.
Subterranean insect larvae, such as white grubs, occasionally cause serious damage when they feed on grass roots. Apply milky disease spores for longterm control of these pests. Biological insecticides that utilize parasitic nematodes control numerous insects likely to feed beneath your lawn. For more ideas on reducing pests and diseases, see the Pests and the Plant Diseases and Disorders entries.
Layering is a way of propagating plants by encouraging sections of stems to sprout new roots. The rooted stems are cut from the mother plants and planted. This simple and reliable method produces good-sized new plants in a relatively short time.
Simple layering involves bending a low-growing branch to the ground and burying several inches of stem. It is used to propagate many types of vines and woody plants, including grapes and magnolias.
Season: Spring is the best time to start simple layers. Choose flexible, vigorous 1-year-old shoots about as thick as a pencil.
Getting started: Thoroughly water the soil around the plant. The next day, bend a shoot down to the soil. Measure back 9 to 12 inches from the top of the shoot, and mark the spot where that point on the stem touches the ground. Release the shoot, and dig a 4-inch hole at the marked point. Make sure that the side of the hole closest to the parent plant slopes gently to the hole’s center. Work in several handfuls of finished compost.
Method: Remove leaves and side shoots along the chosen stem from 6 to 15 inches behind the stem tip. Wound the stem by making a shallow 2-inch-long cut at a point about 9 inches behind the tip. (Far enough away from the parent plant that it can be buried.) Insert a toothpick or small pebble in the cut to keep it open. Dust the cut with rooting hormone. Bend the prepared stem down into the hole, and use a wire pin to keep the wounded area in contact with the soil. Stake the stem tip if it doesn’t stay upright by itself. Cover the pinned stem with the soil you removed earlier, and water the area thoroughly.
Aftercare: Keep the layered area moist and weeded. The stem may root by fall; check by uncovering the stem, removing the wire pin, and tugging lightly. If the stem feels firmly anchored, it has rooted. Sever it from the parent plant, but leave it in place until spring. Then pot it up or transplant it. If the stem is not well rooted, replace the soil and wait a year before separating it from the parent plant.
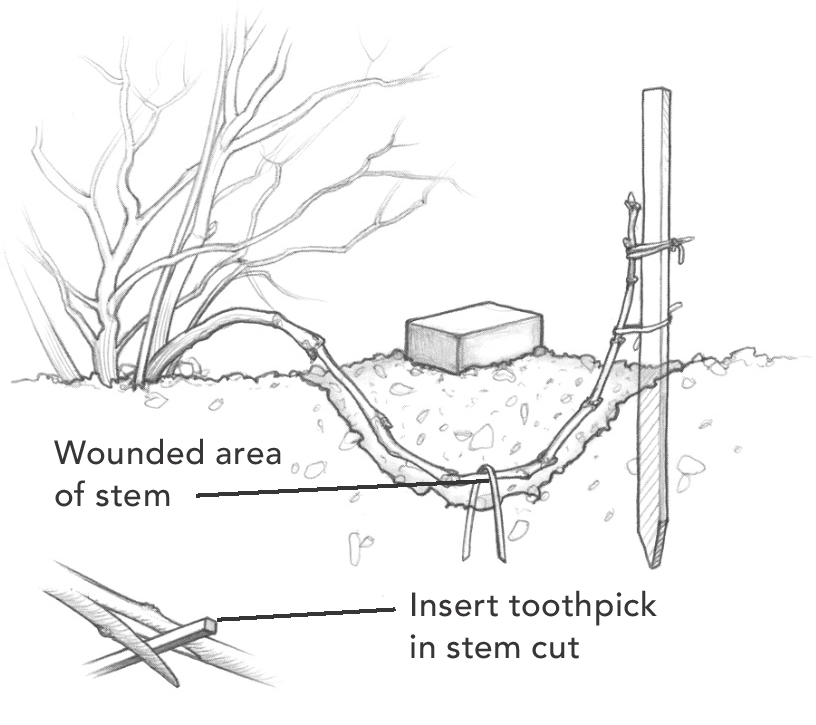
Simple layering. Pin a wounded stem in a trench and cover it with soil. Stake the exposed tip. A brick laid on the soil over the buried stem helps to retain moisture.
Shoot tips of certain plants root when they touch the ground. This phenomenon, called tip layering, happens naturally in brambles.
Season: Plant tip layers in late summer, using the ends of the current season’s growth. Make sure you use healthy, vigorous canes.
Getting started: Prepare a hole as you would for simple layers; judge the placement of the hole by the tip of the stem.
Method: Bend the stem tip down to the prepared planting hole. Lay the cane against the sloping side and place the tip against the farthest edge of the hole. Replace the soil, and water the area well.
Aftercare: Keep the soil moist to promote rooting. By early autumn, shoots will appear and roots will have formed; cut the original cane where it enters the soil. In mid-autumn or the following spring, carefully dig up the rooted tip, and plant it in its new position.
Air layering is similar to simple layering, but the stem is covered with long-fibered (unmilled) sphagnum moss rather than soil. You can air-layer upright stems of trees, shrubs, and indoor plants such as philodendrons and weeping figs (Ficus benjamina).
Season: Outdoors, start air layers in early fall with young wood, or in spring with the previous season’s growth. Indoors, air layers can be done any time, but it’s best to start when plants begin growing actively in spring.
Getting started: Soak the sphagnum moss in water for a few hours or overnight. Before using, wring the excess water out of the moss so it is moist but not dripping wet.
Method: Start with a healthy, vigorous stem. Decide where you want the roots of the new plant to be, anywhere from 6 to 18 inches behind the tip. Remove all leaves and side shoots for 3 inches on either side of that point. Wound the stem by making a shallow 2-inch-long cut into it. Dust the wounded area with rooting hormone and tuck a bit of moss into it. Wrap the ball of moist moss around the wound and tie it with string. Next, cover the moss ball with a piece of clear plastic about 6 inches square. For indoor plants, tie the plastic at both ends with string or twist ties. Use waterproof tape to secure the ends on outdoor air layers; make sure the ends are completely sealed. For outdoor plants, also cover the plastic wrap with foil or black plastic and tie or tape it to the stem; this will keep the layered area from getting too hot in the sun. If the moss looks dry during rooting, open the plastic, moisten the moss, and reseal.
Aftercare: Indoor plants can produce roots in a few months; outdoor plants may take one or two growing seasons. You’ll be able to see the roots growing in the moss. Cut off the top of the plant below the new roots and remove the plastic. Soak the rootball for 3 to 4 hours, pot it up, and place it in a sheltered spot for a few days. Let outdoor plants grow in their pots for a few months before planting them out.

Air layering. Wound the stem and tuck a bit of moss into the wound. Wrap the remainder around the stem, and cover with plastic.
Allium porrum
Amaryllidaceae
The sweetest and most delicately flavored of all onions, leeks are easy to grow. They are resistant to pests and diseases, and by planting a selection of varieties, you can harvest from late summer throughout winter. For winter harvest in cold-winter regions, be sure to plant one super-hardy variety like the heirloom ‘Giant Musselburgh’.
Planting: Sow seeds indoors in flats 2 to 3 months before the last average frost. Keep them at a temperature of 65° to 70°F during the day and 55° to 60°F at night. When seedlings are 3 inches tall, thin to 1 inch apart; at 5 inches tall, thin to 2 inches apart.
Leeks love crumbly, rich loam, but they will do well in any well-prepared soil. When seedlings are about 8 inches tall, transplant to the garden, placing them in 6-inch-deep holes spaced 6 inches apart in rows at least 1½ feet apart. The tips of the plants should be just a few inches above the surface. Water the seedlings, and replace the soil loosely around the plants.
Growing guidelines: Keep the soil evenly moist, and feed with compost tea once a month during the growing season. (For instructions on making compost tea, see the Compost entry.) When leeks are pencil-size, bank soil or mulch around the lower 2 to 3 inches of stem; this will cause the edible part of the stem to elongate and develop a creamy white or pure white color. Many gardeners think that this blanching technique also improves the flavor of leeks.
Problems: See the Onion entry for insect and disease controls.
Harvesting: Leeks take 70 to 110 days to mature; their flavor is best after a light frost. Dig leeks as needed. To protect them from hard freezes, cover them with clear plastic supported by wire hoops or with a thick layer of mulch. Leeks will keep a few weeks if refrigerated; to store them longer, pack them in a box with moist soil and store in a cool, dry place. Use leeks in any recipe that calls for a delicate onion flavor.
Lactuca sativa
Asteraceae
Lettuce greens are so easy to grow, so nutritious, and so delicious picked fresh from the garden that everyone should grow them. Grow lettuce in the vegetable garden, tuck it into flowerbeds, or cultivate it in containers. With regular watering, shade from hot sun, and succession planting, you can enjoy homegrown lettuce almost year-round in much of the country.
Types: Home gardeners can choose from dozens of different cultivars, each with its own special flavor, appearance, and texture.
Cabbagelike crisphead, or iceberg, lettuce stands up to hot weather and ships well; it is the old standby in stores. It also has the thickest, crunchiest leaves of any lettuce. Iceberg lettuce is the least nutritious type, but like all lettuce, it is a good source of dietary fiber. After years of being dismissed as worthless, iceberg lettuce has undergone a renaissance among chefs, so you’re as likely to encounter an iceberg wedge with house-made blue cheese dressing in a restaurant as a salad of spring greens or mesclun mix.
The crunchy, spoon-shaped leaves of romaine, or cos, lettuce are much more nutritious. In addition to being heat tolerant and easy to grow, the big-leaved types also produce crisp, white hearts that can substitute for celery. Romaine is the traditional choice for Caesar salads. Red-leaved and red-speckled romaine lettuces are especially beautiful in salads. Because romaine lettuce is both crunchy and nutritious, it’s a great choice for sandwiches.
Butterhead, or Boston, lettuce has soft, tender, rich green outer leaves and white to yellowish hearts. It is also high in nutrition, and its taste and texture are excellent. Many butterheads, particularly the quick-maturing cultivars, require cool weather and an excellent soil to produce well.
Fast-growing, nutritious leaf lettuce tolerates much warmer temperatures than head lettuce. Most cultivars have loose, open growth habits and leaves that range from smooth to frilly. Harvest the outer leaves of leaf lettuces, and the plants will grow new ones for later picking, or pull entire heads at once.
Lettuces sold as spring mix or mesclun mix are typically blends of several loose-leaf cultivars that are harvested when they’re just a few inches tall. You can find many different combinations available from seed companies, or mix your own favorites for a signature blend. Mesclun also typically features a few spicier greens like radicchio and mustard. See the Salad Greens entry for more about mesclun.
Planting: Lettuce needs a humus-rich, moisture-retentive, but well-drained soil with plenty of nitrogen.
Broadcast the seeds and rake lightly to cover them, or sow seeds ¼ inch apart and as thinly as possible in rows 6 inches apart. A small seed packet will plant a 100-foot row and produce some 80 heads, or about 50 pounds of leaf lettuce. Germination rate is over 80 percent.
Although lettuce is primarily considered a cool-season crop, it is possible to extend the harvest with some careful planning. If you’re a real lettuce lover, try the following schedule.
1.Start romaine, iceberg, or other head lettuces indoors 4 to 6 weeks before your last frost date, making three small sowings at weekly intervals. Set out the seedlings successively as soon as the ground is workable. At the same time, direct-seed leaf lettuce outdoors at 2-week intervals. If the soil temperature is at least 35°F, germination should take place in 6 to 12 days. If you plan to harvest only outer leaves as the plants grow, or harvest the crop for spring mix or mesclun, you can sow the entire loose-leaf crop at once. Choose cold-tolerant cultivars for spring planting (you can find them individually or as a “cool-season mix” or “winter mix” of cultivars from many seed companies).
2.As the weather warms, plant heat-resistant cultivars (you can find them individually or as a “warm-season mix” of cultivars from many seed companies). If you place them in shady areas and give them adequate water, they are less likely to bolt and go to seed during hot spells. You can also cover the lettuce bed with floating row cover to shade it, but leave the ends (and, preferably, the sides) open for air circulation. If the earth is very warm, try presprouting the seeds to get better germination. Place the seeds on wet blotting paper or mix them with a little damp peat moss and perlite; store in the refrigerator for 5 days before sowing.
3.In midsummer, switch back to head or romaine types, making successive sowings—again, in shady areas—for a fall harvest that can last until frost. In milder climates, cover immature heads with cloches to prolong the harvest; in cold-winter areas, transplant a few heads into pots and let them continue growing in a greenhouse or sunny window. You can also sow cold-tolerant loose-leaf lettuces as you did in spring, keeping the bed evenly moist and shaded until outdoor temperatures cool down. If you have a cold frame or a greenhouse with an in-ground bed, you can continue sowing lettuce, extending the season even further.
Growing guidelines: When the seedlings have four leaves, thin head or romaine lettuce to 12 to 16 inches apart. Do the same for leaf lettuce unless you plan to harvest entire plants instead of leaves; in that case, 4-inch spacing is adequate. Thin butterheads to 3 to 5 inches apart.
Lettuce is 90 percent water and has very shallow roots, so keep the soil surface moist but not soggy. Make sure the crop gets at least 1 inch of water a week from rain or irrigation; otherwise, leaves can be thin and bitter, and the plants might bolt to seed. To help prevent disease, try to water on sunny mornings, so the leaves can dry by evening. After a good rain or watering, apply a thick layer of mulch to conserve moisture, suffocate weeds around the easily damaged roots, and keep lettuce leaves free of dirt. To promote quick growth, side-dress with compost or fish emulsion once or twice during the growing season.
Just before bolting, lettuce plants start to elongate and form a bitter sap. To keep this from happening, pinch off the top center of the plant. Pull up and discard any plant that goes to seed. If you are a seed saver, wait and save seeds from the last plants to bolt, since quickness to bolt is a bad trait. Seed savers should also be aware that different lettuce cultivars can cross with each other and with wild lettuce, so next year’s plants may not come true from your saved seed.
Problems: The most likely pests are aphids, cutworms, and slugs. For details on controlling these pests, see The Top 10 Garden Insect Pests and the Slugs and Snails entry.
Soggy soil and crowded plants can encourage bottom rot, a disease that turns lettuce plants black and foul-smelling. There are only a few varieties that are resistant to this disease, which has spores that can persist for years in the soil. If you’ve had problems with bottom rot, choose varieties with an upright form rather than a spreading form, and try planting your lettuce plants on 4-inch-tall ridges of soil. Be careful to avoid wetting the leaves when you water.
Gray mold makes grayish green or dark brown spots on lower leaves and is usually brought on by damp, overcast weather. Injured seedlings are particularly vulnerable. Pull up any infected plant and dispose of it far from the garden.
Harvesting: Pick lettuce in the morning to preserve the crispness it acquires overnight. Watch your crop closely, as mature plants deteriorate quickly. To test the firmness of heading types, press down gently on lettuce hearts with the back of your hand; don’t pinch them, as this can bruise the hearts. Use a sharp knife to cut heads below the lowest leaves, or pull plants out by the roots. Harvest leaf types as needed. Lettuce tastes best when eaten fresh but will keep up to 2 weeks when refrigerated.
Blazing star, gayfeather. Summer-blooming perennials.
Description: Blazing stars bear small, shaggy flowers in white, pink, purple, or magenta along dense spikes from a few inches long to 2 feet or more. Plants have grasslike leaves. Liatris aspera, rough blazing star, grows 4 to 6 feet. L. spicata, spike blazing star, is the best blazing star for gardens, rarely exceeding 3 feet; its best-known cultivar, ‘Kobold’, bears dense spikes of mauve flowers that make good cut flowers. Zones 3–8.
How to grow: Plant or divide (infrequently) in spring in a sunny spot with average, moist but well-drained soil. Blazing stars tolerate both drought and excess moisture in summer, but standing water in winter is fatal.
Landscape uses: Feature small groups of the native American perennial in a border or a meadow or prairie garden. It is also fine for the cutting garden. Tone down magenta blazing stars with pale yellow, medium blue, and cream flowers. They also work well with ornamental grasses.
Privet, ligustrum. Deciduous or evergreen shrubs or small trees.
Description: Privets were once popular as hedging plants, and they’re still found in many backyards. Unfortunately, though, the black berries that these shrubs produce are relished by birds, which spread the plants into wild areas. Many species of privets have been identified as invasive, because once they’re established in the wild, privets outcompete native species. Responsible gardeners no longer plant privet.
Species now identified as invasive in at least one state include Ligustrum amurense, Amur privet, an upright deciduous shrub reaching 15 feet tall, and L. obtusifolium, border privet, a 10- to 12-foot shrub. Both are hardy in Zones 4–7. L. vulgare, common privet, L. sinense, Chinese privet, and L. ovalifolium, California privet, also have been identified as weedy or invasive in some states. Consult your local extension office to learn which species are problematic in your area.
How to grow: Privets are able to grow in a variety of soils, climates, and light levels, but they do require good drainage. One reason Amur and border privets are popular is that they can be planted bareroot, which is cost-effective when many plants are needed, as with a hedge. Shear formal privet hedges during the growing season to keep them tidy. Informal hedges may need occasional rejuvenation pruning; tree forms may need pruning to open or shape them.
Landscape uses: Privets are useful for hedges, but responsible gardeners should consider less-invasive options.
See Syringa
Lily. Late-spring- to late-summer-blooming perennial bulbs.
Description: Lilies have 3- to 12-inch, usually bowl- or trumpet-shaped flowers in white, pink, red, yellow, orange, lilac, and green, many dotted in maroon or near black. Plants bear a few to two dozen or more blooms on 2- to 7-foot stems with narrow leaves. Most lilies are hardy in Zones 3–8 or 4–8. Give winter protection in the North, especially during the first winter.
There are three major groups of hybrid lilies. By choosing some cultivars from each group, you can have lilies blooming all summer. The early-summer-blooming Asiatics normally grow 2 to 4 feet and bear bowl- or cup-shaped, 3- to 5-inch flowers in nearly the entire color range. The summer-blooming trumpets and Aurelians grow 4 to 7 feet, producing large clusters of trumpet- to bowl-shaped, often fragrant, 4- to 6-inch blooms in all colors but bright red. Last to bloom in late summer are the spicily fragrant 3- to 6-foot Orientals in the white-pink-red range, some with distinct yellow stripes; blooms may be 1 foot wide and almost flat.
Besides the popular hybrid lilies, there are many beautiful species. Lilium candidum, Madonna lily, features pure white, lightly fragrant blooms in summer on 2- to 4-foot stalks. L. regale, regal lily, bears fragrant white flowers on majestic 4- to 6-foot stalks in summer; flowers have wine red shading on the outside. L. speciosum, showy lily, bears 15 to 30 fragrant flowers on 4- to 5-foot stalks in late summer; flowers are white, flushed pink, with pink or red spots. L. superbum, Turk’s-cap lily, bears 20 to 40 nodding flowers on 4- to 7-foot stalks in late summer; flowers are orange-red and spotted.
How to grow: Lilies thrive in sun or partial shade in deep, fertile, moist but well-drained, humus-rich soil out of strong winds. Lilies never go completely dormant, so plant the fragile bulbs carefully soon after you receive them. Fall planting is best. Prepare the soil to 1½ feet deep and mulch the site heavily to keep the soil unfrozen and ready for planting in very late fall, which is when many dealers ship. Most lilies produce roots along the belowground part of their stems; therefore, plant the bulbs with no less than 6 inches of soil above the top of the bulb. (Madonna lilies are the exception; they need just 1 inch of soil.) Mark the site to avoid injuring emerging shoots in spring.
Mulch with several inches of compost or finely shredded bark to keep the soil cool. Water during dry spells and douse with compost tea or fish emulsion monthly from late spring to early fall. See the Compost entry for instructions for making compost tea. Stake tall lilies and deadhead after bloom. After the tops die, cut the stems to a few inches above the ground.
Aphids spread devastating viral diseases; dig and destroy any plants with yellow-streaked or deformed leaves or dramatically stunted growth. Many gardeners in New England have given up trying to grow lilies because of an invasion of lily leaf beetles, a pest accidentally introduced from Europe. These small red beetles and their sluglike larvae feed on lily leaves, stems, and flowers. Scientists are testing a parasitic wasp as a control measure; handpicking is the only other feasible control.
Deer and woodchucks relish lilies; see the Animal Pests entry for control measures.
Landscape uses: Plant specimens or groups throughout borders and lightly shaded areas such as open woodlands. Some of the larger, more robust lilies grow happily near shrubs if given a few feet of their own space.
Liriope, lilyturf. Evergreen perennial ground-covers.
Description: Liriope muscari, big blue lilyturf, and L. spicata, creeping lilyturf, form dense, dark green mats of tufted, grasslike leaves. Big blue lilyturf is taller, with clumps 1 to 1½ feet wide and leaves ½ inch wide and 2 feet long. The showy, violet-blue blossoms resemble grape hyacinths and bloom from July to September. The flower spikes rise above the leaves. Shiny black berries persist through winter. The narrow leaves of creeping lilyturf measure ¼ inch across and 8 to 12 inches long. Flowers are pale lavender to white, with black berries appearing after the late-summer blossoms have faded. Unlike big blue lilyturf, the leaves of creeping lilyturf turn yellow and are unsightly through winter. Creeping lilyturf also has been designated as invasive in some states: Consult your extension service to see if it is a problem in your area. Both species are hardy in Zones 6–10.
How to grow: Liriopes can grow in deep shade to full sun in rich, acid, well-drained but moist soil. However, they prefer filtered sunlight in protected locations. Plants are tolerant of drought and salt spray. Add leaf mold or other organic matter to your soil if it isn’t humus rich. Divide clumps in spring or fall and plant them 1 foot apart. In late fall, mow or clip back plants to encourage new growth.
Landscape uses: Liriopes are excellent groundcovers for difficult locations, including seashore areas. They are also attractive along paths, around the edges of flower gardens, and in rock gardens.
Lobelia. All-season annual and midsummer- to early-fall-blooming perennials and wildflowers.
Description: Lobelia erinus, edging or bedding lobelia, produces intricate blooms in shades of white, red-violet, and blue (many with a striking white “eye”). These annual plants produce spreading clumps to 6 inches or trailing forms that may reach a few feet long by the end of the season. Small leaves often assume rich bronzy purple shades.
Perennial L. cardinalis, cardinal flower, bears brilliant red flowers on long spikes above unbranched to more bushy plants reaching 3 to 4 feet. Rich green leaves provide a sharp contrast. Zones 2–9. L. siphilitica, great blue lobelia, grows 2 to 3 feet tall with spikes of pure blue flowers. Zones 4–8. Hybrid cardinal flower, L. × speciosa, also grows 2 to 3 feet tall with flowers in shades of red, blue, or purple, sometimes with bronze foliage. Zones 3 (with protection) and 4–9.
How to grow: Start edging lobelia from seed indoors in late winter in the North or sow directly farther south. Provide full sun in cooler areas and part shade in warmer areas to prolong bloom. Grow in average, moist but well-drained soil. A light mulch is also beneficial.
Plant or divide cardinal flowers and great blue lobelia every few years in spring or after bloom. They prefer a partially shaded spot (full sun in the North if soil is constantly moist) in average to rich, moist to wet, humus-rich soil. Water freely in summer if they’re in a traditional border setting. Mulch in summer with bark or chips; replace with straw or hay in winter in the North. Zones 2–5.
Landscape uses: Mass edging lobelia at the front of borders, along paths, and in pots, especially cascading types. Feature a clump of cardinal flower, hybrid cardinal flower, or great blue lobelia in a moist border or naturalize by a stream or pond. Hummingbirds especially love the brilliant red spikes of cardinal flowers—they’re must-have plants for the hummingbird garden.
Sweet alyssum. Long-season annuals.
Description: Lobularia maritima, sweet alyssum, is a creeping annual that bears clusters of fragrant, tiny white, rose, peach, or purple flowers atop spreading, 4-inch cushions of small, narrow leaves.
How to grow: Sow seeds thinly in spring where they are to grow, indoors 8 weeks before frost, or start with transplants. Just press seeds onto the soil surface, since light is necessary for germination. Pick a sunny or lightly shaded spot with well-drained, average soil. Make later sowings or shear plants in midsummer to extend bloom into fall. Plants withstand heat and drought. They also self-sow.
Landscape uses: Edge a path or bed with one or more colors, or use them to fill in between paving stones and along walls. Or use them to soften the edge of a pot or window box. Plant sweet alyssum where you can enjoy its delightful fragrance. Its multiple small flowers and long season of bloom make it an inviting food source for bees and other pollinators and for tiny beneficial insects; tuck a few plants into corners of your vegetable garden to support your local beneficials.
Choosing to buy and eat locally produced food is one of the best-publicized suggestions for helping to reduce our carbon footprint. The logic is easy to follow: Buying and eating spinach, lettuce, or tomatoes grown by a local farmer is a green choice because it saves the fossil fuel cost of shipping that produce from across the country (or across the world).
Shopping at a farmers’ market or subscribing to a local CSA (community-supported agriculture) farm are great green choices, but the greenest choice of all is to start growing some of your own food. No matter where you live—city, suburbs, or country—your green gardening efforts should start with a vegetable garden or berry patch. Convert some of your lawn to a vegetable garden (which will also cut down on the need to use fossil fuel for mowing). If you don’t have a garden space, grow veggies and small fruits in containers on your patio or deck. Urban gardeners may be able to grow food crops on the rooftop or in a community garden. Choose something you love to eat, and get started!
Even if you need only a small garden to feed yourself, you don’t have to stop your food gardening efforts there. Call a local food bank in your area and ask if it accepts donations of fresh seasonal produce. Or join with other gardeners to start a local chapter of Plant a Row for the Hungry, a national program of the Garden Writers Association that encourages home gardeners to set aside a row in their gardens and commit to donate the food from that row to a food pantry or other local agencies working to alleviate hunger. It’s a satisfying and worthwhile way to combine your green gardening efforts with service to your community.
It’s relatively easy to add more seasonal foods to your diet by finding out what’s in season where you live and including those ingredients in your meals. Visit localharvest.org for a list of foods available near you during any season.
Here are some additional ways to eat more locally and seasonally:
1.Garden. Food doesn’t get more local or seasonal than when it grows in your backyard. Even growing a small amount of food gets you in touch with the changing seasons. And gardening doesn’t have to end when the weather cools. You can grow cool-season crops in many climates by installing simple protection devices, such as hoop tunnels or cold frames.
2.Shop at the farmers’ market, join a CSA, or buy a farm share. Farmers’ markets, community supported agriculture programs, and meat and dairy shares are excellent ways to get to know farmers, connect to where your food comes from, and naturally evolve your diet throughout the seasons.
3.Visit U-pick farms. Want buckets of berries or fruit for a fraction of the typical grocery store cost? Visit pickyourown.org to find a nearby U-pick farm where you can harvest fruit yourself and pay by the pound. You’ll get to know different fruit seasons well; you may even count down the days to blueberry season.
4.Forage. Foraging doesn’t have to be scary or overwhelming. From wild berries to fresh dandelion greens, food grows all around us. Find a local foraging class and invest in a field guide to start learning about wild food sources. If you’re so inclined, hunting is another way to eat locally.
5.Learn to cook seasonally. Fortunately, more restaurants and food companies are dedicated to sourcing foods locally and seasonally. However, most don’t. Cooking is the best way to take advantage of the bounty of seasonal food. When you use fresh, seasonal ingredients, you’ ll be amazed at how delicious homemade meals taste. Different cooking methods are appropriate in different seasons. For instance, raw salads make more sense in summer than winter. Rely more on warming food preparation methods in cold months and cooling methods in warm months.
6.Learn simple preservation methods. Seasonal eating doesn’t mean only eating what’s growing outside at a certain time. People around the world have been using methods to preserve crops for thousands of years. By freezing, dehydrating, and storing crops in proper conditions, you can eat local food for several months after harvest without investing in a root cellar or canning equipment. Many crops, such as nuts, winter squash, beans, onions, garlic, and potatoes, can simply be stored in jars or ventilated boxes in a cold basement or unheated room. Ambitious preservers may want to investigate other methods, including canning, smoking, dry salting, pickling, and fermenting.
You’ll find Web sites that can help you eat locally and seasonally in Resources.
Hand in hand with the idea of eating locally is the practice of eating seasonally. Not so very long ago, this was the norm, before refrigerated trucks stocked our supermarket shelves year-round with fresh produce from across the globe. However, there are many reasons to choose seasonal foods. Eating seasonally helps you eat healthier, more nutritious food and be more in sync with the natural world. Seasonal eating usually is better for the environment than the standard American diet, because foods grown locally require less energy and resources to produce and transport. And eating seasonally helps support the local or regional economy.
Even with all the benefits, adopting a diet that more closely reflects the seasons can be a challenge when imported strawberries and cucumbers tempt us year-round at the grocery store. But you don’t need to eschew all of your favorite imported or exotic foods (think coffee, for example). Even a modest transition to more local and seasonal foods can have a positive effect on your health and that of the planet.
Here are some of the advantages of eating seasonally.
•There are health advantages to sourcing food as locally as possible and adapting your diet to reflect local seasons. That’s because the foods in season within your own region can help your body adapt to the environment.
•Eating seasonally encourages people to eat a wider variety of nutritious foods. Although there are 80,000 edible plant species, very few are included in the modern, industrialized diet. Globally, only 30 plant species make up 95 percent of the calories people eat. Within those 30 species, we eat far fewer varieties of vegetables and fruits than our ancestors did because our industrial agricultural system relies primarily on fruit and vegetable types that produce large yields and hold up well during long-distance transport and long-term storage. These are not necessarily the most nutritious types. Moreover, these crops lose nutrition during long-distance transport and storage, even when temperature and humidity are carefully controlled.
•Getting more produce from local sources is an excellent way to eat a more diverse range of nutritious crops because home gardeners and small farmers can select fruit and vegetable types based on optimum nutrient content. Foods grown close to home typically retain the most nutrients because they’re handled minimally and eaten quickly after harvest.
•Seasonal produce is nearly always more flavorful than produce that’s shipped long distances. Small, local farmers can make flavor a high priority when deciding which vegetable and fruit varieties to grow. And the shorter distance to market translates to more flavor: Anyone who’s eaten a store-bought tomato in January and a sun-ripened one in August has tasted the difference.
•Eating seasonally can also be more affordable than relying exclusively on the grocery store. Purchasing the freshest, tastiest, and most nutritious food available is also relatively inexpensive at farm stands and farmers’ markets. Farmers’ markets sometimes get a bad rap as being elitist and expensive. However, in studies done in four different regions, the produce at farmers’ markets was the same price or less expensive than it was in grocery stores.
•When you buy food locally, more of your dollars stay in your community. According to the Farmers’ Market Coalition, for every $100 you spend at a farmers’ market, $62 remain in your local economy and $99 remain in your state.
Honeysuckle. Deciduous, semievergreen, or evergreen shrubs or vines.
Description: Most honeysuckles are deciduous (some are semievergreen or evergreen) shrubs or vines. While they are valued for their sweetly fragrant and showy, trumpet-shaped, 1- to 3-inch flowers, some are invasive plants that spread by twining vines and/or seed (via birds eating the berries, which appear in late summer or fall). The shrubs have loose upright or rounded growth habits. Honeysuckles have opposite, roundish leaves that range in color from dark green through blue-green to apple green.
Lonicera × brownii, Brown’s honeysuckle, is a vining honeysuckle that looks and behaves much like its parent, L. sempervirens, but it is more cold-tolerant. It has red or orange-red flowers and blooms summer through fall. Zones 3–9.
L. fragrantissima, winter honeysuckle, is a 6- to 10-foot, open, semievergreen shrub that is invasive in a few states. Plants bear fragrant white blooms before the leaves in very early spring. Zones 5–9.
L. × heckrottii, goldflame honeysuckle, is an outstanding, evergreen or semievergreen vine, reaching 10 to 20 feet long. It has blue-green leaves and bears abundant, slightly fragrant flowers that are magenta with yellow interiors. Plants flower in late spring and summer. Zones 4–9.
L. maackii, Amur honeysuckle, is a large (10 to 15 feet), rangy, upright deciduous shrub that is invasive in many states. In late spring, plants bear fragrant flowers that open white, then turn yellow. Birds spread the plant when they eat its red fall fruit. Zones 3–8.
L. morrowii, Morrow honeysuckle, another widely invasive species, is a 6- to 8-foot, rounded deciduous shrub with bluish green foliage. In late spring, plants bear fragrant flowers that open white and turn yellow. Birds spread the plant when they eat its showy red berries. Zones 5–8.
L. nitida, boxleaf honeysuckle, is a dense shrub to 6 feet with small, shiny, dark green leaves that are nearly evergreen. The fragrant flowers are inconspicuous and are followed by dark blue fruit. It is useful for hedges. Zones 6–9.
L. pileata, privet honeysuckle, is very similar to boxleaf honeysuckle, but has a prostrate habit and can be used as a groundcover. Zones 6–9.
L. sempervirens, trumpet honeysuckle, is a native, semievergreen to evergreen twining vine that grows to 20 feet long. The showy, scarlet and yellow-orange flower clusters bloom in summer and are followed by bright red berries in fall. Zones 4–9.
L. tatarica, Tatarian honeysuckle, is a large (10 to 12 feet), upright deciduous shrub that is widely invasive. It bears blue-green foliage and red, pink, or white flowers that are not fragrant. Birds spread the plant by eating the red fall berries. Zones 3–8.
How to grow: Honeysuckles transplant easily. Plant in good, well-drained soil in full or partial sun. They tolerate a range of soil types and pH. Prune after flowering by cutting the oldest wood to the ground and gently shaping the shrub. If plants have become overgrown, cut to the ground and allow them to resprout.
Landscape uses: Use shrub honeysuckles as hedges and screens, or as part of a shrub border. Use the vines to cover banks, fences, walls, or arbors. Remember that they require a support to twine around.
Japanese honeysuckle (Lonicera japonica) is the most invasive of the honeysuckle clan. Plants bear dark green foliage and fragrant blooms from June to September. Flowers open white and turn yellow. This familiar roadside honeysuckle is decorative in bloom, but be warned: It requires vigorous pruning to keep it in bounds. Escaped plants easily cover fields, roadsides, and the edges of woods, smothering local vegetation. This species has been declared an invasive pest in more than 30 states. Instead of adding this potentially troublesome vine to your yard, pick another vining honeysuckle such as trumpet honeysuckle, L. sempervirens, a well-behaved native alternative.
Lupine. Late-spring- to early-summer-blooming annuals and perennials.
Description: Perennial Lupinus ‘Russell Hybrids’ are the most widely grown lupines, bearing spectacular spikes of pealike flowers in a wide color range to 4 feet above large clumps of palmlike leaves. Zones 3–6. L. texensis and L. subcarnosus, Texas bluebonnets, are native annuals that produce spikes of blue flowers on plants to about 1 foot.
How to grow: Set out nursery-grown perennials in spring, or start seeds in late winter to plant out after frost. Grow in full sun to partial shade in moist but well-drained, acid, humus-rich soil. Lupines need cool summers and grow poorly in hot, humid summers and dry soil. Direct-sow annuals onto a sunny site with average to less fertile soil.
Landscape uses: Mass hybrids in borders. Annual lupines look best in natural settings such as meadow and prairie gardens.