Chapter 1. Finding Your Way Around Elements
Photoshop Elements lets you do practically anything you want to digital images. You can colorize black-and-white photos, remove demonic red-eyed stares, or distort the facial features of people who’ve been mean to you. The downside is that all those options can make it tough to find your way around Elements, especially if you’re new to the program.
This chapter helps get you oriented. You’ll learn what to expect when you launch the program and how to use Elements to fix photos with just a couple of keystrokes. You’ll also find out how to use Guided Edit mode to get started editing images. Along the way, you’ll find out about some of Elements’ basic controls and how to get to the program’s Help files.
Getting Started
On a Windows computer, when you install Elements (Installing Elements in Windows explains how), the installer creates a desktop shortcut for you. Just double-click that shortcut to launch Elements. You can also go to the Start menu and click the Adobe Photoshop Elements 13 icon. (If you don’t see Elements in the Start menu, then click the arrow next to All Programs, and you should see it in the pop-up menu.)
On a Mac, you can launch Elements as the last step in the installation process, or you can go to Applications→Adobe Photoshop Elements 13 and double-click its icon there. (Incidentally, the only other thing in that folder besides the uninstaller is a folder called Support Files. That’s where you’ll find the Editor application, which you’ll learn about starting on Editing Your Photos.) If you want to make a Dock icon for future convenience, start Elements and then go to the Dock and click the program’s icon. Keep holding the mouse button down until you see a menu, and then choose Options→Keep in Dock.
Note
Elements 13 uses the same light color scheme Adobe has used since Elements 11. Unfortunately, there’s no way to change it if you prefer a darker look.
The Welcome Screen
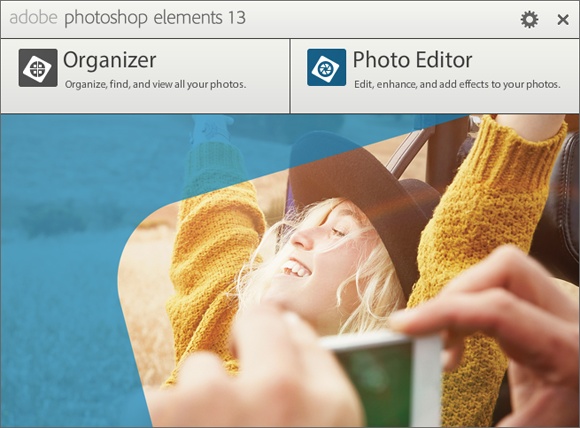
When you launch Elements for the first time, you’re greeted by the Welcome screen (Figure 1-1). This screen is a launcher that lets you choose which part of Elements you want to use:
Organizer. Click this button to start the Organizer, which lets you store and organize your image files. It’s explained in detail starting on Using the Organizer.
Photo Editor. Click this button to start the Editor, which lets you modify images. See Editing Your Photos for more about this part of Elements.
It’s easy to hop back and forth between the Editor and the Organizer, which you can think of as the two halves of Elements. But in some ways, they function as two separate programs. For example, if you start in the Organizer, then once you pick a photo to edit, you have to wait a few seconds while the Editor starts up. And when you have both the Editor and the Organizer running, quitting the Editor doesn’t close the Organizer—you have to close it separately.
At the bottom center of the Editor’s main window is a button that you can click to launch the Organizer (or switch over to it if it’s already running). If you want to do the opposite—get photos from the Organizer over to the Editor—select the photo(s) in the Organizer, and then click the Editor button at the bottom of the screen, or right-click/Control-click one of the selected thumbnails and choose “Edit with Photoshop Elements Editor.” Either way, your photo(s) appear in the Editor so you can work on them. Once both programs are running, you can also just click the Editor’s or the Organizer’s icon in the Windows taskbar or the Mac Dock to switch from one to the other.
One helpful thing to keep in mind is that Adobe built Elements around the assumption that most people work on their photos in the following way: First, you bring photos into the Organizer to sort and keep track of them. Next, you open photos in the Editor to work on them, and then save them back to the Organizer when you’ve finished making changes. You can use a different workflow, of course—by opening photos directly in the Editor and bypassing the Organizer altogether, for example—but you may feel like you’re always swimming against the current. (The next chapter has a few hints for disabling some of Elements’ features if you find that they’re getting in your way.)
Note
In most countries, the first time you launch either the Editor or the Organizer, Elements presents you with Elements Live (a.k.a. eLive), an inspirational and tutorial section explained on eLive. To start organizing your photos in the Organizer, just click the Media tab at the top of the screen. In the Editor, just click any of the tabs at the top of the screen besides eLive.
Organizing Your Photos
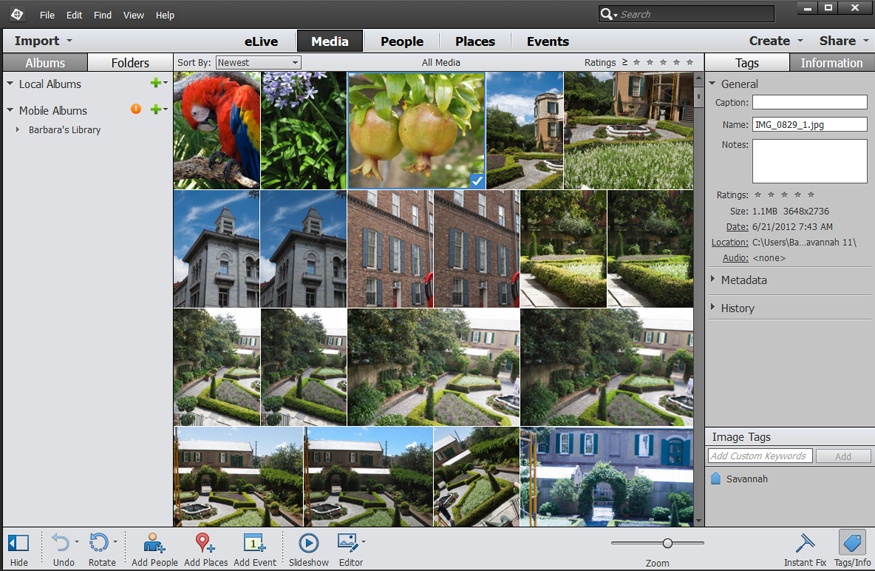
The Organizer is where your photos come into Elements and go out again when it’s time to print, edit, or email them. The Organizer catalogs and keeps track of your photos, and you automatically return to it for many activities that involve sharing photos, like emailing them (Emailing Photos) or creating a slideshow with them (PDF Slideshows). The Organizer’s main window (Figure 1-2) lets you view your photos, sort them into albums, and assign keyword labels to them.
The Organizer got a complete makeover in Elements 11, so if you’re upgrading from Elements 10 or older, it’s pretty much a whole new ballgame compared to the Organizer you knew before. In Elements 13, Adobe gives you a whole new way of seeing your photos in the Organizer, called the Adaptive Grid, which you can see in Figure 1-2. You can switch between this view and the old grid view found in earlier versions of Elements. Your Catalog explains how. The next chapter shows you how to use the Organizer to import and organize photos, and online Appendix B covers all the Organizer’s different menu options (head to www.missingmanuals.com/cds to download it). However, it’s important to understand that you don’t have to use the Organizer if you don’t want to. Lots of people don’t, for a variety of reasons. Media View explains some of the arguments for and against it.
The Photo Downloader
Elements has yet another component that you may have already seen if you’ve plugged a camera into your computer after installing Elements: the Photo Downloader (Figure 1-3), which helps get photos into the Organizer directly from your camera’s memory card.
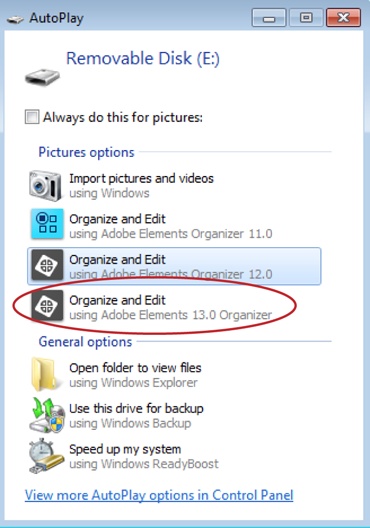
In Windows, the Downloader is one of your options in the Windows dialog box that you see when you connect a device. If you want to use the Downloader, then just choose it from the list.
To launch the Downloader on a Mac, in the Organizer, go to File→“Get Photos and Videos”→“From Camera or Card Reader.” There’s no way to make the Downloader run automatically on a Mac—you have to go through the Organizer to start it.
You can read more about the Downloader in Chapter 2 starting on The Photo Downloader. If you plan to use the Organizer to catalog photos and assign keywords to them, then reading that section can help you avoid hair-pulling moments.
Editing Your Photos
The Editor is the other main component of Elements. This is the fun part of the program, where you get to adjust, transform, and generally glamorize photos, and where you can create original artwork from scratch with drawing tools and shapes.
The Editor has four different modes:
eLive. Elements Live (abbreviated eLive in the tab at the top of your screen) is a new feature in Elements 13. When you click this tab, you’re presented with a variety of tutorials for using Elements and some examples of fancy photography and editing to help inspire you. It’s a collection of interesting stuff from Adobe and from many different Internet sites. This is where you start the first time you launch the Editor. To move on to working with your photos, just click one of the other tabs at the top of the window; they’re explained in the following bullet points. There’s more about Elements Live on eLive.
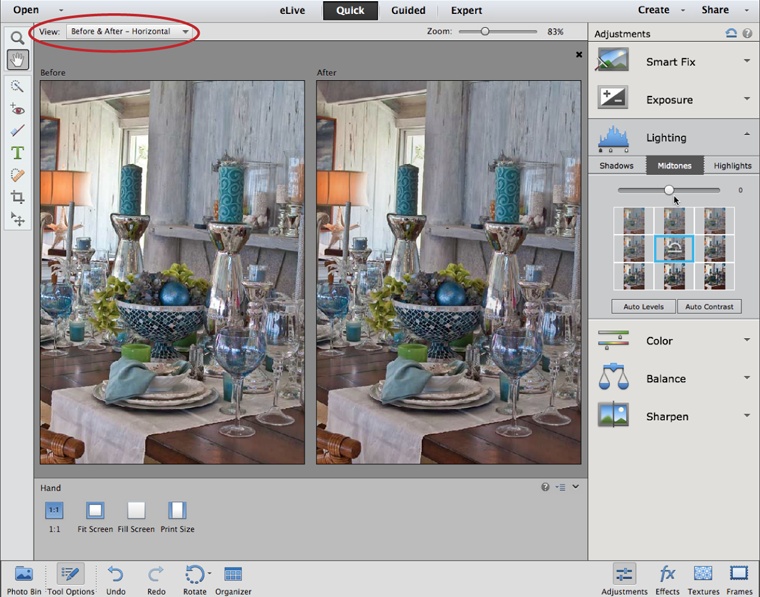
Quick Fix. For many Elements beginners, Quick Fix (Figure 1-4) ends up being their main workspace. It’s where Adobe has gathered together the basic tools you need to improve most photos. You can even add frames, special effects, and textures to your photos here. This is also one of the two places in Elements where you can have a before-and-after view while you work (the other is Guided Edit, described next). Chapter 4 gives you all the details on using Quick Fix. The first time you launch the Editor, you start out in Quick Fix mode.
Guided Edit. This window can be a big help if you’re a newcomer to Elements. It provides step-by-step walkthroughs of popular projects such as cropping photos and removing blemishes; see Guided Edit later in this chapter for an intro. Guided Edit also hosts some fun special effects and workflows for more advanced users (see Special Effects in Guided Edit).
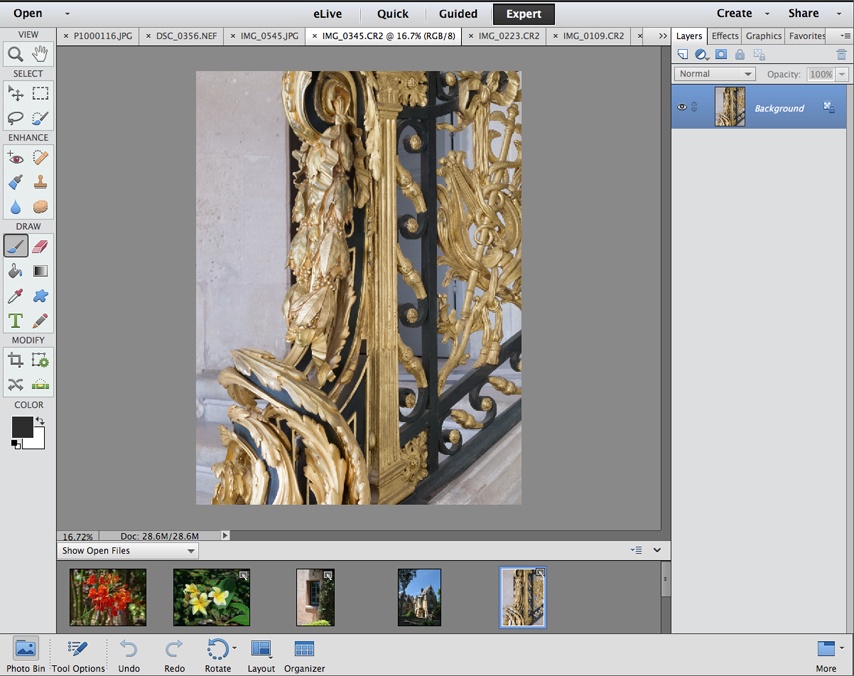
Expert. This mode gives you access to Elements’ most sophisticated tools. You have far more ways to work on your photo in Expert mode than in Quick Fix, and if you’re fussy, this is where you’ll do most of your retouching work. Most of the Quick Fix commands are also available via menus in the Expert mode window (shown in Figure 1-5).
You switch modes by clicking the Quick, Guided, and Expert tabs at the top of the Elements window. The rest of this chapter covers some of the Editor’s basic concepts and key tools.
Tip
If you leave a photo open in the Editor, then when you switch back to the Organizer, you’ll see a red band with a padlock across the photo’s Organizer thumbnail as a reminder. To get rid of the lock and free up your image for Organizer projects, go back to the Editor and close the photo there.
Understanding Expert Mode
Once you enter Expert mode (click the Expert tab at the top of the Editor to get there), you may be pretty puzzled as to how to proceed. There’s a toolbox on the left, a row of icons across the bottom of the screen—and that’s pretty much it. If you’ve ever used old versions of Elements, you may be asking, “Where did everything go?” Not to worry. It’s all still there, you just need to know how to make things work.
Basic Workspace
Expert mode starts out in what Adobe calls the Basic Workspace (Figure 1-6), a design that it hoped would be less confusing to beginners. On the left side of the screen is a double-columned toolbox. When you open a photo, a small thumbnail version of it appears in the area near the bottom of the window, called the Photo Bin. However, what you see in this area changes depending on what you’re doing. When you activate one of Elements’ tools, this area is taken over by the Tool Options, where you see the settings for the tool you’re currently using (more about that on Elements’ Tools).
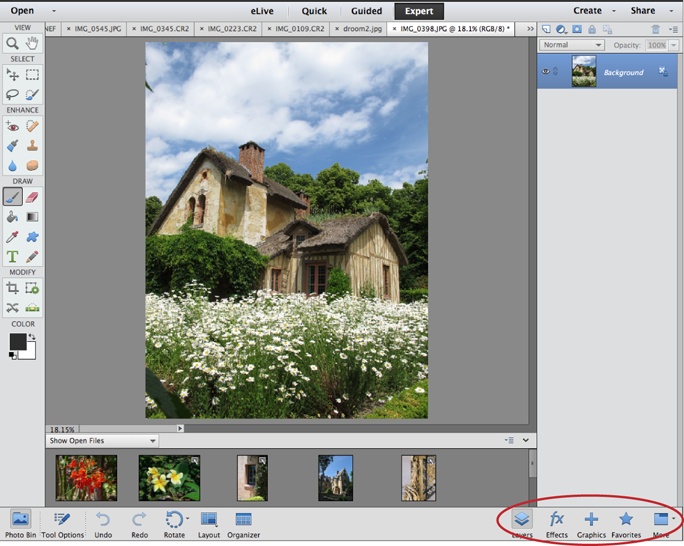
At the bottom right of the screen are a series of buttons: Layers, Effects, Graphics, Favorites, and More. The first four are the names of Elements’ most-used panels. Panels let you do things like keep track of what you’ve done to a photo (with the History panel) and apply special effects to your images (with the Effects and Graphics panels). You’ll learn about the program’s various panels in detail throughout this book.
Here’s the thing about the Basic Workspace: When you click one of those panel buttons, that panel appears and fills the entire right side of your screen (called the Panel Bin) from top to bottom, as the Layers panel does in Figure 1-6. When you’re in the Basic Workspace, only the panels that have buttons at the bottom right of the screen can appear in the Panel Bin, and you can’t see more than one of them at a time or resize them. To switch to another panel, you click its button at the bottom of the screen and the previous panel disappears.
But the Editor has many more panels than just those four. If you need one of the others, like say the History panel, you bring it up by clicking the More button in the window’s lower-right corner. This brings up all of Elements’ other panels in one floating group, and you click the tab of the panel you want to work with to bring it to the front. You can move the group around on your screen, but you can’t put it in the Panel Bin or take anything out of the Panel Bin. You also can’t remove any panels from the group, and you have no control over how big it is—it automatically resizes itself to fit the current panel. You can close the group by clicking the little X at its top right (in Windows) or top left (on a Mac).
Tip
If you click the tiny arrow on the right side of the More button, you can choose a panel by name, but in the Basic Workspace you still get the whole group. All choosing the name does is make sure that the panel you want is the front one when the grouped panels appear.
You can try using Expert mode’s Basic Workspace, but odds are that in about 10 minutes, this setup will have you raving and beating your head on your desk. Fortunately, Elements offers a much better way to use the Editor: the Custom Workspace.
Custom Workspace
If you’ve ever used Elements (or any graphics program) before, you’ll be enormously relieved to know that you can make the Editor work much more efficiently than the Basic Workspace does. The secret is a well-hidden menu command that restores Elements to its full usefulness. To achieve this transformation, just head to the bottom right of the Elements window, click the tiny arrow on the right side of the More button, and then choose Custom Workspace.
Voilà! You may not see much of a change onscreen, but you just regained an enormous amount of freedom to set things up the way you want them. In the Custom Workspace you can tear individual panels out of the panel group, put panels into (and take them out of) the Panel Bin, make your own panel groups, and so on.
Switch to the Custom Workspace right now. The rest of this book assumes that you’d like to see what you’re doing and so are using the Editor’s Custom Workspace.
Bins, Panels, and Tabs
You’re not stuck with the way things are initially laid out in the Editor’s Custom Workspace (explained above). You can rearrange things quite a bit from where Adobe starts you out. This section explains the various ways you can customize the Editor when you’re in the Custom Workspace).
Tip
You can hide everything in the Editor except for your images, the strip of buttons along the bottom of the Editor’s window, and the menu bar: no tools, panels, or anything else cluttering up your screen. This is handy when you want a good, undistracted look at what you’ve done to a photo. To do so, just press the Tab key; to bring everything back into view, press Tab again. (This also works in the Basic Workspace.)
The Photo Bin/Tool Options Area
There’s a long, narrow strip at the bottom of the Editor window that displays different things depending on what you’re doing at the moment. When you first open a photo, you see the Photo Bin (Figure 1-7) in this area, which displays all your open files. But if you click a tool in the toolbox on the left side of the Editor window, the Photo Bin gets replaced with settings for that particular tool, called (logically enough) the Tool Options. There are buttons at the bottom left of the main Editor window that let you switch between the Photo Bin and Tool Options, so you can always see the one you want.
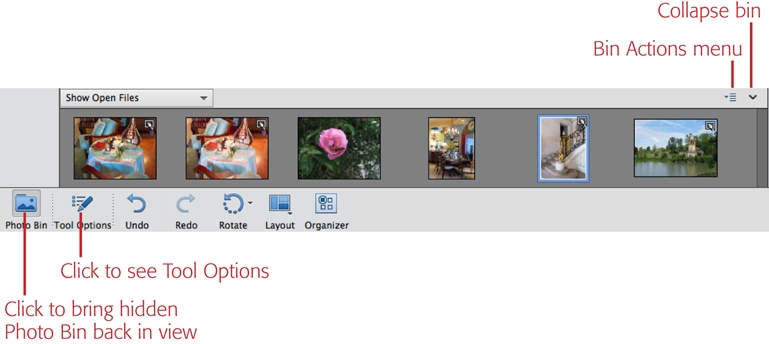
The Photo Bin/Tool Options area is fixed in place: You can’t move it anywhere else or resize it. However, you can hide it by clicking the down-pointing arrow at the right end of the light-gray bar just above it (labeled in Figure 1-7), or by clicking the Photo Bin button (when the Photo Bin is visible) or the Tool Options button (when the Tool Options are visible). This gives you more space, but it also hides the settings for your tools, so it’s hard to do much work with it hidden. To bring it back, click either the Photo Bin or Tool Options button at the bottom of the window. (This behavior is the same in both the Basic and Custom workspaces.)
There’s more about how to use the Tool Options on Elements’ Tools. The rest of this section is about the Photo Bin.
The Photo Bin does a lot more than just show which photos you have open. For example, you can drag photos’ thumbnails in the bin to rearrange them if you want to use the images in a project. The bin also has two drop-down menus:
Show Files. This menu at the bin’s upper left lets you determine what the Photo Bin displays: the photos currently open in the Editor, selected photos from the Organizer, or any albums (Albums) you’ve made. This menu even lets you send files from the Organizer to the bin without actually opening them. Simply click photos to select them in the Organizer, and then come back over to the Editor and switch this menu to “Show Files selected in Organizer”; you’ll see the photos you selected in the Organizer waiting for you in the bin. Double-click one to open it for editing.
Bin Actions. This menu is where the Photo Bin gets really useful, but it’s not easy to spot: It’s the little four-line square in the bin’s upper right. This menu lets you print the photos in the bin or make an album right there in the Photo Bin without ever going to the Organizer. If you don’t use the Organizer, then the Photo Bin is a particularly great feature, because it lets you create groups of photos you can call up together: Just put them in an album here by choosing “Save Bin as an Album”; after that, you can select the album’s name from the bin’s Show Files menu to see those photos. If you like things to be compartmentalized, the Show Grid menu item here puts a thin black line around each thumbnail.
The Panel Bin
When you’re in Expert mode, the right side of the Elements window displays the Panel Bin. (In the Basic Workspace you won’t see this bin until you click one of the panel buttons in the bottom-right corner of the Editor window.) When you first switch to the Custom Workspace (Custom Workspace), the Panel Bin appears with four panels open: Layers, Effects, Graphics, and Favorites (Figure 1-8). These are the same four panels that have their own buttons in the Basic Workspace, but here you can close any of them that you don’t need at the moment.
Note
In older versions of Elements and Photoshop, panels were called “palettes.” If you run across a tutorial that talks about the “Effects palette,” for example, that’s the same thing as the Effects panel.
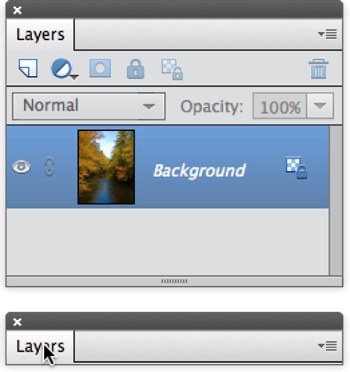
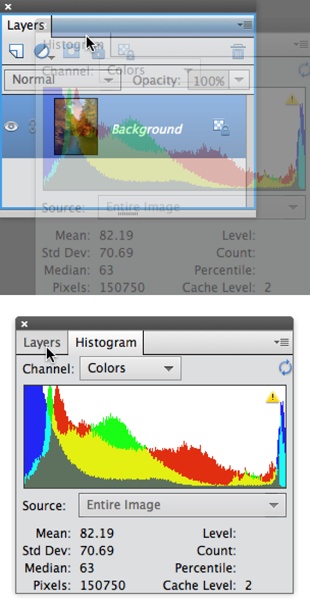
To pull a panel out of the bin, drag the panel’s top tab (the one with its name on it); you’ve now got yourself a floating panel. (You can float panels even if you haven’t turned on floating image windows as explained on Image Views.) Figure 1-9 shows how to make panels even smaller once they’re out of the bin by collapsing them in one of two ways. You can also combine panels, as shown in Figure 1-10; this works with both panels in the bin and freestanding panels you’ve dragged out of the bin.
The first time you call up one of the panels that’s not initially displayed in the Custom Workspace (by selecting its name in either the Window menu or the menu that appears when you click the down arrow on the right side of the More button), you get the same floating panel group that you get in the Basic Workspace (Understanding Expert Mode). Luckily, you can fix this in a jiffy. Just pull the panels you want loose from the clump. After that, Elements will remember what you did, and those panels will appear right where you left them last time. So the first time you call up the History panel, for instance, you get the six-panel group. But if you separate the History panel from the group, from then on, when you go to Window→History or click the arrow next to the More button and choose History, all you get is the panel you want, not the whole clump. You can put the panel in the bin, leave it floating, or combine it with another panel, and that’s exactly how it will appear next time.
Note
If you’ve floated any panels, clicking the More button closes them. You can click the arrow on the right side of this button to display the pop-out menu and make choices there, but click the main part of the button and everything is gone. Click the button again to bring everything back.
To close a floating panel, click its Close button (the X at its upper right [in Windows] or upper left [on a Mac]), or click the little white square made of four horizontal lines in the panel’s upper right, and then choose Close.
Note
Confusingly, Adobe sometimes refers to floating panels as “tabs” in Elements’ menus. So, for example, when you click the four-line square on a floating panel, you see a Close Tab Group option instead of a Close Panel Group option.
In addition, when you’re using the Custom Workspace, you can put floating panels into the Panel Bin. Where you drag the panel determines where it appears in the bin. If you want to see a panel’s tab with the other tabs at the top of the bin, then drag the panel’s tab onto the other tabs at the top of the bin and let go when you see a blue outline. Since the Panel Bin always fills the entire right side of the screen from top to bottom, you may also prefer to stack panels vertically so that you can see more than one at a time. You can’t really do that, but you can get the same effect by dragging a panel’s tab onto the tab of a panel already in the bin. This creates a multi-tabbed panel in the bin. Then grab the tab of the panel you want to see lower in the bin and drag it straight down. The panel is actually floating, but it will position itself within the confines of the bin, below the contents of the first panel, so that it’s effectively the same as if it were docked below the first panel.
One thing that’s a bit tricky about the Custom Workspace is that you may wind up losing the Panel Bin completely. If you pull all the panels out of it, the bin disappears. This can be handy because it gives you more space to spread out when working on photos, but if you want the bin back, you may find yourself dragging a panel all over the right side of the screen trying to make it dock back into the main window. The trick is to move the panel over the far right edge of the main Editor window. When you do this, the blue line appears along that edge. Let go of the panel, and the Panel Bin returns with your panel in it.
All this panel organizing isn’t as complicated as it sounds, and it’s easier to learn by doing than by reading about it. So try dragging some panels around in the Custom Workspace. If you don’t like the results of your handiwork or you move the panels around so much that you can’t remember where you put things, just go to Window→Reset Panels, and Elements puts all the panels back in their original spots.
Image Windows
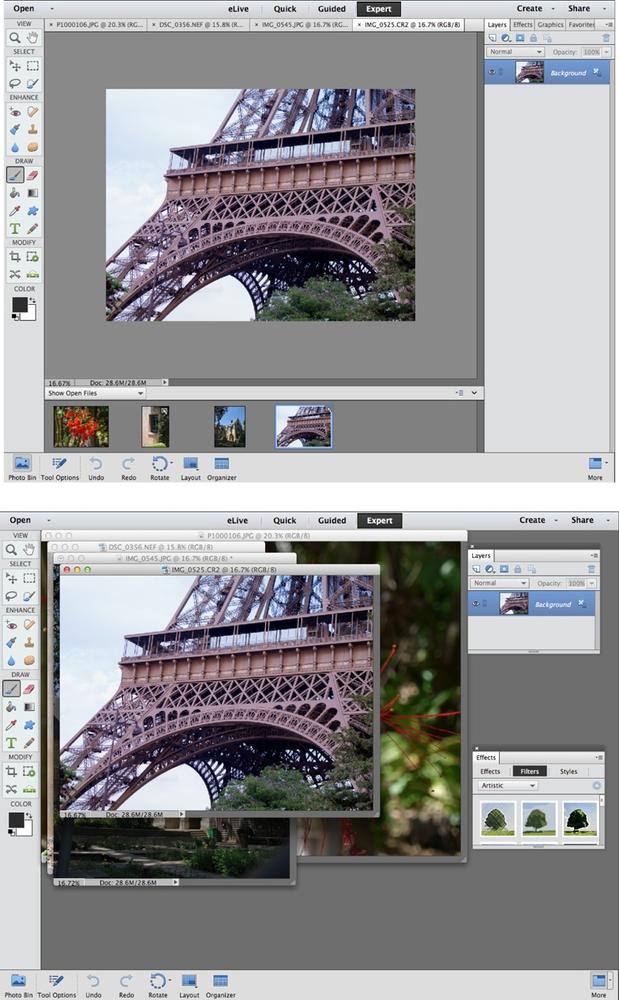
You also get to choose how you want to view the images you’re working on. Old versions of Elements used floating windows, where each image appears in a separate window that you can drag around. Elements now starts you out with a tabbed view—which uses something like the tabs in a web browser or the tabs you’d find on paper file folders; see Figure 1-8, top—but you can still put images into floating windows, if you prefer (Image Views explains how).
The advantage of tabbed view is that it gives you plenty of workspace around your image, which is handy when you’re working near the edges of a photo or using a tool that requires you to be able to get outside the image’s boundaries. Many people switch back and forth between floating and tabbed windows as they work, depending on which is most convenient. All the things you can do with image windows—including how to switch between tabbed view and floating windows—are explained on Zooming and Repositioning Your View. (Incidentally, clicking Window→Reset Panels doesn’t do anything to your image windows or tabs; it resets only your panels.)
Elements’ Tools
Elements gives you an amazing array of tools to use when working on photos. You get almost two dozen primary tools to help select, paint on, and otherwise manipulate images, and some of these tools have as many as seven subtools. Bob Vila’s workshop probably isn’t any better stocked than Elements’ virtual toolbox!
Tip
To explore every nook and cranny of Elements, you need to open a photo (in the Editor, choose File→Open). Lots of the menus are grayed out (unavailable) if you don’t have a file open.
When you’re in Expert mode, the long, skinny strip on the left side of the Editor window is the Tools panel (Figure 1-11). It stays perfectly organized so you can always find what you want without ever having to tidy it up. The Tools panel is fixed in place—you can’t move it, resize it, or make it into a single column like you could in some previous versions of the program.

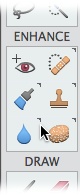
Many of the icons in the Tools panel actually represent tool groups, but Adobe has chosen to play hide and seek with the subtools. Move your cursor over a section of the Tools panel, and you’ll see teeny, tiny arrows above the icons of the tools in that section that have other tools nested with them (see Figure 1-12).
When you click an icon in the Tools panel, the Tool Options area (The Photo Bin/Tool Options Area) displays settings for that tool, as well as icons for any subtools nested with that tool. If you forget what a particular icon is for, just put your cursor over it—without clicking—and a label (called a tooltip) appears telling you the tool’s name.
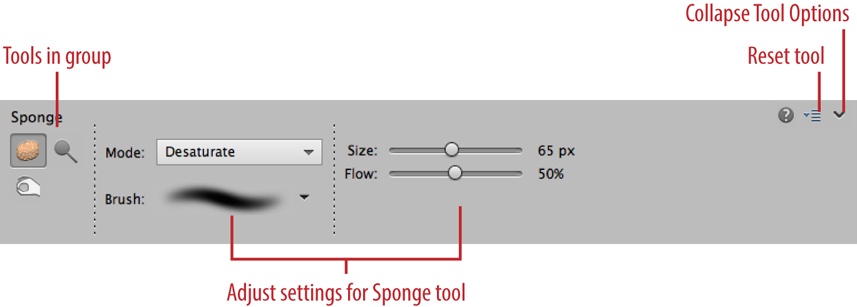
To activate a tool, click its icon in either the Tools panel (if the icon is displayed there) or in the Tool Options area (if the tool is grouped with the currently active tool). Each tool comes with its own collection of options, as shown in Figure 1-13. The Tools panel remembers the last tool you used, so if you choose to use one of the nested tools, the next time you’ll see the icon for that tool in the panel rather than the one for the tool that was there when you first started Elements. This may seem complicated, but after a while you’ll get pretty good at remembering where each tool lives.
Other windows in Elements, like Quick Fix and the Raw Converter, also have toolboxes, but none is as complete as Expert mode’s Tools panel. Don’t worry about learning the names of every tool right now. It’s easier to remember what a tool is once you’ve used it. And don’t be overwhelmed by all of Elements’ tools. You probably have a bunch of Allen wrenches in your garage that you use only every year or so. Likewise, you’ll find that you use certain Elements tools more than others.
Tip
You can save time by activating tools with their keyboard shortcuts rather than by clicking their icons, since that way you don’t have to interrupt what you’re doing to trek over to the Tools panel. To see a tool’s shortcut key, put your cursor over its icon in the Tools panel or Tool Options area, and a label pops up indicating the shortcut key (it’s the letter in parentheses to the right of the tool’s name). To activate the tool, just press the appropriate key. If the tool you want is part of a group, then all the tools in that group have the same keyboard shortcut, so just keep pressing that key to cycle through the group until you get to the tool you want.
Getting Help
Wherever Adobe found a stray corner in Elements, it stuck some help into it. You can’t move anywhere in the program without being offered some kind of guidance. Here are a few of the ways you can summon assistance if you need it:
Help menu. Choose Help→Photoshop Elements Help or press F1/⌘-?. When you do, Elements launches your web browser, which displays Elements’ Help files, where you can search or browse a topic list and glossary. The Help menu also contains links to online video tutorials and Adobe’s support forum for Elements.
Dialog box links. Many dialog boxes have a few words of bright blue text somewhere in them. (Sometimes you’ll see a question mark in a circle instead.) That text is actually a link to Elements Help. If you get confused about what the Remove Color Cast feature does, for instance, then, in the Remove Color Cast dialog box, click the blue words “Color Cast” for a reminder.
Note
When Elements is busy doing something that takes awhile, it lets you know by displaying a notice in a dark gray oval that says something like “Undo Paint Bucket” or whatever the particular task is.
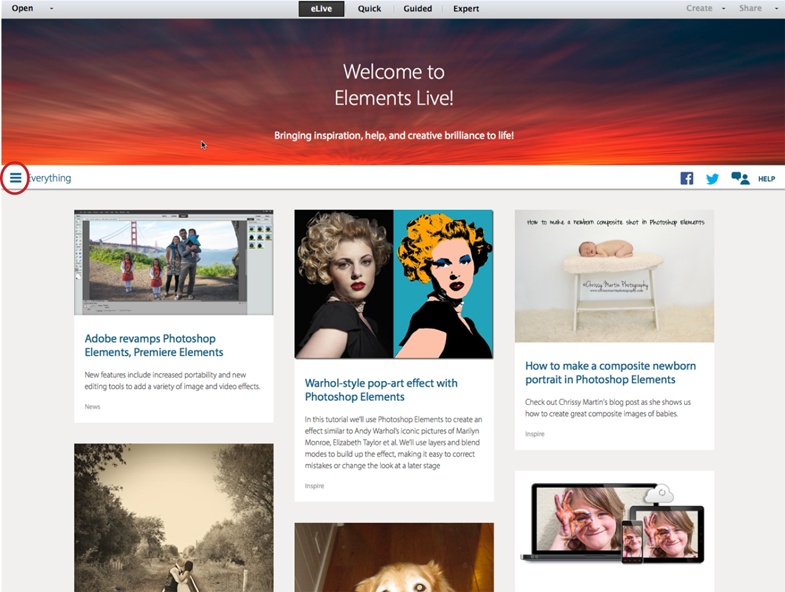
eLive
Elements Live (eLive) is a fun new section that Adobe added to both the Editor and the Organizer in Elements 13. What’s available on this tab changes constantly, and you need an Internet connection to view any of it. It’s a compilation of articles from Adobe and interesting Elements-related links from around the Internet.
Note
In most countries you see the eLive tab and Elements opens to that tab the first time you start the Editor or the Organizer. However, since what Elements Live displays is geared to your language and country, it’s not currently available in every country, especially if you use Elements in a language other than English. If eLive isn’t in your area yet, you won’t see the eLive tab at all, but one day it may spontaneously appear (without you needing to run any kind of update) when Adobe has it ready for your language.
Click this tab and you’re presented with a smorgasbord of tutorials and inspirational articles. Some of the tutorials are very basic; others are quite advanced. Figure 1-14 explains how to filter what you see so you can focus on the type of articles you want. To read an article or tutorial, just click on its card (the graphic and synopsis you see in Elements Live). Elements opens your web browser and takes you to the page you chose. There’s also a button on the right side of the screen that you can click to connect to Adobe support. There are contests and links to interesting material on other sites, like Pinterest.
When Adobe updates the contents of Elements Live, a little red number appears on the eLive tab, showing how many new articles there are. When you click the tab, new cards have a New banner on them. To get rid of the number, just click over to the Everything section, a then click back to where you want to be (if you’re in the midst of something and don’t want to read anything right now). Doing this also removes the banners from the cards, so if you want to go back later, you won’t have any easy way to tell what was changed. (Updates to Elements Live don’t appear in Help→Updates. They just show up any time you open Elements with an active Internet connection.)
Guided Edit
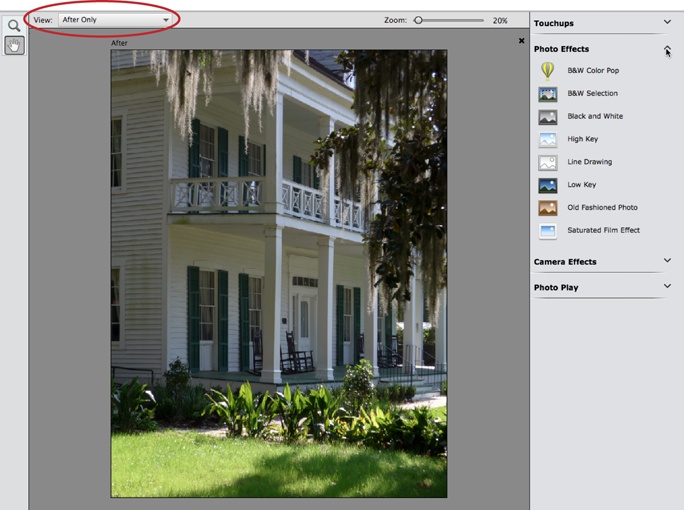
If you’re a beginner, Guided Edit (Figure 1-15) can be a big help. It walks you through a variety of popular editing tasks, like cropping, sharpening, correcting colors, and removing blemishes. It also includes some features that are useful even if you’re an old hand at Elements, like the High Key and Low Key edits (Effects). Guided Edit is really easy to use:
Go to Guided Edit.
At the top of the Editor window, click the Guided tab.
Figure 1-15. Guided Edit gives you step-by-step help with basic photo editing. Just use the tools that appear in the right-hand panel once you choose an activity. When you first open Guided Edit, all the different sections are closed. Just click the name of a section to expand it and see what you can do. When you click another section, the previous one collapses. As with Quick Fix, you can change to a Before & After view by using the View menu (circled) to select the one you want.If you already have an image open when you enter Guided Edit, then it appears in the main window automatically. If you need to open an image, click the Open button at the upper left of the window or press Ctrl+O/⌘-O and then, in the dialog box that appears, choose your photo. If you have several photos in the Photo Bin, then you can switch images by double-clicking the thumbnail of the one you want to work on. (If the Photo Bin disappears while you’re working, just click its button at the bottom left of the screen to bring it back.)
Choose what you want to do.
In the panel on the right side of the Guided Edit window, your options are grouped into major categories like Touchups and Photo Effects, with a variety of specific projects under each heading. Just click the task you want to perform, and the panel displays the relevant buttons and/or sliders for that task.
Make your adjustments.
Simply move the panel’s sliders and click its buttons till you like what you see. If you need to adjust your view of the photo while you work on it, use the Hand (The Hand Tool and Navigator Panel) and Zoom (The Zoom Tool) tools in the little toolbox at the top left of the Guided Edit window.
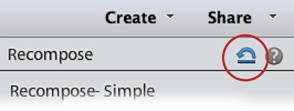
If you want to start over, click the Reset Panel icon circled in Figure 1-16. If you change your mind about the whole project, click Cancel at the bottom of the panel.
Figure 1-16. Adobe tried to make Elements easy for beginners to use, but it’s a pretty good bet that you won’t easily guess the purpose of this strange little icon, which appears in many places in Elements. This is the Reset button. In Guided Edit and Quick Fix, it’s officially called Reset Panels, which is another way of saying, “Undo everything I’ve done since I entered this window.”Click Done to finish.
Don’t forget to save your changes (Saving Your Work). If you decide you don’t like what you did, click Cancel. To close your photo, press Ctrl+W/⌘-W; or leave it open and switch to another tab to share it or use it in a project.
Tip
Guided Edit shows you quick and easy ways to change an image, but it doesn’t always get you the best possible results. It’s a great tool for starting out; just remember that what you see there isn’t necessarily the best you can make your images look. Once you’re more comfortable in Elements, Quick Fix (Chapter 4) is a good next step. You’ll find that most of the tools there will be familiar if you’ve been using Guided Edit.
Escape Routes
Elements has a couple of really wonderful features to help you avoid making permanent mistakes: the Undo command and the History panel. After you’ve gotten used to them, you’ll probably wish it were possible to use these tools in all aspects of your life, not just Elements.
Undo
No matter where you are in Elements, you can almost always change your mind about what you just did. Press Ctrl+Z/⌘-Z, and the last change you made goes away. This keystroke works even if you’ve just saved your photo, but only while the image is still open—if you close the file, your changes are permanent. Keep pressing Ctrl+Z/⌘-Z to keep undoing your work, step by step.
If you want to redo what you just undid, press Ctrl+Y/⌘-Y. These keyboard shortcuts are great for toggling changes on and off while you decide whether you want to keep them. The Undo/Redo keystrokes work in both the Organizer and the Editor.
Note
If you don’t like Ctrl+Z/⌘-Z and Ctrl+Y/⌘-Y, you have a bit of control over the key combinations you use for Undo and Redo. Go to Edit→Preferences→General/Photoshop Elements Editor→Preferences→General. In the Preferences dialog box, the Step Back/Fwd menu gives you two other choices, both of which involve pressing the Z key in combination with the Ctrl, Alt, and Shift keys in Windows, and with the ⌘, Option, and Shift keys on a Mac.
If you prefer buttons to keystrokes, you can click the Undo and Redo buttons in the bottom left of the Elements window instead. And if you want to use the keystrokes but forget what they are, they’re listed at the top of the Edit menu.
The History Panel
In the Editor’s Expert mode, you get even more control over the actions you can undo, thanks to the History panel (Figure 1-17), which you open by choosing Window→History. (In some previous versions of Elements, this feature was called the Undo History panel.)
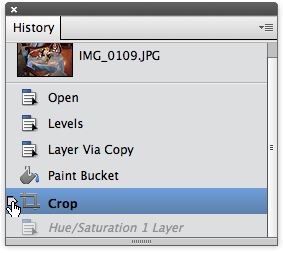
This panel holds a list of the changes you’ve made since you opened your image. Just drag the slider up and watch your changes disappear one by one. Like the Undo command, this panel works even if you’ve saved your file: As long as you haven’t closed the file, the panel tracks every action you take. You can also drag the pointer down to redo changes that you’ve undone.
Be careful, though: You can back up only as many steps as Elements is set to remember. The program is initially set up to record 50 steps, but you can change that number by going to Edit→Preferences→Performance/Photoshop Elements Editor→Preferences→Performance and adjusting the History States setting. You can set it as high as 1,000, but remembering even 100 steps may slow your computer to a crawl if it doesn’t have a superpowered processor, plenty of memory, and loads of disk space. If Elements runs slowly on your machine, then reducing the History States setting to, say, 20 may speed things up a bit.
The One Rule of Elements
As you’re beginning to see, Elements lets you work in lots of different ways. What’s more, most people who use the program approach projects in different ways; what works for your neighbor with her pictures may be quite different from how you’d work on the very same shots. But you’ll hear one suggestion from almost every Elements veteran, and it’s an important one: Never, ever work on your original. Always, always, always make a copy of your image and work on that instead.
The good news is that, if you store your photos in the Organizer, you don’t need to worry about accidentally messing up your original. If you save your files as version sets (Saving Your Work), Elements automatically creates a copy when you edit a photo that’s cataloged in the Organizer, so you can always revert to your original. Other image-management programs, like Apple’s iPhoto and Adobe’s Lightroom, also make versions for you if you set up Elements as your external editor (see Opening Stored Images).
But, as explained on Organizing Your Photos, you don’t have to use the Organizer. If you’ve decided not to use it or version sets, then follow these steps to make a copy of your image in the Editor:
Open the image you want to copy, and then go to File→Duplicate.
The Duplicate Image dialog box appears.
In the dialog box, name the duplicate, and then click OK.
Elements opens the new, duplicate image in the main image window.
Find the original image and click its Close button (the X or the red dot).
If you’re using tabs (you are unless you’ve changed the settings described on Image Windows), the Close button is on the right side of the image’s tab in Windows, and on the left side on a Mac. If you have floating windows (Image Windows), the Close button is the standard Windows or Mac Close button you’d see in any window. Once you click this button, your original image is safely tucked out of harm’s way.
Save the duplicate by pressing Ctrl+S/⌘-S.
Choose Photoshop (.psd) as the file format when you save it. (You may want to choose another format after you’ve read Chapter 3 and understand more about your different format options.)
Now you don’t have to worry about making a mistake or changing your mind, because you can always start over.
Note
Elements doesn’t have an auto-save feature, so you should get into the habit of saving frequently as you work. Mac folks, pay special attention—Elements isn’t currently able to use OS X’s Auto Save feature. Saving Your Work has more about saving.
Getting Started in a Hurry
If you’re the impatient type and you’re starting to squirm because you want to be up and doing something to your photos, here’s the quickest way to get started in Elements: Adjust an image’s brightness and color balance all in one step.
In the Editor’s Expert mode or the Quick Fix window, open a photo.
Press Ctrl+O/⌘-O, navigate to the image you want, and then click Open.
Press Alt+Ctrl+M/Option-⌘-M.
You’ve just applied Elements’ Auto Smart Fix command (Figure 1-18).
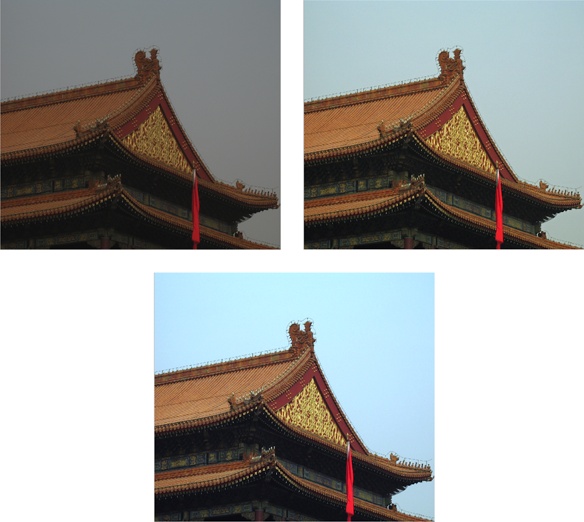
Voilà! You should see quite a difference in your photo, unless the exposure, lighting, and contrast were almost perfect before. (If you don’t like what just happened to your photo, no problem—simply press Ctrl+Z/⌘-Z to undo the changes.) The Auto Smart Fix command is one of Elements’ many easy-to-use features.
If you’re really raring to go, jump ahead to Chapter 4 to learn about using the Quick Fix commands. But it’s worth taking the time to read the next two chapters so you understand which file formats to choose and how to make some basic adjustments to images, like rotating and cropping them.
Don’t forget to give Guided Edit a try if you see what you want to do in its list of topics (Guided Edit). Guided Edit can be a big help while you’re learning your way around.