Chapter 17. Email and the Web
Printing photos is great, but it costs money, takes time, and doesn’t do much to instantly impress your faraway friends. And to many people, printing is just so 20th century. Fortunately, Elements comes packed with tools that make it easy to prep your photos for onscreen viewing and to email them in a variety of crowd-pleasing ways. (In Elements 13, emailing got a major makeover, making it easier to send photos using any email program.) This chapter explains your options.
Image Formats and the Web
Back in the Web’s early days, making graphic files small was important because most Internet connections were as slow as snails. Nowadays, file size isn’t as crucial; your main obligation when creating graphics for the Web is ensuring they’re compatible with the web browsers people use to view them. That means you’ll probably want to use either of the two most popular image formats, JPEG or GIF, though PNG is also an option:
JPEG (Joint Photographic Experts’ Group) is the most popular choice for images with lots of details, and for ones where you need smooth color transitions. Photos are almost always posted on the Web as JPEGs.
Tip
JPEGs can’t have transparent areas, although there’s a workaround for that: Fill the background around the image with the same color as the web page you want to post it on. That way, the background blends into the web page, giving the impression that the object is surrounded by transparency. See Figure 17-4 (Save for Web Format and Quality Options) for details on this trick.
GIF (Graphics Interchange Format) files are great for images with limited numbers of colors, like corporate logos and headlines. Text looks much sharper in GIF format than it does as a JPEG. And GIFs can include transparency.
PNG (Portable Network Graphic) format was created to overcome some of the disadvantages of JPEGs and GIFs. There’s a lot to like about PNG files: They can include transparent areas, and they reduce the file size of photographs without losing data, as happens with JPEG files (see About JPEGs for more about that).
Elements makes it a breeze to save images in any of these formats using the Save For Web dialog box, explained next.
Saving Images for the Web and Email
If you plan to email your photos or put them up on a website, you’ll love the Save For Web dialog box, a terrific feature that takes any open image and saves it in a web-friendly format. It also gives you lots of options to help maintain maximum image quality while keeping file size to a minimum. Save For Web aims to create as small a file as possible without compromising the image’s onscreen quality.
Save For Web creates smaller JPEG files than you can get by using the Save As command because it strips out the image’s EXIF data, the information about your camera’s settings (see Media View). To get started with Save For Web, in the Editor, go to File→“Save for Web” or press Shift+Alt+Ctrl+S/Shift-Option-⌘-S, and the dialog box in Figure 17-1 appears.
Tip
If the Save For Web dialog box isn’t big enough for you, you can make it larger by dragging its lower-right corner.
The most important point to remember when saving images for the Web is that the resolution (measured in pixels per inch, or ppi) is completely irrelevant. You only care about the image’s pixel dimensions, such as 400 x 600. If you’re working with a photo that you’ve optimized for print, you almost certainly want to downsize it; Save For Web makes that a snap.
Elements gives you lots of useful tools in the Save For Web dialog box, like the Hand and Zoom tools for adjusting the view. But the main attractions are the before and after image previews in the main image area. On the left is your original, and to its right you see what the image will look like after you save it. The file size is listed below each image preview.
Note
The Save For Web dialog box’s preview panes may sometimes be stacked one above the other rather than side by side, depending on the size of your image and its orientation.
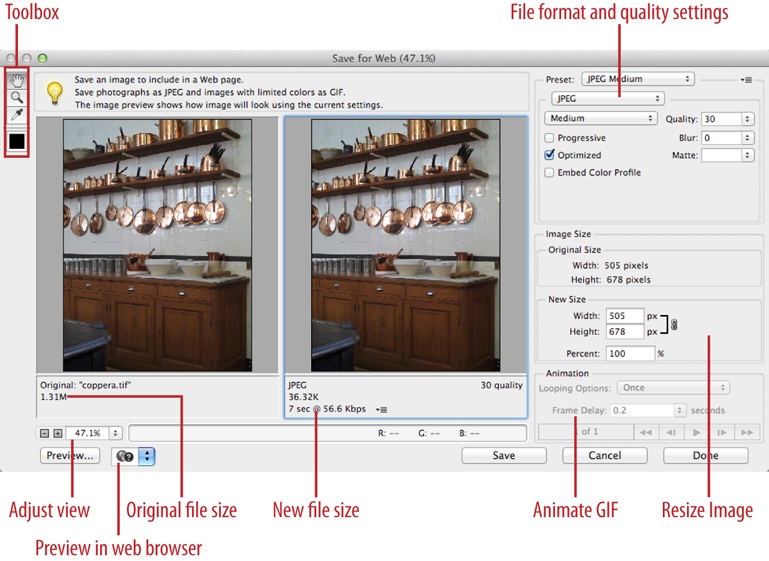
Below the left corner of the right-hand preview is an estimate of how long it will take to download the image at that size. You can adjust the download time by modifying your assumptions about your recipient’s Internet connection speed, as shown in Figure 17-2. You can also change the zoom percentage (using the Zoom menu in the dialog box’s bottom left), but you should usually stick with 100 percent because that’s the size your image will be on the Web.
The upper-right part of the dialog box has your file format and quality choices (exactly what you see there varies a bit depending on which format you’ve chosen). Below that are your options for resizing the image. If you want to create animated GIFs (those tiny moving images you see on web pages), then tweak the settings in the Animation section, which are explained on Creating Animated GIFs.
Using Save For Web
When you’re ready to use Save For Web, follow these steps:
In the Editor, open the image you want to modify.
Open the Save For Web dialog box.
Go to File→“Save for Web” or press Shift+Alt+Ctrl+S/Shift-Option-⌘-S.
Figure 17-2. Below the right-hand preview pane, the Save For Web dialog box displays an estimate of how long it’ll take to download your image. To change the download settings (for example, the speed of the Internet connection), click the four-line square (where the cursor is pointing) to call up this list and pick a different option.If you’re working with a large file, you may see a dialog box stating, “The image exceeds the size Save for Web was designed for,” along with dire-sounding warnings about slow performance and out-of-memory errors. Just click Yes to tell Elements that you want to continue anyway. If your computer has enough horsepower to run Elements 13, it won’t choke when you use Save for Web.
Choose format and quality settings for your web image.
In the dialog box’s upper right, use the Preset drop-down menu to choose a format. Your choices are explained in the following section.
If necessary, resize the image.
To make sure that anyone can see the whole image, no matter how small her monitor, in the New Size section, enter 650 pixels or less for the longest side of the photo. (650 pixels is about the largest size that fits on small monitors without scrolling. If your friends all have big, new monitors, you can go much larger, but keep in mind that people may look at your images on smartphones or tablets.) As long as the chain icon is visible to the right of the Width and Height boxes, you don’t have to enter the dimension for the other side of the photo—Elements fills it in automatically. (The icon indicates that the two dimensions are linked—get it?) If the chain icon isn’t visible (meaning the two dimensions aren’t linked), there’s a break in the line to the right of the two boxes. To relink them, just click the break in the line.
You can also resize the image by entering a percentage in the New Size section. For example, typing 90 in the Percent field shrinks your image to 90 percent of its original size. When you finish entering the new dimensions, press Enter/Return.
Note
Remember, if any of your friends have dial-up connections, it can take them a long time to download large photos. Elements helps you out by telling you the download times for various connections, as explained in Figure 17-2.
Check the results.
Look at the right-hand image’s file size again to see if the new file is small enough, and use the Hand tool in the dialog box’s left to scoot the image around in the preview area to take a close look at it. Use Elements’ file-size optimization feature (explained in Figure 17-3) if necessary. You can also preview the image in your actual web browser (see Previewing Images). There’s no Undo option in the Save For Web dialog box, but you can Alt-click/Option-click the Cancel button to change it to a Reset button.
Figure 17-3. Save For Web’s file-size optimization feature is helpful when you need to send a file someplace that puts limits on your total file size. Top: Click the four-line square in the upper right of the Save For Web dialog box, and then choose “Optimize to File Size,” as shown here. Bottom: The “Optimize to File Size” dialog box uses kilobytes as its unit of measurement. Simply enter the size you want (in kilobytes) in the Desired File Size box. Below that, picking Current Settings tells Elements to start with whatever settings you’ve entered in the main Save For Web window, like the format and quality. Choose Auto Select GIF/JPEG instead if you want Elements to decide between GIF and JPEG for you. Once you finish making your selections, click OK, and Elements shrinks the image to the size you requested.


Tip
If you want to process several photos in Save For Web with the same settings, press the Alt/Option key to change the Done button to a Remember button, and then click it. That way, the next time you open Save For Web, it’ll have your current settings preselected. (At least that’s what it’s supposed to do, although it doesn’t always work properly.) If you want Save For Web to remember your settings but you don’t actually want to save the current photo, just click Done and Save For Web should open with the same settings next time you call it up.
Save for Web Format and Quality Options
You can reduce an image’s file size by changing its length and width, as explained in step 4 above. You can also make a file smaller by adjusting its quality settings. The quality options you see in the Save For Web dialog box vary depending on which format you choose from the unlabeled menu in the dialog box’s upper right, just below the Preset menu:
JPEG. When you choose a JPEG option from the Preset menu, Elements offers you a variety of quality settings: Low, Medium, High, Very High, and Maximum. You can then fine-tune the quality by entering a number in the Quality box (not surprisingly, a higher number means higher quality). Medium is usually good enough if you’re saving the file for Web use. If you’re using Save For Web to make JPEG files for printing, then use Maximum instead.
If you turn on the Progressive checkbox, then your JPEG loads from the top down. This option was popular for large files when everyone had slow dial-up connections, but it makes for a slightly larger file, so it’s not as popular today. You can also embed a color profile in the image by turning on the checkbox to do so. (See Choosing a Color Space for more about color profiles.)
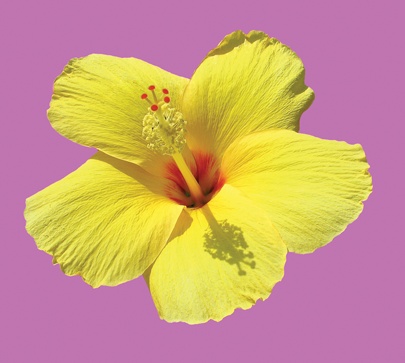
Since JPEGs can’t include transparency, the Matte menu lets you set the color of any area that’s transparent in the original (see Figure 17-4). (If you don’t pick a matte color, Elements uses white.) By choosing a color that matches the background of your web page, you can make it look like the image is surrounded by transparency. You have three ways to select a color: Click the arrow to the right of the Matte box, and then choose from the drop-down menu; use the Eyedropper tool on the left side of the Save For Web dialog box to sample a color from your image, and then choose Eyedropper Color from the Matte drop-down menu; or click the Matte box to call up the Color Picker.
Tip
Elements’ Color Picker lets you limit your choices to web-safe colors by turning on the Only Web Colors checkbox in its lower-left corner. But do you have to stick to this limited color palette for web graphics? Not really. All modern browsers can cope with a normal color range. (Getting colors to display consistently in all browsers is another kettle of fish entirely, as the next section explains.)
GIF. The fewer colors a GIF contains, the smaller its file size. Once you choose a GIF option from the dialog box’s Preset menu, you can then use the Colors box to set the number of colors, either by clicking the down arrow on the right side of the box to scroll to the number you want, or just typing it in the box.
If you want to keep transparent areas transparent, then leave the Transparency checkbox turned on. If you don’t want transparency, then choose a matte color the way you do for a JPEG (see the previous bullet point). If you turn on the Interlaced checkbox, then your image downloads in multiple passes (sort of like an image that’s slowly coming into focus). With today’s computers, interlacing isn’t as useful as it used to be on slower machines. If you’re creating a GIF that you plan to animate, turn on the Animate checkbox. (You need a layered file to make an animated GIF; Creating Animated GIFs has the details.)
Figure 17-4. When you save an image in JPEG format, the transparent areas aren’t preserved. But Elements lets you choose a matte color, which replaces the transparency. By choosing a color that’s identical to your web page’s background, you can simulate transparency. For example, the purple matte around this hibiscus blossom will blend into the purple background of the page it’s bound for.Dither is an important setting because the GIF format works by compressing and flattening large areas of colors. When you use dithering, Elements blends existing colors to make the image look like it has more colors than it actually does. For instance, Elements may mix red and blue pixels in an area to create purple. You can choose how much dither you want by entering a percentage in the Dither field. Depending on your image, you may not want any dithering; in that case, set the Dither field to 0 percent. (Dithering makes for a larger file, but in these days of large files and fast connections, the difference in size is minuscule, so you’ll usually want to use it.)
You can choose the kind of dithering Elements uses for the image itself and for any transparent areas by selecting from the menus directly above and below the Transparency checkbox, respectively, although 99 percent of the time you won’t need to bother with these settings. But if you’re interested, Diffusion, the basic setting, applies dithering in a random pattern that is the least noticeable of the choices. Pattern applies dithering in a square pattern, something like the pattern of a halftone, and Noise is something like Diffusion, except that Diffusion disperses the effect over partial adjacent pixels, while Noise restricts it to staying within pixels. The Transparency dither options affect only partially transparent pixels.
Web Snap and Lossy are both settings that let you tell Elements you want only the antique web-safe colors in your image (see the Tip on Tip). Leave both these settings set to 0—there’s no sense in making your GIF lose data.
PNG-8. This option, the more basic of your PNG choices in Elements, gives you pretty much the same options you get with GIF.
With both PNG-8 and GIF, you get advanced options for how to display colors (specifically, to have Elements generate the color lookup table, which probably doesn’t mean anything to you unless you’re a web-design maven). The menu below the file-format menu lists your options. You can safely ignore this menu (Elements chooses Selective unless you change it), but if you’re curious, here are your choices: Selective favors broad areas of color and keeps to web-safe colors; Perceptual favors colors to which the human eye is more sensitive; Adaptive samples colors from the spectrum appearing most commonly in the image; and Restrictive keeps everything within the old 216-color web palette.
PNG-24. This is the more advanced level of PNG. Technically, both PNG formats let you use transparency, but more web browsers understand transparent areas in PNG-24 files than in PNG-8 files. Your other save options for this format are the same as some of those for JPEGs.
Previewing Images
Elements gives you a few different ways to preview how an image will look in a web browser. You can start by looking at the image in any browser you have on your computer; Figure 17-5 explains how.
To add a new browser, in the Save For Web dialog box, click the button shown in Figure 17-5, and then choose Edit List. In the Browsers dialog box that appears, click the Add button and navigate to the one you want. If you want Elements to list all your browsers, click Find All. From then on, you can pick any browser in the list to make Elements launch the browser with your image in it.
Note
If you’ve used old versions of Elements, you may notice that Adobe has dropped the ability to preview using different color options like Standard Windows or Macintosh Color. That’s probably because it was never a very good approximation of what your image would look like in real life. (You need only take a stroll down the monitor aisle at your local electronics store to see what a wacky bunch of color variations are possible.) You really can’t control how other people will see your image without going to their homes and adjusting their monitors for them.

Creating Animated GIFs
With Elements, it’s easy to create animated GIFs, those little illustrations that make web pages look annoyingly jumbled or delightfully active, depending on your taste. If you’ve ever seen a strip of movie film or the cels for a cartoon, Elements creates a similar series of frames with these specialized GIFs.
Animated GIFs are made up of layers, with a separate layer for each frame. The Save For Web dialog box creates the actual animation, which you can preview in a web browser.
Note
It’s a shame that you can’t easily animate a JPEG the way you can a GIF. Most elaborate web animations involving photographs are created with Flash, which is another program altogether. (If you want to learn more about Flash, pick up a copy of Flash CS6: The Missing Manual.)
The best way to learn about animated GIFs is to create one. Here’s how to make twinkling stars:
In the Editor, set your foreground color to some shade of yellow and the background color to black.
See Choosing Colors if you need help setting these colors.
Create a new document.
Press Ctrl+N/⌘-N. In the New dialog box, set the size to 200 pixels x 200 pixels, choose RGB for the color mode, and then choose Background Color for the background contents. Finally, set the resolution to 72 ppi, and then click OK.
Activate the Custom Shape tool (The Custom Shape Tool) and choose a star shape.
In the Tool Options area, click the down arrow to the right of the Shape field to open the Shapes panel. Then click the drop-down menu at the top of the panel and select Nature. Double-click the Sun 2 shape, which is in the top row, second from the left.
Draw some stars.
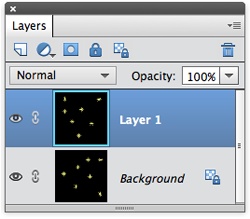
Drag to draw one yellow star, and then, in the Tool Options area, click the “Add to shape area” button (see Figure 5-4) before drawing four or five more stars. (This puts all the stars on the same layer, which is important, since that way you won’t have a bunch of layers to merge.)
Merge the star layer and the Background layer.
Choose Layer→Merge Down. You now have one layer containing yellow stars on a black background, like the bottom layer in Figure 17-6.
Choose Layer→Duplicate Layer, and then click OK. You now have two identical layers.
Rotate the top layer 90 degrees.
Go to Image→Rotate→Rotate Layer 90° Left (not Image→Rotate→90° Left—that command rotates your whole image, not just the active layer). You should now have two layers with stars in different places on each one.
Animate your GIF.
Go to File→Save For Web, and on the right side of the dialog box that appears, turn on the Animate checkbox. (If you don’t see this checkbox, make sure GIF is selected in the box below the word “Preset”; if it isn’t, select it from the drop-down menu.)
In the Animation section on the right side of the dialog box, adjust the time between frames, if you want. Leave the Looping Options field set to Forever so the animation repeats over and over (otherwise your animation plays just once and then stops).
Preview the animation.
You can use the arrows in the Animation section to step through your animation one frame at a time, but for a more realistic preview, view the image in a web browser as explained in the previous section. The stars should twinkle. (Well, OK, they flash off and on—think of twinkle lights.)
Save the animation, if you like, by clicking Save in the Save For Web dialog box.
You can reopen and edit your original files in Expert mode and see all the layers they include. However, it’s a good idea to also save them as PSD files to preserve their layers, just in case. If you make any changes, be sure to use Save For Web to reanimate it.
Emailing Photos
Elements makes emailing photos you have stored in the Organizer a piece of cake. With just a few clicks, the program preps the image(s), fires up your email program, and attaches the image(s) to an outgoing message. (Of course, you can also email images without Elements’ help by using your email program, and you may prefer that method since you get more freedom to specify settings like file size.)
Note
There’s one really annoying aspect of sending images from Elements: each message you send includes an ad for Elements.
If you’ve used a previous version of Elements, you’ll be pleased to know that, in Elements 13, you can easily email from any email program without having to hassle around with trying to get the Adobe authentication codes that plagued earlier versions. However, if you were a fan of the Windows-only Photo Mail, that’s gone now. Your email options are now the same whether you’re using Windows or a Mac.
All emailing in Elements starts from the Organizer’s Share menu. Your main choices there are:
Email Attachments. This is the most traditional option, where you send each photo as a standard attachment.
PDF Slide Show. This option creates a basic PDF-format slideshow of your images. All you have to do is name the slideshow (see PDF Slideshows).
You need to choose the kind of email you want to send before you start. To pick, click the one you want in the Organizer’s Share menu. The basic process is pretty similar for both types and is explained in detail below.
Individual Attachments
To send photos as regular email attachments, just follow these steps:
Note
All sharing starts in the Organizer. So if you don’t use the Organizer or you want to email photos that aren’t in the Organizer, just use the Attachments button in your regular mail program instead.
In the Organizer, before you email photos for the first time, tell Elements about your email program.
Go to Edit→Preferences→Email/Elements Organizer→Preferences→Email. Select the email program you want to use with Elements by clicking the New button to the right of the Email Profile drop-down menu. In the New profile dialog box that opens, if you see your email program in the Service Provider menu, select it; if not, choose Other. Give the profile a name, and then click OK.
Next, if Elements asks, enter your email address, name, and the password for your email account, and then click Validate.
If you use Microsoft Outlook in Windows or OS X Mail, Outlook, or Entourage on a Mac, you don’t need to enter this information.
If you chose Other in step 1, you may also need to provide the SMTP server information and the port to use, as well as information on the security needed. You should be able to find this information in the settings for your email program.
When you click Validate, Elements checks with your email service provider to be sure everything is OK.
In the Organizer, select some photos (this is optional), and then go to Share→Email.
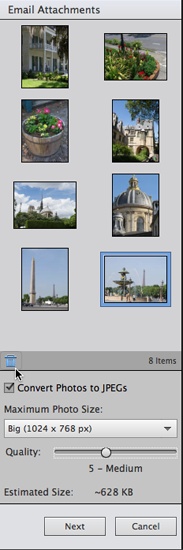
You can select photos before you start or add or change them once the Email Attachments panel appears; Figure 17-7 explains how.
Figure 17-7. The Organizer’s Email Attachments panel is pretty easy to use. You can start with one photo or a group, as shown here. To send more photos, just drag the images’ thumbnails from the Media Browser into this panel. Remove photos you don’t want by highlighting them in the panel and then clicking the little trashcan below the thumbnail area (where the cursor is here). Drag your photos in the panel to change their orderIn the Email Attachments panel, below the image thumbnails, is some info that can help you decide how many photos to send and how large to make them:
Number of Items. Indicates how many photos you’ve selected to send.
Convert Photos to JPEGs. JPEG is the best format for emailing photos, so you can turn on this checkbox to have Elements make JPEG versions of the images you’ve selected. (If the photos are already JPEGs, then this option is grayed out.) If you want to convert only some of your soon-to-be-emailed photos to JPEGs, select their thumbnails before turning on this checkbox.
Maximum Photo Size. This setting tells Elements how large you want the emailed photos to be. Remember that it can take a really long time to download a large image with a dial-up Internet connection, and many email providers have a 10 MB limit per mailbox. If you need to change the size, then use this drop-down menu to choose a new one.
Tip
Adobe recommends that you not send email attachments from Elements that are larger than 10 MB. If you try to send a larger attachment, Elements warns you about the size and suggests that you may prefer using a different sharing method, but if you’re sure it’s OK to send the big attachment, you can just click OK and continue. Most of the time, though, that’s not a good idea.
Quality. If you’re just emailing photos for viewing onscreen, then you can get away with a lower Quality setting than you can for photos that the recipient is going to print.
Below these settings, at the very bottom of the panel, is Elements’ calculation of how large the attachment will be.
Click Next, and then address the email and edit its subject and body text.
In Elements 13, you have to add your recipients to the program’s Contact Book (explained in the list below) before you can send email to them, unless you’re using Microsoft Outlook in Windows or Apple’s Mail app or Outlook or Entourage on a Mac, in which case you have the following options:
Do nothing. If you’re using Outlook (Windows or Mac), Apple Mail, or Entourage (Mac only), you don’t need to select any recipients here. Instead, you can wait until Elements is through and then type the address in the completed email before you send it. If you’re using one of these email programs and you don’t select any recipients, at the end of the email process, Elements presents you with a regular email message, ready for you to address and send.
Select Recipients. Elements keeps a Contact Book—a list of people you regularly email (or all the people you email if you aren’t using one of the email programs listed above)—so you can simply select names from the list. (The box on Elements’ Contact Book has more about this feature.) If you haven’t used Elements’ email feature before, then start by clicking the Edit Contacts button (the little silhouette just above the Select Recipients box) and entering your recipient’s contact info.
Edit Contacts. To enter a new recipient or change the information for someone in your list, click the Edit Contacts button (the silhouette), and then enter the new info in the Contact Book.
After you have the email addressed to the folks you want to share your photos with, tweak the text in the Subject and Message fields, if you like. (You’ll probably want to get rid of the Adobe advertising—just highlight it and type what you want.) If you aren’t using Outlook, Apple Mail, or Entourage for Mac, you have to select at least one recipient before you can go to the next step.
To finish, click Next.
If you are using an email program other than Outlook (Windows or Mac), Apple Mail, or Entourage, or if you’re using one of those programs but you already selected recipients, Elements sends your email. You never see the actual message, only a little window that says “Your files were shared successfully.”
If you didn’t select any recipients, Elements launches your email program, creates a new message, and attaches the files for you. You can then add recipients and edit the email in the normal way, and then send it yourself.
PDF Slideshows
You can also email a group of photos as a slideshow. Elements uses the popular PDF format, which lets your recipients page through each slide using the free, ubiquitous Adobe Reader program available from http://get.adobe.com/reader (or, on a Mac, in OS X Preview, if they prefer). They just open the PDF and view the photos one by one.
To create a slideshow from the Organizer, select the photos you want to include, and then go to Share→PDF Slide Show. In the PDF Slide Show panel that appears, Elements offers you size and quality choices, just as you have for sending photos as email attachments. Name the slideshow, click Next, and then choose recipients and enter a message, if you like, and then click Next again. Elements generates a standard email message with the slideshow attached. At this point, Elements displays a dialog box letting you know the message’s file size and approximately how long it will take your recipients to download it. As with regular attachments, pay attention to the size of the PDF that Elements has created to make sure you won’t choke your recipient’s inbox. If the size looks reasonable, click OK and Elements sends your email or pops up a message with the slideshow attached, just as with regular email (as described in the previous section).