Chapter 5. Making Selections
One of Elements’ most impressive talents is its ability to let you select part of an image and make changes to only that area. Selecting something tells Elements, “This is what I want to work on—don’t touch the rest of my image.”
You can select a whole image or any part of it. Using selections, you can fine-tune images in very sophisticated ways: Change the color of just one rose in a bouquet, for instance, or change your nephew’s festive purple hair back to something his grandparents would appreciate. Graphics pros will tell you that good selections make the difference between shoddy, amateurish work and a slick, professional job.
Elements includes a bunch of different Selection tools. You can draw a rectangular or circular selection with the Marquee tools; paint to create a selection with the Selection Brush; or just drag in your photo with the Quick Selection tool and let Elements figure out the exact boundaries of your selection. The Transform Selection command lets you resize selections in a snap, and the Refine Edge dialog box is a great help with difficult selections like hair and fur. The Content-Aware Move tool lets you move an object to a different location in your photo, while it analyzes the image to create plausible new material to fill in the hole where the object was originally. And Elements 13 gives you an interesting new tool for adjusting your selections after you’ve made them: the Refine Selection Brush, which lets you easily reshape any selection; it’s explained on Reshaping Selections.
Note
If you’ve used older versions of Elements and you’re looking for the Magic Extractor, unfortunately it’s gone now. You’ll find some workarounds on Extracting Objects.
For most selection jobs, there’s no right or wrong tool. With experience, you may find that you prefer working with certain tools more than others, and you’ll often use more than one tool to create a perfect selection. Once you’ve read this chapter, you’ll understand all of Elements’ Selection tools and how to use them.
Tip
It’s much easier to select an object that’s been photographed against a plain, contrasting background. So if you know you’re going to want to select a bicycle, for example, shoot it in front of a blank wall rather than, say, a hedge.
Selecting Everything
Sometimes you want to select a whole photo, like when you need to copy and paste it. Elements gives you some useful commands that help you make basic selections:
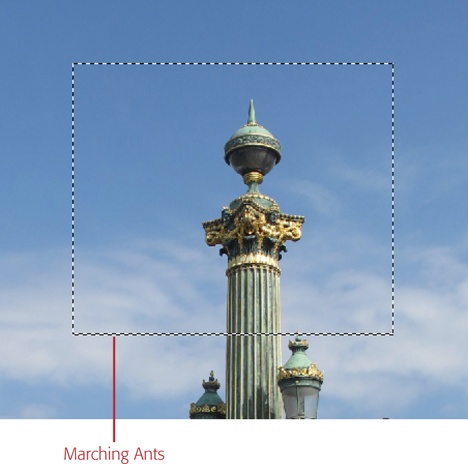
Select All (Select→All or Ctrl+A/⌘-A) tells Elements to select your whole image. You’ll see “marching ants” (Figure 5-1) around the outer edge of the picture. If you want to copy your image into another picture or program, Select All is the fastest way to go.
Note
If the photo contains layers—which you will learn about in Chapter 6—you may not be able to get everything you want with the Select All command. In that case, use Edit→Copy Merged, or press Shift+Ctrl+C/Shift-⌘-C instead.
Deselect Everything (Select→Deselect, Esc, or Ctrl+D/⌘-D) removes any current selection. Remember this keystroke combination, because you’ll probably use it a lot.
Reselect (Select→Reselect or Shift+Ctrl+D/Shift-⌘-D) tells Elements to reactivate the selection you just canceled. Use Reselect if you realize you still need a selection you just got rid of (Ctrl+Z/⌘-Z works, too).
Hide/View a Selection (Ctrl+H/⌘-H) keeps your selection active while hiding its outline. This is handy because sometimes the marching ants can be distracting or make it hard to see what you’re doing. To bring back the ants, just press Ctrl+H/⌘-H again.
Selecting Rectangular and Elliptical Areas
Selecting a whole photo is all well and good, but many times your reason for making a selection is precisely because you don’t want to make changes to the whole image. So how do you select just part of a picture?
The easiest way is to use the Marquee tools. You already met the Rectangular Marquee tool back in Chapter 3 in the section on cropping (Cropping Pictures). If you want to select a block, circle, or oval in an image, the Marquee tools are the way to go. As the winners of the Most Frequently Used Selection Tools award, they get top spot in the Select section of the Editor’s Tools panel in Expert mode. You can modify how they work, like telling them to create a square instead of a rectangle, as Figure 5-2 explains. Here’s how to use them:
Press M or click the Marquee tools’ icon in the Tools panel.
The Rectangular Marquee tool is the dotted rectangle at the upper right of the Tools panel’s Select section. (If you used the Elliptical Marquee tool last, you see a dotted oval instead.)
Choose the shape you want to draw: a rectangle or an ellipse.
At the left end of the Tool Options area, click the rectangle or the ellipse to pick a shape, or just tap the M key again to switch between the two shapes.
If you want Elements to soften the selection’s outline, in the Tool Options area, adjust the Feather slider.
Feathering makes the edges of a selection softer or fuzzier for better blending (when you’re trying, say, to replace Brad Pitt’s face with yours). The box on Feathering and Anti-Aliasing explains how feathering works.
Figure 5-2. To make a perfectly circular or square selection with the Marquee tools—rather than an elliptical or rectangular one, respectively—hold down the Shift key while you drag. After you draw a selection, you can reposition it by dragging it or tapping the arrow keys on your keyboard. You can also adjust it with Elements’ Transform Selection command, which is explained on page 173.Drag within your image to make a selection.
Wherever you initially click becomes one of the corners of your rectangular selection or a point just beyond the outer edge of your ellipse (you can also draw perfectly circular or square selections, as Figure 5-2 explains). The selection’s outline expands as you drag.
If you make a mistake, just press Esc. You can also press either Ctrl+D/⌘-D to get rid of all current selections or Ctrl+Z/⌘-Z to remove the most recent one.

The items in the Tool Options area’s Aspect drop-down menu give you three ways to control the size of your selection: Normal lets you manually control it; Fixed Ratio lets you enter proportions in the W (width) and H (height) boxes; and Fixed Size lets you enter specific dimensions in the W and H boxes. The Anti-aliasing checkbox is explained in the box on Feathering and Anti-Aliasing.
Once you’ve made a selection, you can move it around in the photo by dragging it or using the arrow keys on your keyboard to nudge it. And the Transform Selection command lets you drag a selection larger or smaller, or change its shape; Resizing Selections tells you how.
Selecting Irregularly Sized Areas
It would be nice if you could get away with making only simple rectangular and elliptical selections, but life is never that neat. If you want to change the color of one fish in your aquarium picture, for example, selecting a rectangle or an oval just isn’t going to cut it.
Thankfully, Elements gives you other tools that make it easy to create very precise selections—no matter their size or shape. In this section, you’ll learn how to use the rest of the Selection tools. But first you need to understand the basic controls that they (almost) all share.

Controlling the Selection Tools
If you never make mistakes or change your mind, you can skip this section. If, on the other hand, you’re human, you need to know about the mysterious little icons that appear in the Tool Options area when one of the Selection tools is active (see Figure 5-4).

These icons don’t look like much, but they tell the Selection tools how to do their jobs: whether to start a new selection with each click, to add to what you’ve already selected, or to remove things from the current selection. They’re available for all the Selection tools except the Selection Brush, the Quick Selection tool, and the Refine Selection Brush, which have their own sets of options. From left to right, here’s what they do:
New is the standard selection mode that you’ll probably use most of the time. When you click this icon and start a new selection, your previous selection disappears.
Add tells Elements to add what you select to whatever you’ve already selected. Unless you have an incredibly steady mouse hand, this option is a godsend because it’s not easy to get a perfect selection on the first try. (Holding down the Shift key while you use any Selection tool temporarily switches you to this mode.)
Subtract removes what you select next from any existing selection. (Holding down Alt/Option while selecting the area you want to remove does the same thing.)
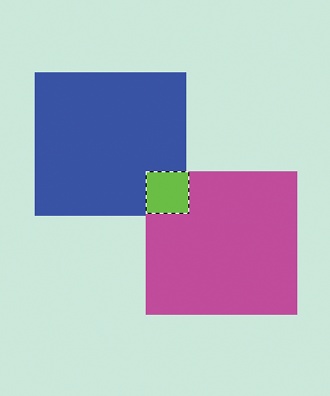
Intersect is a bit confusing. This mode lets you take a selected area, make a new selection, and wind up with only the area where the selections overlap, as Figure 5-5 shows. (The keyboard equivalent is Shift+Alt/Shift-Option.) Most people don’t need this one much, but it can be useful for things like creating special shapes. If you need a selection shaped like a quarter of a pie, for instance, create a circular selection, and then switch to “Intersect with Selection” and drag a rectangular selection from the circle’s center point. You’ll wind up with just the arc-shaped area where they intersect.
Selecting with a Brush
Elements gives you two very special brushes for making selections. The Selection Brush has been around since Elements 2, so if you’ve used the program before, you probably know how handy it is. But these days it often takes a backseat to the Quick Selection tool, which makes even the trickiest selections as easy as doodling. The Quick Selection tool automatically finds the bounds of the objects you drag it over, while the Selection Brush selects only the area directly under your cursor. Using the Quick Selection tool in combination with the Refine Edge dialog box makes it incredibly simple to create the kinds of selections that would have driven you half crazy trying to get right in old versions of Elements.
These two brushes are grouped together in the Tools panel, and they’re available in both Expert and Quick Fix modes because they’re so useful. You may well find that with these two brushes, you rarely need the other Selection tools.
It couldn’t be easier to use the Quick Selection tool:
Activate the Quick Selection tool.
It shares a slot in the Tools panel’s Select section with the Selection Brush, the Magic Wand, and the Refine Selection Brush. Click this slot or press A, and then—if one of the other tools is active instead—click the Quick Selection tool’s icon in the Tool Options area or tap the A key until you see its icon.
Drag within your photo.
As you move the cursor, Elements calculates where it thinks the selection’s edges should be, and the selection outline (the marching ants) jumps out to surround that area. It’s an amazingly good guesser. You don’t even need to cover the entire area or go around the edges of the object—Elements does that for you.
This tool has a few Tool Options settings, which are explained below, but you mostly won’t need to think about them—at least, not till you’ve finished making your selection. Then you’ll probably want to try using the Refine Edge dialog box (explained in the next section).
Adjust the selection.
Odds are that, on the first try, you won’t get a perfect selection that includes everything you wanted. To increase the selection’s area, drag over the additional area you want to add to the selection. A small move usually does it, and the selection jumps outward to include the area that Elements thinks you want, as shown in Figure 5-6.
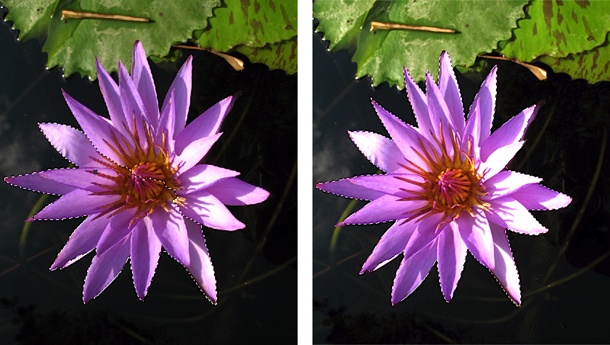
Figure 5-6. Left: It would be tough to select this water lily by hand because of the pointy petals. One drag with the Quick Selection tool produced this result. Notice how well the tool found the petals’ edges. Right: Another drag across the lily selected the whole blossom. Creating this selection took less than 5 seconds. (Elements missed a little bit on the edges in a couple of spots. Reduce the brush size and drag again to add those, or switch to the regular Selection Brush to finish up.)To remove an area from the selection, hold Alt/Option while dragging over or clicking that area.
Once you’re happy with your selection, that’s it—unless you want to tweak the edges by using Refine Edge (see the next section), and you probably do.
The Quick Selection tool has a few Tool Options settings, but you really don’t need most of them:
New, Add, Subtract. These three icons let you choose a selection mode, as described in the previous section (Controlling the Selection Tools), but you don’t need to use them. The Quick Selection tool automatically adds to your selection if you drag over an unselected area. Shift-drag to select multiple areas that aren’t contiguous, or Alt-drag/Option-drag to remove areas from your selection.
Brush Settings. You can make all kinds of adjustments to your brush by clicking this drop-down menu, although you’ll rarely need to tweak any of these except maybe the brush size once in a while. These settings are explained on Modifying Your Brush.
Refine Edge. This option lets you tweak the selection’s edges so you get more realistic results when changing the selected area or copying and pasting it. (This button is grayed out until you make a selection.) It’s also wonderful for improving selections of things like hair or fur. This feature is explained in detail in the next section.
Sample All Layers. Turn on this checkbox and the Quick Selection tool selects from all visible layers in your image, rather than just the active layer. (Chapter 6 explains all about layers.)
Auto-Enhance. This setting tells Elements to smooth out the selection’s edges. This is a more automated way to make some of the same types of edge adjustments you can make manually with Refine Edge.
Tip
Depending on what you plan to do with your selection, you may want to check out the Smart Brush tool. It works just like the Quick Selection tool, but it goes further than simply completing your selection for you; it also automatically applies the color correction or special effect you choose. See Correcting Part of an Image for more about the Smart Brushes.
The Quick Selection tool doesn’t work for every selection, but it’s a wonderful tool that’s worth trying first for any irregular selection. You can use the Refine Selection Brush (Reshaping Selections) or one of the other Selection tools to clean up afterward, if needed, but be sure to give Refine Edge a chance to see what it can do for the edges of your selection.
Refining Selection Edges
The Refine Edge dialog box is another tremendously helpful feature. In the days before Refine Edge, people used to spend a lot of money on fancy plug-ins that helped them create difficult selections and extractions, but now it’s amazingly simple to create even the toughest selection right in the Refine Edge dialog box. (If you’re used to Elements 10 or earlier, you’ll find the upgraded Refine Edge does quite a lot more than it did in your old version.)
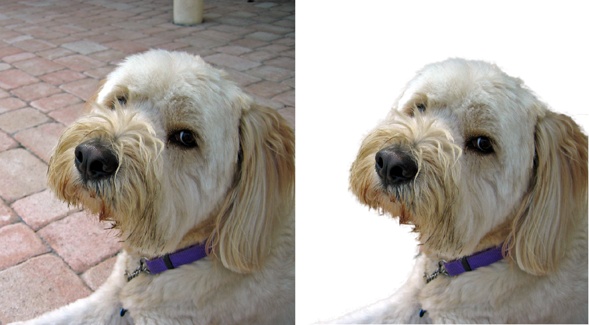
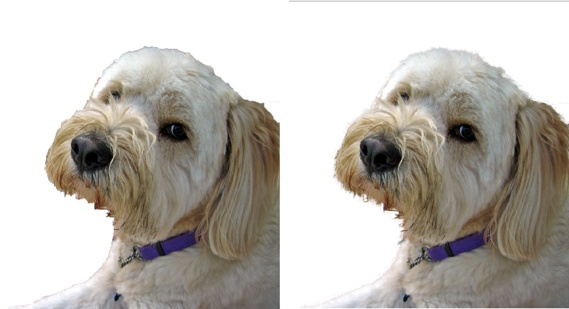
If you’ve ever tried selecting a girl with flyaway hair or a Golden Retriever, you know how hard it can be to get a selection that includes the edges of the hair or fur so that it doesn’t look obviously cut out. Cases like that are where the Refine Edge dialog box shines, as Figure 5-7 shows.
You can call up the Refine Edge dialog box in a couple of different ways. One is to click the Refine Edge button that appears in the Tool Options area when you have a Selection tool active. The other is by going to Select→Refine Edge whenever you have an active selection. Either way, here’s how to use the dialog box once it’s open:
Choose how you want to view your selection.
If Elements plops the Refine Edge dialog box right on top of your image, start by dragging the dialog box out of the way.
Once you can see your image, you can use the dialog box’s controls to decide how to view the selection. (Your many view options are explained after this step list.) Most of the time, you can leave the options in the View Mode section the way Adobe set them. There’s a two-item toolbox to the left of this section that contains your old friends the Hand and Zoom tools, which let you get a precise look at how you’re changing your selection.
Tip
If you inadvertently selected some areas that you don’t want, you’ve got a couple of options. If the unwanted area is touching the stuff you do want (for instance, the selection includes a big chunk of the floor as well as your subject), it’s best to click Cancel in the Refine Edge dialog box, edit your selection, and then open the dialog box again. But if the unwanted areas aren’t touching the stuff you want to keep, you can usually go back once you’re done with Refine Edge and use the Eraser tool (if you choose to output a selection—see step 3 of this list) or edit the layer mask (if you choose to output a masked layer) to get rid of the unwanted areas. Bottom line: Your selection doesn’t need to be absolutely perfect before you use the Refine Edge dialog box, but it’s harder to edit the selection’s edges after you’ve used Refine Edge.
Use the options in the dialog box’s Edge Detection and Adjust Edge sections to refine your selection’s edges.
These tools and sliders, which are explained after this list, let you tweak and polish the selection’s edges. It may take Refine Edge a few seconds to catch up to you when you adjust one of these settings, so go slowly and watch to see just how you’re changing the edges. It usually doesn’t take much to get any soft edges you’re trying to select. If you go too far, you may see more of the background color bleeding through, or Elements may even decide to omit some flyaway hairs or other fine details.
In the Output section, choose what kind of selection you want and where you want it to appear (in the current document or a new one) once you’re done with Refine Edge.
The Output To drop-down menu gives you six choices that are all explained below. You can even save your extracted selection to a brand-new file, if you want.
When you like what you’ve done, click OK.
If you decide not to refine your selection’s edges after all, click Cancel. To undo all the changes you’ve made in this dialog box and start over, Alt-click/Option-click the Cancel button (it turns into a Reset button).
The Refine Edge dialog box is packed with options. It may look a bit confusing at first, but like most things in Elements, it’s logically arranged. The dialog box is divided into four main sections: View Mode, Edge Detection, Adjust Edge, and Output. As in the Quick Fix window, you don’t need to use all the adjustments (only the ones you want), and generally your best bet is to start at the top and work down.
The first section, View Mode, is full of useful ways to get the best possible look at your selection. As mentioned above, you have the Hand and Zoom tools on the left, and the View menu, which gives you seven different ways to see your selection; click the View thumbnail to see your options. Each view has a keyboard shortcut that makes it easy to switch among them without using your mouse, or you can keep tapping the F key to cycle through them all:
Marching Ants (keyboard shortcut: M) shows the regular selection outline that you normally see.
Overlay (V) displays the red mask overlay you get when using the Selection Brush in Mask mode (The Selection Brush). The red area is the unselected part of your image. This view is a good way to check for holes and jagged edges.
On Black (B) shows just the selected area against a black background.
On White (W) displays your selection against a white background. In most cases, this view works well. Elements usually starts you off in this view the first time you use Refine Edge. (After that, Elements remembers which view you used last time and automatically selects it.)
Black and White (K) shows only the outline of the selection in white against a black background so you aren’t distracted by the details in your image.
On Layers (L) shows your selection against the transparency checkerboard (see Using the Organizer).
Reveal Layer (R) shows the current layer (or the whole image if you aren’t working with layers yet) with the selection outline hidden. In other words, this view shows what you would see with no selection at all.
This section also includes two checkboxes to give you even more help:
Show Radius (keyboard shortcut: J). Turn this on and you see only the outline of your selection, the part you’re adjusting with the Refine Edge dialog box. It’s helpful to turn on this setting after you’ve used the Radius slider in the Edge Detection section; doing so lets you see exactly the area that Elements is analyzing for Smart Radius (explained below).
Show Original (P). When you turn on this setting, Elements displays your original image without a visible selection. If the image isn’t layered, you’ll see the same thing you’d see in Reveal Layer view described above. This is a great way to go back and see where you started to make sure you like the effect your Refine Edge edits are having.
The next section is Edge Detection. If your selection is fine except for needing a little feathering or smoothing, you can skip this section, but for tricky selections, this is where the magic starts:
Smart Radius. Turn on this checkbox and Elements goes to work analyzing the edges of your selection to see whether they’re hard or soft, and figuring out what it needs to do to improve them. You can control the results (to some extent) by using the Radius setting below this checkbox. Figure 5-8 shows Smart Radius at work. (This setting may be turned on when you open the Refine Edge dialog box, but it doesn’t affect anything until you move the Radius slider, described next.)
Radius. This slider tells Elements how far from your original marching ants to search for potential edges. You can adjust this setting either by dragging the slider or clicking where it says 0.0 and typing a number of pixels. Increasing this setting softens the edges of your selection to some extent. So if you selected the edge of a roof or other hard object, for instance, you’d want to leave this set to 0.0 (unless the roof is thatched, maybe). The fuzzier the object you selected, the farther to the right you’ll probably want to move this slider.
There are also two special tools to the left of the Edge Detection section that can help you fine-tune your selection even more; press the E key to toggle between them:
Refine Radius. If Elements isn’t quite finding everything you want to select, then run this tool over the spots on the edge of your selection where you want the program to pay more attention. This forces Elements to refine its calculations for that region, making the selection more precise. Brushing over soft edges like hair or fur, for example, increases the amount of detail in the selection’s edges.
Erase Refinements. If, on the other hand, Elements starts taking in too much of the surrounding area when you use the Refine Radius tool, this tool acts like an eraser to tell Elements to ignore the area where you drag.
Tip
While the Refine Edge window is onscreen, you can use the Zoom tool and the keystrokes for zooming in and out (The Zoom Tool) to get as large a view as you need to see just how you’re changing the edges of your selection.
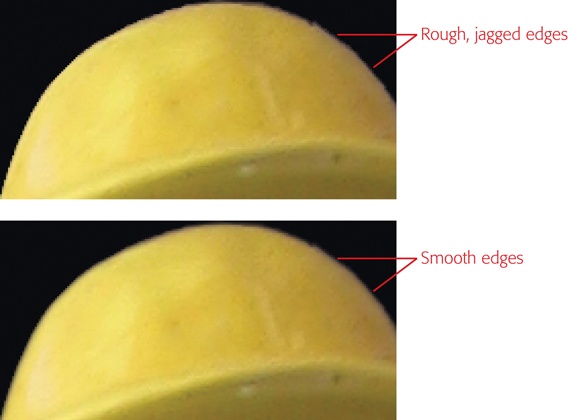
As if all those features weren’t enough, the dialog box’s Adjust Edge section gives you even more ways to tweak your selection’s outline. This section’s first two settings, Smooth and Feather, are most helpful for hard-edged selections where you don’t need the other Refine Edge tools so much. To adjust the following settings, you can either drag the slider or type a number in pixels (for Smooth and Feather) or a percentage (for Contrast and Shift Edge).
Smooth. This setting gets rid of jagged edges in your selection. Be careful: A little smoothing goes a long way. If you’ve increased the Smart Radius setting, you probably don’t want to use this option, too.
Feather. Feathering (which also softens edges) is explained in the box on Feathering and Anti-Aliasing.
Contrast. Use this slider if you find that everything you’ve done to your selection has melted away all the edge differentiation between your subject and the background, and you want to increase the contrast between your selection and the surrounding area. Usually, though, you’re better off going back to the dialog box’s Edge Detection section and adjusting your selection there.
Shift Edge. This setting adjusts the size of your selection. Move the slider left to contract the selection or right to expand it. The main use for this setting is to help when you’ve included too much of the contrasting background in your selection, although the Decontaminate Colors setting (explained next) may be able to fix that better than this slider. However, sometimes shifting the selection’s edges a bit helps the Smart Radius feature do its job better.
Finally, the Output section gives you another immensely helpful tool for tweaking the coloration of your selection’s edges: the Decontaminate Colors checkbox. After all that edge adjusting, your final selection may still include some of the background color you don’t want, like the blue shirt of the person who was holding the fuzzy duckling in your original photo. Turn on this checkbox and then use the Amount slider below it to tell Elements how much to try to replace any color fringes with nearby colors (not necessarily the colors of your selection). Move the slider right and Elements changes more pixels; move it left and Elements changes fewer. Using the View menu to switch back and forth between your current view and Reveal Layer view is a good way to monitor how the Amount slider is affecting the colors in your photo.
The Output section also lets you send your perfected selection out for use in many different ways. After all that work refining it, you’ll want to get the most use out of your exquisite selection, so the Output To menu lets you tell Elements what to do when you click OK in the Refine Edge dialog box:
Selection. If you simply want a plain ol’ selection, only a much-improved one, choose this option.
Layer Mask. If you understand layers and masks (see Chapter 6, especially Layer Masks), then select this option and Elements will turn your selection into a mask for your original layer.
New Layer. Select this option if you want to save your selected object on its own layer in your original image. Elements cuts the selection out and puts it on a transparent background in your image.
New Layer with Layer Mask. Choose this and you get a duplicate layer in your image that includes a layer mask based on the selection.
New Document. If you want to cut out your selected object to use on its own, this option creates a brand-new file containing nothing but your selection on a transparent background.
New Document with Layer Mask. Choose this option and Elements copies the entire original layer (the one that was the basis for your selection) into a new document that includes a layer mask based on the selection.
Note
If you used Decontaminate Colors, you can’t choose Selection or Layer Mask from the Output To menu—you have to choose one of the New Layer or New Document options instead. That’s because Decontaminate Colors changes the color of pixels in your image, so it does more than just change the edges of a selection. Adobe imposes this restriction to help preserve your original image.
There aren’t any particular Refine Edge settings that apply to every selection. Most of the time you’ll need to play around with several of its sliders to get the best result. But if you want the Refine Edge dialog box to always open with the same settings (you always want Smart Radius turned on, say), turn on the Remember Settings checkbox at the bottom of the dialog box. After that, the next time you launch Refine Edge, all the settings should be just the way you left them.
The Selection Brush
The Selection Brush is great for creating complex selections when you want to be totally in charge (without the help you get from the Quick Selection tool), and for cleaning up selections made with other tools, especially if you’re trying to fix holes within such a selection. You can use it on its own or as a complement to the Quick Selection tool.
The Quick Selection tool doesn’t always put the edges of your selection exactly where you want them. In contrast, the Selection Brush gives you total control because it selects only the area you drag your cursor over. You can even let go of the mouse button, and each time you drag again, Elements automatically adds to your selection; you don’t need to change modes in the Tool Options area or to hold down the Shift key, as you do with other Selection tools.
The Selection Brush also has a Mask mode, where Elements highlights what isn’t part of your selection, which is great for finding tiny spots you’ve missed and for checking the accuracy of your selection’s outline. In Mask mode, anything you paint over gets masked out; in other words, it’s protected from being selected. Masking is a little confusing at first, but you’ll soon see how useful it is. Figure 5-9 shows the same selection made with and without Mask mode.
The Selection Brush is pretty simple to use:
Click the Selection Brush’s icon in the Tools panel or press A.
You may not see the Selection Brush at first because it shares a Tools panel slot with the Quick Selection tool, the Magic Wand, and the Refine Selection Brush. If you see one of those tools’ icons instead, just click it, and then click the Selection Brush’s icon in the Tool Options area; it’s the brush that looks like it’s painting—its tip points down.
In the Tool Options area, choose either Selection mode or Mask mode and the brush size and hardness you want.
All these settings are explained after this list.
Drag over the area you want to select.
If you’re in Selection mode, the area you drag over becomes part of your selection, and Elements puts marching ants around it. If you’re in Mask mode, the area you drag over is excluded from becoming part of your selection, and Elements puts a red film over it.
The Selection Brush gives you several Tool Options choices:
Mode. This unlabeled drop-down menu is where you tell Elements whether you want to create a selection (Selection) or exclude an area from being part of a selection (Mask).
Brush thumbnail. Click the triangle to the right of this squiggly line to choose from lots of different brushes. (For more about brushes, see Picking and Using a Basic Brush.)
Size. To change the brush cursor’s size, drag this slider or click the pixel value and then type in a new one. Or you can press the close bracket key (]) to enlarge the cursor (keep tapping it until you get the size you want) or the open bracket key ([) to shrink it. You can also put your cursor over the word “Size” and scrub to the left or right to make the brush smaller or larger, respectively. (Don’t know how to scrub? For more on this nifty feature, see Locking Layers.)
Refine Edge. You can use Refine Edge to adjust the edges of your selection as explained in the previous section.
Hardness. This setting controls the sharpness of the brush cursor’s edge, which affects your selection (see Figure 5-10).

Switching between Selection and Mask mode is a good way to see how well you’ve done when you finish making a selection. In Mask mode, the areas of your image that aren’t part of the selection have a red film over them, so you can clearly see the selected area.
Tip
You don’t have to live with a red mask. To change the mask’s color, in the Tool Options area, click the color square below the Overlay slider (the Selection Brush has to be active and in Mask mode for this setting to appear). In the window that pops up, either click a color swatch or click the multicolored circle in the window’s bottom right, and then use the Color Picker to choose a different hue. You can also tweak the Overlay setting in the Tool Options area to adjust how well your image shows through the mask.
To temporarily make the Selection Brush do the opposite of what it’s been doing, hold down Alt/Option while you drag. This can save a lot of time when you’re making a tricky selection, since you don’t have to keep hopping down to the Tool Options area to change modes, and you can keep the view (either your selection or the mask) the same. For example, if you’re in Selection mode and you’ve selected too large an area, Alt-drag/Option-drag over the excess to remove it. If you’re masking out an area, Alt-drag/Option-drag to add to the selection. This may sound confusing, but it’ll make sense once you try it. Some things are easier to learn by doing.
The Magic Wand
The Magic Wand is a slightly temperamental—and occasionally highly effective—tool for selecting irregularly shaped but uniformly colored (or nearly so) regions. If there’s a big area of a particular color, the Magic Wand can find its edges with one click.
This tool isn’t actually all that magical: All it does is search for pixels with similar color values. But if it works for you, you may decide Adobe should keep “magic” in this tool’s name because, when it cooperates, it’s a great timesaver, as Figure 5-11 shows.
You’ll find the Magic Wand in the same Tools panel slot as the Quick Selection tool, the Selection Brush, and the Refine Selection Brush. Its icon is an upward-pointing wand with a yellow starburst tip. To activate it, either press the A key repeatedly or, in the Tools panel, click the icon for whichever tool from the group is visible, and then head to the Tool Options area and click the Magic Wand’s icon.
Using the Magic Wand is pretty straightforward: Just click anywhere in the area you want to select. Depending on the Wand’s tolerance setting (explained in the following list), you may nail the selection right away, or it may take several clicks to get everything. If you need to click more than once, remember to hold down Shift so that each click adds to your selection—otherwise, each click simply creates a new selection.
As mentioned above, the Magic Wand does best when you offer it a good, solid block of color that’s clearly defined and doesn’t have a lot of different shades in it. It doesn’t work well for selecting colored areas that have any shading or tonal gradations—you have to click and click and click.
Elements includes some special Tool Options settings that can help the Wand do a better job:
Tolerance controls how many shades the tool selects. A higher setting includes more shades (resulting in a larger selected area), while a lower setting gets you fewer shades (and a more precise selection). If you set the tolerance too high, you’ll probably select a lot more of your image than you want.
Sample All Layers works if you have a layered file (you’ll learn about layers in the next chapter). Turn on this checkbox to make the Magic Wand select the color in all the image’s layers. If you want it to select the color only in the active layer, then leave this setting turned off.
Contiguous makes the Magic Wand select only similarly colored areas touching one another. This checkbox is on by default, but sometimes you can save a lot of time by turning it off, as Figure 5-12 explains.
Anti-aliasing is explained in the box on Feathering and Anti-Aliasing.
The Tool Options for the Magic Wand also give you access to the Refine Edge dialog box so you can fix up the edges of your selection, as explained on Refining Selection Edges.
The big disadvantage of the Magic Wand is that it tends to leave unselected, contrasting areas around the edge of your selection that are a bit of a pain to clean up. So you may want to give the Quick Selection tool (Selecting with a Brush) a spin before trying the Magic Wand, especially if your goal is to select a range of colors. However, if you put a Magic Wand selection on its own layer (see Chapter 6), you can use Refine Edge or the Defringe command (Extracting Objects) to help clean up the edges.
The Lasso Tools
The Magic Wand is pretty handy, but it works well only when your image has clearly defined areas of color. If you want to select something from a cluttered background, the Magic Wand just won’t cut it. In cases like that, the easiest option is to draw around the object you want to select.
Enter the Lasso tool. Elements actually has three lasso tools: the Lasso, the Polygonal Lasso, and the Magnetic Lasso. Each one lets you select an object by tracing around it.
You activate the lasso tools by clicking their icon in the Tools panel’s Select section (just below the Move tool), and then selecting the particular variation you want in the Tool Options area, or by repeatedly pressing the L key till you see the right tool. Then simply drag around the outline of an object to make your selection.
The following sections cover each lasso tool in detail. All three let you apply feathering and anti-aliasing as you make a selection (see the box on Feathering and Anti-Aliasing), and the basic Lasso and Polygonal Lasso give you access to Refine Edge (Refining Selection Edges) right in their Tool Options settings.
The Basic Lasso Tool
The basic Lasso tool is useful for making rough selections that you plan to clean up later. For instance, use the Lasso to drag quickly around what you want to select, and then use the Refine Selection Brush (Reshaping Selections) to create a more refined selection.
To use this tool, simply activate it (your cursor changes to the lasso shape shown in Figure 5-13), and then click your photo and drag around the outline of what you want to select. When the end of your outline gets back around and joins up with the beginning, you’ve got a selection. (If the start and end points don’t meet up, then when you let go of your mouse, Elements connects them with a straight line.) The only settings for this tool are Feather and Anti-Aliasing, explained in the box on Feathering and Anti-Aliasing.

It’s not always easy to make an accurate selection with the Lasso, especially if you’re using a mouse. A graphics tablet (Graphics Tablets) is a big advantage when using this tool, since tablets let you draw with a pen-shaped stylus. But even if you don’t have a graphics tablet, you can make all of Elements’ tools work just fine with your mouse once you get used to their quirks.
It helps to zoom way in and go very slowly when using the Lasso. Many people use this tool to quickly select an area that roughly surrounds an object (as in Figure 5-13), and then go back with other Selection tools—like the Selection Brush or the Magnetic Lasso—to clean things up.
Tip
If you need to draw a straight line for part of your selection, hold down Alt/Option and click the points where you want the line to start and end. So if you’re selecting an arched Palladian window, for instance, once you get around the curve at the top and reach the straight side, press Alt/Option and click at the bottom of the side to get the whole side all in one go. You need to have already clicked in your image with the tool at least once before you press this key, though, or this trick won’t work.
Once you’ve created a selection, you can click the Refine Edge button in the Tool Options area to adjust and feather the edges. If you decide you don’t want your selection anymore, press Esc or Ctrl+D/⌘-D to get rid of it.
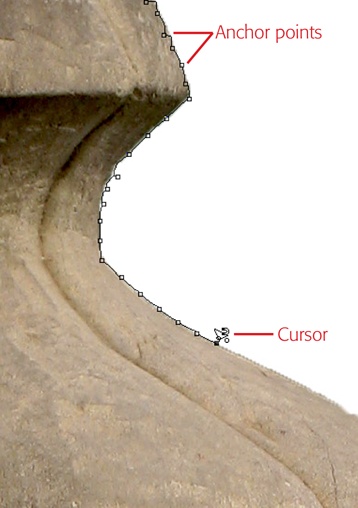
The Magnetic Lasso
The Magnetic Lasso is a very handy tool, especially if you were the kind of kid who could never color inside the lines or neatly cut out paper chains. This tool snaps to the outline of any clearly defined object you’re trying to select, so you don’t have to follow the edge exactly.
As you might guess, the Magnetic Lasso works best on objects with well-defined edges, so you won’t get much out of it if your subject is a furry animal, for instance. This tool also likes a good, strong contrast between the object and the background.
To use this tool, click to start a selection, and then move your cursor around the perimeter of what you want to select. (Just as with the basic Lasso tool, you can change the cursor’s shape by pressing the Caps Lock key.) Then double-click back where you began to finish your selection. The Tool Options settings let you adjust how many anchor points the Magnetic Lasso puts down as you move your mouse and how sensitive it is to the edge you’re tracing, as shown in Figure 5-14.
Tip
You can Ctrl-click/⌘-click at any point, and the Magnetic Lasso will immediately close up whatever area you’ve surrounded by drawing a straight line from the last anchor point to where you started.
In addition to Feather and Anti-aliasing (explained in the box on Feathering and Anti-Aliasing), the Magnetic Lasso has four other Tool Options settings:
Width tells the tool how far to look when it’s trying to find an edge. This value is in pixels; you can set it as high as 256.
Contrast controls how sharp a difference the Magnetic Lasso should look for between the object’s outline and its background. A higher number makes Elements look for sharper contrasts, and a lower number makes it look for softer ones.
Frequency controls how often Elements puts down anchor points (Figure 5-14).
Use tablet pressure to change pen width—the little icon of a pen tip to the right of the other Tool Options settings—works only if you have a graphics tablet (Graphics Tablets). When you turn this setting on, how hard you press with the stylus controls how Elements searches for the edge of objects you’re trying to select: When you bear down harder, it’s more precise (in other words, it doesn’t look as far); when you press more lightly, you can be a bit sloppier, and Elements will still find the edge.
Many people live full and satisfying lives paying no attention whatsoever to these settings, so don’t feel that you have to fuss with them. You can usually ignore them unless the Magnetic Lasso misbehaves.
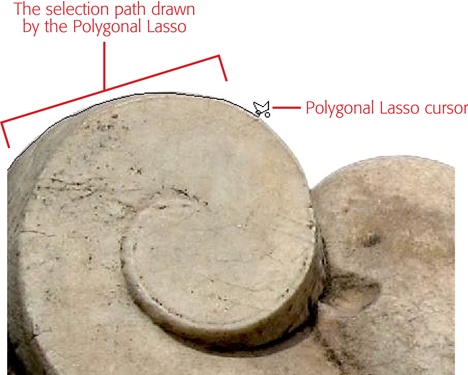
The Polygonal Lasso
At first, this may seem like a totally useless tool. It works something like the Magnetic Lasso in that it puts down anchor points (though you have to click each time you want it to add one and you don’t see the boxes for each point like you do with the Magnetic lasso [see Figure 5-14]), but it creates only perfectly straight line segments. So you may think, “That’s great if I want to select a stop sign, but otherwise, what’s the point?”
Actually, if you’re one of those people who just plain can’t draw, and you even have a hard time following the edge of an object onscreen, this is the tool for you. The trick is to move your cursor very short distances between clicks. Figure 5-15 shows the Polygonal Lasso in action.
The big advantage of this tool over the Magnetic Lasso is that it’s much easier to keep it from getting into a snarl. Your only Tool Options settings for this tool are Feather and Anti-aliasing (which are explained in the box on Feathering and Anti-Aliasing), as well as Refine Edge (Refining Selection Edges).
Extracting Objects
Ever feel the urge to pluck an object out of a photo so you can use it on its own or somewhere else? For example, say you want to take an amazing shot you got of the moon and stick it in another photo. How do you do that?
For several versions, Elements included the Magic Extractor to help you with this task, but that feature disappeared in Elements 12. But you still have plenty of options for extracting objects, beginning with the traditional method: In the Layers panel, double-click your Background layer to make it a regular layer (or you won’t get transparent areas around the object; The Background has more on this), make your selection, invert it (Changing and Moving Selections), and then delete the rest of the image.
You can also use the handy Defringe Layer command, explained in Figure 5-16, to clean up any messy contrasting pixels around the edge of the object. The new Photomerge Compose command (Combining Photos with Photomerge Compose) lets you do this, too.
Another option is to give the Refine Edge dialog box (Refining Selection Edges) first crack at extracting your object, especially if it’s got tricky edges. Refine Edge can do fancy extracting, including saving your extracted object to a masked layer or a new document, so this can also substitute for the Magic Extractor.
If you plan to use the object in another image, you can simply select it, press Ctrl+C/⌘-C to copy it, click the image where you want to put it, press Ctrl+V/⌘-V to paste it in, and then use the Move tool (The Move Tool) to precisely position the object.
Changing and Moving Selections
Now that you know all about making selections, it’s time to learn some of the finer points of using and manipulating them. Elements gives you several options for changing the areas you’ve selected and for moving objects around after you select them. You can even save a tough selection so that, if you need it again later, you don’t have to go to all the trouble of recreating it. This section has the lowdown.
Inverting Selections
One thing you often want to do with a selection is invert it. That means telling Elements, “You know the area I’ve selected? I want you to select everything except that area.” Why would you want to do that? Because sometimes it’s easier to select what you don’t want.
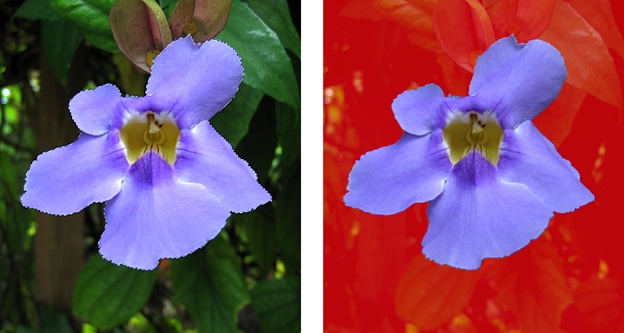
For example, suppose you have an object with a complicated outline, like the building in Figure 5-17. If you want to use just the building in a scrapbook of your trip to Europe, it’s going to be difficult to select. But the sky is just one big block of color, so it’s easy to select with the Magic Wand.
To invert a selection, simply make a selection with any tool that suits your fancy, and then go to Select→Inverse or press Shift+Ctrl+I/Shift-⌘-I. Now the part of your image that you didn’t select is selected. Easy, huh?

Resizing Selections
What if you want to tweak the size of your selection? For example, say you want to move the outline of your selection outward a few pixels to expand it. Elements gives you a really handy way to do that: the Transform Selection command.
With Transform Selection, you can easily drag any selection larger or smaller, rotate it, squish it narrower or shorter, or pull it out longer or wider (imagine smooshing a circular selection into an oval, for instance). This is really handy, as you can see in Figure 5-18.
Note
As its name implies, Transform Selection does all these things to the selection, not to the object you’ve selected. If you want to distort an object, you can do that with the Move tool (The Move Tool) or the Transform commands (Transforming Images). And if you want to make freehand changes to the shape of your selection, use the Refine Selection Brush, described in the next section.

Make a selection.
Use the Selection tool(s) of your choice. Transform Selection is especially handy when you’ve used one of the Marquee tools and didn’t get the selection quite right.
Go to Select→Transform Selection, or right-click/Control-click inside your selection and then choose Transform Selection from the shortcut menu.
Either way, a bounding box with little square handles appears around your selection, as shown in Figure 5-18. (The bounding box is rectangular even if your selection is some other shape.) The Tool Options area changes to show the settings for this feature, which are the same as those for the Transform tools (Transforming Images). Most of the time, you won’t need to worry about these settings.
Drag the bounding box’s square handles and adjust the area covered by your selection.
The different ways you can adjust a selection are explained after this list.
When you get everything just right, click the green checkmark or press Enter/Return to accept your changes.
If you mess up or change your mind about the whole thing, click Cancel (the red No symbol) or press Esc to revert to your original selection.
You can change your selection in most of the same ways you learned about back in the section on cropping (Cropping Pictures):
To make the selection wider or narrower, drag one of the side handles.
To make the selection taller or shorter, drag a top or bottom handle.
To make the selection larger or smaller, drag a corner handle. Before you start, take a quick look at the Tool Options: If you want the selection’s shape to stay exactly the same, then make sure the Constrain Proportions checkbox is turned on; if you want the shape to change (get smooshed or stretched), then turn this checkbox off.
To rotate the selection, move your cursor near a corner handle till you see the curved arrows, and then drag to spin the selection’s outline to the angle you want.
Transform Selection is a great feature, but it only expands or contracts your selection in the same ways the Transform tools can change things. In other words, you can change the selection’s width, height, and proportions, but you can’t change a star-shaped selection into a dog-shaped one, for example. (In that situation, you should simply start a new selection from scratch.) Elements gives you a number of other ways to adjust a selection’s size, which may work better for you in certain situations, although in most cases Transform Selection is probably the easiest.
But what do you do if you just want to enlarge the selection to include surrounding areas of the same color? Elements has you covered. Figuring out which of the following commands to use can be confusing because the two ways to enlarge a selection sound really similar: Grow and Expand. You may think they do the same thing, but there’s a slight, important difference between them, as Figure 5-19 shows:
Grow (Select→Grow) moves your selection outward to include more similar, contiguous colors, no matter what shape your original selection was. This command doesn’t care about shape; it just finds more matching contiguous pixels.
Expand (Select→Modify→Expand) preserves the shape of your selection and just enlarges it by the number of pixels you specify.
Similar (Select→Similar) does the same thing as Grow but looks at all the pixels in your image, not just ones adjacent to the current selection.
Contract (Select→Modify→Contract) shrinks a selection by the number of pixels you specify.

Reshaping Selections
Transform Selection is a useful feature, but it has some limitations. For example, you can’t use it to completely change the shape of your selection: If you started with a rectangular selection, you can’t curve one side of the selection. Not to worry, though. Elements 13 includes a new tool just for adjusting and cleaning up selections after you’ve made them: the Refine Selection Brush.
If you’ve ever tried to make a difficult selection, you know how time consuming it can be. The Refine Selection Brush is intended to simplify the process by making it easy to refine rough selections. This brush analyzes your photo and looks for edges within the area you brush over so that it can snap your selection to the bounds of objects in your photo. It’s a bit fiddly, but here’s how to use it:
Make a selection.
It doesn’t have to be great. Even just drawing roughly around the object you want to select with the Lasso tool may be good enough.
Activate the Refine Selection Brush and choose an editing mode for it.
It shares a Tools panel slot with the Quick Selection tool, the Selection Brush, and the Magic Wand, so click whichever of those is currently visible, or tap the A key till you see the Refine Selection Brush. Its icon is a down-pointing brush pushing a dotted line ahead of it. (Don’t confuse this with the Selection Brush, whose icon includes a dotted line arcing up from the brush.)
Next, in the Tool Options area, choose an editing mode by clicking one of the four icons to the right of the various tool icons. Each mode is explained after this list.
Use the brush to push your selection’s edges to where they should be.
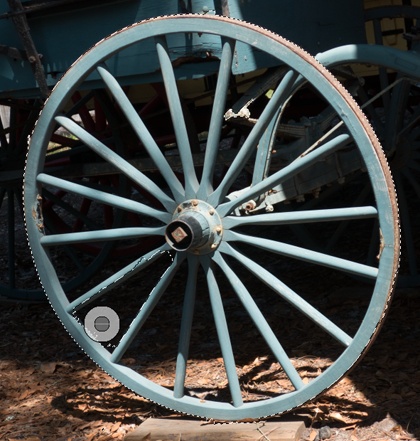
The Refine Selection Brush has a unique cursor, shown in Figure 5-20, and it’s important to choose an appropriate brush size for the area you’re working in. So use the Tool Options area’s Size slider to get the size you need.
You want a brush size that’s large enough for the cursor’s dark center to cover a good part of what you want to change, while keeping the lighter gray part of the cursor over an edge that Elements can use for reference. In situations like the area between the spokes of the wagon wheel in Figure 5-20, you may need to adjust the brush size as you go.
Once you’ve got the right brush size, just drag over the part of your selection that you want to change. The Refine Selection Brush has a few settings (described after this list) that you can adjust to the tool do a good job.
When you’re happy with your new selection outline, you’re done.
You don’t need to do anything more except use your improved selection.
The Refine Selection Brush has four little mode icons like the other Selection tools, but these are a bit different:
Add to selection. If you choose this mode, then no matter where your cursor is in your image when you drag with this tool—whether inside your existing selection or outside it—Elements adds the material you drag over to your selection.
Subtract from selection. In this mode, even if your cursor is inside the existing selection, dragging makes the Refine Selection Brush remove whatever you drag over. For instance, if you’ve selected a water tower, you can use this mode to remove the background area visible between the tower’s legs, even though that area is within your original selection.
Push. This is the mode you’ll normally use with this tool. Push mode makes the Refine Selection Brush automatically find and analyze the edges of the objects you drag over. If you move the cursor within a selected area, that area gets removed from your selection. If you drag over an area outside your selection, Elements adds that area to your selection. The Refine Selection Brush is smart enough to know where you are: Although it can be hard to see, there’s a tiny plus or minus sign in the center of the brush, depending on whether you’re adding to or subtracting from your selection.
Smooth. If your selection contains bumpy edges, this mode can smooth them out. Simply drag over the lumpy edges to make them smoother.
The most useful aspect of this brush is the way it automatically searches for edges to snap the selection to (see Free Rotate Layer for more about snapping). You can control how vigorously the Refine Selection Brush does this by adjusting the Snap Strength setting. Move the slider to the right to make the tool snap your selection only short distances, or to the left if you’d rather it snap farther. (This setting isn’t available when using the brush in Smooth mode.)
Moving Selected Areas
So far you’ve learned how to move and reshape selections themselves (the marching ants), but often you make selections because you want to move selected objects around—like putting that dreamboat who wouldn’t give you the time of day next to you in a class photo.
There are several ways to do this, even without using any special tool, but you’ll probably want to try out the Content-Aware Move tool described on The Content-Aware Move Tool. For now, here’s the simplest, tool-free way to move something from one image to another:
Select the object you want to move.
Make sure you’ve selected everything you want—it’s really annoying when you paste a selection from one image to another and then find that you missed a spot.
Press Ctrl+C/⌘-C to copy it.
You can use Ctrl+X/⌘-X if you want to cut it out of your original; just remember that, if you do that, you leave a hole behind.
Put the selected object into its new home.
If you want to dump the object into its very own document, choose File→New→“Image from Clipboard.” Doing so creates a new document with just your selection in it.
If you want to place the object into an existing photo, then use Ctrl+V/⌘-V to paste it into another image in Elements, or even into a document in another program.
Tip
You can also use Refine Edge to select, cut out, and paste your object into a new file, all in one go. Flip back to Refining Selection Edges to learn how.
Once the object is where you want it, you can use the Move tool (The Move Tool) to position it, rotate it, or scale it to fit the rest of the photo.
Tip
If you copy and paste a selection and then notice that it’s got partially transparent areas in it, back up and go over your selection with the Selection Brush using a hard brush cursor. Then copy and paste again.
The Content-Aware Move Tool
Elements includes two Move tools that you can use to arrange things in your photos. The traditional Move tool has been at the top of the Elements toolbox as long as the program has existed, and you’ll still prefer that tool in some situations, especially when working with layers, which are explained in the next chapter. But if you want to move an object from one place in your photo to another, or to duplicate objects, you definitely want to try the Content-Aware Move tool first, since it makes it super easy to get seamless, plausible results most of the time. Here’s how to use it:
Activate the Content-Aware Move tool.
Press Q or click this tool’s icon in the Tools panel (the crossed arrows in the Modify section).
Tip
Use this tool when you want to move something within a single image. If you want to move an object from one image to another, try the new Photomerge Compose feature described on Combining Photos with Photomerge Compose.
Decide whether you want to move the object or copy it.
If you want to move it from its original location, then in the Tool Options area, click the Move radio button. If you want to move a copy of the object instead, then click the Extend radio button. Figure 5-21 shows the difference.
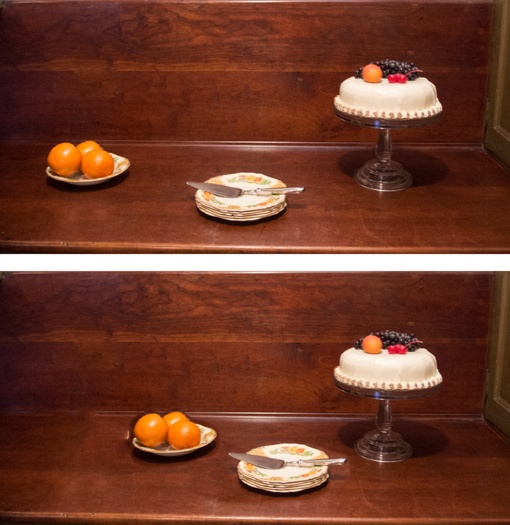
Figure 5-21. Top: Let’s say you need to use the dessert on this sideboard as an illustration. This photo is OK, but everything is pretty spread out. Bottom: With the help of the Content-Aware Move tool, you can bring the oranges and plates much closer to the cake. As you can see, this tool did a pretty good job, but the area to the left of the oranges still needs a bit of cleanup help. Moving the tool’s Healing slider to the left may help get rid of this problem spot. (Do this while your Content-Aware Move tool selection is still active.) If that doesn’t work, try the Clone Stamp (page 318).Click in the photo and drag to make a selection around the object you want to move.
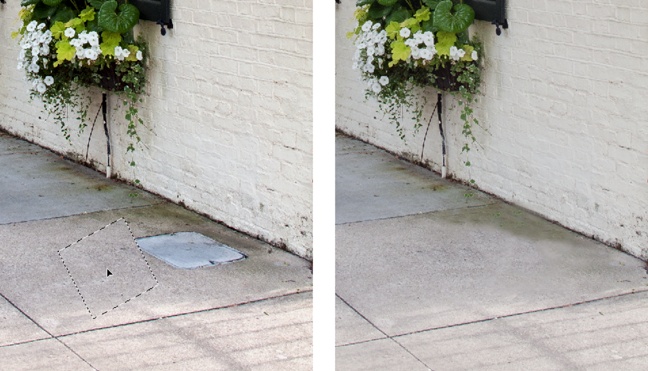
This selection doesn’t have to be very precise, but if there’s a nearby detail you really don’t want to include, try to avoid it when making your selection. For instance, if you’re moving or duplicating a flag from one spot on a roof to another, including some of the sky is no big deal, but you want to be careful around the roofline, since if you drag a piece of the roof along with the flag, it may not match the roofline in the flag’s new home.
The Tool Options area includes the usual squares for adding to and subtracting from selections (Controlling the Selection Tools), but you probably won’t need to use them much. Be aware, however, that if you create a selection with this tool and then click in your photo outside the selection, you lose the selection you had and start a new one. (Press Ctrl+Z/⌘-Z if you do this by mistake.)
Once you see the marching ants around your object, drag it to its new home.
It may take a minute to see the final result because Elements has some work to do: it analyzes the area where the object was and does its best to seamlessly blend the moved object into the new area. If you aren’t satisfied with the location, you can keep dragging the selection around as long as you see the marching ants.
If you selected the Move option in step 2 above, Elements also creates new material to fill in the area where the object used to be.
If necessary, use the Healing slider to adjust Elements’ handiwork.
The Tool Option area’s Healing slider tells Elements how much area to consider when blending the object into its new home and filling the spot where it was originally. If Elements picks up too much detail from around the object, move this slider to the left. If Elements doesn’t include enough detail from the surrounding material, move this slider to the right.
If you’re using the tool’s Move mode, as you move this slider, be sure to watch both the area around the moved object and the area where it came from. (With Extend mode, pay more attention to the object you’re moving.)
The one disadvantage to this tool is that, once you drag the object, as soon as you let go of your mouse button, your moved object merges into the photo. You don’t get an opportunity to resize it or flip the object if, for instance, you need to duplicate an eye in a damaged photo. However, there is a workaround, if you understand layers (which are explained in the next chapter): put the moved object on its own layer.
To do that, before you start using the Content-Aware Move tool, create a new layer (choose Layer→New Layer or press Shift+Ctrl+N/Shift-⌘-N). Then, activate the tool and make sure that Sample All Layers is turned on in the Tool Options area. That setting tells Elements to put the moved object on a separate layer, making it easy to grab with the regular Move tool (explained next) so that you can flip it, rotate it to a better angle, resize it, and so on. If you don’t create a new layer, once you move your object, it immediately becomes part of the existing layer, so there’s no opportunity to do anything like, say, flipping a table leg so you can replace one that’s missing.
Note
If you use this layer trick with the tool’s Extend radio button turned on, then only the moved area appears on the new layer and it’s very easy to choose that layer and make changes to it. However, if the Move radio button is turned on, then your new layer will get material from both the moved object and the stuff that Elements creates to fill the hole where the object was, so you need to be careful to select only the moved object if that’s all you want to change. Turning off the Background layer’s visibility (Managing Layers) can help you see what you’re doing.
The Move Tool
You can also move things around within a photo by using the Move tool, which lets you cut or copy selected areas. Unlike the Content-Aware Move tool, if you move an object without copying it, this tool doesn’t do anything about the hole left behind. The big advantage of the Move tool is that you can resize the object you’re moving or adjust it by using the Transform tools (Transforming Images). Figure 5-22 shows how to use the Move tool to conceal distracting details.
The Move tool lives at the top left of the Tools panel’s Select section. To use it to relocate an object, first select the object, and then:
Activate the Move tool.
Click the Move tool’s icon or press V. Your selection stays active but is now surrounded by a rectangle with square handles on it.
Move the selection as described after this list and then, when you’re satisfied with its position, press Enter/Return.
As long as the selection is active, you can work on your photo in other ways and then come back and reactivate the Move tool. (If you’re worried about losing a complex selection, save it as described in the next section.)
If you’re not happy with what you’ve done, just press Ctrl+Z/⌘-Z as many times as needed to back up and start over again.
You can move a selection in several different ways:
Move it. If you simply move a selection by dragging it, you leave a hole in the image where the selection was, because the Move tool truly moves the selection. So unless you have something under it that you want to show through, this probably isn’t what you want to do.
Move a copy. If you press the Alt/Option key as you drag with the Move tool, you’ll copy the selection so the original stays where it is. But now you have a duplicate to move around and play with, as shown in Figure 5-22, left.
Resize it. You can drag the square handles that the Move tool puts around your selection to resize or distort the selected material, which is great when you need to change the size of your selection. The Move tool lets you do the same things as Free Transform (see Free Transform).
Rotate it. You can also rotate a selection the same way you can rotate a picture by using Free Rotate (Free Rotate Layer): Just grab a corner handle and turn it.
Tip
You can save yourself a trip to the Tools panel and move selections without activating the Move tool. To move a selection without copying it, just place your cursor in the selection, hold down Ctrl/⌘, and then drag the selection. To move a copy of a selection so you don’t damage the original, do the same thing, but hold down Ctrl+Alt/⌘-Alt instead; to move multiple copies, simply repeat this process.
The Move tool is also a great way to manage and move objects that you’ve put on their own layers (Chapter 6), which is what the Tool Options area’s Arrange, Align, and Distribute sections are for. Rearranging Layers explains how to use the Move tool to arrange layered objects.
Saving Selections
You can tell Elements to remember the outline of a selection so that you can reuse it again later on. This is a wonderful, easy timesaver for particularly intricate selections. It’s also handy if the “Text on Selection” tool (Artistic Text) misbehaves, forcing you to restart Elements to get it working again; just save the selection before you quit Elements, and then reload it to pick up where you left off.
Note
Elements’ saved selections are the equivalent of Photoshop’s alpha channels. Keep that in mind if you decide to try tutorials written for Photoshop. Incidentally, alpha channels saved in Photoshop show up in Elements as saved selections, and vice versa. You can save a selection, load it again, and then save the file with the selection active to have it appear as an alpha channel in other programs that understand alpha channels, like Microsoft Word or Apple’s Pages.
To save the current selection, choose Select→Save Selection, name the selection, and then click OK. When you want to use that selection again, simply go to Select→Load Selection, and there it is waiting for you.
Tip
When you save a feathered selection and then change your mind about how much feather you want, use the Refine Edge dialog box to adjust it. You can also save a hard-edged selection, load it, and then go to Select→Feather to add a feather to it. That way, you can change the feather amount each time you use the selection, as long as you remember not to save your change to the selection.
Editing a Saved Selection
If you need to tweak a saved selection, it’s probably just as easy to start your selection over, but you can edit saved selections if you want. This can save you time if the original selection was really tricky to create.
Say you’ve got a full-length photo of somebody, and you’ve created and saved a selection of the person’s face (and named it, naturally enough, Face). Now, imagine that after applying a filter to that selection, you decide it would look silly to change only the person’s face and not his hands, too. So you want to add the hands to your saved selection.
You can do this in a couple of ways. The simplest is to load the Face selection, activate your Selection tool of choice, put the tool in “Add to Selection” mode, select the hands, and then save the selection again with the same name.
But what if you already have the hands selected and you want to add them to the existing, saved Face selection? Here’s what you’d do:
Go to Select→Save Selection.
In the Save Selection dialog box, choose Face from the Selection drop-down menu. When you do, all the radio buttons in the dialog box become active.
In the dialog box’s Operation section, choose “Add to Selection,” and then click OK.
Elements adds your current selection (the hands) to the saved Face selection and saves the whole shebang, so now the saved Face selection includes the hands, too. (Unfortunately, you can’t rename a saved selection. If it bothers you to keep the old name, just load the selection again by going to Select→Load Selection, and then save it as a new selection with a new name.)
Tip
If you find yourself frequently making changes to saved selections, you may want to consider using layer masks (Layer Masks) instead, as they’re much quicker to modify than selections.