Chapter 2. Importing, Managing, and Saving Photos
Now that you’ve had a look around Elements, it’s time to start learning how to get photos into the program and keep track of where they’re stored.
As a digital photographer, you don’t have to deal with shoeboxes stuffed with prints, but you’ve still got to face the menace of photos piling up on your hard drive. Fortunately, Elements gives you some great tools for organizing your collection and quickly finding individual pictures.
In this chapter, you’ll learn how to import photos from cameras, memory card readers, and scanners. You’ll also find out how to create new files from scratch and open files that are already on your computer. Then you’ll be ready for a quick tour of the Organizer, where you can sort and find pictures once they’re in Elements. Finally, you’ll learn about saving and backing up your precious files.
Importing from Cameras
Elements gives you lots of different ways to get photos from camera to computer, but if you use the Organizer, the simplest method is to use Adobe’s Photo Downloader. Later in this section, you’ll learn about other ways to import photos.
Note
Take a moment to carefully read the instructions from your camera’s manufacturer. If those directions conflict with anything you read here, follow the manufacturer’s instructions.
The Photo Downloader
What happens when you plug a camera or memory card reader into your computer depends on your operating system. In Windows, you get a standard Windows dialog box (shown on The Photo Downloader) asking what you want to do. To use the Photo Downloader to get your photos into Elements, choose “Organize and Edit using Adobe Photoshop Elements Organizer 13.0.”
Note
If you’re using Windows and don’t automatically see the dialog box described above when you plug your camera into your computer, then call up the Photo Downloader by heading to the Organizer and choosing File→“Get Photos and Videos”→“From Camera or Card Reader” or pressing Ctrl+G.
On a Mac, you won’t see the Downloader at all unless you specifically tell your computer to use it, which you do in the Organizer: Go to File→“Get Photos and Videos”→“From Camera or Card Reader” or press ⌘-G. (You can’t set the Mac Downloader to run automatically whenever you plug in a camera or card reader—you have to launch it manually.) If iPhoto normally opens when you connect your camera, open iPhoto, and then go to iPhoto→Preferences→General→“Connecting camera opens” and choose “No application,” so that nothing interferes with using the Downloader.
Note
Although much of this chapter talks about importing pictures from a camera, most memory card readers work the same way. Use a card reader if you have one, since doing so will spare the camera’s batteries and subject your camera to less wear and tear.
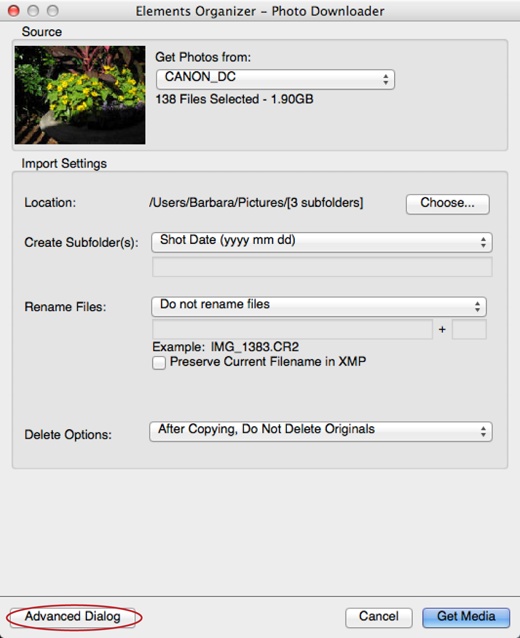
The Downloader’s job is pretty straightforward: to shepherd your photos as they make the trip from camera to computer, and to make sure Elements knows where your images are stored. Your job is to help it along by adjusting the following settings (which are on display in Figure 2-1):
Get Photos from. Your first step in downloading is to choose your camera or card reader from the list of available devices. (You may see a more generic “Camera or Card Reader” choice rather than the name of your camera; if that’s all you see, then pick that option.) Just below this menu, the Downloader lists how many photos it found and how many duplicates (of images already in the Organizer) it plans to skip, if any.
Location. Your photos usually get stored in a folder named for the date you shot them. In Windows, this folder lives in C:\Users\[your user name]\Pictures. On a Mac, it’s [your hard drive]→Users→[your user name]→Pictures. If you want to change where your photos are headed, click the Browse button (on a Mac, it’s the Choose button instead), and then pick another location. You can permanently change the standard save location by opening the Organizer and going to Edit→Preferences→“Camera or Card Reader”/Elements Organizer→Preferences→“Camera or Card Reader” and changing the Save Files In setting; from then on, the Downloader will put your photos in the folder you chose.
Figure 2-1. When the Photo Downloader first launches, you see this dialog box, which lets you choose where Elements puts the photos and what it names them (say goodbye to names like IMG_0327. JPG). To get started, choose your camera or card reader from the “Get Photos from” drop-down menu at the top of the dialog box. If you want to import only specific images, click the Advanced Dialog button (circled) so you can choose which photos to grab and fine-tune other settings.Create Subfolder(s). If you want to have more levels of organization, you can put your image files into a subfolder inside the folder you chose for the Location. Use this drop-down menu to decide what Elements uses as the subfolder’s name: today’s date, the shot date (in your choice of several different formats), or a custom name. If you don’t want to create a subfolder, choose None.
Rename Files. Here you can choose to give all the files you’re importing a custom name. If you select Custom Name from the drop-down menu and then type obedience_school_graduation in the box below it, for example, then you get photos named obedience_school_graduation_0001, obedience_school_graduation_0002, and so on. Or you can use just the shot date or today’s date, the name of the subfolder, or a combination of a custom name and the date you shot the photo. No matter which naming scheme you choose, Elements adds a four-digit number to the end of each file’s name (as in the obedience-school example above) to help you distinguish among them. You can also choose Advanced Rename to bring up a window where you can set a very complex group of parameters for naming your photos. If you leave the Rename Files field set to “Do not rename files,” then Elements keeps the filenames your camera assigned.
Preserve Current Filename in XMP. Turn this checkbox on if you want the photos’ current filenames to be stored in the photos’ metadata (Media View).
Open Organizer when Finished (Windows only). You won’t see this checkbox if the Organizer is already running when you import your photos, but it appears if the Downloader opened automatically or you launched it as described at the beginning of this section (The Photo Downloader). If you’re going to put your files in the Organizer, leave this checkbox turned on. Turn it off if you don’t use the Organizer, or if you’d rather wait until later to get organized.
Delete Options. You can have the Downloader delete your files from your camera’s memory card when it’s done importing them. Figure 2-2 explains more about this option.
Figure 2-2. The Photo Downloader can delete files from your camera or memory card reader once it’s done importing them. This feature seems handy, but think twice about using it. The Downloader is pretty reliable, but it’s always good to wait until you’ve reviewed all your photos in Elements before deleting the originals. If you really want the Downloader to delete your files, at least choose “After Copying, Verify and Delete Originals” to make Elements check that it has copied your files correctly before vaporizing the originals.Automatic Download (Windows only). This checkbox appears only after you’ve selected a device in the “Get Photos from” menu. If you like to live dangerously, you can turn on this checkbox and Elements will download any new photos it detects without showing you the Photo Downloader dialog box. It’s almost always best to leave Automatic Download off so that you have some control over what’s going on. If you decide to take this risky route, you can tell Elements where to put your photos and whether it should delete the originals by going to the Organizer and choosing Edit→Preferences→“Camera or Card Reader.”

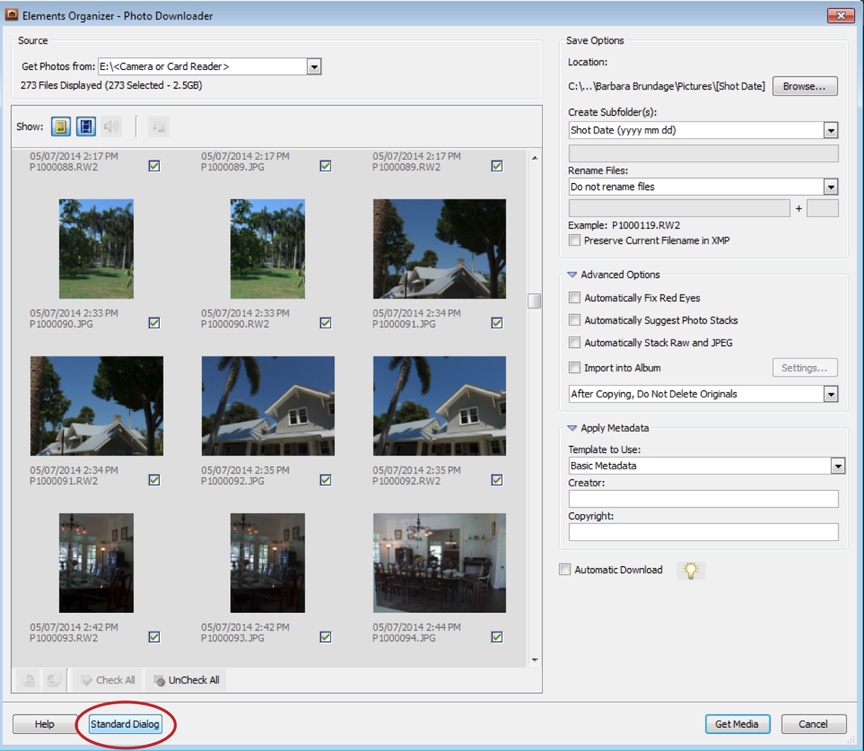
The Downloader is smart enough to recognize any photos that it has already imported, and it doesn’t reimport those. If you want to see these duplicates and for some reason download them again, or if you want to pick and choose which photos to import, then click the Advanced Dialog button at the bottom of the Downloader window to bring up the dialog box shown in Figure 2-3. (If you change your mind and want to switch back to the standard dialog box, then click the Standard Dialog button.)
Note
If your screen is less than 768 pixels tall (if you’re using a netbook, say), you won’t see the option to switch to the Advanced Downloader, since the dialog box would be too big for your screen.
The advanced dialog box gives you all the options found in the standard Photo Downloader, plus a few more. The advanced dialog box is divided into two main parts. On the left side are the thumbnails of your photos, and on the right side are a bunch of settings. The little checkmarks next to each thumbnail indicate which photos Elements plans to import; just turn off the checkboxes for the ones you don’t want to bring into the Organizer. If you plan to import only a few images, save yourself some time by clicking UnCheck All below the preview area and then just turning on the checkboxes for the ones you want. (If you’ve already imported some of the images, the Organizer tells you so and doesn’t import them again.) You can also import video and sound files.
The four buttons above the preview area (next to the word “Show”) let you choose which files you see. From left to right, here’s what these buttons do:
Show/Hide Images. If you want to temporarily hide your photos (so you can look at just your video files, for instance), click this button or press Ctrl+M/⌘-M.
Video files. This button is grayed out unless Elements finds any movie or video files on your memory card. If it does, you can hide them by clicking this button. You might do that if, say, you’re interested in importing only still photos right now. To see the video files again, just click this button.
Audio files. This button works just like the video button, but it becomes active when Elements finds audio files you may want to import.
Show Duplicates. If Elements has already imported some of the photos on your memory card and you want to see those files again, then click this button and you can reimport them (or just see them for comparison’s sake). In the preview area, the thumbnails of the files you’ve already imported display an icon that looks just like the Show Duplicates button in their upper-right corners to indicate that they’re duplicates.
Note
If you want to search for duplicates among the images already on your computer, in the Organizer, go to Find→By Visual Searches→“Duplicate photos,” or click the little magnifying glass at the top of the Organizer and choose “Duplicate Photo Search.” Unfortunately, either method just makes Elements perform a visually based search, and while it will probably find some duplicates this way, it’s also likely to find a lot of photos you don’t consider duplicates. However, you can put your cursor over a thumbnail to see the image’s name, creation date, and size, so you have more help in deciding which images are truly duplicates. To get rid of the duplicates, select them, and then click the “Remove from Catalog” button at the window’s lower left.
The right side of the advanced dialog box is where you can adjust the settings for where your pictures are stored on your computer and how their folders are named. Most of these choices are the same ones you get in the Photo Downloader’s standard dialog box (The Photo Downloader), but you also get a few extras:
Automatically Fix Red Eyes. If you turn this checkbox on, Elements searches through all your newly imported photos looking for people with red eyes (caused by camera flash) and fixes them automatically. It sounds great, but it’s not 100 percent reliable and tends to “fix” things like bright white teeth as well. Fortunately, these changes aren’t permanent, because Elements makes a version set (Saving Your Work) with your original, so you can ditch the new version if you don’t like what Elements did. But the extra time it takes for Elements to analyze all your photos and the time you’ll waste looking for mistakes mean you’re better off leaving this option turned off and using another method to fix red eyes later. See Fixing Red Eye for more about Elements’ Red Eye Removal tool. (You may find that, to keep this setting from turning itself back on again, you also need to turn off Automatically Fix Red Eyes in the Organizer by going to Edit→Preferences→“Camera or Card Reader”/Elements Organizer→Preferences→“Camera or Card Reader.”)
Automatically Suggest Photo Stacks. The Organizer lets you group related photos together into stacks. Turn on this checkbox to use the auto-stack feature, where Elements automatically finds photos that should be grouped together. This feature works best for photos taken in your camera’s burst (rapid advance) mode—in other words, photos of the same subject taken in quick succession.
Automatically Stack Raw and JPEG. Many people like to hedge their bets by setting their cameras to create both a raw file (The Sharpen Tool) and a JPEG file each time they press the shutter. If you turn on this checkbox, Elements will stack the two files together so you don’t have duplicate thumbnails in the Organizer for what is essentially the same shot.
Import into Album. Turn on this checkbox and Elements automatically adds the files you’re currently downloading to the album you choose. Click the Settings button to select an existing album or create a new one. (Flip to Albums to learn about albums.)
Apply Metadata. If you want to write your name or copyright info into the files’ metadata (Media View) so that anyone who views your files will know they’re yours, you can do that here.
Once you’re done adjusting the Downloader’s settings, click Get Media. The Downloader slurps down the photos and, in Windows, launches the Organizer (if it’s not already running) so you can review your pictures.
Tip
In Windows, you can tell the Organizer to “watch” folders that you often bring graphics—or even sound files or videos—into. (Sorry, this feature isn’t available on Macs.) For instance, you could tell Elements to watch your Pictures folder, which means the program will notice when you put new photos there. The program can then either import the new files or tell you that they’re waiting for you, depending on which option you choose. In the Organizer, go to File→Watch Folders, and in the dialog box that appears, make sure that the “Watch Folders and their Sub-Folders for new Files” checkbox is turned on. Next, click the Add button, and then browse to the folder you want Elements to watch. (If you don’t want Elements to watch a folder anymore, this is where you remove it from the watch list.)
If you want Elements to watch a folder that already contains photos in the Organizer, you can right-click the folder’s name in the Folders panel (Working with Folders) and then use the pop-out menu to tell Elements to watch it.
Opening Stored Images
If you’ve got photos already stored on your computer, you have several options for opening them with Elements. If Elements isn’t currently running but the file’s format is set to open in Elements, then simply double-click the file’s icon to launch Elements and open the image. (To change which files open in Elements automatically, see the box on Picking the File Types That Elements Opens.) You also have several ways to open files from within Elements:
From the Organizer, for files not yet in the Organizer. Go to File→“Get Photos and Videos”→“From Files and Folders” (or press Shift+Ctrl+G/Shift-⌘-G), navigate to your photos, and then select them and click Get Media. (The other options in the “Get Photos and Videos from Files and Folders” dialog box—like fixing red eye and automatically suggesting photo stacks—are covered on The Photo Downloader.) Then follow the steps in the next bullet point to open your photos in the Editor.
From the Organizer, for files already in the Organizer. You can select an image that’s in the Organizer and open it in the Editor. To do so, in the Organizer, either click the file’s thumbnail and then press Ctrl+I/⌘-I; right-click the thumbnail and choose “Edit with Photoshop Elements Editor”; or click the thumbnail and then click the Editor button at the bottom of the Organizer window. You can also Shift-click or Ctrl-click/⌘-click to select multiple photos before using any of these commands, and all the selected photos go to the Editor.
From the Editor, for files anywhere on your computer. Go to File→Open or press Ctrl+O/⌘-O and select your file(s). You can also drop a file right onto the Editor’s main window and it’ll open.
From other programs. If you use another program to manage and organize your photos—like Lightroom, Aperture, or iPhoto—it’s best to set Elements up as your external editor for that program and send your files to the Editor that way, rather than trying to use Elements’ File→Open command. There are two reasons for this: First of all, the other program may be able to create and save version sets (Saving Your Work) like the Organizer does, but it won’t be able to do that unless you send your files out for editing from within your other program. Also, the program’s library file (the data the program stores about your photos) could get corrupted if you don’t handle it exactly the way it’s meant to be used. iPhoto’s library is particularly resentful of being poked and prodded from outside the program itself.
The exact method for setting up an external editor depends on which program you’re using, but there’s typically a place to do that in the program’s preferences. In Windows, you probably get to them by going to Edit→Preferences, and on a Mac, it’s likely [Application name]→Preferences.
Note
People who are new to Elements often get confused by the message shown in Figure 2-4, which appears in the Organizer when you leave a photo open in the Editor.

Working with PDF Files
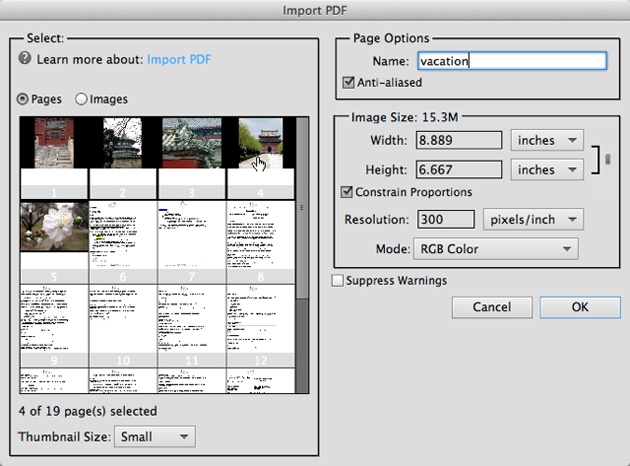
If you open a PDF file in Elements, you’ll see the Import PDF dialog box (Figure 2-5), which lets you control how Elements treats the file. You can choose to import whole pages or just the images on the pages, import multiple pages (if the PDF is more than one page long), and pick the imported files’ color mode (Selecting a Color Mode) and resolution, as well as tell Elements whether to use anti-aliasing (Controlling the Selection Tools).
Scanning Photos
Scanning is a little different in Elements 13 than it was in previous versions. You can probably still scan into Elements, but if you have a 64-bit version of Windows 7 or 8, you need to use WIA, Windows’ built-in scanning system. If you have a 32-bit version of Windows 7 or 8 instead, you can still use the older TWAIN option for scanning. (To figure out which version you’re using, go to http://support.microsoft.com/kb/827218 and scroll down to the “Automatic version detection results” section, which tells you whether you have the 32- or 64-bit version.) Macs can still use TWAIN if your scanner understands 64-bit TWAIN (not all scanners do).
In 64-bit versions of Windows, there’s nothing you need to do to prepare for scanning into Elements except to make sure your scanner driver is up to date (if you’re not sure how to do that, check with your scanner’s manufacturer). If you have a 32-bit Windows computer, you need to install the Adobe TWAIN driver by going to C:\Program Files\Adobe\Photoshop Elements 13\Optional Plug-Ins and then copying the Import-Export folder to C:\Program Files\Adobe\Photoshop Elements 13\Plug-Ins. On a Mac, go to Applications→Adobe Photoshop Elements 13→Support Files→Optional Plug-Ins, and then copy (Option-drag) the ImportModules folder from there into Applications→Adobe Photoshop Elements 13→Support Files→Plug-Ins. (It’s important to copy this folder rather than move it because if Adobe makes any “point updates” to Elements—from Elements 13 to 13.1 for example—Elements expects to find that folder in the original location.)
To control your scanner from within Elements, you can scan from the Editor and (in Windows) the Organizer. In the Editor, go to File→Import, and you’ll see your scanner’s name or WIA Support. In the Windows version of the Organizer, go to File→“Get Photos and Videos”→From Scanner, or press Ctrl+U.
Tip
If you have a 64-bit version of Windows and you don’t want to use WIA, one workaround is to use your scanner’s software and save all your scans to a folder that you have designated as a watched folder (Opening Stored Images). That way, you can easily get your scans into the Organizer.
If you have a Mac, you can also scan from Preview and then send the scan to Elements. To do that, with your scanner connected to your computer, launch Preview, and then choose File→“Import from Scanner.” You can even tell Preview to send the scan to Elements when you’re done scanning. You can also scan with Image Capture (also part of OS X). However, if you have a really old scanner, the scanning features in OS X may not acknowledge its existence, in which case you have to use the software provided by the scanner’s manufacturer.
If these methods don’t work for you or don’t offer all the features you need, you’ll need to use the software that came with your scanner. Then, once you’ve saved your scanned image in a format that Elements understands, like TIFF (.tiff, .tif) or Photoshop (.psd), open the file in Elements like you would any other photo. (File Formats Elements Understands explains which formats Elements can use.)
Tip
If you do a lot of scanning, check out the Divide Scanned Photos command (Straightening Scanned Photos), which lets you quickly scan in several photos at the same time. Also, to save yourself a lot of drudgery in Elements, make sure that both your scanner’s glass and the prints you’re scanning are as dust-free as possible before you start.
Creating a New File
You may want to create a new, blank document when you’re using Elements as a drawing program or when you’re combining parts of images, for example.
To create a new file, go to the Editor, and choose File→New→Blank File, press Ctrl+N/⌘-N, or click the Open button at the upper left of your screen and choose New Blank File. No matter which method you use, you see the New dialog box, which contains lots of settings. The Name field is self-explanatory: Simply type in a name for the file. The following sections explain all the other settings.
Tip
You can’t create a new, blank file in the Organizer, but Elements gives you a quick shortcut from the Organizer to the Editor so you can open a new file there. In the Organizer, choose File→New→Photoshop Elements Image File, and Elements sends you over to the Editor and creates a virgin file for you. If you want to create a new file based on a photo that’s in the Organizer, select the image’s thumbnail, press Ctrl+C/⌘-C to copy the image, and then choose File→New→“Image from Clipboard.” Elements switches you to the Editor, where you’ll see your copied photo awaiting you, all ready to work on.
Picking a File Size
After you type a name for your file in the New dialog box, the next thing you need to decide is how big you want the image to be. There are two ways to do this:
Start with a preset. The dialog box’s Preset drop-down menu lets you choose the general kind of document you want. If you want to create a file for printing, pick from the menu’s second group. The third group contains choices for onscreen viewing. Once you make a selection here, the next menu—Size—changes to show you suitable options for your choice. Figure 2-6 shows how this works.
Enter the numbers yourself. If you prefer, you can ignore the Preset and Size menus and just type what you want in the Width and Height boxes instead. The drop-down menus next to these boxes let you choose inches, pixels, centimeters, millimeters, points, picas, or columns as your unit of measurement.

Choosing a Resolution
If you decide not to use one of Elements’ preset sizes, you’ll need to choose a resolution for your file. You’ll learn a lot more about resolution in the next chapter (Figure 3-17), but a good rule of thumb is to go with 72 pixels per inch (ppi) for files that you’ll look at only on a monitor, and 300 ppi for files you plan to print.
Selecting a Color Mode
Elements gives you lots of color choices throughout the program, but color mode is probably the most important because it determines which tools and filters you can use on the document. Here are your options:
RGB Color. Choosing this mode (whose name stands for red, green, and blue) means that you’re creating a color document, as opposed to a black-and-white one. (Choosing a Color Space has more about color in Elements.) You’ll probably use this mode most of the time, even if you don’t plan on having color in your image, because RGB gives you access to all of Elements’ tools. That’s right: You can use RGB Color mode for black-and-white images—and many people do, since it gives you the most options for editing your photos.
Bitmap. Every pixel in a Bitmap-mode image is either black or white. Use this mode for true black-and-white images—shades of gray aren’t welcome here.
Grayscale. Black-and-white photos are technically called grayscale images because they’re actually made up of many shades of gray. In Elements, you can’t do as much editing on a grayscale photo as you can on an RGB one; for example, you can’t use some of the program’s filters on a grayscale image.
Tip
Sometimes you may need to change the color mode of an existing file to use all of Elements’ tools and filters. For example, there are quite a few things you can do only if your file is in RGB Color mode. So if you need to use a filter (Using Filters) on a black-and-white photo and the menu item you want is grayed out, go to Image→Mode→RGB Color. Don’t worry; changing the color mode won’t suddenly colorize your photo; it just changes the way Elements handles the file. (You can always change back to the original color mode when you’re done.) If you use Elements’ “Convert to Black and White” feature (Making Color Photos Black and White), you’ll still have an RGB-mode photo afterward, not a Grayscale-mode image.
If your image is in RGB and you still don’t have access to all the program’s filters, check to see if the file is 16 bit (Choosing Bit Depth). If so, you need to convert it to 8-bit color to get everything working. Make that change by choosing Image→Mode→8 Bits/Channel. You’re most likely to have 16-bit files if you import your images in raw format (The Sharpen Tool). Some scanners also let you create 16-bit files. JPEG files are always 8-bit.
Choosing a Background
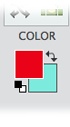
The last choice you have to make when creating a new file setting is the file’s background contents, which tells Elements what color to use for the empty areas of the file, like, well, the background. You can be a traditionalist and choose White from the New dialog box’s Background Contents menu (almost always a good choice), or select a particular color or transparency (more about transparency in a minute). To pick a color other than white, before you call up the New dialog box, use the background color square to pick the color you want, as shown in Figure 2-7; then select Background Color from the New dialog box’s Background Contents menu.
Transparent is the most interesting option. To understand transparency and why it’s such a wonderful invention, you need to know that every digital image is either square or rectangular. Digital images can’t be any other shape, but they can appear to be a different shape—sunflowers, sailboats, or German Shepherds, for example. How? By placing an object on a transparent background so that it looks like it was cut out and only its shape appears, as shown in Figure 2-8. The actual photo is still a rectangle, but if you placed it into another image, you’d see only the shell and not the surrounding area, because the rest of the photo is transparent.
To keep the clear areas transparent when you close the image, you need to save it in a format that allows transparency. JPEGs, for instance, automatically fill transparent areas with solid white, so they’re not a good choice. TIFFs, PNGs, PDFs, and Photoshop (.psd) files, on the other hand, let the transparent areas stay clear. Save for Web Format and Quality Options has more about which formats allow transparency.
Using the Organizer
The Organizer is where you keep track of your photos and start most of the projects that involve sharing images with others (like posting them online, for example). You can see thumbnails of all your photos in the Organizer, assign them keywords (called tags) to make them easier to find, and search for them in lots of different ways.
In Elements 11, Adobe gave the Organizer a substantial makeover, based on two main ideas: Most people find organizing and tagging photos something of a chore; and most people want to organize photos by the people, places, or events they contain. Elements 13 builds on the changes Adobe made in Elements 11.
To try to deal with the drudgery of organizing, Elements includes a lot of ways to use various smart features, which let Elements do a lot of the heavy lifting for you. (If you’ve used a recent version of the Organizer, its face-recognition system is one example of this, but there are other such features, too.) You’ll read about these features in the relevant sections of this book.

To help you organize your photos by people, places, or events, the Organizer is divided into sections, which Adobe calls views. When you first import your photos, they come into Media view (Figure 2-9), which is the part of the Organizer where you can see all your photos all the time. From there, you can go into one of the other three views—People, Places, or Events—to do more organizing. You move from one view to another by clicking the tabs at the top of the window. To get the most out of the Organizer, you need to understand how all the views work together. There’s also a tab for eLive, which works the same way it does in the Editor (eLive).
You can see all your tags (Creating Categories and Tags) in Media view, although sometimes you need to switch views to use some of the program’s smart features. Also, if you use Adobe Revel (see Editing Your Photos) and sign into it through the Organizer, your Revel albums and libraries appear right in Media view. Using Revel explains how to use Revel with the Organizer.
In Elements 13, you have a new way to see your photos in Media view. When you first open Elements you see only your photos, edge-to-edge, so that they fill the entire space. Figure 2-10 explains how to use this new view, which Adobe calls the Adaptive Grid. To make the side panels, visible you may need to click the icons shown in Figure 2-9. In the Adaptive Grid view, you can only see the top item in version sets (Saving Your Work) and stacks (The Photo Downloader), and it can be hard to deselect photos after you’ve selected them. Fortunately, you can also still use the old grid view (called Detail view), where your thumbnails are surrounded by gray space and you see info like the photo’s date and star rating below its thumbnail. To toggle between the two views, press Ctrl+D/⌘-D or go to View→Details. You need to be in Detail view to expand stacks and version sets to see all the images they contain. In either view, while you scroll through your photos, a black pop-up appears under your cursor so that you can see the date for that particular batch of images to help you know where you are in your catalog.

This section covers only the very basics of Elements’ organization system—there’s lots more to it than there’s room for here. Give the Organizer a good test drive to see if it works for you before you commit all your photos to it. You may hear from longtime Organizer users that they find the current incarnation of the Organizer more complicated than older versions, especially if they were used to the old setup. However, if you’re upgrading from an older version of Elements, you’ll be pleased to know that Elements 13 makes it easier than Elements 11 did to keep any organization you did in Elements 10 and earlier.
You don’t have to use the Organizer. Many people use other programs to organize their photos (Lightroom, Aperture, iPhoto, or iView MediaPro, for example), or you can just create your own filing system. If you decide the Organizer isn’t for you, see the box on Avoiding the Organizer on a PC if you use Windows or Media View if you use a Mac to learn how to work around it.
Your Catalog
The Organizer stores information about your photos in a special database called a catalog. And you aren’t limited to photos—you can store videos and audio files in the Organizer as well.

You don’t have to do anything special to create your catalog—Elements creates it automatically the first time you import photos (and creatively names it My Catalog). It’s possible to have more than one catalog, but most people don’t because you can’t search more than one catalog at a time. If for some reason you want more than one catalog, or if you ever want to start over with a new catalog, in the Organizer, go to File→Manage Catalogs, and then click the New button. Enter a name for it, and then click OK.
Your catalog can include photos stored anywhere on your computer, and even photos that you’ve moved to external hard drives and CDs or DVDs. There aren’t any limits on where you can keep your originals. That’s how it’s supposed to work, anyway. But in practice, Elements sometimes has a tough time finding files stored on network drives and other externals, so you may run into trouble if you want Elements to find photos you’ve saved on such devices. (The Mac Organizer, in particular, can’t deal with network drives at all, although it should see removable drives, like FireWire or USB drives.)
Once your photos appear in the Organizer, if you want to move them, you have to use the Organizer to do that—as opposed to using another method like Windows Explorer—otherwise, the Organizer won’t know where they are.
Tip
If you want to edit photos in programs other than Elements, the Organizer lets you do that. Just go to Edit→Preferences→Editing/Elements Organizer→Preferences→Editing, turn on the Supplementary Editing Application checkbox, and then select your preferred program. This is handy if you want to supplement Elements with a program like PaintShop Pro or Pixelmator. (If you have Photoshop installed on your computer, it’s automatically listed as an editing option.) Once you’ve chosen a supplemental editor, sending photos there is easy: Just select their thumbnails and then click the tiny arrow next to the Editor button at the bottom of the Organizer and choose External Editor.
If you decide to use a supplemental editor with the Organizer, be aware that Elements 13 doesn’t automatically update your image thumbnails when you’re through editing them. You need to do it manually by selecting the photo(s) and going to View→Refresh, or just pressing F5.
Media View
Media view (Figure 2-9) is where your photos make their first appearance in the Organizer. There’s a lot happening in this window, but it’s all laid out pretty logically.
The center of the window shows thumbnails of all your photos. On the left side of the window is a panel with two tabs (if you don’t see this panel, click the Show button at the window’s bottom left); this useful panel is visible in all the Organizer’s views, not just Media view. One tab (Albums) includes the names of any albums (Albums) you’ve made. The other tab (Folders) contains, logically enough, a list of all the folders where your Organizer photos live. You can hide this panel by clicking the Hide button at the bottom of the screen. When the panel is hidden, the button changes to say “Show”; click it again to bring the panel back.
Tip
If you want to move photos that are in the Organizer from one place on your hard drive to another, use the Folder tab, which is described starting on Working with Folders.
You can use the Sort By menu above the thumbnail area to see your photos by newest first, oldest first, name, or the batches in which you imported them. To adjust the size of the thumbnails, use the Zoom slider below the thumbnail area. You can also quickly see any image in a larger view by double-clicking its thumbnail. This enlarges the image so it’s the only one on your screen. If you want to look through multiple photos in this single-image view, navigate through them by clicking the arrows above the image area. To get back to the regular grid view of all the thumbnails, press Esc or click the Grid button at the upper left of the image area. (You can also view, organize, and edit your photos in Full Screen view, which is described on Full Screen View.)
On the right side of the Organizer window is another panel with two tabs at its top: Tags and Information. (If you don’t see this panel, click the Tags/Info button at the bottom right of the Organizer window.) If you click a photo’s thumbnail, the Information panel shows you a lot of info about that photo—so much, in fact, that the panel is divided into three sections. Click the name of a section to expand it and see the information it contains:
General. This section includes the photo’s name, caption, any notes you’ve made, any rating you’ve assigned (Albums), along with the photo’s size, date, location, and any audio associated with it.
Metadata. This section includes all the info that your camera stores in the file. Most notably, this is where you can see your image’s EXIF (Exchangeable Image Format) data, information your camera stores about your photos including the camera you used, when you took the picture, and the various camera settings like exposure, aperture setting, and so on.
There are two little buttons at the upper right of this section. Normally Elements starts you off showing the brief metadata, a short list of the most commonly used information, but if you click the right-hand button, you get the full metadata—all the info stored in the file. There’s more about metadata on Searching by Metadata.
Tip
You can easily edit your files’ metadata in the Organizer. In Media view, just select the files you want to tweak, and then click the Edit IPTC Information button that appears in the Information panel. In the window that appears, you can add or change metadata, or click the Remove IPTC Metadata button to remove it.
History. Here you can see when the file was last modified, when you imported it and from where, and the name of the volume (meaning “drive”) where it’s stored now.
At the bottom of the panel is a section labeled Image Tags, where you can see any tags currently attached to the selected image and add your own tags. If you switch over to the Tags panel by clicking its tab, you also see the hierarchy of your tags and categories (Creating Categories and Tags).
At the bottom right of the Organizer window is the Instant Fix button. Click it and Elements replaces the Tags and Information panels with the Photo Fix Options panel, which lets you apply a bunch of popular one-button edits to your photos right in the Organizer, without sending the images over to the Editor. You can crop a photo here, as well as apply Auto Contrast, Auto Red Eye, Auto Color, Auto Sharpening, Auto Levels, and Auto Smart Fix. (Chapter 4 has more about how these Auto features work.) When you use any of these fixes, the Organizer automatically creates version sets with your original photo, so it’s not altered at all. To bring the other panels back when you’re done using these instant fixes, just click the Tags/Info button at the bottom right of the Organizer window.
If some of your images came into the Organizer on their sides or upside down, you can get them upright by selecting their thumbnails and then clicking the Rotate button at the bottom of the window. This turns the photos counterclockwise; if you want to turn them the other way, click the tiny arrow on the right side of the Rotate button and then click the button that appears. You can also press Ctrl/⌘ and the right or left arrow key.
If you want to undo anything you’ve done in the Organizer, click the Undo button that’s always at the bottom left of your screen, or just use the regular Ctrl+Z/⌘-Z keystroke. If you change your mind about undoing something, click the tiny arrow to the right of the Undo button, and then click the Redo button that appears, or just press Ctrl+Y/⌘-Y.
In addition, no matter which of the Organizer’s views you’re in, you always have the option to import new files into the Organizer, start a Create project (Photo Collages), or share your photos in a variety of ways (A Few More Ways to Share). You can do all these things from the bar at the top of the Organizer window.
Working with Folders
If you decide to use the Organizer, you’re putting it in charge of keeping track of your photos. But it can’t do that if you move or delete photos from outside the Organizer; if you do, your photos become unconnected, and you have to help the Organizer reconnect them. So it’s much better to do all moving and deleting from within the Organizer, which includes the handy Folders panel that makes it easy to move photos around in a way that the Organizer can keep track of.
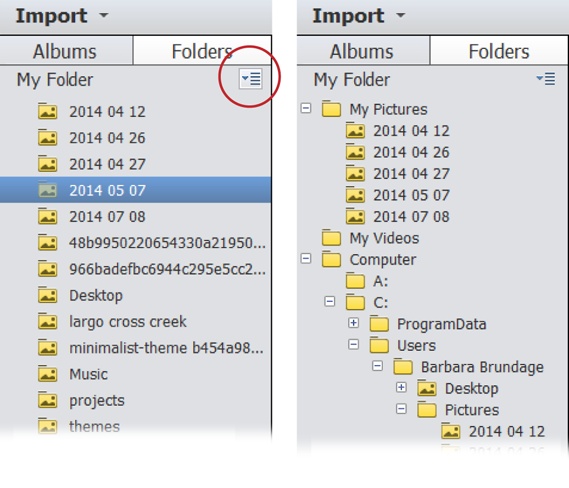
To see your folders, head to the panel on the left side of Media view and click the Folders tab. (If you don’t see this panel, click the Show button at the bottom left of the Organizer window.) This tab is a big improvement over Elements 12, which combined folders and albums into one view.
Adobe gives you two ways to see folders in the Organizer. When you first start out in the Folders panel, you just see a list of the folders containing the photos currently in the Organizer. In this simple view (which Adobe calls List view), you can move a photo by simply dragging its thumbnail from the preview area in the middle of the Organizer window onto the name of the folder you want to put it in. In List view, you can also right-click/Control-click any folder to display a pop-out menu that lets you see where it’s located in Windows Explorer or the Mac Finder, watch the folder (if you use Windows—see Opening Stored Images), rename it, delete it, or create an instant album based on it (an album of all the photos contained in that folder; Elements names the album the same thing as the folder).
That’s all well and good, but what if you want to move a photo into a folder that doesn’t yet contain any Organizer photos? Simply click the little four-line square at the upper right of the Folders panel (circled in Figure 2-11), choose “View as Tree,” and Elements displays an expanded view of the folders on your hard drive. This hierarchical view, aptly called Tree view, lets you see all the folders on your hard drive, as Figure 2-11 explains.
You can also search by folder name. To see the contents of a particular folder, just type its name in the search box at the top of the Organizer window. You can also include the folder’s name in a more complex search if you go to Find→By Details→Metadata. There’s more about searching on Searching for Photos.
Full Screen View
One of the handiest features in the Organizer is Full Screen view. Once you get your photos into the Organizer, click the Slide Show button at the bottom of the screen, (keyboard shortcut: F11/⌘-F11) or use the secret “Compare Photos Side by Side” keystroke (F12/⌘-F12) to see a larger, slideshow-like view of your photos (either singly or in pairs) so you can pick the ones you want to print or edit. You can even choose music to accompany them. Figure 2-12 shows the difference between the two views. (If you don’t want anything that elaborate, just double-click a thumbnail in Media view to see that photo enlarged to fit the available space. Double-click it again to go back to thumbnail view.)
Note
If you have a Mac with a keyboard without the 10-key pad on the right—like a laptop or the current Bluetooth keyboard—you need to add the fn key to most keystroke combinations that use the top row of the keyboard. So if you have a MacBook Pro, for example, you’d press fn-⌘-F11 for Full Screen view.

Elements also lets you apply many editing commands right in Full Screen and “Side by Side” view. Just put your cursor over the Quick Edit panel’s tab on the left side of the screen, and it pops out to give you access to all the one-button fixes available in the Editor’s Quick Fix mode (Adding Canvas). When you use these buttons, Elements automatically creates a new version (Saving Your Work) for each edited file. You can also use the stars at the top of this panel to rate your photos (Albums). The Quick Organize panel (also on the left side of the screen) lets you apply keyword tags, or put photos into albums (Albums).
Tip
The Organizer’s Quick Edit and Quick Organize panels close back up each time a new image appears onscreen. To make a panel stay open, click the tiny pushpin icon on its right edge. To get rid of a panel entirely, click its Close button (the X). To bring it back, use the controls at the bottom of the screen, which are described in detail on Full Screen View.
You can even use Full Screen view as a quick slideshow to show off your latest images—see Full Screen View to learn how. To exit Full Screen view and get back to Media view, press Esc.
Creating Categories and Tags
The Organizer has a great system for quickly finding photos, but it works only if you use special keywords, called tags, that help Elements track down your pictures. A tag can be a word, a date, or even a rating (see the box on Special Tags). When you import photos to the Organizer, they’re automatically tagged with the import date and any other tags you’ve specified in the Photo Downloader (see The Photo Downloader). But you may want to add more tags to make it easier to search for the photo’s subject later on. You can give a photo as many tags as you like.
Elements lets you group tags into categories. You get a few preset categories—like Nature, Color, and Travel—and you can create your own, as well as make subcategories. For example, you can make a Vacations category with China Trip and Cozumel as subcategories. Your photos in those categories could have tags like “Jim and Helen,” “silk factory,” and “snorkeling.”
You create some tags in Media view. These basic tags are explained here, but tagging people, places, and events works a little differently (although you can start assigning those tags right in Media view). Those tags are explained in the following sections, beginning on Tagging People.
Working with Basic Tags and Categories
As mentioned above, Elements gives you a few generic tags to help get you started, but you’ll want to create your own tags, too. After all, by the time you’ve got 5,000 or so photos in the Organizer, searching for “Family” probably isn’t going to narrow things down much. Creating a new tag is as easy as can be:
Just type it. In the Tags panel (Media View), head down to the box that contains the placeholder text “Add Custom Keywords” and start typing. At first you see a pop-up menu of all the existing tags, but if you keep typing, once Elements recognizes it as a new tag, the pop-up changes to say “Create new tag ‘[whatever you typed].’” Select the photo(s) you want to apply this new tag to, and then click Add. Elements puts tags created this way in the Other category in the upper part of the Tags panel (you may need to click the word “Keywords” to see these categories). To put it somewhere else, drag the tag’s icon to the category where it belongs.
Keyboard shortcut. When you’re in the Organizer, press Ctrl+N/⌘-N to display the Create Keyword Tag dialog box. The next paragraph explains how to use this dialog box.
Menu. At the top of the Tags panel, click the green + sign to the right of the word “Keywords,” and the Create Keyword Tag dialog box appears. (Alternatively, you can click the down arrow to the right of this + sign and choose New Keyword Tag instead; you can also create a new category or subcategory via this same menu.) Name the new tag by typing it in, and then use the drop-down menu to assign it to a category. (You can change the category later if you want.)
If you want to assign people, places, or events tags, in the Tags panel, click the green + sign to the right of the kind of tag you want to create. If you click the + sign to the right of “Places Tags,” for example, a map appears so that you can associate the photo with its location (see Tagging Places for details).
No matter which method you use, Elements automatically assigns the first photo to which you apply the tag as the tag’s icon image, but you can edit the tag’s icon, as explained in Figure 2-13. To assign the tag to a photo, simply drag the tag’s icon from the Tags panel onto the photo’s thumbnail. You can rearrange tags by dragging them to different categories in the Tags panel, and change tags to categories and categories to tags by right-clicking/Control-clicking them and choosing from the pop-up menu.
Tip
To see all the photos that have a certain tag assigned, in the Tags panel, just turn on the checkbox to the left of its name. To get back to all your photos, turn off the checkbox or click the Back button at the top of the window.
To remove a tag you’ve assigned:
From a single photo. Right-click/Control-click the photo’s thumbnail and select Remove Keyword Tag→[name of tag].
From a group of photos. Select the photos, right-click/Control-click one of them, select “Remove Keyword Tag from Selected Items,” and then choose the tag you want to remove.

Tip
In the past few versions of Elements, the Organizer has included a feature called the Auto Analyzer, which can evaluate photos and videos. In previous versions of Elements, the Auto Analyzer would evaluate your photos and assign special tags, called smart tags, for characteristics like high or low quality, in focus, and so on. Elements 13 still includes the Auto Analyzer, but now it runs only on video files, and even then only if you also have Premiere Elements installed or upload a video to Revel (Using Revel), or if you let the Organizer index your photos when it asks. If you refuse, you won’t start the Auto Analyzer (which, once it runs, will always start up each time you restart your computer), but you won’t get very good search results, either. There are no more smart tags in Elements, but if you used this feature in a previous version, smart tags created there are still available for searching, although they no longer appear in the Tags panel.
Albums
Elements lets you group photos into albums, which are great for gathering together pictures taken at a particular event. They’re also handy for preparing groups of photos that you want to use in a Create project like a slideshow or photo collage (see Chapter 15).
When you create an album, you don’t actually make a copy of all the photos included in it; you just create a group of virtual “pointers” to each image so Elements knows where to find them. That means albums can hold lots of pictures without taking up much space and, even better, you can include the same picture in different albums. Also, photos in an album can appear in any order you choose, which is important if, for instance, you’re preparing a slideshow. Albums are divided into two main sections: Local Albums, which contain photos stored on your computer, and Mobile Albums, which are for photos stored online via Adobe Revel. (Revel is explained in the next section.)
Elements gives you several ways to create albums:
From the Organizer. First, Ctrl-click/⌘-click the photos you want to include to select them. Then, go to the Albums panel (Media View) and click the green + sign. In the New Album panel that appears on the right side of the Organizer window, name your album and assign it to a category (explained in a moment) if you wish, and then click OK. Your new album joins the list of albums.
You can also make an album from files anywhere on your computer, even if they’re not in the Organizer, by heading to the Albums panel and clicking the tiny arrow to the right of the green + sign, and then selecting “Import Albums from File.”
From the Editor. In the Editor, you can create an album from the Photo Bin’s Bin Actions menu (The Panel Bin).
Note
No matter which method you use to make an album, it will appear in the lists of albums in both the Organizer and the Editor (in the Photo Bin’s Show menu).
To see the photos in an album, just click its name in the Albums panel. To return to viewing all your photos, click the Back button at the top left of the thumbnail area.
You can also create album categories, which are just what they sound like: they let you group albums into categories to make them easier to keep track of (handy if you have lots of albums). To make an album category, go to the Albums panel, click the tiny arrow to the right of the green + sign, and then choose New Album Category. Name your category, and it appears in the Albums list. To add albums to it, just drag their icons onto the category’s name. To remove an album from it, click the flippy triangle to the left of the category’s name so you can see all the albums it contains, and then right-click the album you want to remove and choose Edit. In the Edit Album panel that appears on the right side of the Organizer window, click the Category drop-down menu and choose “None (Top Level).” Then click OK at the bottom of the Edit Album panel.
You can also create subcategories within categories. To do that, in the Albums panel, click the tiny arrow to the right of the green + sign and choose New Album Category. Then name your subcategory and, in the Parent Album Category drop-down menu, choose the main category under which you want it to appear. The new category appears as a subcategory of the original one.
Note
If you’re looking for the Smart Albums feature from old editions of Elements, it’s gone, but you can achieve pretty much the same thing with saved searches (Searching by Metadata).
Using Revel
Just below the Local Albums section of the Albums panel is the Mobile Albums section. This is the Organizer’s gateway to Adobe’s Revel online service, which is a way to share your photos among all your devices, both computers and mobile devices like smartphones or tablets. (You need to have the free Adobe Revel app installed on your mobile devices; it’s available for both iOS and Android.)
Note
Everything in this section describes how Revel worked with Elements when this book was written. But since Revel is constantly changing, don’t be surprised if some things are quite different by the time you read this. Any major changes will be noted on this book’s Missing CD page at www.missingmanuals.com/cds.
When you first start the Organizer, you probably won’t see anything in this section unless you used Revel in Elements 12. You need to sign into your Revel account (or create one) before Elements can connect and display your Revel photos. This is in addition to the sign-in you did when you first installed Elements, and you don’t have to use the same Adobe ID for both sign-ins (though you can). However, only one Revel account at a time can be associated with a particular Organizer catalog.
Tip
If you have more than one Revel account and you want to switch the one you’re using in Elements, first sign out of your current Revel account. To do that, go to Edit→Preferences→Online Account/Elements Organizer→Preferences→Online Account and click Sign Out. Then, sign in again by going to File→“Sign In to Online Account” and entering the information for the account you want to use.
If you used Photoshop.com in an older version of Elements, you probably already have photos stored on the Revel servers, since Adobe moved all Photoshop.com images over to Revel in June 2013. (You should have received several emails about this, both before and during the transition.) If you used Elements 12, your Revel information should have transferred along with the rest of your catalog when you upgraded it. If you’ve never used Photoshop.com or Revel before, no problem—you can just create a new account. Revel gives you 2 GB of storage space for free. If you want more than that, you have to pay $5.99 a month.
To sign into Revel or create a new account, in the Organizer, go to File→“Sign In to Online Account.” In the window that appears, either log in with your existing Adobe ID or click “Create an Adobe ID” to make a new one.
Once you’re signed in, if you already have albums on Revel, they appear in the Albums panel’s list of Mobile Albums. Revel organizes your photos and albums into groups called libraries. You can create as many libraries as you like, but you can work with only one library at a time in the Organizer, so you see only the albums from the current library. You can delete albums from Revel via the Albums panel. This deletes only the album itself; if you want to delete the photos within the album from Revel as well, select them, and then right-click/Control-click one and choose “Remove from Revel.” To delete a library from Revel, go to Edit→Preferences→Online Account/Elements Organizer→Preferences→Online Account, click its name in the list there, and then click the – button.
You can share your photos with other Revel users, and they can share theirs with you. When someone wants to share photos with you, a window with the invitation pops up in the Organizer so you can accept or reject the invite. If you accept, the photos appear in your Mobile Albums list. To share your own album with other people, click the “Share via Adobe Revel” icon to the right of the album’s name (it looks like a rectangle with a curved arrow on it). Next, in the Album Web Share window that opens, click Start Sharing, and then enter the email address of the person you want to share with. Once you’ve shared an album, the icon changes from gray to blue, and you can see a list of all the people who have access to it (as well as the status of any invitations) by clicking the icon. To stop sharing with someone, click the X to the right of his name. Sharing a library works pretty much the same way, only libraries have an “Invite users to collaborate” icon that looks like a two-person silhouette. Click it, and then enter the email of the person with whom you want to share your library. You stop sharing the same way you do with albums: by clicking the X to the right of the name of the person you don’t want to share with anymore.
You can upload photos to Revel by adding them to a shared album or by selecting them and then going to Share→Private Web Album. To send albums from the Organizer to Revel, just drag the album in the Albums panel and, in the Mobile Albums section, drop it into the library you want. You can also drag a Mobile Album onto the Local Albums heading to move it to that section.
It’s important to know that Revel likes JPEG files best. If you send a raw file or a PSD file to Revel, it automatically creates a JPEG of the file (and in the case of the raw file, a DNG file, too, so things can get pretty cluttered after a while). If you edit the original of a file you’ve shared via Revel, Elements automatically creates a new JPEG and saves it as a version in the Organizer, and then shares that JPEG to Revel.
If you like, you can tell Elements to upload all your photos to Revel (but you probably won’t want to do this unless you have a subscription). Once you’re logged into Revel, in the Organizer, go to Edit→Preferences→Online Account/Elements Organizer→Preferences→Online Account and turn on “Automatically access all my catalog media in online account.” After that, Elements uploads all your photos to Revel and you can use them on all your computers and mobile devices. (If you do this, then the Local Albums section of the Organizer’s Albums panel disappears.)
If you want to work with photos that are only stored on Revel, you normally have just a small preview of them in the Organizer. So if you want to do something that requires a full-resolution photo—like editing or printing the image—Elements has to download it. To tell Elements to download a photo from Revel, right-click/Control-click the image’s thumbnail and choose “Download original.”
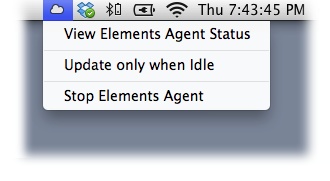
The Elements Agent is the feature that gets your photos onto the Revel servers and keeps an eye on whether there’s anything new to upload. The Agent can use a lot of your computer’s processor power, but there are few ways you can control it, as Figure 2-14 explains. You can also use the items in the menu shown in Figure 2-14 to view the status of your Revel uploads and downloads, and to tell the Organizer to stop syncing to Revel (although going to Edit→Preferences→Online Account/Elements Organizer→Preferences→Online Account and setting the Elements Agent slider to Off is a better way to do this).
Here are some basics of what you can do with Revel from the Organizer:
Add a photo to a mobile album. Just drag its thumbnail from the main Organizer window into the album you want.
Create a new mobile album. In the Albums panel, click the green + sign to the right of the Mobile Albums label to display the New Album pane on the right side of the Organizer window. Using this pane works pretty much the same way as creating a regular album (Albums), except that the album you make here automatically gets shared to Revel.
Figure 2-14. Once you’ve logged into your Revel account you see a special icon in the Notifications area at the bottom of your screen (in Windows) or in the menu bar at the top of your screen (on a Mac); the icon is a little cloud. Click it to display this menu, which lets you tell Revel to sync your photos only when your computer isn’t busy doing something else, which frees up your processor to concentrate on other things.Remove a photo from a mobile album. In the Mobile Albums section of the Albums panel, click the album’s name to see its contents. Then right-click/Control-click the thumbnail of the photo you want to remove and choose “Remove from Album”→[album name].
Remove a photo from Revel. Right-click/Control-click its thumbnail and choose “Remove from Revel.”
Download a photo from Revel. Right-click/Control-click its thumbnail and choose “Download original.”
Tagging People
Elements has included face recognition technology for a while now. This feature lets the Organizer analyze your photos for faces and then display the ones it found so you can create tags for them. (Adobe calls this feature “people recognition,” but it’s designed to find only faces; it doesn’t work so well on a photo of someone’s back, for example.)
Here’s how to use face recognition to find people in your photos:
If you want to limit the photos that the Organizer analyzes, select them (this step is optional).
At the bottom of the Media view window, click the Add People button.
If you haven’t pre-selected any photos, a dialog box asks if you’re sure you want to find people. (Why else would you have clicked the button?) Click Yes. (If you selected any photos in step 1, you don’t see this dialog box.) If you have any files where Elements didn’t recognize anything in the photo as a person, you see a warning that Elements will skip those files; click OK. Elements starts chugging away, looking for people. When it’s done, the People Recognition window opens with thumbnail images of different people that Elements found, with “Which of these people would you like to label?” at the top of the screen.
Click the thumbnails of the people you want to tag, and then click Save.
Identify the people Elements found.
Click the words “Who is this?” below a photo and type a name for each person. (Figure 2-15 shows what to do if Elements offers you an image that isn’t a person.) If you need to see a larger view to be sure who the person is, right-click/Control-click the thumbnail and choose “Show in Full Size View.” When you’re done looking at the bigger view, click Back. Once you’ve filled in everyone’s names, click Save.
Tell Elements if it made mistakes in identifying anyone.
After you click Save in step 3, Elements shows you all the photos it found of each person and asks you to exclude anyone who doesn’t belong in the group. If Elements misidentified someone—it thought one photo of your Uncle Fred was his brother Bill, say—click the arrow on the lower-right corner of the misidentified photo and choose “Not [name].” When you’re done, click Save.
Identify more people.
Elements shows you another group of people. Repeat steps 3 and 4. It’s easier this time because, when you click “Who is this?” Elements offers you a little pop-out with some of the people tags you’ve already created; just click a name to apply it to that photo. And if you start typing a name, you see a list of the names you’ve already entered that begin with that letter. When you’re done, click Save.
Identify (or exclude) even more people.
When Elements is through with the people it’s most sure about, it offers you a larger group of prospects that may include lots of things that aren’t people and asks, “Which of these people would you like to label?” If Elements shows a photo that isn’t a person you want to tag (or isn’t a person at all), click the No symbol (the circle with a slash across it) in its upper-right corner. For photos that are people you want to tag, click the No symbol and choose “Is a Person.” When you’re done, click Save, and Elements puts you through the identification process for your selections. When you’re through, Elements displays a dialog box that says, “You have labeled everyone in your selection.” Click OK and, if you like, switch over to People view, shown in Figure 2-16, for a look at all the people you’ve tagged.

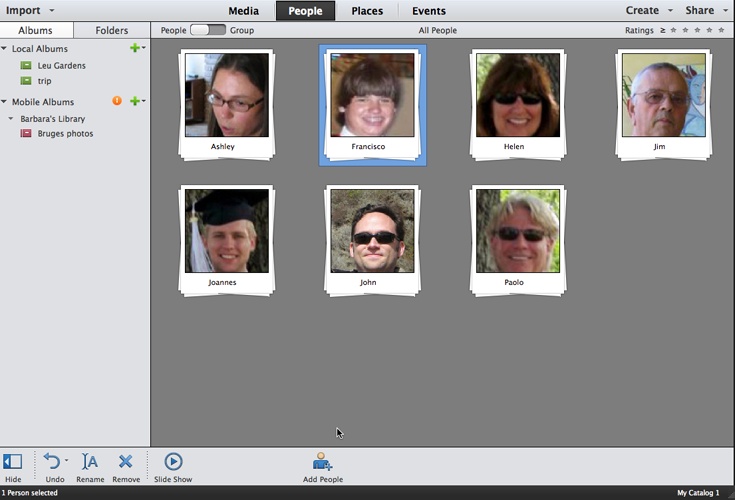
People view includes only images tagged with people tags. You can quickly scroll through all the images in a person’s stack by moving your cursor over the stack. If you want the Organizer to use a different photo as the top image in the stack, right-click/Control-click the image when it appears and choose “Assign as Profile Picture.”
Note
You can manually add people tags to a particular photo, but there are some limitations. Just go to Media view and right-click/Control-click a photo and choose “Add a Person.” A little window pops up where you can type in the name; type it, and then click Add. When you’re through adding people, click the window’s Close button (the X in Windows, the red dot on a Mac) to dismiss it. If you add a new person this way, she gets a stack, but no profile photo—you just see a gray box at the top of her stack. Photos of people with existing Elements-generated People tags that you tag this way should go right into their existing stacks. In either case, to see all the photos associated with the person, expand his stack by double-clicking it and, at the top left of the preview area, clicking the Faces/Photos switch to make sure it’s set to Photos.
To see all the photos in a stack at once, double-click the stack to expand it. If you want the Organizer to find additional photos of this person, click Find More at the bottom of the screen. (If you’ve already let the Organizer analyze all your photos for people, most likely it will just tell you there aren’t any more.) Click the Back button at the top left of the preview area to go back to the main People view.
Tip
If you made a mistake naming someone—say you mistyped her name—you can fix that by clicking her photo stack and then clicking the Rename button at the bottom left of the Organizer window. A window pops up where you can type the name correctly.
Once you’ve tagged everyone, the People/Group switch above the photo area becomes active. Click it to set it to Groups, and a Groups panel appears on the right side of People view, where you can put people into groups. (If you don’t see the panel, click the Groups button at the bottom right of the Organizer window to display it.) You get some preset groups (Colleagues, Family, Friends), and you can create your own by clicking the panel’s green + sign. You add people to groups by dragging their tags onto the group’s name. To remove a photo from a group, right-click/Control-click its thumbnail and choose “Move to Ungrouped.” However, there’s a severe handicap to using groups: Nobody can be in more than one group. So if you put a friend from work into the Colleagues group and then add her to the Friends group, she disappears from Colleagues.
Tagging Places
You can add two different kinds of place tags to the photos you take. The first kind, the ones you assign in Places view, include GPS data about the location. The second kind are ones you create in Media view, but those tags don’t include any GPS info. Creating place tags in Media view is explained on Media View; this section focuses on creating them in Places view.
Tagging Places in Places View
If your camera has a GPS system that automatically records the coordinates where you take each shot, then using Places view is super easy. When you click the Places tab at the top of the Organizer window, you see all your GPS-enabled photos already placed on the Google map for you. However, this doesn’t create a place tag that you can see in Media view. If you want to make such a tag, in either Media view or Places view, right-click/Control-click the photo’s thumbnail, and then choose Edit Places from the pop-out menu. Then you can create a tag by reassigning the photo to the map using the procedure explained in the following numbered list. Or, if it’s not important to you that the tag appear in the Tags panel’s Places category or you don’t want to hassle with replacing all your photos on the map, you can just create a regular tag in Media view.
If your camera doesn’t use GPS and you haven’t added that data to any of your photos, then you see a blank window the first time you enter Places view. Not to worry, though: You can manually tag your photos here by dragging them to locations on a Google map. It’s pretty easy to do:
Go to Places view and call up the map.
Click the Add Places button at the bottom of Places view. The Add Places window appears, where you see your photos in a strip along the top of the Google map. You can preselect photos or limit your search by clicking an album or a folder in the Albums or Folders panel (if the panel isn’t visible, click the Show button at the bottom left of your screen) either before or after entering Places view. If you don’t, then all your photos appear here.
Place your photos on the map.
Figure 2-17 explains how to do this. You can adjust your view of the map by using the drop-down menu at its upper right if you want a hybrid map/satellite view instead, for example. You can also search the map by typing the location you want into the search box above the map’s left side.
Once you’ve placed a photo, a pin appears in that spot, showing the number of photos you placed there. When you drag additional photos to the map, a little orange navigation symbol with crossed arrows appears (it’s visible in Figure 2-17). If the location is close but not exact, you can drag this symbol to the exact spot you want to tag. Once you’ve assigned place tags, the thumbnails of the files that have already been assigned to a place show a little white tag symbol on some of them to indicate that they’ve already been placed.
To see places with photos already assigned, turn on the “Show existing pins on map” checkbox.
Figure 2-17. Zoom and drag the map to the spot where you want to place photos, and then drag a photo (or photos) from the top of the window onto the map, and a pop-up asks, “Place Media Here?” If it’s the right spot, click the green checkmark or press Enter/Return. If not, click the red Cancel symbol and try again.When you finish placing photos, click Done.
Elements takes you back to Media view, where you see the message “Places have been assigned to media.”

In Media view, if you look at the Tags panel (Media View), in the Places category, you see the place tags assigned to your photos. That’s at most four levels of tagging, because that’s all the Organizer’s map can do. So you might see something like United States, Georgia, Savannah, and Historic District-North. These tags are always visible when the Tags panel is onscreen, so you can see them in Media view and use them in searches.
Tip
If you’re upgrading from an older version of Elements where you used the map and now you have two differently named tags for the same location—like an Elements 9 tag for “Our House” and an Elements 12 Place tag for the actual address, say—you can combine them. Just assign the older tag to the exact same location as the new tag (type out the address, if possible), and Elements will merge the old tag into the new place tag.
Once your photos have been tagged with locations (by you or your camera), you can see them on the map again by clicking the Map button at the bottom right of Places view. This opens as a regular map view, which you can drag around and search to locate your photos. Click a pin to display a pop-up that says Show Media; click that to make the photos for that location appear in the image area. There’s also a search field at the top of the map where you can type a place name to find it quickly.
Places view also includes the Instant Fix button (The Quick Fix Toolbox) so you can make quick corrections to your photos right there.
Tagging Places in Media View
You don’t have to switch to Places view to add place tags to your images. You can create place tags right in Media view by clicking the Add Places button at the bottom of the window or by going to the Tags panel’s Places Tags section and clicking the green + sign to the right of the words “Places Tags.” Either way, Elements displays the same map you see in Places view and the process is the same. There’s one important difference, though: Tags you create this way have no GPS location data associated with them.
Editing and Deleting Place Tags
To remove either kind of place tag from a photo, in Media view, right-click/Control-click the tag icon below the image, and then choose “Remove from [name of place]” from the pop-out menu. You can also edit a tag’s name by right-clicking/Control-clicking it in the Tags panel, and then choosing Rename from the pop-out menu.
To completely delete a place tag from Elements, right-click/Control-click the tag in the Tags panel, and then choose Delete. When you delete a tag, any sub-tags of it also get deleted. So if you have photos tagged, say, “United States, North Carolina, Linville Falls,” deleting the United States tag also deletes the North Carolina and Linville Falls tags, as well as any other tags that are below the United States tag.
Working with Events
After learning about all the effort involved in tagging people and places (if your camera doesn’t have GPS), you’ll be pleased to know that Elements can deal with events automatically. The first time you enter Events view by clicking its tab at the top of the Organizer window, you see a whole lot of empty gray space with no photos, and a message suggesting you try Smart Events. Click the Events/Smart Events switch at the top left of the window and presto! Elements fills the window with piles of photos, all neatly divided based on when they were taken. As with the program’s other views, you can move your cursor across an event’s pile to see preview thumbnails of all the photos, or double-click one to see an expanded view.
You can name an event to make it easier to search for later on. To do that, either right-click/Control-click the event’s stack and choose Name Event(s), or click the stack to select it and then click the Name Event(s) button at the bottom of the screen. Either way, in the Name Event window that opens, type a name for the event and, if necessary, use the Start Date and End Date fields to adjust the event’s date(s). If you wish, you can add a description, too. (You can select multiple events before opening the Name Event window, but if you do, they all get assigned the same name. This is handy when Elements makes multiple events for one real event in your life.)
You can also create events manually. To do that, click the Events/Smart Events switch above the image area to set it to Events. Your smart events disappear, and you’re back to the empty view. Next:
Create a new event.
Click the Add Event button at the bottom of the window. (You can do this from Media view, too.) The Organizer switches you to a view where you see all your photos (or, if you preselected some images, just the selected ones) and the Add New Event panel on the right of your screen.
Enter the info for your event.
In the top section of the panel, give the event a name, set its date(s), and enter a description, if you like. It’s best to avoid punctuation like commas, which can throw off searching for the event later. Stick to letters, numbers, underscores and dashes (hyphens).
Add your photos, if you didn’t select them before you started this process.
You can control which photos are displayed in the middle of the Organizer by using the Albums or Folders panel on the left side of the screen. (If you don’t see this panel, click the Show button in the lower left of your screen.) Click the name of a folder or an album and you see only the photos it contains. To get back to all photos, click the All Media button above the photo area’s top-left corner. If you change your mind about creating an event, click the Cancel button at the lower right of the Organizer window.
To add photos to the event, drag their thumbnails to the lower part of the Add New Event panel (called the Media Bin), or select their thumbnails and then click “Add to Media Bin” at the bottom of your screen. There are also buttons in the lower left of the screen that select or deselect all your photos. If you want to remove a photo after you’ve added it to the Media Bin, click it in the bin and then click the little trashcan at the bin’s lower left.
When you’re finished, click Done.
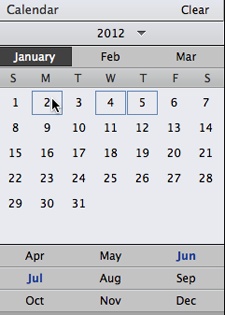
Events view also lets you use a calendar to search for events by date. Click the Calendar button at the bottom right of the view’s window, and the Calendar panel opens. Figure 2-18 explains how to use it. To close the panel, click the Calendar button again.
Searching for Photos
After all that effort jumping from view to view tagging photos, you’ll be happy to know that Elements makes it easy to search for photos, offering you several different methods. The most basic is to go to the search box at the upper right of the Organizer window and type a keyword into it. New in Elements 13, a slideout menu appears as you type, offering suggestions for search categories. It’s explained in Figure 2-19.
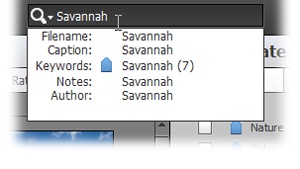
If you click the magnifying glass on the left side of the search box, you see a menu that gives you some more sophisticated ways to search:
Visual Similarity search. Select a photo (or photos) before choosing this menu item and the Organizer seeks out photos that it thinks look similar. (If you didn’t select a photo before choosing this item, then near the top of the window that appears, drag the photo you want to use as the basis for your search into the dotted rectangle next to the word “Find.” You can also add more photos to your search this way, since the rectangle keeps reappearing to the right of each photo you drag onto it.) You can fine-tune the results by dragging the slider at the top of the window. Drag it toward Color if you want Elements to give more weight to images with similar colors, or toward Shapes if you want Elements to emphasize similar shapes more than colors. When you’re done searching, click the All Media button (it may be labeled Back instead) at the top left of the thumbnail area.
Object search. You can show Elements a picture of your dog, your house, or just about anything and tell it to find more photos with the same subject. Select a photo of the object, and then choose Object Search. In the “Mark an object for search” window that appears, drag the white frame so it’s over your subject, and then drag the frame’s corners so that it fits as precisely as possible. Then click Search Object. After that, you can drag the Color/Shape slider above the search results to tell Elements which attribute to favor.
Duplicate Photo search. Choose this menu item and the Organizer finds all the photos it thinks might be duplicates. Put your cursor over a photo to see its name, date, and size. If you’re sure the photos are duplicates, click the one you want to remove, and then click “Remove from Catalog” at the bottom left of the window. It can be hard to tell if the photos are really duplicates, though, since the thumbnails are pretty small. You can expand your view by using the Zoom slider at the upper right of the window. If you aren’t sure, you can stack the photos by selecting them, clicking the Stack button (or, if you want to stack all the photos in a section, clicking the Stack button at the top of that section), and then expanding the stack in Media view by choosing Edit→Stack→“Expand Photos in Stack.” This lets you look through larger versions of the photos to see which one(s) you want to get rid of.
Saved searches. In the search results menu, you can save any of the searches you make from the search box’s menu by clicking the word “Options.” After you’ve done that, you can choose this option from the search box’s menu to call up your saved searches and use them again.
If you want to try a different search, click the Close button in the Search Results window or to the right of the Color/Shape slider in the Search Results window, or click the All Media button and try again.
In addition to searching from the search box’s menu, you can quickly search in the Tags panel (Media View). Just click the box to the left of the name of a tag or category, and Elements finds all the photos associated with it. Click it again to turn off the search results.
Searching by Metadata
As explained on Media View, your camera stores lots of information about your images in the form of metadata. In the Organizer, you can search by metadata to find, say, all the photos you took with a particular camera model at a certain aperture and exposure. Figure 2-20 explains how.

Tip
To share your tag information with other people, select the photos you want, and then go to File→“Save Metadata to File(s).” This transforms your tags into metadata keywords that lots of programs can read. Or you can use the Organizer’s Export command (File→“Export As New File(s)”), which also writes your tags into the metadata.
Saving Your Work
You’ve heard the advice before: Save files early and often. Happily, saving your work is easy in Elements. You don’t need to do anything special to save information like tags or albums in the Organizer; that happens automatically. You just need to save images you’ve created or changed in the Editor. When you’re ready to save a file in the Editor, go to File→Save As or press Shift+Ctrl+S/Shift-⌘-S to bring up the dialog box shown in Figure 2-21.
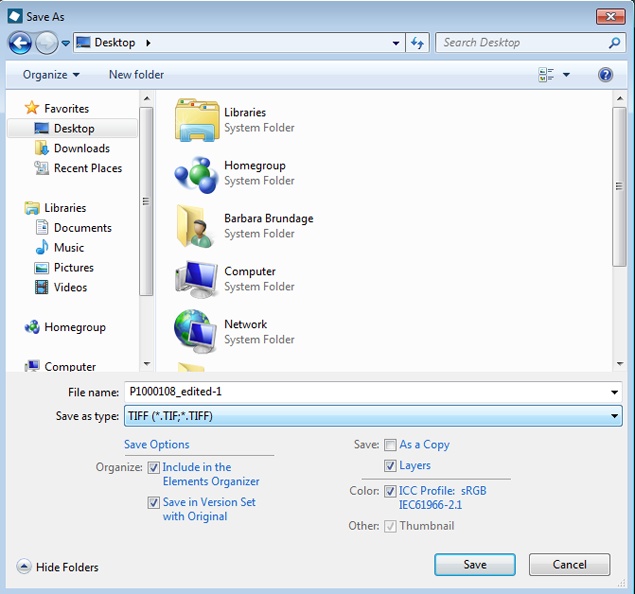
The top part of the Save As dialog box is pretty much the same as it is for any program: You choose where you want to save the file, what to name it, and the file format you want (more about file formats in a moment). The settings in the bottom part include some important choices that are unique to Elements:
Include in the Elements Organizer. This checkbox is turned on the first time you use Elements. Leave it on and your photo gets saved in the Organizer. Turn it off if you don’t want the new file to go to the Organizer. If you turn it off, Elements should leave it off, at least for this editing session or until you save a photo that came from the Organizer.
Save in Version Set with Original. This option tells the Organizer to save your image (including any edits you’ve made) as a new version, separate from the original. The image gets the same name as the original, plus a suffix to indicate it’s an edited version.
Elements lets you create as many versions as you want. That way, you can go directly to any state of the image that you’ve saved as a version, which is really handy. When you turn on this checkbox to start a version set, from then on, you’ll be presented with the Save As dialog box every time you save. Elements does that to give you the chance to create a new version each time.
As a Copy. When you save an image as a copy, Elements makes the copy, names it “[Original filename] copy,” and puts the copy away, but the original version remains open. If you want to work on the copy, you have to specifically open it. Sometimes Elements forces you to save an image as a copy—for instance, when you want to save a layered image and you turn off the Layers checkbox described in the next bullet point.
Layers. If your image has layers (see Chapter 6), turn on this checkbox to keep them. If you turn this setting off, Elements usually forces you to save the file as a copy. To avoid having to do that, flatten the image (Flattening an Image) before saving it. But bear in mind that, once you close a flattened image, you can’t get your layers back—flattening is a permanent change.
ICC Profile. Turn on this checkbox to make Elements embed a color profile (Choosing a Color Space) in your file.
Thumbnail. This setting is visible only in Windows, and it’s always turned on—you can’t change it.
File Formats Elements Understands
Elements gives you loads of file-format options in the Save As dialog box. (See the box on File Formats for a quick introduction to file formats.) Your best choice depends on how you plan to use the image. Here’s a rundown of the various options in the Save As dialog box’s “Save as type” menu (this menu is labeled “Format” on Macs):
Photoshop (.psd, .pdd). It’s a good idea to save photos as .psd files—the native file format of Elements and Photoshop—before you work on them. A .psd file can hold lots of information, and you don’t lose any data by saving in this format. It also lets you keep layers, which is important even if you haven’t used them for much yet.
BMP (.bmp). This format is an old Windows standby. It’s the file format that Windows uses for many graphics tasks.
CompuServe GIF (.gif). Everywhere except this menu, this format is known simply as GIF; Adobe adds “CompuServe” because CompuServe invented and owns the code for this format. This format is used primarily for web graphics, especially files without a lot of subtle shadings of color. For more on when to choose GIFs, see Chapter 17. Creating Animated GIFs explains how to animate GIFs.
Photo Project Format (.pse). This special format is only for multipage Elements files. These days, you can create a multipage file in only a few of Elements’ Create projects, like a photo book (see Chapter 15 for details). You can’t create and work with multipage files in the Editor anymore.
JPEG (.jpg, .jpeg, .jpe). Almost everyone who uses a computer has run into JPEGs, and most digital cameras offer this format as an option. Generally, when you bring a JPEG into Elements, you want to use another format when you save it to avoid losing data. Keep reading this chapter for more about why that is.
Photoshop PDF (.pdf, .pdp). Adobe invented PDF (Portable Document Format), which lets you send files to people with Adobe Reader (a free program formerly called Acrobat Reader) so they can easily open and view the files. (People with Macs can also use OS X’s Preview to view PDFs.) Elements uses PDF files to create presentations like slideshows.
Pixar (.pxr). Yup, that Pixar. This is the special format for the movie studio’s high-end workstations, although if you’re working on one of those, it’s extremely unlikely that you’re reading this book.
PNG (.png, .pns). Here’s another web-graphic format, created to overcome some of the disadvantages of JPEGs and GIFs. It has its own disadvantages, though; see Previewing Images for details. PNG has become a lot more important recently, since it’s the preferred graphics format for Apple’s iOS (the operating system for iPhones and iPads).
TIFF (.tif, .tiff). This is another format that, like PSD, preserves virtually all your photo’s info and lets you save layers. Also like PSD files, TIFFs can be really big. This format is used extensively in print production, and some cameras let you choose it as a shooting option.
Digital Negative (.dng). This format isn’t listed in the Save As dialog box’s format menu; it’s available only in the Raw Converter (Converting to DNG). This format was developed by Adobe as an attempt to create a more universal way to store all the different raw file formats (The Raw Converter). You can download a special free DNG Converter from Adobe’s website (www.adobe.com/downloads) that lets you convert your camera’s raw-format photos into DNG files. DNG files aren’t ready to use the way JPEG or TIFF files are—you have to run them through the Raw Converter before you can use them in projects. Converting to DNG has more info.
About JPEGs
Certain file formats are designed to make files as small as possible—and they do that by throwing out information by the bucketful. These formats are known as lossy because they discard, or lose, some of the file’s data every time you save it, to help shrink the file. Sometimes you want that to happen, like when you need a small (and hence, fast-loading) file for a website. Because of that, many of the file formats that were developed for the Web, most notably JPEG, favor smallness above all.
Note
Formats that preserve all your data are called lossless or non-lossy. The most popular file formats for people who are looking to preserve all their photos’ data are PSD and TIFF.
If you save a file in JPEG format, then every time you save and close the file, your computer squishes some of the data out of the photo. What kind of data? The info your computer needs to display and print the fine details. So you don’t want to keep saving your file as a JPEG over and over again, because every time you do, the image loses a little more detail. You can usually get away with saving as a JPEG once or twice, but if you keep it up, sooner or later you’ll start to wonder what happened to your beautiful picture.
It’s OK that your camera takes photos and saves them as JPEGs—those are typically pretty enormous JPEGs. Just importing a photo as a JPEG won’t hurt the picture, and neither will opening it to look at it, as long as you don’t make any changes. But once you get your files into Elements, save them as PSD or TIFF files while you work on them. If you want the final product to be a JPEG, then change the format back to JPEG after you’re done editing it.
Changing a File’s Format
It’s super easy to change a file’s format in Elements: Just press Shift+Ctrl+S/Shift-⌘-S or go to File→Save As and, in the Save As dialog box’s “Save as type” drop-down menu (labeled “Format” on Macs), select the format you want. Elements makes a copy of your file in the new format and gives you a chance to change the name, if you want.
Backing Up Files
With computers, you never know what’s going to happen, so “Be prepared” is a good motto. If your computer crashes, it won’t be nearly as painful if all your photos are safely backed up someplace else.
You’ll be glad to know that Elements makes it easy to save files to any add-on storage device—like an external hard drive—or to a CD or DVD (in Windows, anyway). The following section explains your options.
Note
In Windows, Elements offers one frequently requested feature for making backups: You can create multisession discs. That means you can tell Elements to leave your CD or DVD “open” so that you can come back later and add more files to it, instead of wasting a whole CD or DVD to save only a handful of pictures. To use this feature, in the Organizer, go to Edit→Preferences→Files and turn on “Enable Multisession Burning to CD/DVD.” (Unfortunately, you can’t burn discs in the Mac version of Elements.)
Organizer Backups
The Organizer includes a really helpful way to back up photos. It’s one of Elements’ best features, and it’s certainly thorough, even going so far as to remind you to label the disc you create if you back up to CD or DVD on a computer running Windows.
You can back up your whole catalog or just specific photos. Simply follow these steps:
Make sure your catalog is in tip-top shape.
In the Organizer, go to File→Manage Catalogs. In the Catalog Manager window, select your catalog in the list, and then click Repair. (Elements will probably tell you the catalog doesn’t need repair. In that case, click Repair Anyway.) When Elements is finished doing its thing, click OK. Next, click the window’s Optimize button, which makes sure your catalog’s database is in prime shape. When Elements is done doing that, click OK and then close the Catalog Manager window.
It’s also not a bad idea to go to File→Reconnect→All Missing Files, although the Organizer warns you if you have unconnected files when you start your backup. (An unconnected file is a cataloged item that the Organizer can’t find.)
Call up the Backup dialog box, and let Elements make sure your catalog is in backup-ready shape.
Go to File→Backup Catalog, or press Ctrl+B/⌘-B. If Elements is aware of any missing files, you see a window where you can choose to let Elements reconnect them, or you can click Continue to ignore any unconnected files.
Tell Elements what kind of backup to make.
In the Backup Catalog dialog box, you have to decide whether to back up your whole catalog or to make an incremental backup. The Full Backup option backs up everything in your catalog. Pick that option the first time you make a backup, or if you’re backing up everything to move to a new computer. The Incremental Backup option finds only the stuff that’s new since the last time you made a backup, and that’s all it copies—a major time- and space-saver. Make your choice, and then click Next to continue.
Choose a destination for your files.
Your choices in the Select Destination Drive section include all your available hard drives. In the list, click the drive you want to use. If you’re using Windows and you want to back up to CDs or DVDs, choose your disc drive from this list. Elements even pops the drive open for you.
Tip
In Windows, you may also find that you can back up to online storage if it has a mapped network drive letter and your Internet connection is fast enough. So, for example, you may be able to back up to your Dropbox account or to something like Microsoft OneDrive. Test this with a small catalog first to be sure it works for you. (Unfortunately, this doesn’t work on Macs.)
If you’re backing up to a hard drive (your only option on a Mac), click the Backup Path field’s Browse button to tell Elements where to put the backup. Navigate through the folders in the window that appears, and create a new folder if you’d like to keep your backups tidy (a good idea). Once you’re done, the folder’s path (a roadmap to where it lives) appears in the Backup window.
If you’re making an incremental backup, then you have to show Elements where to find your previous backup. Click the name of the drive where you made your previous backup, and then click the “Previous Backup file” field’s Browse button to point Elements to the existing backup file.
If you’re on a PC and are backing up to a CD or DVD, insert a disc into the drive when Elements asks you to. (If you’re backing up to any other kind of media, including internal or external hard drives, then skip ahead to step 6.)
Elements has to calculate how many discs it needs to create your backup. As Elements burns each disc, it asks if you want it to verify the disc to be sure it’s OK. You do. Elements prompts you to feed it more discs if the backup doesn’t all fit on one disc.
If you like, you can change the write speed for your disc. (A slower speed takes longer but may be more reliable.) Just choose one of the other speed options from the drop-down menu.
Create the backup.
Click Save Backup, and Elements generates the backup. If you decide you don’t want to make a backup, click Cancel instead.
Tip
These directions cover how to back up your images and your catalog. It’s also a really good idea to back up your catalog database (the data file that the Organizer creates to keep track of where your photos are) every once in a while. To do that, in the Organizer, go to Help→System Info to see the file path to your current catalog (it’s listed next to Catalog Location). Then burn those folders (including the files within them) to a CD or DVD or copy them to an external hard drive.
Be aware that a backup made using these steps is for Elements’ use, not yours: If you look at the backup in Windows Explorer or a Mac’s Finder, you’ll see files with weird numerical names, and you can’t just rummage around to find a particular photo you accidentally deleted. Instead, you have to let Elements handle restoring the files. Because you can’t easily get individual files out of an official Elements backup, many people prefer to create their own backups, copying the catalog file (the preceding Tip explains where to find it) and their images. That way, you don’t have to rely on Elements to retrieve lost photos for you.
If you want to switch your catalog to a new machine, you can install Elements and restore your existing backup. (This works even when moving from Windows to a Mac. If you want to do that, save your backup to a removable hard drive.) To restore your catalog, in the Organizer, go to File→Restore Catalog, and then follow the onscreen directions.
Note
In Windows, you can also copy just a few photos to CDs or DVDs rather than making a full backup of your catalog. To do that, go to File→“Copy/Move to Removable Drive.” Leave the Move Files checkbox turned off, click Next, and then select your disc-burning drive in the list on the next screen.
Macs don’t let you do any kind of disc burning directly from Elements, but you can select photos in the Organizer and go to File→“Export as New File(s)” (Ordering Prints) to send them to the Finder for burning, if your Mac has an optical drive (one that can read and burn discs).