Chapter 4. The Quick Fix
With Elements’ Quick Fix tools, you can dramatically improve a photo’s appearance with just a click or two. The Quick Fix window includes easy-to-use tools that help you adjust the brightness and color of your photos and make them look sharper. You don’t even need to understand much about what you’re doing—just click a button or move a slider, and then decide whether you like how your image looks.
You can also frame photos here and apply some fancy special effects (think Instagram filters) and textures with just a click. For example, you can make your photo look like it’s printed on metal or was painted long ago on a wall where the paint is now cracking and flaking off. Elements 13 includes lots of new effects that are really fun and incredibly easy to use.
Tip
You can also share your photos right to Facebook, Twitter, Revel, and a few other popular sites right from Quick Fix. Just click the Share button at the upper right of the window. (There’s more about sharing photos on Organizer Slideshows.) If you want to use your photos in a Create project (Chapter 15), just click the Create button (also in the window’s upper right) and choose a project. When you finish in Create, you’ll be in Expert mode. If you want to get back to the Quick Fix, just click the word “Quick” at the top of your screen.
Even if you do know what you’re doing, you may still find yourself using the Quick Fix window to tweak things like shadows and highlights because it gives you a handy before-and-after view as you work. Also, the window’s Vibrance, Temperature, and Tint sliders can come in handy for advanced color tweaking, like finessing the overall color of an otherwise finished photo. You also get two tools—the Selection Brush and the Quick Selection tool—that let you easily change specific areas of photos.
Besides letting you make general fixes, the Quick Fix window also makes it a snap to whiten teeth and fix blemishes in a photo. You can even add text or crop your photo. And Adobe has made it super easy to decide just what to do to an image by adding a number of presets to the adjustments; you’ll learn about them on Using Presets. These presets are great if you need extra help—just pick one of them as a starting point and work from there.
In this chapter, you’ll learn how (and in which order) to use the Quick Fix tools. If you have a newish digital camera, you may find that the Quick Fix window gives you everything you need to take your photos from pretty darn good to dazzling.
Tip
If a whole chapter on Quick Fix is frustratingly slow, you can start off by trying out the ultrafast Auto Smart Fix—a quick-fix tool for the truly impatient; Getting Started in a Hurry explains how to use it. Also, Guided Edit may give you enough help to accomplish what you want to do; Guided Edit has the full story.
The Quick Fix Window
It’s easy to get to the Quick Fix window, as long as you’re in the Editor: Just click the word “Quick” near the top of your screen.
The Editor remembers which component you were last using (Quick, Guided, or Expert). So if you’re working in the Organizer and want to send photos over to the Editor, if you right-click/Control-click a photo in the Organizer and choose “Edit with Photoshop Elements Editor,” your photo will go right to the Quick Fix window if that’s where you were the last time you used the Editor. If not, just click the Quick tab near the top of the screen.
You can also get to Quick Fix from some of the projects in Create mode: Just right-click/Control-click the photo you want to fix, and then choose Edit Quick; you get sent to Quick Fix with the photo ready for your adjustments. When you come into Quick Fix this way, you see a button at the left of the screen that says “Return to Creations.” When you finish editing the image, click this button to go back to where you left off in your project.
Tip
You can also apply many quick fixes right from the Organizer, even in Full Screen view. See the box on Quick Fixes in the Organizer for details.
The Quick Fix window looks like a stripped-down version of the Expert mode window (see Figure 4-1). Your tools are neatly arranged on both sides of the image: On the left, there’s a nine-item toolbox; on the right, the Adjustments panel, which includes six sections for different adjustments you can make (see Figure 4-2).
At the bottom left of the Quick Fix window is the same group of buttons you have in Expert mode: Photo Bin, Tool Options, Undo, Redo, Rotate, Layout, and Organizer. They work the same way in Quick Fix as they do elsewhere in the Editor.
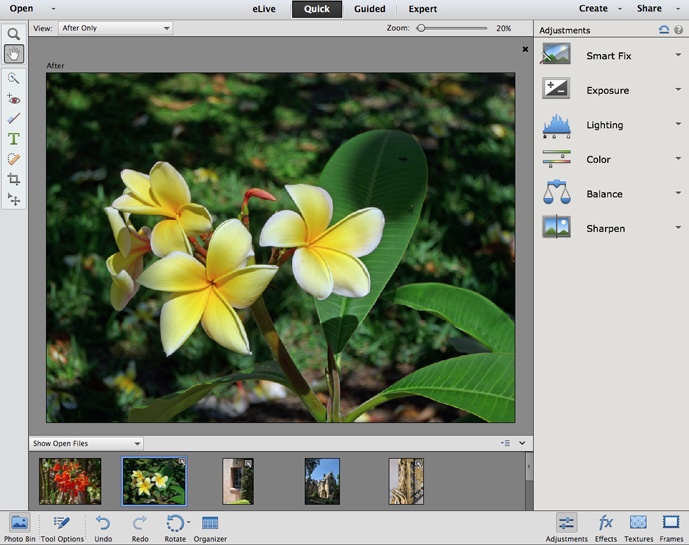
At the bottom right of the window is a new set of buttons:
Adjustments. Click this button to see the Adjustments panel shown in Figure 4-1 and Figure 4-2, where you work on improving your photo.
Effects. Click this button, and the panel on the right side of the window switches to show you thumbnails of the special effects that you can apply with just a single click, like aging a photo or making it look like a pencil sketch. Getting Fancy: Effects, Textures, and Frames has more on these effects.
Textures. Click this button to do things such as make your photo look like it’s printed on canvas, like it had a color wash applied to it long ago, or like it’s on a bumpy chrome surface.
Frames. If you want to give your photo a border that looks like a frame or makes your photo look like an old film print that’s lying on the page, click this button.
Note
There’s more about using effects, textures, and frames on Getting Fancy: Effects, Textures, and Frames.

The following sections give you a quick overview of the tools Quick Fix offers and then explain how to use them.
Tip
If you need extra help, check out Guided Edit (Guided Edit), which walks you through each step of basic editing projects.
The Quick Fix Toolbox
In the Editor, the Quick Fix window’s toolbox holds an easy-to-navigate subset of the tools available in Expert mode. All the tools work the same in both modes, and you can use the same keystrokes to switch tools. And just as in Expert mode, when you click a tool, its Tool Options replace the Photo Bin. (To bring the Photo Bin back into view, click the Photo Bin button at the bottom of the screen.) From top to bottom, here’s what you get:
The Zoom tool lets you telescope in and out on your image—perfect for getting a good, close look at details or pulling back to see the whole photo. (See The Zoom Tool for more on this tool.) You can also zoom by using the Zoom slider in the upper-right corner of the image preview area.
The Hand tool helps move your photo around in the image window—just like grabbing it and moving it with your own five fingers. There’s more about this tool on The Hand Tool and Navigator Panel.
The Quick Selection tool lets you apply Quick Fix commands to specific portions of the image. Once you make a selection with this tool, the commands you use will change only the selected area, not the entire photo. You can also use the regular Selection Brush in Quick Fix; just activate the Quick Selection tool and then click the Selection Brush icon in the Tool Options area (the brush that’s pointed down, like it’s painting).
What’s the difference between the two tools? The Selection Brush lets you paint a selection exactly where you want it (or mask out part of your photo to keep it from changing), while the Quick Selection tool figures out the boundaries of your selection based on marks you make on the image (which don’t have to be precise). Also, the Quick Selection tool is far more automatic than the regular Selection Brush. You can read more about these tools beginning on Selecting with a Brush. (To get the most out of them, you need to understand the concept of selections; Chapter 5 tells you everything you need to know.)
The Red Eye Removal tool lets you darken those red, demonic-looking flash reflections in people’s eyes. This tool works on the green reflections in pets’ eyes, too. Generally, if you need to fix red eyes on people or glowing eyes on pets, you should use this tool first, before doing any other edits to your photo. See Fixing Red Eye to learn how to use it.
The Whiten Teeth tool makes it super simple to brighten your subject’s pearly whites. Whitening Teeth explains how to use it.
The Type Tool. To add text to an image, just click it with this tool and start typing. The Tool Options at the bottom of the window make it easy to choose a different font and change the size and color of the text. In the Quick Fix window, you can do anything that doesn’t require access to the Layers panel, including bending and warping text (see Warping Text). Chapter 14 is all about the many things you can do with text in Elements.
The Healing Brushes. The Spot Healing Brush lets you make truly invisible corrections to fix blemishes in a snap. The Spot Healing Brush explains all about using this helpful tool. For now, if you’re a beginner, first zoom in so you can see what you’re doing, activate this tool, and then use the slider in the Tool Options area to choose a brush size that just barely covers the spot you want to fix. Then click that spot, and Elements fixes it right up so it blends with the surrounding area.
You can also use the regular Healing Brush in Quick Fix—just click its icon in the Tool Options area (it looks like a Band-Aid without a dotted semicircle next to it). The Healing Brush explains how to use this tool.
The Crop tool lets you change the size and shape of a photo by cutting off areas you don’t want (see The Crop Tool).
Tip
If the contents of your photo need straightening (see Straightening the Contents of an Image), it’s usually easier to straighten in Expert mode before switching to Quick Fix, since the Quick Fix toolbox doesn’t include the Straighten tool. However, there’s a sneaky way to straighten with the Crop tool that you can use in Quick Fix, too—see The Crop Tool for details.
The Move tool lets you rearrange items in your photos, but in the Quick Fix window it’s most useful when you’re working with the frames in the Frames panel. The Move Tool has more about the Move tool in general, and Getting Fancy: Effects, Textures, and Frames explains how to use the frames.
The Adjustments Panel
When you switch to Quick Fix mode, the Adjustments panel appears on the right side of your screen, as you saw back in Figure 4-1. This is where you make the majority of your adjustments. Elements helpfully arranges the panel into six sections—Smart Fix, Exposure, Levels, Color, Balance, and Sharpen. (If you see something else in the panel, click the Adjustments button at the bottom right of your screen). In most cases, it makes sense to start with the panel’s top section and work your way down until you get the results you want. (See Quick Fix Suggested Workflow for more suggestions on what order to work in.)
Tip
If the Adjustments panel is in your way, you can make it disappear by clicking the Adjustments button at the bottom right of the window; click this button again to bring the panel back. (This same technique works on the other Quick Fix panels, too.)
You can expand and collapse sections within the panel as you work, as explained in Figure 4-3.

Using Presets
Elements has a handy feature to help the undecided: presets. When you click a section in the Adjustments panel, a grid of nine tiny thumbnails appears below that section’s slider (see Figure 4-4). Each thumbnail represents a different preset for that slider.
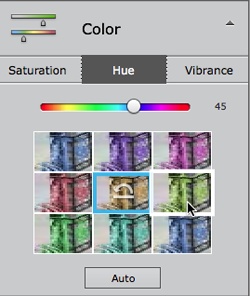
If you don’t have super-micro vision, these thumbnails are probably too darn small for you to be able to tell the difference—but not to worry: Place your cursor over a thumbnail (without clicking) and Elements previews that setting on your image itself so you can get a good view. If you like what you see, click the thumbnail to apply that change to your photo.
To reset your image back to what it looked like when you began using the current group of presets, click the thumbnail with the curved arrow on it. (If you’ve already moved on to another preset group, you can use the Undo button at the bottom of the window, or just use the standard Undo command [Ctrl+Z/⌘-Z] instead.) If you want to undo all the changes you’ve made in Quick Fix, click the blue Reset icon at the panel’s top right.
Tip
As you make changes with the Adjustments panel’s sliders and presets, Elements displays a numeric value to the right of each slider. If you have several similar photos to fix, when you get the first photo how you like it, jot down these numbers. Then, when you open the next photo, just click the number next to each slider (it turns into a text box) and type in the value you want.
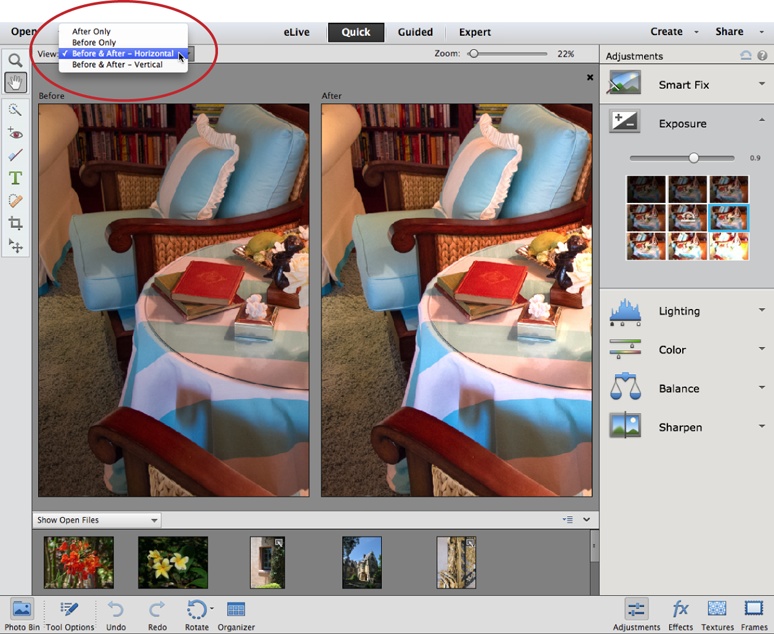
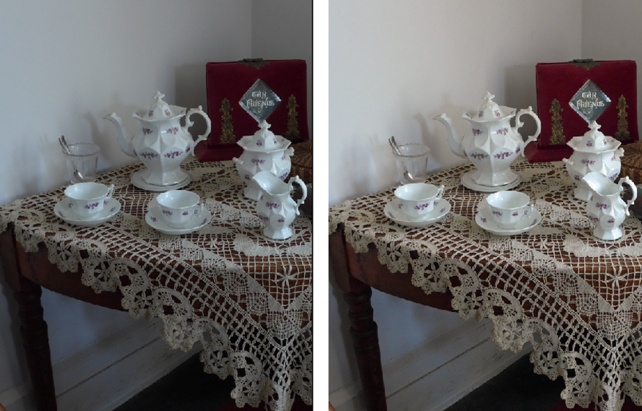
Different Views: After vs. Before and After
When you open an image in Quick Fix, your picture appears by itself in the main window with the word “After” above it to let you know that you’re in After Only view. Elements keeps the Before view—your original photo—tucked out of sight. But you have three other layout options, which you can choose anytime: Before Only, “Before & After - Horizontal,” and “Before & After - Vertical.” You switch between views by picking from the View drop-down menu at the top left of the image area (circled in Figure 4-5). Both of the before-and-after views are helpful when you’re trying to figure out whether you’re improving a photo.
Editing Your Photos
The Quick Fix window’s tools are pretty easy to use. You can try one or all of them—it’s up to you. And whenever you’re happy with how your photo looks, you can leave Quick Fix and go back to Expert mode or the Organizer.
Tip
If you just want to rotate a photo, simply click the Rotate button below the image area. To rotate in the opposite direction, click the tiny arrow to the right of the Rotate button, and then click the button that appears. (See Straightening Individual Photos for more about rotating photos.)
In Quick Fix, Elements automatically applies any changes you make—you don’t have to do anything to accept them. If you’re tweaking an image and decide you don’t like how it’s turning out, click the blue Reset icon at the top of the Adjustments panel to return your photo to the way it looked before you started working in Quick Fix. (The Reset icon is a blue arrow arching over a straight line, and it’s just below the word “Share.”) Keep in mind that clicking this button undoes all Quick Fix edits, so don’t use it if you want to undo only a single action. For that, just click the Undo button at the bottom of the window, or use the regular Undo command: Choose Edit→Undo, or press Ctrl+Z/⌘-Z.
When you make a change and then close a section of the Adjustments panel, your image remains changed, so remember to undo that edit or reset the photo (or undo that change) if you’re just experimenting and don’t want to keep that change.
Fixing Red Eye
Anyone who’s ever taken a flash photo has run into the dreaded problem of red eye—those glowing, demonic pupils that make your little cherub look like a character from an Anne Rice novel.
Red eye is even more of a problem with digital cameras than with film cameras, but luckily Elements has a simple and terrific tool for fixing it. All you need to do is click the red spots with the Red Eye Removal tool, and your problems are solved. You can also use this tool to fix pet eye, a.k.a. green eye, the animal equivalent. Fixing pet eye is explained later in this section.
This tool works the same in both Quick Fix and Expert mode. Here’s what you do:
Open a photo and zoom in so you can see where you’re clicking.
Use the Zoom tool to magnify the problem eyes. (Switch to the Hand tool if you need to drag the photo around so the eyes are front and center.)
Activate the Red Eye Removal tool by clicking the red-eye icon in the toolbox or pressing Y.
Click the red part of the pupil (see Figure 4-6).
That’s it! Just one click should fix the problem. If it doesn’t, press Ctrl+Z/⌘-Z to undo the edit, and then try dragging over the pupil instead. Sometimes one method works better than the other. You can also try adjusting this tool’s two settings, Darken Amount and Pupil Size, which are explained in a moment.
Repeat the process on the other eye, and you’re done.

Tip
You can also apply the Organizer’s Auto Red Eye Fix in Quick Fix and Expert mode. In either window, just press Ctrl+R/⌘-R or go to Enhance→Auto Red Eye Fix. (Alternatively, you can activate the Red Eye Removal tool and then, in the Tool Options area, click Auto Correct.) The only tradeoff to using Auto Red Eye Fix in the Editor is that you don’t automatically get a version set like you do when using the tool in the Organizer, but you can create a version set when you save your changes, as explained on Saving Your Work.
If you need to adjust how the Red Eye Removal tool works, the Tool Options area gives you two controls, although 99 percent of the time you can ignore them:
Pupil Radius. Drag this slider to tell Elements how large an area to consider part of the pupil.
Darken. If the result is too light, drag this slider to the right.
If you can’t get a good result by using the existing settings, undo your red-eye correction, move these sliders, and then try again.
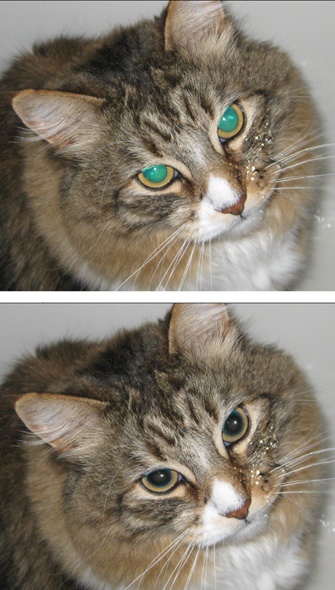
The Tool Options area also includes a checkbox for Pet Eye, in case Fluffy or Fido needs a fix. The different structure of animals’ eyes makes them reflect green instead of red, so this setting tells Elements to look for the right color. (In older versions of Elements, the Red Eye Removal tool couldn’t cope with animals at all.) Turn this checkbox on before starting to correct your pet’s glaring retinas. The results you’ll get with this setting are rather mixed. In Figure 4-7, you can see how well it works when conditions are right, though it doesn’t always work this well. It’s certainly worth a try, though.
Tip
If you’re dealing with raw files, you can fix red eye right in the Raw Converter (Rotating, Straightening, and Cropping), although the Raw Converter’s tool doesn’t have a Pet Eye setting.
Smart Fix
The Quick Fix window’s secret weapon is the Smart Fix command, which automatically adjusts a picture’s lighting, color, and contrast, all with one click. You don’t have to figure anything out—Elements does it all for you. This command generally works better on photos that are underexposed (too dark) than overexposed (too bright), but it doesn’t hurt to give it a try even on overexposed shots.
You’ll find the Smart Fix command in the aptly named Smart Fix section of the Adjustments panel, and it’s about as easy to use as hitting the speed-dial button on your phone: Click the Auto button at the bottom of the Smart Fix section and, if the stars are aligned, your picture will immediately look better. Figure 4-8 gives you a glimpse of its capabilities.
Tip
You’ll find Auto buttons scattered throughout Elements. When you click one, the program makes a best-guess attempt to apply whatever change the Auto button is next to (Smart Fix, Levels, Contrast, and so on). It never hurts to at least try clicking these buttons; if you don’t like the result, you can always perform the magical undo: Edit→Undo or Ctrl+Z/⌘-Z.
If you’re happy with Auto Smart Fix’s changes, you can move on to another photo, or try sharpening the same photo a little if the focus appears a bit soft (see Balancing Color). You don’t need to do anything to accept the Smart Fix changes, but if you’re not thrilled with the results, take a good look at your picture. If you like what Auto Smart Fix did but the effect is too strong or too weak, press Ctrl+Z/⌘-Z to undo it, and then try one of the Smart Fix section’s presets or play with its slider instead. This slider does the same thing as the Auto Smart Fix button, only you control the degree of change. Watch the image as you drag the slider to the right. (If your computer is slow, there will be a certain amount of lag, so go slowly to give Elements a chance to catch up.) If you overdo it, click the Undo button at the bottom of the Editor window and start again.
Tip
You’ll usually get better results by moving the Smart Fix slider in several small increments rather than in one big, sweeping movement.
Incidentally, these are the same Smart Fix commands you see in the Editor’s Enhance menu: Enhance→Auto Smart Fix (Alt+Ctrl+M/Option-⌘-M) has the same effect as clicking the Auto button in the Smart Fix section of the Adjustments panel, and Enhance→Adjust Smart Fix (Shift+Ctrl+M/Shift-⌘-M) displays a Smart Fix slider you can tweak.
Sometimes Smart Fix just isn’t smart enough to do everything you want, and sometimes it does things you don’t want. Fortunately, you still have several other editing options that are covered in the following sections. (If you don’t like what Smart Fix has done to your photo, remember to undo its effect before making other changes.)
Tip
Auto Smart Fix is one of the commands you can also apply from within the Organizer, so there’s no need to launch the Editor if all you want to do is run this command. See the box on Quick Fixes in the Organizer for more about making fixes in the Organizer.
Adjusting Exposure
You can use the presets or the slider in the Adjustments panel’s Exposure section to make adjustments to your photo’s overall exposure. You may want to use this section first, if you think your image needs it. But if the image’s exposure looks fine, you can skip this section and move on to the Levels section.
Tip
There’s another way to adjust the exposure and tone of your photos: Auto Smart Tone. It’s described on Auto Smart Tone.
Adjusting Lighting and Contrast
The Levels section of the Adjustments panel lets you make sophisticated adjustments to photos’ brightness and contrast. You may be surprised: Sometimes problems you thought stemmed from exposure or even focus can be fixed with these commands.
Levels
If you want to understand how Levels works, you’re in for a long, technical ride. But if you just want to know what it can do for your photos, the short answer is that it adjusts their brightness by redistributing their color information. Levels changes (and hopefully fixes!) both brightness and color at the same time.
If you’ve never used a photo-editing program before, this may sound rather mysterious, but photo pros will tell you that Levels is one of the most powerful commands for fixing and polishing pictures. To find out if its magic works for you, click the Auto Levels button at the bottom of the Levels section. Figure 4-9 shows what a big difference it can make.
What Levels does is complex. Chapter 7 has loads more details about what’s going on behind the scenes and how you can apply this command more precisely.
Note
Although the Auto Levels and Auto Contrast buttons appear at the bottom of each tab in the Levels section (Shadows, Midtones, and Highlights), they always work on your entire image, so you get the same result no matter which tab is displayed when you click these buttons.
Contrast
In Quick Fix, the main alternative to Auto Levels is Auto Contrast. Most people find that their images tend to benefit from one or the other of these options. Contrast adjusts the relative darkness and lightness of an image without changing its color, so if clicking Auto Levels in the Adjustments panel’s Levels section made the colors in your image go all goofy, try clicking the Auto Contrast button instead (remember to undo Auto Levels first).
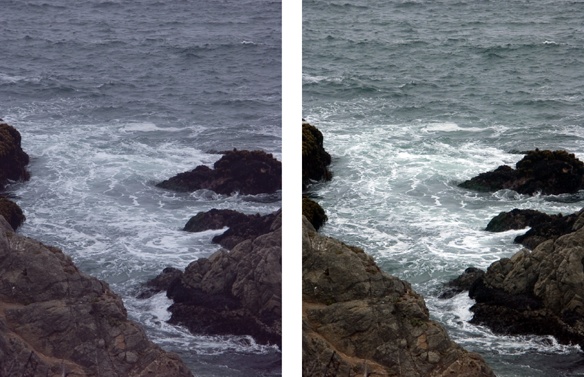
Shadows, Midtones, and Highlights
The other fixes in the Levels section of the Adjustments panel do an amazing job of bringing out details that are lost in the shadows or bright areas of your photo. Figure 4-10 shows what a difference they can make.

To use these fixes, click the appropriate tab in the Adjustments panel’s Levels section. Although there are presets for each of these fixes, you’ll probably find you have more control by using the sliders. Here’s what each one controls:
Shadows. Nudge this slider to the right, and you’ll see details emerge from murky black shadows as Elements lightens the dark areas of your photo.
Midtones. Use this fix after you’ve adjusted the photo’s shadows and highlights, which can make an image look flat—like it doesn’t have enough contrast between dark and light areas. This slider can help bring back a more realistic look.
Highlights. Use this slider to dim the brightness of overexposed areas.
Tip
You may think you need only lighten shadows in a photo, but sometimes just a smidgen of Highlights may help, too. Don’t be afraid to experiment with this slider even if you’ve got a relatively dark photo.
Go easy: Getting overenthusiastic with these sliders can give your photos a flat, washed-out look.
Adjusting Color
The Color section of the Adjustments panel lets you—surprise, surprise—play around with the colors in your images. In many cases, if you’ve been successful with Auto Levels or Auto Contrast, you won’t need to use this section.
Auto Color
The Color section’s Auto button is another one-click fix. In some ways, it seems like Auto Color should be up in the Levels section because, like Levels, it simultaneously adjusts color and brightness, but it looks at different information in photos to decide what to do.
When you’re first learning to use Quick Fix, you may want to try Auto Levels, Auto Contrast, and Auto Color to see which generally works best for your photos. Undo the changes after you use each one and compare your results. Most people find they prefer one of the three most of the time.
Auto Color may be just the ticket for your photos, but you may also find that it shifts colors in strange ways. Try it and see what you think. If it makes your photo look worse, just click the Reset icon at the top of the Adjustments panel or press Ctrl+Z/⌘-Z to undo it, and go back to Auto Levels or Auto Contrast. If they all make your colors look a little wrong, or if you want to tweak the colors in your photo, move on to the Color sliders and presets instead.
The Color Sliders
If you want to adjust the colors in your photo without changing its brightness, try the Color section’s sliders. For instance, your digital camera may produce colors that don’t quite match what you saw when you took the picture; you may have scanned an old print that’s faded or discolored; or you may just want to change the colors in a photo for the heck of it.
Whatever the case, the sliders in the Color section are for you (you can click preset thumbnails, too). Just click the appropriate tab near the top of the section:
Saturation controls the intensity of the image’s color. For example, you can turn a color photo to black and white by moving this slider all the way to the left. Move it too far to the right and everything glows with so much color that your photo looks radioactive.
Hue changes the color in an image from, say, red to blue or green. If you aren’t aiming for realism, you can have fun using this slider to create funky color changes.
Vibrance used to be available only in the Raw Converter (see Chapter 8), but it’s such a useful tool that Adobe added it to Quick Fix, too. While Saturation adjusts all colors equally, the Vibrance slider is much smarter: It increases the intensity of the duller colors while holding back on colors that are already so vivid they may oversaturate. If you want to make colors pop, try this slider.
You probably won’t use all three sliders on a single photo, but you can if you like. To fine-tune the color, you may want to move on to the next panel: Balance. In fact, in many cases you’ll need only the Balance fixes.
Balancing Color
Photos often have the right amount of saturation, but suppose there’s something about the color balance that just isn’t right, and moving the Color section’s Hue slider (described above) makes everything look funky. Fortunately, the Adjustments panel’s Balance section contains two very useful tabs for adjusting the overall colors in an image:
Temperature lets you adjust colors from cool (bluish) to warm (orangeish). Use this slider for things like toning down the warm glow you see in photos taken in tungsten lighting, or just for fine-tuning color balance.
Tint adjusts the green/magenta balance of a photo, as shown in Figure 4-11.
Figure 4-11. Left: This kind of greenish tint is a common problem with many digital cameras, especially cellphone cameras. Right: A little adjustment of the Tint slider clears it up in a jiffy. It’s not always as obvious as it is here that you need a tint adjustment. If you aren’t sure, the sky can be a dead giveaway: Is it robin’s egg blue like the left photo here? If so, tint is what you need.

There are presets for these adjustments, too, but if you’re after realistic color, you may find that they’re all much too exaggerated, so you’re probably better off using the sliders.
Tip
In early versions of Elements, these sliders were grouped with the Color sliders, since you’ll often use a combination of adjustments from both groups. Chapter 7 has lots more about how to use Expert mode to really fine-tune your image’s colors.
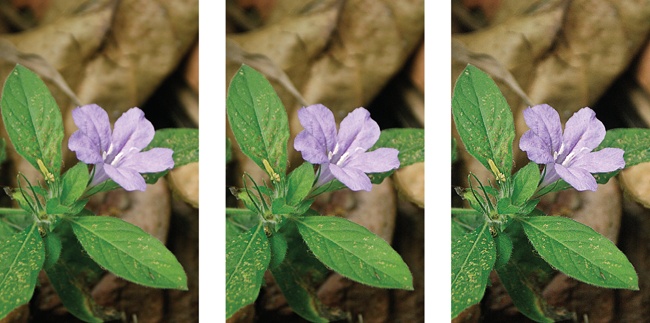
Sharpening
Now that you’ve finished your other corrections, it’s time to sharpen your photo, so move down the Adjustments panel to the Sharpen section. Sharpening creates the effect of better focus by improving the edge contrast of objects in photos. Once again, an Auto button is at your service; click it to get things started. Figure 4-12 shows what you can expect.
The sad truth is that there really isn’t any way to improve the focus of a photo once you click the shutter. Photo-editing programs like Elements sharpen by increasing the contrast where they perceive edges of objects, which is why it’s best to make sharpening your last editing step. Sharpening first can have strange effects on other editing tools you apply afterward.
Tip
If you see funny halos around objects in your photos or strange flaky spots (making your photo look like it has eczema), those are sure signs of oversharpening; reduce the Sharpen setting until they go away. In fact, many modern cameras apply a pretty hefty dose of sharpening right in the camera, so you may decide you like your photo best with no extra sharpening at all.
Always look at the image’s actual pixels (View→Actual Pixels) when sharpening, because that gives you the clearest sense of what you’re doing to your picture. If you don’t like what Auto Sharpen does (a distinct possibility), you can undo it (click the Undo button or press Ctrl+Z/⌘-Z) and try the Sharpen slider instead. Zero sharpening is all the way to the left; dragging the slider to the right increases the amount of sharpening Elements applies. You can also click the preset thumbnails, but it’s probably easier to use the slider. As a general rule, you want to sharpen photos you plan to print more than images destined for use online. Sharpening Images has lots more about sharpening.
Note
If you’ve used photo-editing programs before, you may be interested to know that the Auto Sharpen button applies Adjust Sharpness (Adjust Sharpness) to photos. But unlike when you apply Adjust Sharpness from the Enhance menu, Auto Sharpen doesn’t give you any control over the settings. The good news is that if you want to use Adjust Sharpness—or even if you prefer to use Unsharp Mask (Sharpening Images)—you can get that control from within Quick Fix. Just go to the Enhance menu and choose the sharpener of your choice.
At this point, all that’s left to do is crop your photo; Cropping Pictures tells you everything you need to know. And if you like, you can give your photo a bit more punch by using the Touch Up tools explained in the next section.
Tip
If you have a Mac, OS X has some pretty sophisticated sharpening tools built right in. Preview lets you apply Luminance Channel sharpening, a complex technique you might like better than Elements’ sharpening options. Open a photo in Preview and give it a try (choose Tools→Adjust Color→Sharpness) to see whether you prefer it to what Quick Fix can do.
Whitening Teeth
The Quick Fix toolbox contains a special tool to help whiten dull or discolored teeth. It’s very easy to use—just drag over the area you want to change, and Elements makes a detailed selection of the area and applies the change for you. Here are the details:
Open a photo and make your other corrections first.
Note
If you’re an old hand at using Elements, use Whiten Teeth before sharpening. But if you’re a beginner and not comfortable with layers (see Chapter 6), sharpen first. (See Quick Fix Suggested Workflow for more about why.)
Click the Whiten Teeth tool’s icon (the toothbrush) or press F.
Either way, your cursor turns into a circle with crosshairs in it.
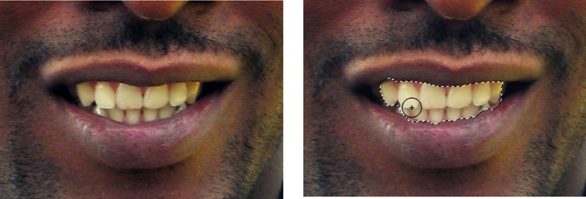
Drag across the area you want to whiten.
Just drag over the teeth in your photo, and Elements automatically creates a selection that includes the entire object it thinks you want. (It works just like the Quick Selection tool [Selecting with a Brush], only it also whitens the selected area.) You’ll see marching ants appear (Cropping with the Marquee Tool) around the area Elements is changing (see Figure 4-13).
If Elements selected too much or too little, tweak the selection’s size.
The Tool Options area contains three little brush icons. Click the top icon to create a new selection, click the middle one and then drag to add to the existing selection, or click the bottom one and then drag over an area you want to remove from the existing selection. (You don’t have to use the Tool Options settings: You can just drag to extend your selection, or Alt-drag/Option-drag to remove some of it.)
Once you’re happy with the change, you’re done.
You can back up by clicking the Undo button or pressing Ctrl+Z/⌘-Z to undo your changes step by step. Just keep going to eliminate the whitening completely if you don’t like it.
Note
Quick Edit’s Whiten Teeth and Type tools create a layered file (see Chapter 6). If you understand layers, you can go back to Expert mode and make changes after you use these tools to do things like adjust the opacity or blend mode of the new layer. You can always discard your changes by discarding the layer they’re on. And for the Whiten Teeth tool, you can even edit the area affected by the changes by editing the layer mask it creates (Editing a Layer Mask) or using the Smart Brush tool (Correcting Part of an Image) in Expert mode.
As mentioned above, after you work with this tool, Elements leaves you with a layered file. Normally that isn’t a problem, even if you don’t know anything about layers, but once in a while you may find that nothing happens when you try to make further changes to your photo. In that case, click the Expert tab near the top of the screen to switch to Expert mode. In the Layers panel (if you don’t see it, display it by going to Window→Layers), look for the word “Background” and click it. Once you do, that part of the panel should turn blue (if it doesn’t, click it again). Now you can go back to the Quick Fix window (by clicking the Quick tab near the top of the screen) and do whatever you want to your photo. However, the whitened teeth may behave differently from the rest of the photo. If that happens and you haven’t closed the photo since using Whiten Teeth, use the History panel (Undo) to back up to before you used it.
Note
If you’ve used a previous version of Elements and you’re looking for the Make Dull Skies Blue and Black and White—High Contrast tools, you’ll find them in Expert mode as options for the Smart Brush (Correcting Part of an Image). The Smart Brush also has a Whiten Teeth option, so there’s no need to switch to Quick Fix just for that.
Quick Fix Suggested Workflow
There are no hard-and-fast rules for what order you need to use the Quick Fix tools. As mentioned earlier, Elements lays out the tools in the Adjustments panel in the order that usually makes sense. But you can pick and choose whichever tools you want, depending on what your photo needs.
If you’re the type of person who likes a set plan for fixing photos, here’s one order in which to apply the commands:
Rotate your photo (if necessary) by using the buttons below the image preview.
Fix red eye (if necessary) as explained on Fixing Red Eye.
Fix any blemishes with the Spot Healing Brush (The Spot Healing Brush).
Crop the image.
If you know you want to crop your photo, now’s the time. Doing so gets rid of any problem areas before they affect other adjustments. For example, say your photo has a lot of overexposed sky that you want to crop out. If you leave it in, that area may skew the effects that the Levels and Color fixes have on your image. So if you already know where you want to crop, do so before making other adjustments for more accurate results. (If you aren’t yet sure what you want to trim, it’s OK to wait until later to crop.)
Fix exposure (if necessary).
If your photo’s overall exposure is way out of whack, try using the Adjustments panel’s Exposure section to adjust it. If the exposure is only bad in spots, skip this step.
Try Auto Smart Fix and/or the Smart Fix slider; use the Undo command if you don’t like the results.
Pretty soon, you’ll get a good idea of how likely it is that this fix will do a good job on your photos. Some people love it; others think it makes their pictures too grainy.
If Smart Fix didn’t do the trick, work your way down through the Adjustments panel’s Levels, Color, and Balance sections until you like the way your photo looks.
Read the sections earlier in this chapter to understand what each fix does to your photo.
Sharpen your image.
Try to make sharpening your last adjustment, because other commands can cause funky results on photos you’ve already sharpened. But if you’re a beginner and not comfortable with layers, you can sharpen before using the Whiten Teeth tool. (See Quick Fix Suggested Workflow for more about why you’d wait to use it.)
To close your photo from the Quick Fix window, click the X at the top right of the preview area, choose File→Close, or press Ctrl+W/⌘-W.
Other Fast Fixes
As if all of the options described above weren’t enough, Adobe gives you two more ways to fix photos fast. Both of these features are only available from the menus at the top of your screen. The first one, “Adjust Color for Skin Tone,” is available in both Quick Fix and Expert modes, but for some reason you have to switch over to Expert mode for the second one, Auto Smart Tone—it’s not available in Quick Fix.
Adjusting Skin Tones
If you’re like most amateur photographers, your most important photos are of people: family members, friends, or even just fascinating strangers. Elements has a feature designed especially for correcting photos with people in them: the “Adjust Color for Skin Tone” command, available from the Enhance menu in both Quick Fix and Expert modes.
This command’s name is a bit confusing. What it actually does is adjust your whole image based on the skin tone of someone in the photo. The idea is that you’re likely much more interested in the way the people in your photos look than in how the background looks, so “Adjust Color for Skin Tone” makes good skin color its top priority. This is another automatic fix, but there’s a dialog box where you can tweak the results once you’ve previewed Elements’ suggested adjustments.
Generally, you want to use this command after making any overall changes to your photo, but before you sharpen the image. Here’s how to use this command:
Call up the “Adjust Color for Skin Tone” dialog box (Figure 4-14).
In either Quick Fix or Expert mode, go to Enhance→Adjust Color→“Adjust Color for Skin Tone.” Once the dialog box appears, you may need to move it out of the way so you can see what’s happening in your photo.
Figure 4-14. While this dialog box is open, your cursor turns into a little eyedropper when you move it over your photo. Just click the best-looking area of skin you can find. Clicking different spots gives different results, so you may want to experiment by clicking various places. You can’t drag the dialog box’s sliders until after you click. Once Elements adjusts the photo based on your click, use the sliders to fine-tune the results.Tip
If you understand layers (Chapter 6), you may want to make a duplicate layer and apply this command to the duplicate. That way you can adjust the intensity of the result by changing the layer’s opacity (see Managing Layers). You can also apply a layer mask (Layer Masks) to protect areas you don’t want Elements to change.
Tell Elements which patch of skin to use for calculating color adjustments.
Find a portion of your photo where your subject’s skin has relatively good color, and click it.
Tweak the results.
Elements is often a bit overenthusiastic in its adjustments, so you may need to use the sliders in the dialog box to get more pleasing, realistic color. You can get an idea of which way to move them by looking at the colors in their tracks:
The Tan slider increases or decreases the browns and oranges in the skin tones.
The Blush slider increases the rosiness of the skin as you move the slider right and decreases it as you move it left.
The Ambient Light slider works just like the Temperature slider in the Adjustments panel (Balancing Color).
You may get swell results with your first click or have to use all the sliders to get a truly realistic result—it depends on the photo. As you work, Elements previews the changes right in your photo. If you mess up and want to start again, click the dialog box’s Reset button. If you decide you’d rather use another tool instead, click Cancel.
When you like what you see, click OK.
Elements applies your changes. If you want to undo them, press Ctrl+Z/⌘-Z.

“Adjust Color for Skin Tone” seems to work better on fair skin than on darker skin tones, and it’s better at making fairly subtle adjustments than dramatic ones. Also, notice that skin tones aren’t the only colors that change—Elements adjusts all the colors in the photo (Figure 4-15). By the time you’ve got the skin looking just right, you may find that your image has acquired quite a color cast. If this bothers you, try a different tool. On the other hand, you can create some very nice late-afternoon light effects with this command.
While “Adjust Color for Skin Tone” is really meant as a kind of alternative fast fix, you may find it’s most useful for making small, final adjustments to photos you’ve already edited using other tools.

Auto Smart Tone
Elements includes yet another kind of auto correction, but you have to go up to the Enhance menu at the top of your screen to find it. When you use Auto Smart Tone, Elements automatically corrects the tonality of your photo (its brightness, contrast, exposure, and so on) and then presents you with a way to make further adjustments. The interesting thing about Auto Smart Tone is that it can watch what you do to your photos, learn how you like to adjust them, and remember and reapply similar corrections to future images.
It’s quite easy to use this command:
In either Quick Fix or Expert mode, open a photo and then go to Enhance→Auto Smart Tone.
Elements makes its best guess about the best adjustments to make to your image and applies them, but you don’t have to accept what it does—you can easily tweak the results.
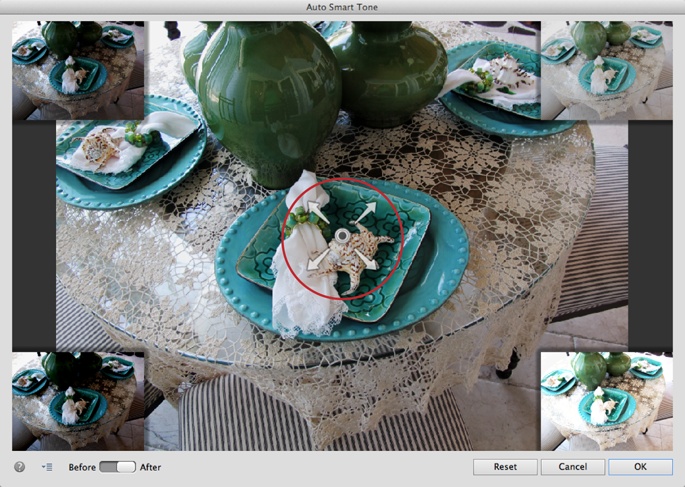
In the Auto Smart Tone window that appears, adjust the changes Elements applied.
The window displays your already-corrected image in the middle, surrounded by four thumbnails of other corrections, one in each corner (Figure 4-16). In the middle of your image is a black dot with four arrows radiating from it; Adobe calls this the joystick. Just grab the joystick and drag it toward the thumbnail that looks closest to how you want your photo to look. As you drag, a grid appears over the center of your image. Just keep dragging until you like what you see.
Click OK to accept the corrections.
Click Cancel if you decide the process isn’t helping your photo any.
Click the four-line square at the bottom of the window to see a pop-out menu with two options: “Learn from this correction,” which tells Elements to remember what settings you liked for this image and to use them as a basis for future adjustments, and “Show corner thumbnails,” which toggles the corner thumbnails on and off.
You may find this command really helpful or you may not like what it does at all. Generally speaking, for adjusting a single photo, your may find that one of the other auto fixes (described beginning on Smart Fix) works just fine. But if you have a bunch of similar photos to correct, the “Learn from this correction” setting can shorten the amount of time you need to spend on each one.
The corrections that Auto Smart Tone makes are pretty sophisticated, and you may find it worth spending some time to get comfortable with it. If you use Elements in conjunction with Adobe’s Lightroom, you may find that Auto Smart Tone does an even better job with your photos than Lightroom’s Auto Tone, for example.
Tip
You can tell Auto Smart Tone to start over with its remembering. Say you’ve been fixing a bunch of photos that are too dark and now you’ve got a batch that are too light. You don’t want Auto Smart Tone to make the same changes it learned to make to the dark photos, so go to Edit→Preferences→General/Photoshop Elements Editor→Preferences→General and click Reset Auto Smart Tone Learning. That tells Elements to forget everything it’s remembered so far about how to adjust your images and start learning what you do from now on.
Getting Fancy: Effects, Textures, and Frames
In addition to making basic corrections to your images, Elements’ Quick Fix window also lets you gussy them up by using the panels that are hidden when you first start the Quick Fix: Effects, Textures, and Frames. One of the best new features in Elements 13 is all the new effects that Adobe added, which let you give your photos lots of the artistic and filtered looks that are so popular right now.
They couldn’t be easier to use: Just head to the bottom right of the Quick Fix window and click the button for the panel that contains what you want to add to your photo. If you click Effects, you may have to wait a bit, since Elements is busy creating a thumbnail for each effect that shows it applied to your image. Once the thumbnails appear, just scroll through them and click the one you want to try. There are even more choices than you can see at first, as Figure 4-17 explains.

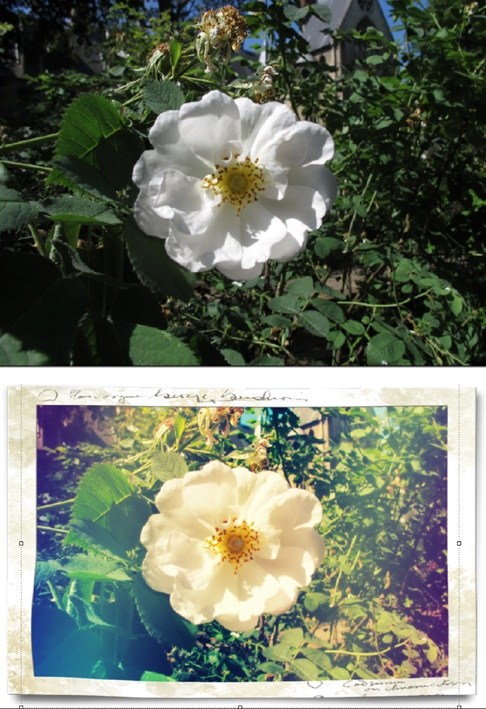
Figure 4-18 shows an example of the types of things you can do with these fun features. If you don’t like the result, use Ctrl+Z/⌘-Z to undo it and try another one, or click the Reset button at the panel’s upper right to undo everything you’ve done in the Quick Fix window. If you like what you did, all you need to do is save your changes.
Note
When you click the Effects button, you may have to wait a moment to see the thumbnails in the Effects panel. That’s because Elements is busy creating a thumbnail of what your photo will look like with each effect added to it. (The Textures and Frames panels just use generic thumbnails.)
There’s no special order in which you need to apply effects or textures—you can switch back and forth and stack them up by applying more than one to your photo. But you should wait to apply a frame after you’re through with the effects and textures, because effects and textures may not have a visible impact on your image once you’ve added a frame. That’s because all three panels add layers to your file (see Chapter 6)—some of the frames add several layers—and Elements may not target the correct layer for other changes once you’ve added a frame; Quick Fix Suggested Workflow explains why. A good rule of thumb is to use the Quick Fix panels from left to right: first make any adjustments to your image, then add a special effect, then a texture, and finally a frame (if you want to use them all on one image, that is).
Note
The Effects and Textures panels are unique to Quick Fix—this is the only place you can find them in Elements (although you can apply different effects in Expert mode, as explained in Chapter 13). The options in the Frames panel are a subset of the frames available in the Graphics panel in Expert and Create modes, and they work the same way.
Once your photo is framed, Elements should automatically activate the Move tool (if it doesn’t and you want to make adjustments to the frame, simply click the tool’s icon in the toolbox). With this tool active, you can right-click/Control-click your photo for a menu that gives you many ways to adjust the frame, and adjust the size of your photo or the part that’s visible in the frame by dragging one of the handles on the image. (You’ll also see the Tool Options settings explained on Elements’ Tools.) The Move tool is explained in detail on The Move Tool.
If you apply effects, textures, or a frame to your photo in the Quick Fix window and later change your mind, in Expert mode, just click over to the Layers panel and delete the layer(s) that Elements added when you applied those changes.
Tip
If you understand layer masks (Layer Masks), you can control which parts of your photos are affected by the effects and textures by editing the layer masks that Elements adds when it applies them.