3
Sacroiliac Joint Stability, Muscle Imbalances, and the Myofascial Slings
As the incidence of pelvic and lower back pain continues to increase, we will need to look at and understand the muscular relationships that affect the core and lumbo–pelvic–sacral stability. We will then have to decide how to incorporate this knowledge into an assessment and treatment plan, especially for patients and athletes who present with pain associated with the area of the pelvic girdle and lower back.
There are two main factors that affect the stability of the pelvis (or to be more precise the sacroiliac joint (SIJ)): form closure and force closure. These two mechanisms collectively assist in a process known as the self-locking mechanism.
Form closure arises from the anatomical alignment of the bones of the innominate and the sacrum, where the sacrum forms a kind of keystone between the wings of the pelvis. The SIJ transfers large loads and its shape is adapted to this task. The articular surfaces are relatively flat, which helps to transfer compression forces and bending movements. However, a relatively flat joint is vulnerable to shear forces. The SIJ is protected from these forces in three ways. First, the sacrum is wedge (triangular) shaped and thus is stabilized between the innominate bones, similarly to a keystone in a Roman arch, and is kept in a state of “suspension” by the ligaments acting upon it. Second, in contrast to other synovial joints, the articular cartilage is not smooth but rather irregular (think back to Chapter 1). Third, a frontal dissection through the SIJ reveals cartilage-covered bone extensions protruding into the joint—the so-called “ridges” and “grooves.” They seem rather irregular, but are in fact complementary to each other, and this unusual irregularity is very relevant as it serves to stabilize the SIJ when compression is applied.
According to Vleeming et al. (1990a), after puberty most individuals develop a crescent-shaped ridge running the entire length of the iliac surface with a corresponding depression on the sacral side; this complementary ridge and groove are now believed to lock the surfaces together and increase stability of the SIJ.
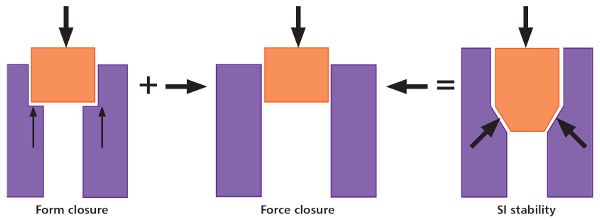
If the articular surfaces of the sacrum and the innominate bones fitted together with perfect form closure, mobility would be practically impossible. However, form closure of the SIJ is not perfect and mobility—albeit small—is possible, and therefore stabilization during loading is required. This is achieved by increasing compression across the joint at the moment of loading; the anatomical structures responsible for this compression are the ligaments, muscles, and fasciae. The mechanism of compression of the SIJ by these additional forces is what is commonly called force closure. When the SIJ is compressed, friction of the joint increases and consequently reinforces form closure, as shown in Figure 3.1. According to Willard et al. (2012), force closure reduces the joint’s “neutral zone,” thereby facilitating stabilization of the SIJ.
Force closure is accomplished as follows. The first method is by nutation of the sacrum, which is achieved either by anterior motion of the sacral base or by posterior rotation of the innominate bone. These two types of motion result in a tightening of the sacrotuberous, sacrospinous, and interosseous ligaments; this tightening assists in activating the force closure mechanism, thereby increasing the compression of the SIJ. Counter-nutation, on the other hand, decreases the stability of the SIJ because of the reduced tension in the above-mentioned ligaments.
Cohen (2005) states that because the ilium and sacrum only meet at approximately one-third of their surfaces, the associated ligaments provide the rest of the stability between these bones.
In the second method, force closure is assisted by the activation/contraction of the inner and outer core muscles (local and global muscle systems), as you will read later on in this chapter.
The terms form closure and force closure delineate the active and passive components of this self-locking mechanism and were first identified by Vleeming et al. (1990a, 1990b). Below is a quote from Vleeming et al. (1995) that I personally believe explains the above text.
“Shear in the sacroiliac joints is prevented by the combination of specific anatomical features (form closure) and the compression generated by muscles and ligaments that can be accommodated to the specific loading situation (force closure). If the sacrum would fit the pelvis with perfect form closure, no lateral forces would be needed. However, such a construction would make mobility practically impossible.”
Sacroiliac Stability
Several ligaments, muscles, and fascial systems contribute to force closure of the pelvis: these are collectively referred to as the osteo-articular-ligamentous system. Recall that when the body is working efficiently, the shear forces between the innominate bones and the sacrum are adequately controlled, and loads can then be transferred between the trunk, pelvis, and legs.
Vleeming and Stoeckart (2007) mention that various muscles are involved in force closure of the SIJ, and that even muscles such as the rectus femoris, sartorius, iliacus, Gmax, and hamstrings have adequate lever arms to influence movement in the SIJ. The effect of these muscles is dependent on open or closed kinematic movements, and whether the pelvis is sufficiently braced.
As you will read shortly, and also in later chapters, there is one muscle in particular that plays a highly significant role in stabilizing the SIJs—this muscle is the Gmax. Some of the Gmax fibers merge and attach onto the sacrotuberous ligament as well as onto a connective tissue structure known as the thoracolumbar fascia. Vleeming et al. (1989a) demonstrated this fact on 12 cadaver dissections; they found that the Gmax muscle was directly attached to the sacrotuberous ligament in all cases.
The Gmax connects, via the thoracolumbar fascia, to the contralateral latissimus dorsi to form what is known as the posterior oblique myofascial sling (see section “The Outer Core Unit: The Integrated Myofascial Sling System (Global System)” later in this chapter). It has been shown that weakness, or possibly a misfiring sequence, of the Gmax will predispose the SIJ to injury by decreasing the function of this (posterior oblique) myofascial sling. A weakness or misfiring of the Gmax is a potential cause of a compensatory overactivation of the contralateral latissimus dorsi; walking and running (gait cycle, explained in Chapter 4) impose high loads on the SIJ, so this weight-bearing joint will need to be self-stabilizing in order to reduce the effect of the altered compensatory mechanism.
Research has shown that sacral nutation (a nodding type of movement of the sacrum between the innominate bones) is the best position for the pelvic girdle to be at its most stable. As I have already explained in earlier chapters, nutation occurs when moving (for example) from a sitting position to standing, and full nutation occurs during forward or backward bending of the trunk. This motion of sacral nutation tightens the major ligaments (sacrotuberous, sacrospinous, and interosseous) of the posterior pelvis, and the resulting tension increases the compressive force across the SIJ. The increased tension provides the required stability that is needed by the SIJ during the gait cycle as well as when simply rising from a sitting to a standing position.
Vleeming et al. (1989b) showed how load application to the sacrotuberous ligament, either directly to the ligament or through its continuations with the long head of biceps femoris or the attachments of the Gmax, significantly diminishes forward rotation of the sacral base. They demonstrated that this increases the coefficient of friction, thus decreasing movement of the SIJ by force closure.
Sacral Nutation and Counter-Nutation
I find it very beneficial at certain times, especially for you the reader, to try to discuss alternative ways of explaining a relatively complex motion. I therefore thought I would introduce an opinion by another author, Evan Osar (2012), who states that nutation is the anterior inferior motion of the sacral base, while counter-nutation is the posterior superior motion of the sacral base. Nutation is necessary for the locking of the SIJ during unilateral stance, as shown in Figure 3.2(a). The inability to nutate the sacrum is a leading cause of unilateral stance instability and one of the causes of the classic Trendelenburg gait. Counter-nutation, on the other hand, is necessary in order to unlock the SIJ to allow anterior rotation of the innominate and extension of the hip joint, as shown in Figure 3.2(b). The inability to unlock or counter-nutate the sacrum leads to compensatory increases in lumbopelvic flexion, which in turn lead to and perpetuate lumbar instability.
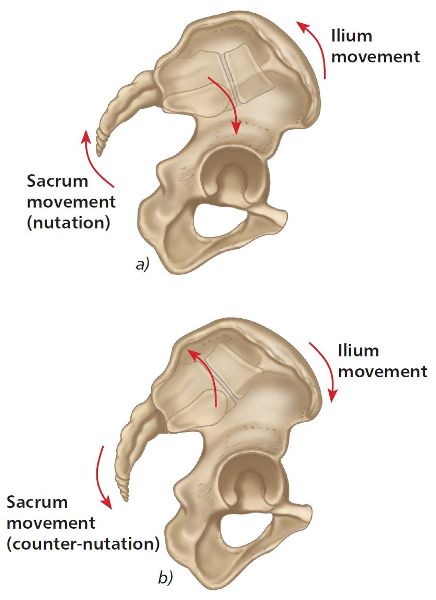
Figure 3.2. (a) Posterior pelvic rotation and sacral nutation. (b) Anterior pelvic rotation and sacral counter-nutation.
Force Closure Ligaments
The main ligamentous structures that influence force closure (Figure 3.3) are: (1) the sacrotuberous ligament, which connects the sacrum to the ischium and has been termed the key or lead ligament; and (2) the long dorsal sacroiliac ligament, which connects the 3rd and 4th sacral segments to the PSIS and is also known as the posterior sacroiliac ligament.
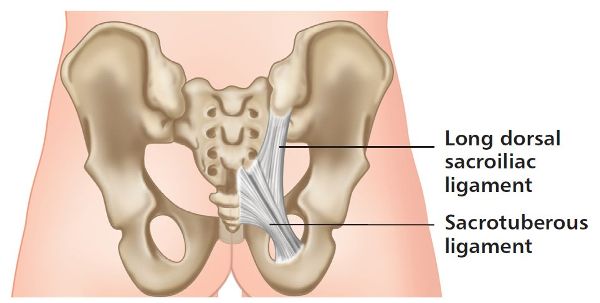
Figure 3.3. Sacrotuberous ligament (key) and the long dorsal sacroiliac ligament.
Ligaments can increase articular compression when they are tensed or lengthened by the movement of the bones to which they attach, or when they are tensed by the contraction of muscles that insert onto the bones.
Tension in the sacrotuberous ligament can be increased in one of three ways:
1. Posterior rotation of the innominate bone relative to the sacrum.
2. Nutation of the sacrum relative to the innominate bone.
3. Muscular contraction of any one of the four muscles that have a direct attachment to the sacrotuberous ligament, namely biceps femoris, piriformis, Gmax, and multifidus.
The main ligamentous tissue to restrain counter-nutation of the sacrum, or anterior rotation of the innominate, is the long dorsal sacroiliac ligament (posterior sacroiliac ligament). This is a less stable position (compared with the position of nutation) for the pelvis to resist horizontal and/or vertical loading, since the SIJ is under less compression and is not self-locked. The long dorsal ligament is commonly a source of pain and can be palpated just below (inferior to) the level of the PSIS.
By themselves, ligaments cannot maintain a stable pelvis—they rely on several muscle systems to assist them. There are two important groups of muscles that contribute to stability of the lower back and pelvis: collectively they are called the inner unit (core) and the outer unit (myofascial sling systems). The inner unit consists of the transversus abdominis (TVA), multifidus, diaphragm, and muscles of the pelvic floor—also collectively known as the core, or local stabilizers. The outer unit consists of several “slings,” or systems of muscles (global stabilizers and mobilizers that are anatomically connected and functionally related). The inner and outer units will be discussed later on in this chapter.
Force Couple
Definition: A force couple is a situation where two forces of equal magnitude, but acting in opposite directions, are applied to an object and pure rotation results, as mentioned by Abernethy et al. (2004).
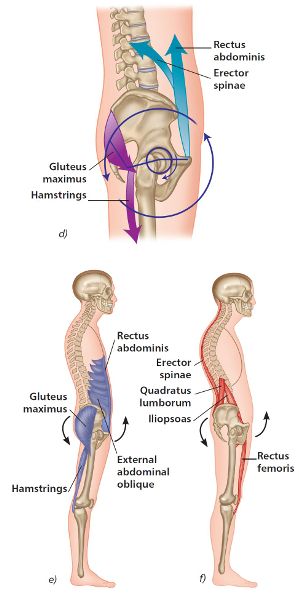
Any altered positioning of the pelvis caused by potential muscle imbalances will subsequently affect the rest of the kinetic chain. There are several force couples responsible for maintaining proper positioning and alignment of the pelvis. The force couples responsible for controlling the position of the pelvis in the sagittal and frontal planes are shown schematically in Figures 3.4(a–f) and 3.5.
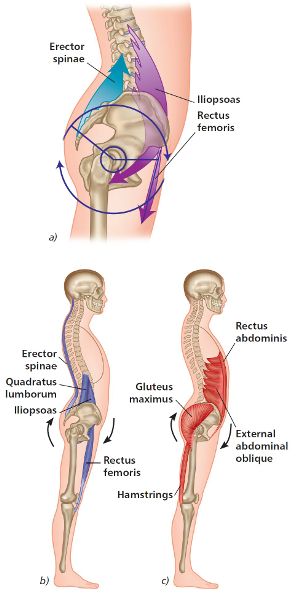
Figure 3.4. (a) Sagittal plane (anterior) pelvic force couple. (b) Anterior tilt: muscles held in a shortened position. (c) Anterior tilt: muscles held in a lengthened position.
Figure 3.4. (d) Sagittal plane (posterior) pelvic force couple. (e) Posterior tilt: muscles held in a shortened position. (f) Posterior tilt: muscles held in a lengthened position.
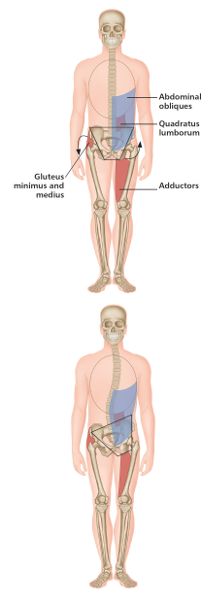
Figure 3.5. Frontal plane (lateral) pelvic force couples.
Posture
Definition: Posture is the attitude or position of the body, as discussed by Thomas (1997).
According to Martin (2002), posture should fulfill three functions:
1. Maintain the alignment of the body’s segments in any position: supine, prone, sitting, all fours, and standing.
2. Anticipate change to allow engagement in voluntary, goal-directed movements, such as reaching and stepping.
3. React to unexpected perturbations or disturbances in balance.
From the above, it can be seen that posture is an active as well as a static state, and that it is synonymous with balance. Optimal posture must be maintained at all times, not only when holding static positions (e.g. sitting and standing) but also during movement.
If optimal posture and postural control are to be encouraged during exercise performance, the principles of good static posture must be fully appreciated. Once these are understood, poor posture can be identified and corrective strategies adopted.
• Good posture is the state of muscular and skeletal balance that protects the supporting structures of the body against injury or progressive deformity, irrespective of the attitude (e.g. erect, lying, squatting, or stooping) in which these structures are working or resting.
• Poor posture is a faulty relationship of the various parts of the body, producing increased strain on the supporting structures, and resulting in less efficient balance of the body over its base of support.
Poor Posture
Poor posture may be a result of many different contributing factors. It may be caused by trauma suffered by the body, some form of deformity within the musculoskeletal system, or even faulty loading. Because sitting has become a position maintained by our bodies for long periods of time (possibly 8+ hours), most people in today’s society are losing the fight against gravity and altering their center of gravity (COG). With correct posture, your postural muscles are fairly inactive and energy efficient, only responding to disruptions in balance in order to maintain an upright position. As you move away from an ideal alignment, postural muscle activity therefore increases, thus leading to higher energy expenditure.
Pain Spasm Cycle
Ischemia will be a primary source of pain in the initial stages of poor posture. The blood flow through a muscle is inversely proportional to the level of contraction or activity, reaching almost zero at 50–60% of contraction. Some studies have indicated that the body is not able to maintain homeostasis with a sustained isometric contraction of over 10%.
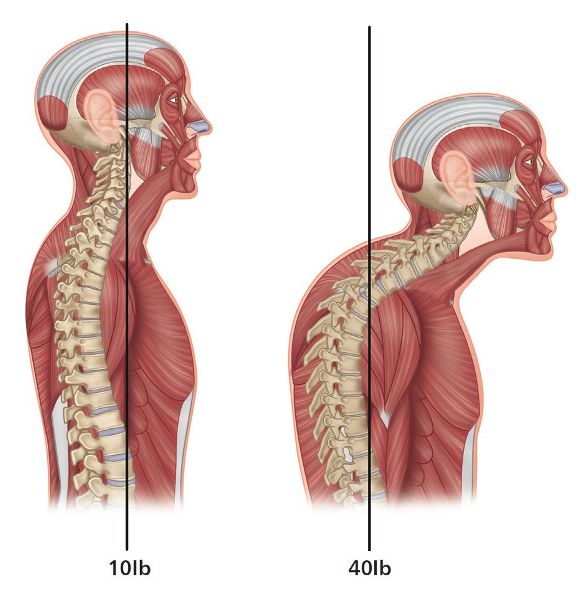
Consider the following example: the weight of the head is approximately 7% of total body weight (shoulders and arms are around 14%). This means that for a person weighing 176lbs (80kg), the head will weigh around 11–13lbs (5 to 6kg). If the head and shoulders move forward, out of ideal alignment, the activation of the neck extensors will increase dramatically, resulting in restricted blood flow. Previous authors have stated that for every inch of forward head posture, the weight of the head on the spine can increase by approximately 10lb (4.5kg). For example, if the weight of the head is normally 10lb (4.5kg), it will now potentially weigh 20lb (9kg) for just a 1” (2.5cm) increase in forward head posture, 30lb (13.5kg) for a 2” (5cm) increase, and an unbelievable 40lb (18kg) if the head translates 3” (7.5cm), as shown in Figure 3.6(a).
This prolonged isometric contraction will force the muscles into anaerobic metabolism and increase lactic acid and other irritating metabolite accumulation. If adequate rest is not given, a reflex contraction of the already ischemic muscles may be initiated. This person will have now entered the pain spasm cycle (Figure 3.6(b)).
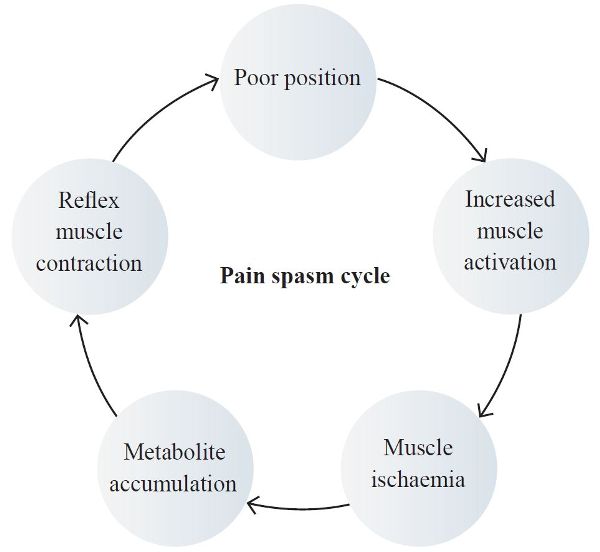
Figure 3.6. (b) Pain spasm model.
The neuromuscular system, as we know, is made up of slow-twitch and fast-twitch muscle fibers, each having a different role in the body’s function. Slow-twitch fibers (Type I) are active in sustained low-level activity, such as maintaining correct posture, whereas fast-twitch fibers (Type II) are used for powerful, gross movements. Muscles can also be broken down into two further categories—tonic (or postural) and phasic.
Tonic (Postural) and Phasic Muscles
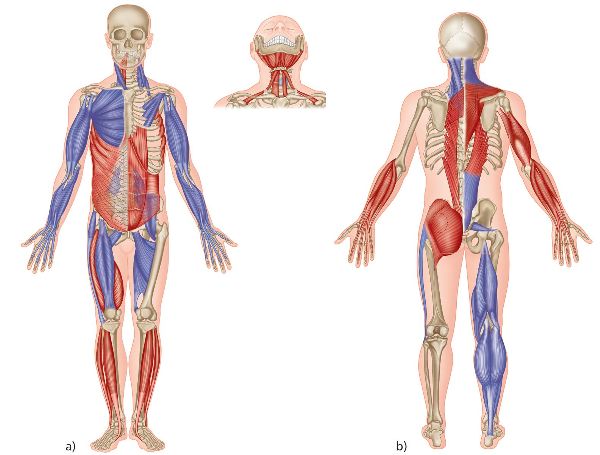
Janda (1987) identified two groups of muscles on the basis of their evolution and development. Functionally, muscles can be classified as tonic or phasic. The tonic system consists of the flexors, which develop later on to become the dominant structure. Umphred et al. (2001) identified that the tonic muscles are involved in repetitive or rhythmic activity and are activated in flexor synergies, whereas the phasic system consists of the extensors and emerges shortly after birth. The phasic muscles work eccentrically against the force of gravity and are involved in extensor synergies. The division of muscles into predominantly phasic and predominantly postural is given in Table 3.1.
Table 3.1. Phasic and postural muscles of the body.
Previous authors have suggested that muscles which have a stabilizing function (postural) have a natural tendency to shorten when stressed, and that other muscles which play a more active/moving role (phasic) have a tendency to lengthen and can subsequently become inhibited (see Table 3.2). The muscles that tend to shorten have a primary postural role and are related to the potential inhibition weakness of the gluteal muscles (which you will read about later).
| Postural | Phasic | |
|---|---|---|
|
Function |
Posture |
Movement |
|
Muscle type |
Type I |
Type II |
|
Fatigue |
Late |
Early |
|
Reaction |
Shortening |
Lengthening |
Table 3.2. Lengthening and shortening of muscles.
There are some exceptions to the rule which states that certain muscles follow the pattern of becoming shortened while others become lengthened—some muscles are capable of modifying their structure. For example, some authors suggest that the scalene muscles are postural in nature, while others suggest that they are phasic. We know from specific testing, depending on what dysfunction is present within the muscle framework, that the scalenes can be found to be held in a shortened position and tight, but at other times they can be observed to be lengthened and weakened.
There is a distinction between postural and phasic muscles; however, many muscles can display characteristics of both and contain a mixture of Type I and Type II fibers. The hamstring muscles, for example, have a postural stabilizing function, yet are polyarticular (cross more than one joint) and are notoriously prone to shortening.
Postural Muscles
Also known as tonic muscles, the postural muscles have an antigravity role and are therefore heavily involved in the maintenance of posture. Slow-twitch fibers are more suited to maintaining posture: they are capable of sustained contraction but generally become shortened and subsequently tight.
Postural muscles are slow-twitch dominant because of their resistance to fatigue, and are innervated by a smaller motor neuron. They therefore have a lower excitability threshold, which means the nerve impulse will reach the postural muscle before the phasic muscle. With this sequence of innervation, the postural muscle will inhibit the phasic (antagonist) muscle, thus reducing its contractile potential and activation.
Phasic Muscles
Movement is the main function of phasic muscles. These muscles, which are often more superficial than postural muscles and tend to be polyarticular, are composed of predominantly Type II fibers and are under voluntary reflex control.
A shortened, tight postural muscle often results in inhibition of the associated phasic muscle, whose function becomes weakened as a result. The relationship between a tightness-prone muscle and an associated weakness-prone muscle is one way. As the tightness-prone muscle becomes tighter and subsequently stronger, this causes an inhibition of the weakness-prone muscle, resulting in its lengthening and consequent weakening: think about how this might affect the relationship, for example, between the iliopsoas and the gluteal muscles, or between the pectoralis major/minor and the rhomboids.
Figure 3.7. Postural and phasic muscles: (a) anterior view; (b) posterior view. The blue muscles are predominantly postural, and the red muscles predominantly phasic.
Muscle Activity Before and After Stretching
Let’s take a look at some electromyography (EMG) studies of trunk muscle activity before and after stretching hypertonic muscles, in this case the erector spinae. In Table 3.3 the hypertonic erector spinae are indicated as being active during trunk flexion. After stretching, these muscles are suppressed both in trunk flexion (which allows greater activation of the rectus abdominis) and in trunk extension (dorsal raise).
| Muscle | First recording
|
Second recording
|
||||
|---|---|---|---|---|---|---|
|
Rectus abdominis |
|
|
|
|
|
|
|
Erector spinae |
|
|
|
|
|
|
Table 3.3. EMG recordings of muscle activity.
(Source: Hammer 1999)
Effects of Muscle Imbalance
The research results of Janda (1983) indicate that tight or overactive muscles not only hinder the agonist through Sherrington’s law of reciprocal inhibition as stated by Sherrington (1907), but also become active in movements that they are not normally associated with. This is the reason why, when trying to correct a musculoskeletal imbalance, you would encourage lengthening of an overactive muscle by using a muscle energy technique (MET), prior to attempting to strengthen a weak elongated muscle (METs will be explained in Chapter 7).
Think about the following words before you continue reading:
“A tight muscle will pull the joint into a dysfunctional position and the weak muscle will allow this to happen.”
One possible way to address this, therefore, is to simply apply the following rule: “lengthen before you strengthen.”
If muscle imbalances are not addressed, the body will be forced into a compensatory position, which increases the stress placed on the musculoskeletal system, eventually leading to tissue breakdown, irritation, and injury. You are now in a vicious circle of musculoskeletal deterioration as the tonic muscles shorten and the phasic muscles lengthen (Table 3.4).
Muscle imbalances are ultimately reflected in posture. As mentioned earlier, postural muscles are innervated by a smaller motor neuron and therefore have a lower excitability threshold. Since the nerve impulse reaches the postural muscle before the phasic muscle, the postural muscle will inhibit the phasic (antagonist) muscle, thus reducing the contractile potential and activation.
When muscles are subject to faulty or repetitive loading, the postural muscles shorten and the phasic muscles weaken, thus altering their length–tension relationship. Consequently, posture is directly affected because the surrounding muscles displace the soft tissues and the skeleton.
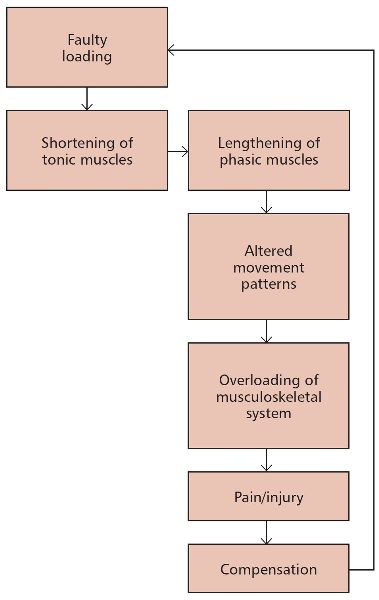
Table 3.4. The vicious circle of musculoskeletal deterioration.
Core Muscle Relationships
Inner Core Unit (Local System)
Definition: Static stability is the ability to remain in one position for a long time without losing good structural alignment, as mentioned by Chek (1999).
Static stability is also often referred to as postural stability, although this might be somewhat misleading, since as Martin (2002) states: “… posture is more than just maintaining a position of the body such as standing. Posture is active, whether it is in sustaining an existing posture or moving from one posture to another.”
The inner core unit (Figure 3.8) consists of:
• Transversus abdominis (TVA)
• Multifidus
• Diaphragm
• Muscles of the pelvic floor
Only the TVA and multifidus will be covered in this book, as these muscles are specifically related to postural and phasic imbalances and are easily palpated by the physical therapist. Since the diaphragm and muscles of the pelvic floor are difficult to palpate, they will not be discussed here.
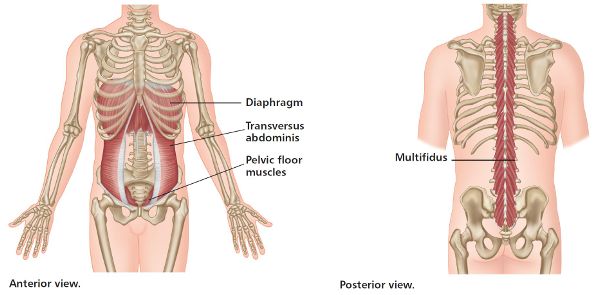
Figure 3.8: The inner core unit.
Transversus Abdominis
The transversus abdominis (TVA) is the deepest of the abdominal muscles. It originates at the iliac crest, inguinal ligament, lumbar fascia, and associated cartilage of the inferior six ribs, and attaches to the xiphoid process, linea alba, and pubis.
The main action of the TVA is to compress the abdomen via a “drawing-in” of the abdominal wall. This drawing-in is observable as a movement of the umbilicus (belly button) toward the spine. The muscle neither flexes nor extends the spine. Kendall et al. (2010) also state that “this muscle has no action in lateral flexion except that it acts to … stabilize the linea alba, thereby permitting better action by anterolateral trunk muscles [internal and external obliques].”
The TVA appears to be the key muscle of the inner unit. Richardson et al. (1999) found that in people without back pain, the TVA fired 30 milliseconds prior to shoulder movements and 110 milliseconds before leg movements. This corroborates the key role of the TVA in providing the stability necessary to perform movements of the appendicular skeleton. As the TVA contracts during inspiration it pulls the central tendon inferiorly and flattens, thereby increasing the vertical length of the thoracic cavity and compressing the lumbar multifidus.
Multifidus
The multifidus is the most medial of the lumbar back muscles, and its fibers converge near the lumbar spinous processes to an attachment known as the mammillary process. The fibers radiate inferiorly, passing to the TPs of the vertebrae that lie two, three, four, and five levels below. As well as some fibers uniting distally with the sacrotuberous ligament, those fibers that extend below the level of the last lumbar vertebra (L5) anchor to the ilium and the sacrum.
The multifidus is considered to be a series of smaller muscles, which are further divided into superficial and deep components. There is more muscle mass of the multifidus near the base of the sacrum than at the apex, especially filling the space between the PSISs rather than the ILAs.
The role of the multifidus in producing an extension force is essential to the stability of the lumbar spine, as well as functioning to resist forward flexion of the lumbar spine and the shear forces that are placed upon it. The multifidus muscle also functions to take pressure off the intervertebral discs, so that the body weight is evenly distributed throughout the whole vertebral column. The superficial muscle component acts to keep the vertebral column relatively straight, while the fibers of the deep muscle component contribute to the overall stability of the spine.
Richardson et al. (1999) identified the lumbar multifidus and the TVA as the key stabilizers of the lumbar spine. Both muscles link in with the thoracolumbar fascia to provide what Richardson et al. refer to as “a natural, deep muscle corset to protect the back from injury.”
More recently, Richardson et al. (2002) investigated how these muscles impact the SIJ using the Echo Doppler (a diagnostic ultrasound device, which can show if specific muscles are contracting). They were able to demonstrate that when the TVA and multifidus co-contract, the stiffness of the SIJ increases, thereby proving that these muscles are essential to compressing the SIJ and stabilizing the joint under load (force closure) and also that it is critical that this compression occurs at just the right time.
Hydraulic Amplifier
Described by Osar (2012), the hydraulic amplifier effect occurs with the contraction of muscles within their fascial envelopes. All muscles are invested inside fascia and, as they contract, push out into the fascia, thus creating a stiffening effect around the joint. In the spine, contraction of the lumbar erector spinae and multifidus within the thoracolumbar fascia creates an extension force, assisting extension of the spine. Osar says that when the lumbosacral multifidus contracts, it broadens posteriorly into the lumbodorsal fascia (Figures 3.9 and 3.10).
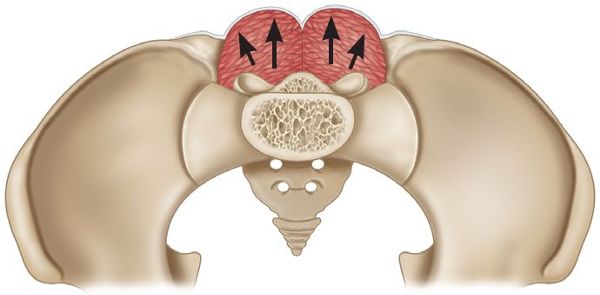
Figure 3.9. As the multifidus contracts, it pushes into the thoracolumbar fascia and, along with contraction of the TVA, provides intersegmental stability.
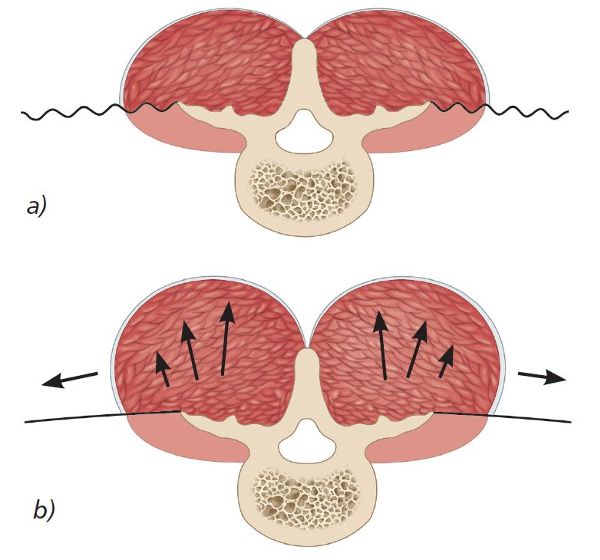
Figure 3.10. (a) The relaxed multifidus muscle in transverse section. (b) Co-contraction of the TVA and multifidus creates a stiffening tension on the thoracolumbar fascia, thereby providing intersegmental stability.
This effect is aided by contraction of the TVA, which pulls the thoracolumbar fascia tight around the contracting erector spinae and multifidus, thereby creating a stable column (Figure 3.11).
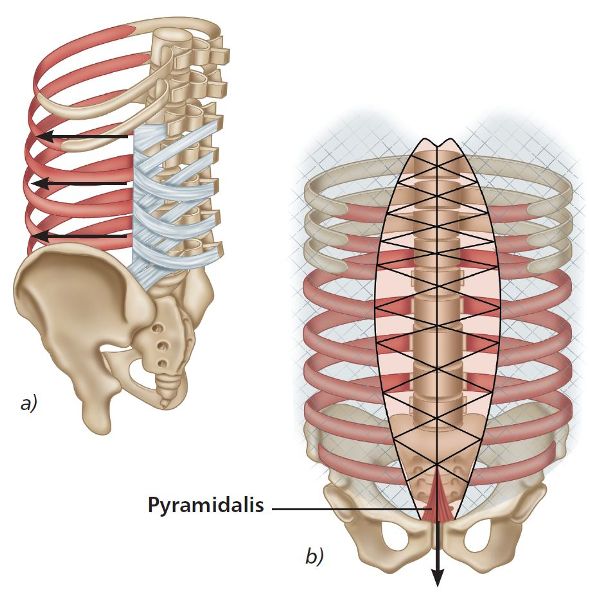
Figure 3.11. (a) As the TVA contracts, it tenses the thoracolumbar fascia, which allows the multifidus and lumbar erector spinae to contract against it and aid spinal elongation and stiffness. (b) Contraction of the pyramidalis tenses the linea alba (central tendon), creating a stable base for contraction of the TVA.
Outer Core Unit (Global System)
The force closure muscles of the outer core unit consist of four integrated myofascial sling systems (Figures 3.12–3.15):
• Posterior (deep) longitudinal sling
• Lateral sling
• Anterior oblique sling
• Posterior oblique sling
These myofascial slings provide force closure and subsequent stability for the pelvic girdle; failure or even weakness of any of these slings to secure pelvic stability can lead to lumbopelvic pain and dysfunctions. Although the muscles of the outer core unit can be trained individually, effective force closure requires specific coactivation and release of these myofascial slings for optimal function and performance.
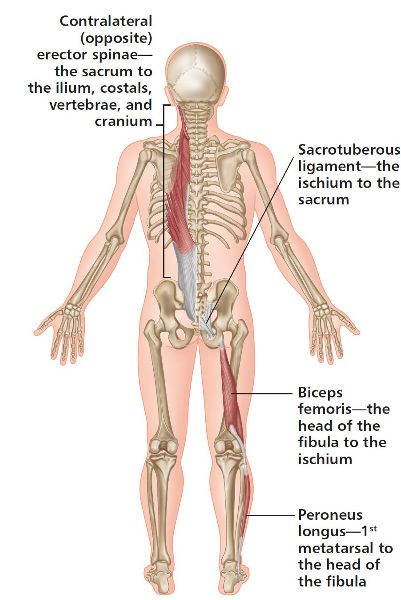
Figure 3.12. Posterior (deep) longitudinal sling.
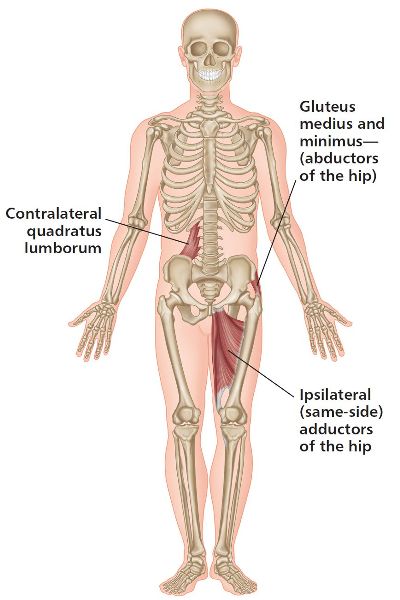
Figure 3.13. Lateral sling.
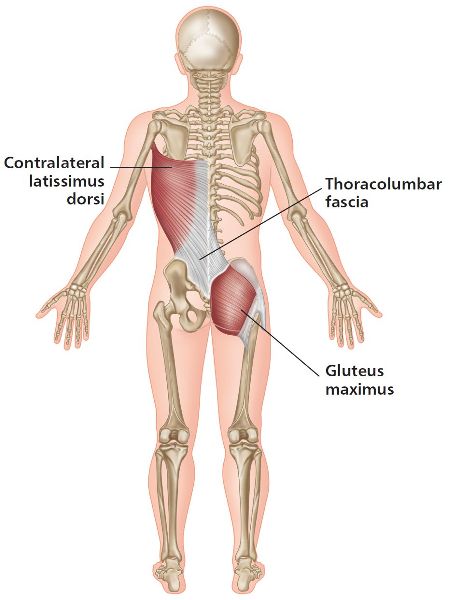
Figure 3.15. Posterior oblique sling.
The integrated myofascial sling system represents many forces and is composed of several muscles. A muscle may participate in more than one sling, and the slings may overlap and interconnect, depending on the task in hand. There are several slings of myofascial systems in the outer unit, including (but probably not limited to) a coronal sling (having medial and lateral components), a sagittal sling (having anterior and posterior components), and an oblique spiral sling. The hypothesis is that the slings have no beginning or end, but rather connect as necessary to assist in the transference of forces. It is possible that the slings are all part of one interconnected myofascial system, and a sling that is identified during any particular motion could merely be a result of the activation of selective parts of the whole sling (Lee 2004).
The identification and treatment of a specific muscle dysfunction (such as weakness, inappropriate recruitment, or tightness) is important when restoring force closure (second component of stability) and for understanding why parts of a sling may be restricted in motion or lacking in support. Note the following points:
• The four systems of the outer core unit are dependent upon the inner core unit for the joint stiffness and stability necessary for creating an effective force generation platform.
• Failure of the inner unit to work in the presence of outer unit demand often results in muscle imbalance, joint injury, and poor performance.
• The outer unit cannot be effectively conditioned by the use of modern resistance machines, as the specific training provided by these types of machine generally does not relate to day-to-day functional movements.
• Effective conditioning of the outer unit should include exercises that require integrated function of the inner and outer units, using movement patterns common to any given client’s work or sport environment (Chek 1999).
In Chapter 4 I will discuss the walking cycle (gait cycle); if you have a good understanding of the information regarding the myofascial sling systems, then, hopefully, it should make perfect sense how these slings are now incorporated into this cycle. I truly hope that as you read that particular chapter, the pieces of the jigsaw puzzle will slowly begin to form a recognizable picture. My goal is for you to come back to each specific chapter time and time again, to try to understand and digest what I have written. More importantly, however, I want you to be able to use this information in your own clinical setting to assess and treat your own athletes and patients.
Exercising the Outer Core
I personally believe that when most people go to the gym to exercise, they generally perform routines that are typically frontal-plane or sagittal-plane types of exercise: they either lift a weight to the sides (frontal plane) of their body or to the front (sagittal plane). If one were to ask these individuals to demonstrate an exercise to train their core, and also to perform that specific exercise in the transverse plane, I am sure that after some thought they would probably lie on their back and perform an abdominal crunch type of motion with a rotation; in other words, their elbow would be directed toward their opposite knee while performing the crunch movement, as shown in Figure 3.16(a).
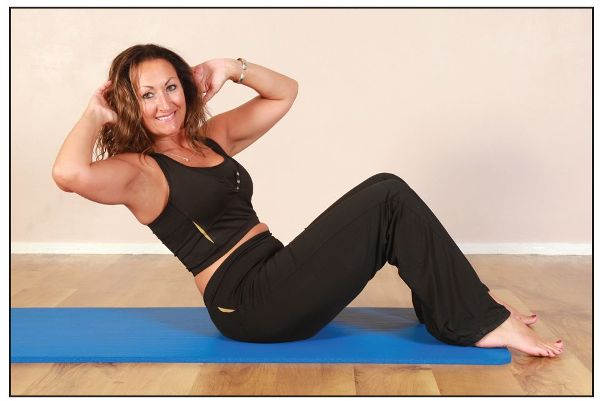
Figure 3.16. (a) Abdominal crunch in the transverse plane.
Let’s be a little realistic here. Apart from when we get out of bed in the morning, when do we ever perform that type of motion on a daily basis? When do we lie on our back and rotate the elbow toward the opposite knee? I would call this exercise non-functional, even though the majority of gym users routinely perform this exercise for their core muscles every day in their personal exercise routines.
If you think about it, most sporting movements, or simply walking come to that, normally involve some type of action in the transverse plane (movement across the body) of motion. Does it not make perfect sense, therefore, to train specifically within the parameters of the transverse plane, in combination with training in the sagittal (coronal) and frontal planes?
Movement-Based Exercise
The inner core unit musculature is generally made up of postural (tonic) muscle types that function mainly as stabilizers. These inner core muscles effectively stabilize the spine and SIJ at low levels of muscular contraction, with a low susceptibility to fatigue. Coordination of the inner core is critical for proper stabilization, which then allows a coordinated recruitment of the muscles of the outer core unit. The ability of the inner core unit muscles to contract prior to force production by the phasic muscles (biased toward movements) is actually considered more important than their inherent strength.
The outer core unit is mainly a phasic system, with large muscles that have the ability, because of the fact that they are very well orientated, to produce enough force to subsequently propel the body forward. The outer core, consisting of the four myofascial slings, also plays a very important role in stabilization of the pelvis, as all of the four individual slings mentioned earlier cross this area and naturally assist in force closure of the SIJ.
With regard to functional types of exercise, movement patterns must be identified and resistance applied to those patterns in a specific way. This is what resistance training is all about … resisting movements!
If specific movements performed by athletes and patients on a daily basis can be identified, these can be replicated by using some form of resistance training, thereby creating a stability protocol. This stability protocol will be further enhanced if these movements can be performed at a speed of contraction that mimics their daily functions. This will not only improve levels of overall fitness but also promote force closure of the pelvis, and subsequently promote a stable foundation. Each exercise will now have a direct purpose and function, instead of just increasing the size of the cross-sectional area of a particular muscle.
Before embarking on a training program for the outer and inner core, it is important to understand the meanings of the words “rep” and “set.”
Repetitions and Sets
Definition: A repetition (or rep) is one complete motion of an exercise. A set is a group of consecutive repetitions.
You may have heard someone comment that they performed, for example, three sets of 12 reps on the bench press machine. This means that they did 12 consecutive bench presses, had a break (rest), and then repeated the process a further two times.
There is no simple answer to the question of how many repetitions and sets should be performed, as the number of repetitions required depends on many factors, including where the patient/athlete is in their current training and what their individual goals are. Remember, the purpose of this book/chapter is to improve the optimum functionality of the pelvis through activation of the outer core unit so that your patient/athlete can perform the activities needed for everyday life, as well as participate in any sports-related activities. I suggest we aim for between 10 and 12 reps and between one and two sets of each exercise, at least to start with.
Please also remember that, as with any training program, the workouts will need to be progressive. For example, let’s say the patient/athlete starts with two or three exercises that I have chosen from the above primary movement patterns, and they perform two sets of 10 reps for each exercise; when the patient gets to the stage where they find these exercises to be relatively easy, it is then time to progress. This might happen after one week or it might take longer, perhaps three or four weeks. The exercise can be made more difficult by simply changing the number of repetitions, reducing the rest period between sets, adding in another exercise, or changing the resistance of the band (another color), as shown in Figure 3.16(b). For example, the green band is level 1 (easy), the blue band is level 2 (moderate), and the black band is level 3 (hard).
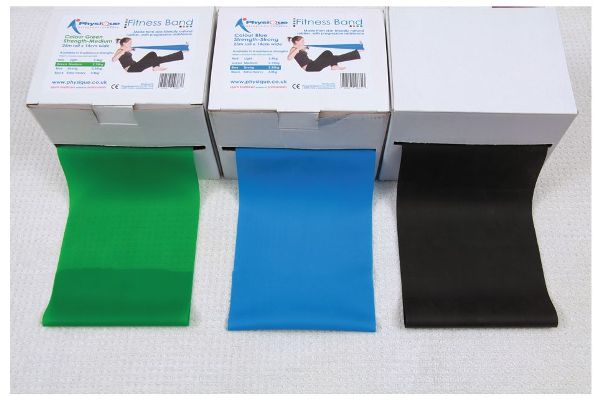
Figure 3.16. (b) Color of band indicates the level of resistance.
To progress in the program, you could, for example, ask the patient to either increase the number of repetitions, i.e. perform two sets of 12 reps (instead of 10 reps), or rest for only 30 seconds (instead of 45 seconds) between the sets. I highly recommend that everything be written down, as it is very easy to forget what was done in the previous training session—trust me on this! I can guarantee that within a few weeks the patient/athlete will easily be doing three sets of 12–15 reps for six or seven different types of outer core exercise.
The following exercises do not specify the number of repetitions and sets next to the exercise diagram, as I want to demonstrate how to perform the individual exercises correctly. Refer to Appendix 2 at the end of the book for an “Exercise Stabilization Sheet” for the outer core muscles; it has been designed specifically for you to photocopy and give out to your athletes and patients (or even for your own personal use). The blank boxes allow you to record the number of repetitions and sets for your patient’s rehabilitation program for the pelvis.
Unfortunately, there are a multitude (indeed, an almost infinite number) of movements that are performed in everyday life, making it near impossible to ensure that they are all included in every gym-based training program. However, I have selected the following six exercises, which can be incorporated into any strength and stability training regime, as they will specifically target the global muscles of the outer core sling system.
Primary Movement Patterns
The following exercises are what I consider to be the primary movement patterns, and one or more of these demonstrated exercises can be included in any functional, strength, or stability training program. The therapist/trainer should nevertheless be able to modify and adapt these primary movement exercise patterns accordingly (I will explain later in this chapter). This adaptability protocol will make the exercises far more functional, as well as being more interesting and specific to the needs and demands of your athletes and patients.
Some of the exercises I mention will activate one particular sling more than another; remember, however, that there is a natural cross-over on each exercise, so it is difficult to exercise and target only one specific sling at a time. This is because all of the four slings I have mentioned have to be involved in one way or another, depending on the particular movement one is performing. For example, the anterior and posterior oblique sling will be classified as agonist and antagonist (opposite to each other); however, I consider them to be also synergists (helpers to each other), because when you walk or run in a forward direction, the right arm moves in a forward motion, subsequently activating the anterior oblique sling, but at the same time the left arm moves in a backward type of motion, activating the posterior oblique sling. Hence the opposite and synergistic theory!
I believe the theory above is explained very well by the following:
“When walking or running, every forward motion of the right limb elicits an automatic backward motion of the left limb, and vice versa. You cannot have one movement without the other.”
The six primary movement pattern exercises are:
1. Push
2. Pull
3. Squat—Bend to Extend
4. Bend to Extend with Rotation
5. Single-Leg Stance
6. Rotation
Each of these movement patterns can be reproduced in a gym environment using specific exercise machines (e.g. cable machine) or resistance bands; they can, however, also be performed practically anywhere, as the majority of the exercises that I demonstrate in this chapter simply involve using a single piece of resistance exercise band, a core ball, and some dumbbells. Example movement/exercises for incorporating sling patterns are presented in the following sections.
1. Push
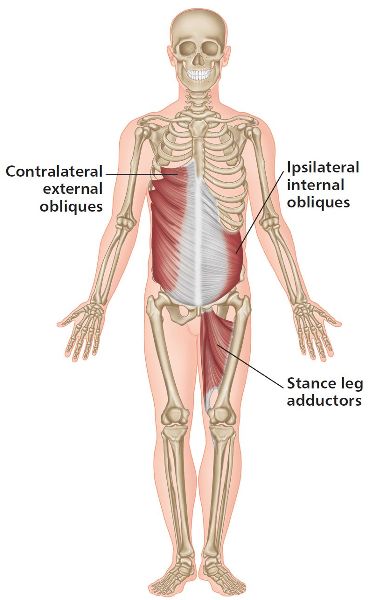
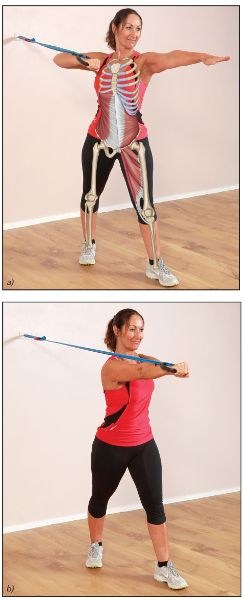
The first exercise I propose is very effective at utilizing the anterior oblique sling. If you look at the start position in Figure 3.17(a), you will notice that the exercise band (alternatively a cable machine can be used) is held with the athlete’s right hand at shoulder height, and their left arm and left leg are placed in a forward position. The exercise motion is shown in Figure 3.17(b): the athlete pushes the band forward across their body, using their stance leg adductors, internal oblique, and contralateral external oblique. At the same time, the left arm comes backward, as this induces a rotation of the trunk to the left side, subsequently working the anterior oblique sling in the transverse plane of motion.
All day-to-day movements will work this muscle sling, but particularly good examples are the actions of walking, running, and throwing.
Note: It is very important that the athlete control the motion in both phases, i.e. the concentric (shortening) phase and the eccentric (lengthening) phase, and not let the band control the movement. Moreover, one has to be very aware of the activation of the inner core musculature in order to provide the necessary stability to perform all of these exercises I describe. If you are unsure about performing these exercises, please seek professional advice before you begin any type of resistance training.
I always say the following to my athletes and patients during the demonstrations, as I consider it to be relevant to all of the sling exercises:
“You control the movement—don’t let the movement control you.”
2. Pull
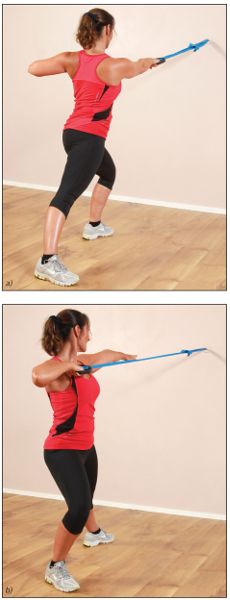
This particular exercise is one of my personal favorites, as it is very effective in utilizing the posterior oblique sling. If you look at the start position in Figure 3.18(a), you will see that the exercise band/cable is held with the athlete’s right hand at shoulder height, and their left leg and left arm are placed in a backward position. The exercise motion is shown in Figure 3.18(b): using the latissimus dorsi, thoracolumbar fascia, and contralateral Gmax, the athlete pulls the band backward across their body with their right arm. At the same time, the left arm comes forward, as this induces a rotation of the trunk to the right side, subsequently working the posterior oblique sling in the transverse plane of motion.
I often say the following when teaching a class, or even to my athletes and patients, as it I consider it reinforces perfectly the motion in the two exercises outlined above:
“Every pull is a push and every push is a pull—you cannot have one without the other.”
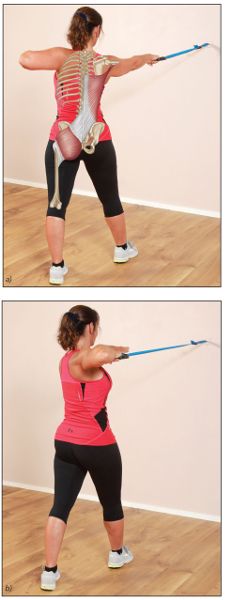
Figure 3.18. Posterior Oblique Sling: (a) start position; (b) finish position.
3. Squat—Bend to Extend
Any exercise or motion that incorporates a bend-to-extend type of motion, such as a typical squat or a dead lift, will incorporate the posterior (deep) longitudinal sling as well as involving the posterior oblique sling.
Core Ball Squat
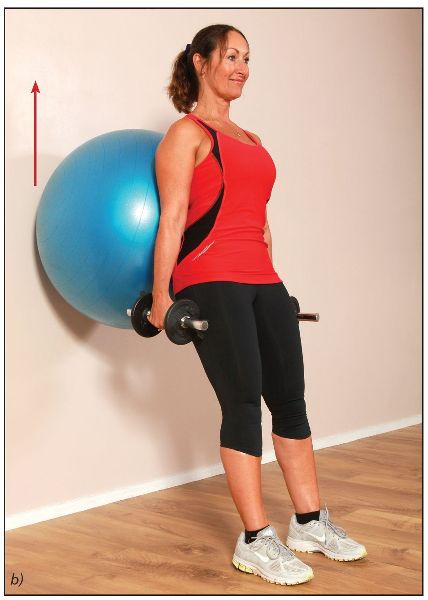
A core ball is placed against the wall, and the patient positions themselves so that the core ball is located near their lower back, as shown in Figure 3.19(a). From this position, the patient steps forward slightly, with their knees shoulder-width apart. The patient is then asked to activate the inner core and slowly squat (eccentric phase) until they reach a position of approximately 90 degrees, as shown in Figure 3.19(b). The therapist makes sure that the tracking of the patella is toward the patient’s second toe and that the patella does not pass beyond the level of the toes, as indicated by the arrows in Figure 3.19(b). The patient is then instructed to stand up on the return (concentric phase) for a count of two; they are also instructed to squeeze their glutes just before the end phase of the squat.
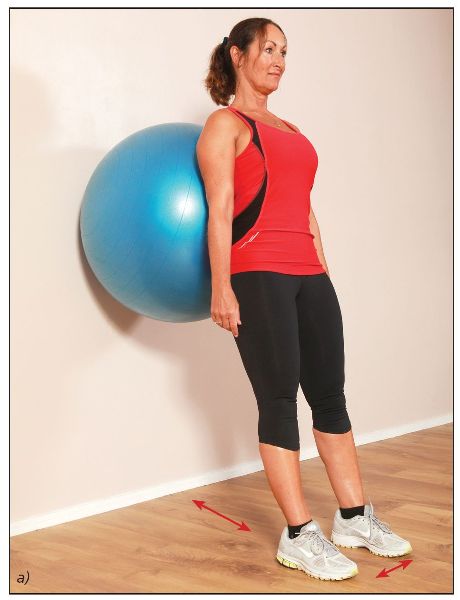
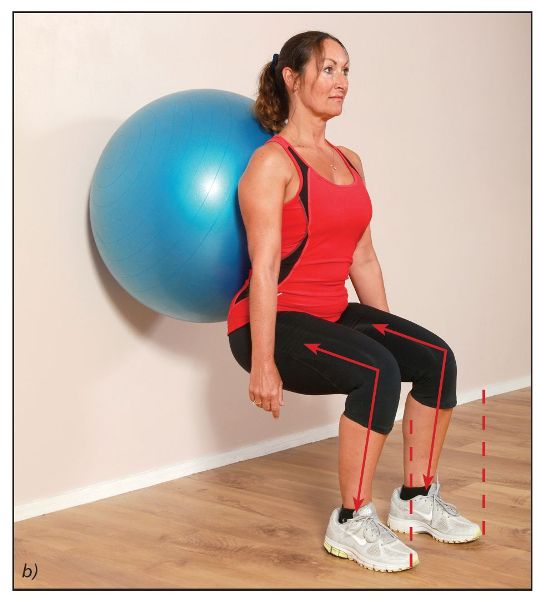
Figure 3.19. Core Ball Squat: (a) start position; (b) full-squat position.
Progression 1: With Weight
The Core Ball Squat exercise is performed as explained above, except the patient now holds a light weight in each hand, as shown in the start position in Figure 3.20(a). The concentric phase of the squat is shown in Figure 3.20(b).
Progression 2: With Weight and Without a Core Ball
The start position of this progression is shown in Figure 3.21(a): the athlete holds a dumbbell in each hand, with their knees shoulder-width apart. The squat is then performed to reach a knee-bend of approximately 90 degrees, as shown in Figure 3.21(b).
Please remember that the patella follows an imaginary line to the second toe and does not pass the level of the toes. From the 90-degree position, the athlete then rises to return to the start position. (This exercise can be performed with or without dumbbells.)
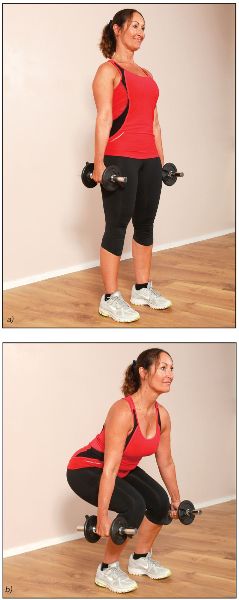
Figure 3.21. Squat with Weight: (a) start position; (b) finish position.
4. Bend to Extend with Rotation
A bend-to-extend type of movement with a rotation is an excellent way of incorporating the posterior (deep) longitudinal sling as well as the posterior oblique sling, all at the same time. In the start position shown in Figure 3.22(a), the athlete’s right hand holds the exercise band/cable at shoulder height in a forward position, and their left arm is placed in a backward position. Notice that the athlete has adopted a type of squat position, which can vary in terms of depth; the athlete here has adopted an angle of 45 degrees, but one can choose to start at a smaller or greater angle, depending on requirements.
The exercise motion is shown in Figure 3.22(b): the athlete pulls the band backward across their body, using both of their posterior slings. At the same time, the left arm comes forward as the athlete returns to the erect position. Figure 3.22(c) shows an alternative end position for the right arm, as some patients find this movement easier. What I sometimes suggest is that my athletes vary or alternate the two movements described above.
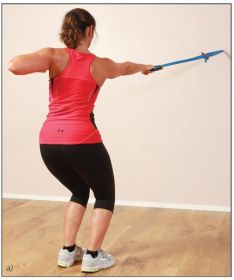
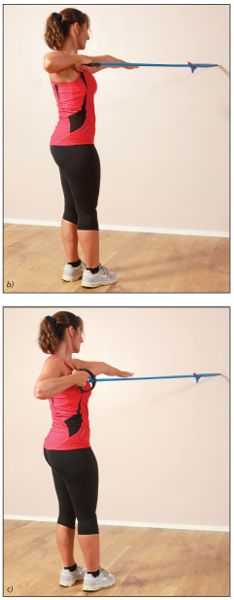
Figure 3.22. Posterior (deep) Longitudinal and Posterior Oblique Sling: (a) start position; (b) finish position; (c) alternative position for the arm at the end of motion.
5. Single-Leg Stance
The lateral sling system helps to stabilize the body in the frontal plane. During any type of single-leg stance the hip abductors—gluteus medius (Gmed) and gluteus minimus (Gmin)—and the adductors of the supporting leg work in conjunction with the contralateral (opposite) quadratus lumborum (QL) to stabilize the pelvis. The internal and external oblique abdominal musculature also works synergistically to secure a stable spine and pelvis. Dysfunction of the lateral sling system is a common source of injury to the back, the SIJ, and also the supporting leg. If you think about it, most sports are single-leg dominant in nature. During walking, but especially running and sprinting, the body is propelled forward through powerful single-leg actions, so the need for a strong and functional lateral sling system is of paramount importance. This specific sling system will help improve overall athletic performance and conserve energy expenditure, as well as reducing the possibility of sustaining musculoskeletal types of injury.
Any exercises which incorporate a movement that relies on being in a single-leg stance position will activate the muscles of the lateral sling. The last chapter of The Vital Glutes: Connecting the Gait Cycle to Pain and Dysfunction (Gibbons 2014) specifically targets exercises that are biased toward a single-leg stance position in order to activate the Gmed muscle in particular of the lateral sling system. For this text I will therefore include an exercise that is demonstrated on one leg; however, I am also going to simultaneously target the anterior and oblique slings while performing a push and a pull motion as described earlier.
Note: If you have difficulty standing on one leg, possibly because of weakness of the lateral sling, I recommend that you read the vital glutes book (Gibbons 2014) first, so that you will have a better understanding of why and how to initiate the strengthening of the Gmed/lateral sling system before embarking on trying to perform the following exercise.
Lateral Sling and Anterior Oblique Sling
Figure 3.23(a) shows the athlete in a single-leg stance position (lateral sling), while at the same time holding the exercise band with their right hand, with the arm raised to 90 degrees; the left arm is held in a forward position and the body is rotated to the right. The athlete then pushes the right arm forward while the left arm moves backward; this will induce a rotation of the trunk to the left side, as shown in Figure 3.23(b), subsequently activating the anterior oblique system and at the same time utilizing the lateral sling musculature.
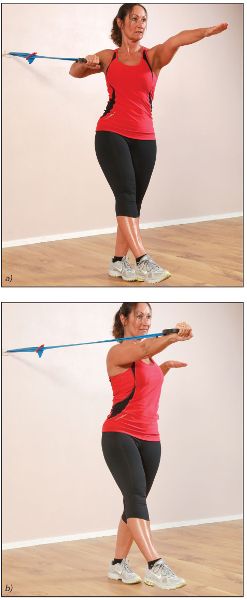
Figure 3.23. Lateral Sling and Anterior Oblique Sling: (a) start position; (b) finish position.
Lateral Sling and Posterior Oblique Sling
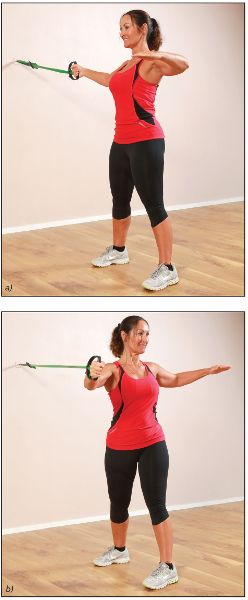
Figure 3.24(a) shows the athlete standing on one leg (lateral sling), while at the same time holding the exercise band with their right hand, with the arm raised to 90 degrees; the left arm is held in a backward position and the body is rotated to the left. The athlete then pulls the right arm backward while the left arm moves forward; this will induce a rotation of the trunk to the right side, as shown in Figure 3.24(b), causing an activation of the posterior oblique system and at the same time utilizing the lateral sling muscles.
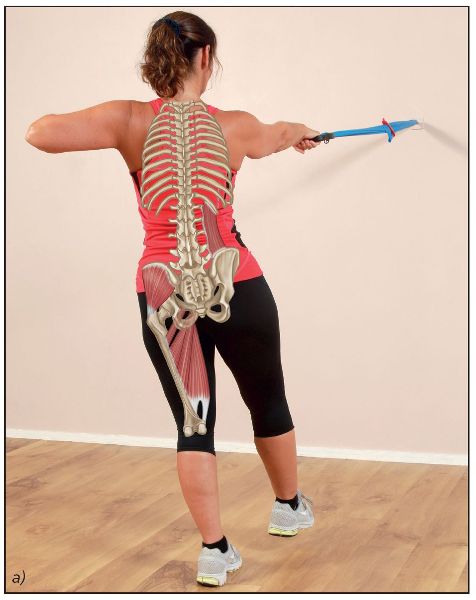
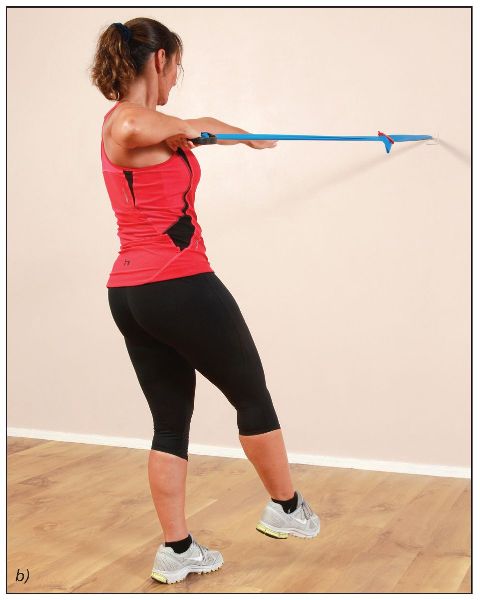
Figure 3.24. Lateral Sling and Posterior Oblique Sling: (a) start position; (b) finish position.
6. Rotation
The last motion of the primary movement patterns is rotation, which will utilize mainly the internal and external obliques as well as the gluteal muscles.
Anterior Rotation
Figure 3.25(a) shows the athlete standing with their legs shoulder-width apart, holding the exercise band with their right hand, and stabilizing the inner core muscles. The athlete rotates their body to the left, which will utilize the oblique muscles, as shown in Figure 3.25(b). The arm should be relatively fixed, since the motion is from the trunk and not from the movement of the arm.
Posterior Rotation
Figure 3.26(a) shows the athlete standing with their legs shoulder-width apart, holding the exercise band with their left hand, and stabilizing the inner core muscles. The athlete rotates their body to the left, which will utilize the oblique muscles, as shown in Figure 3.26(b). The arm should be relatively fixed, since the motion is from the trunk and not from the movement of the arm.
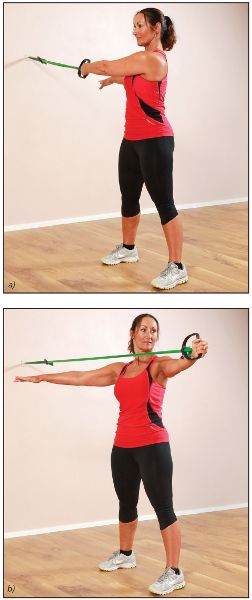
Figure 3.26. Oblique Sling—Posterior Rotation: (a) start position; (b) finish position.
Exercise Variations
I have demonstrated and explained six primary movement patterns that can be included in an outer core stabilization program. When I see athletes and patients for the first time I normally suggest that only two initial exercises are performed to start with, namely a pull motion and a push motion. I recommend that they do between 10 and 12 reps on both sides (push exercise on the left and push on the right, then the same for the pull exercise) and repeat for two/three sets (10–12 × 2/3). I suggest starting with 10 reps initially, for one or two sets (once per day), and progress to 15 reps for three sets per day over a couple of weeks.
When patients visit me for their second and third sessions, I will personally check their technique before I give them another exercise; this way I can make sure that what I showed them initially is being reiterated in their demonstration back to me. When I am happy with what they have shown me, then, and only then, will I give them another one (or possibly two) of the primary movement exercises listed above.
Once all of the six exercises have been incorporated into their exercise regime, we can then start to add a bit of variety and adapt the exercises accordingly to make them more specific and tailored to the athlete, depending on their individual sporting requirements. Although the following exercises are explained and demonstrated for only one side of the body, they would of course be incorporated in a program for both sides (an exercise performed on the right is repeated on the left, and so on).
Combined Push–Pull
The athlete in Figure 3.27(a) holds a piece of exercise band with their left hand and another piece of exercise band with their right hand. They are asked to combine the motion of a push from the right arm and a pull from the left arm, as indicated in Figure 3.27(b). It is recommended that the inner core muscles are activated, to make sure that they are stable while performing this motion.
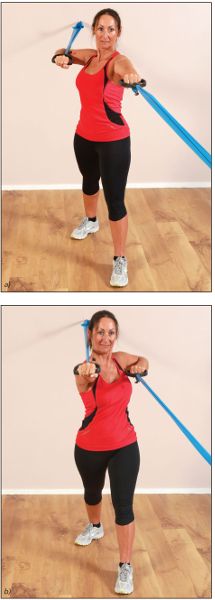
Figure 3.27. Combined Push–Pull: (a) start position; (b) finish position.
Combined Push–Pull on One Leg
This is the same exercise as above, but this time the athlete adopts a single-leg stance position while grasping the exercise bands, as shown in Figure 3.28(a). The motion is a combination of a push from the right arm and a pull from the left arm while standing on one leg, as indicated in Figure 3.28(b).
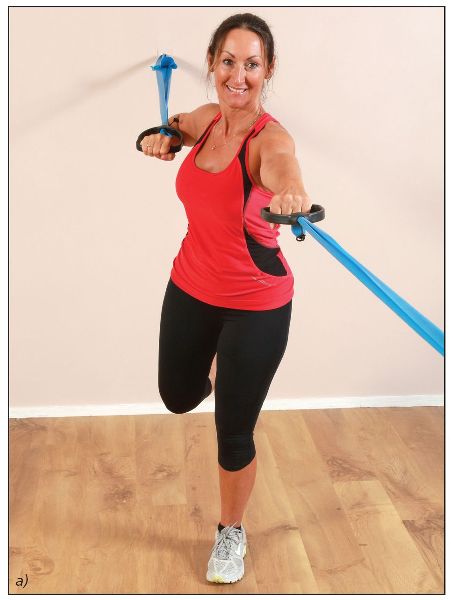
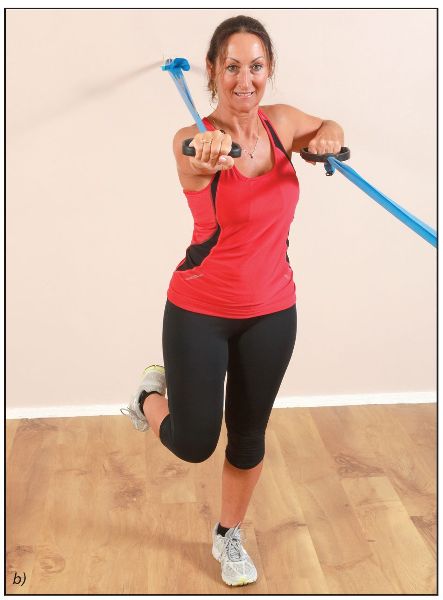
Figure 3.28. Combined Push–Pull on One Leg: (a) start position; (b) finish position.
Push with Lunge
In the start position shown in Figure 3.29(a), the athlete is holding the exercise band with the right hand at shoulder height, and the left arm and left leg are placed in a forward position. The exercise motion is shown in Figure 3.29(b): the athlete pushes the band forward across their body, while at the same time the left arm moves backward as the left knee bends to perform a lunge type of motion. (Note: the left knee does not past the level of the toes, and the patella follows the second toe.)
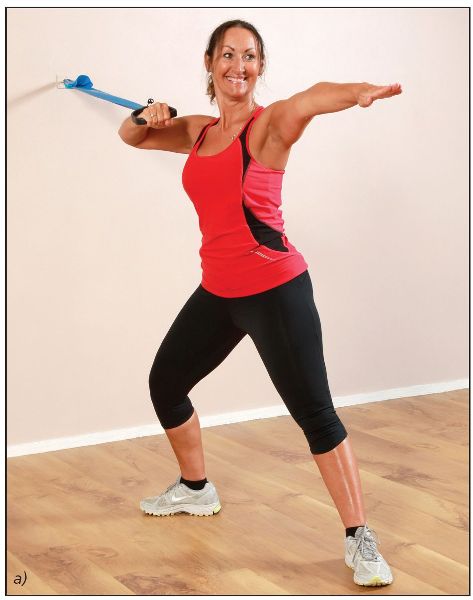
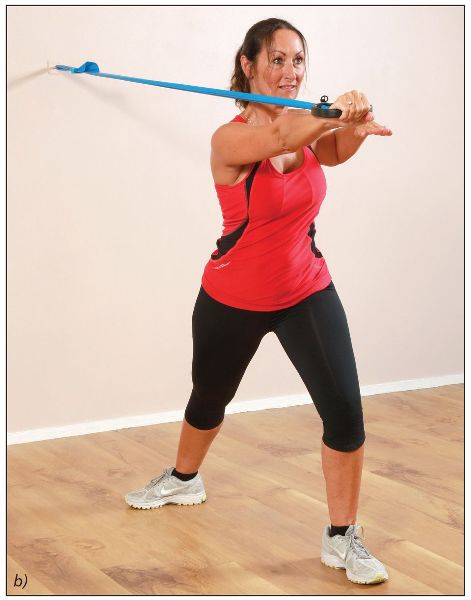
Figure 3.29. Push with Lunge: (a) start position; (b) finish position.
Pull with Lunge
In the start position shown in Figure 3.30(a) you will notice that this time the athlete is holding the exercise band with their right hand placed in a forward position at shoulder height; the left arm is held in a backward position, with the left leg forward. The exercise motion is shown in Figure 3.30(b): the athlete pulls the band backward across their body, while at the same time the left arm moves forward as the right knee bends to perform a lunge type of motion. (Note: the right knee does not pass the level of the toes, and the patella follows the second toe.)
Push on Unstable Base
In the start position shown in Figure 3.31(a), the exercise band is held in the right hand at shoulder height, and the left arm is placed in a forward position. Overleaf, the exercise motion is shown in Figure 3.31(b): the athlete pushes the band forward across their body, and at the same time the left arm moves backward while maintaining stability on the unstable base.
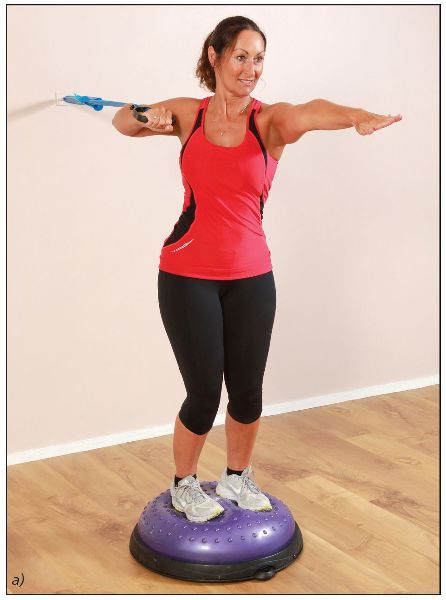
Figure 3.31. Push on Unstable Base: (a) start position.
Pull on Unstable Base
In the start position shown in Figure 3.32(a), the athlete holds the exercise band in the right hand at shoulder height, and the left arm is placed in a backward position. The exercise motion is shown in Figure 3.32(b): the athlete pulls the band backward across their body, and at the same time the left arm moves forward while maintaining stability on the unstable base.
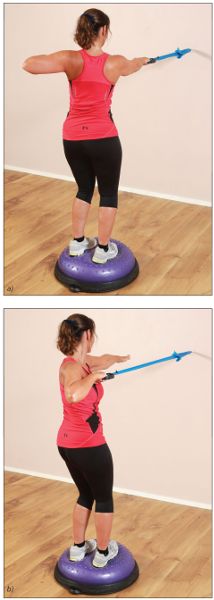
Figure 3.32. Pull on Unstable Base: (a) start position; (b) finish position.
Bend to Extend with Rotation on Unstable Base
In the start position shown in Figure 3.33(a), the athlete holds the exercise band with their right hand at shoulder height and places their left arm in a backward position, while adopting a squat position on the unstable base. The exercise motion is shown in Figure 3.33(b): the athlete pulls the band backward across their body, and at the same time the left arm moves forward as they return to the erect position while maintaining stability on the unstable base.
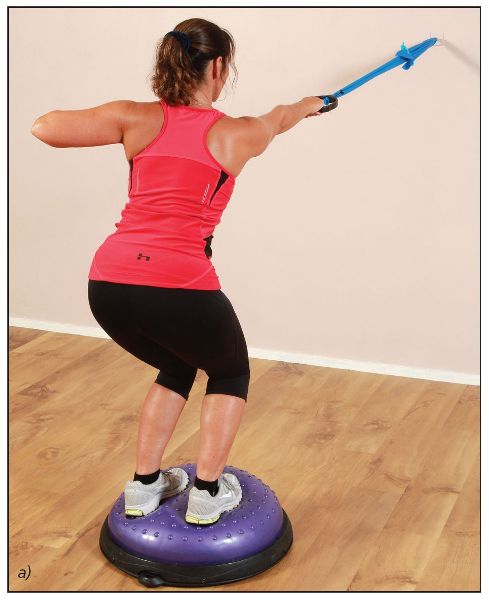
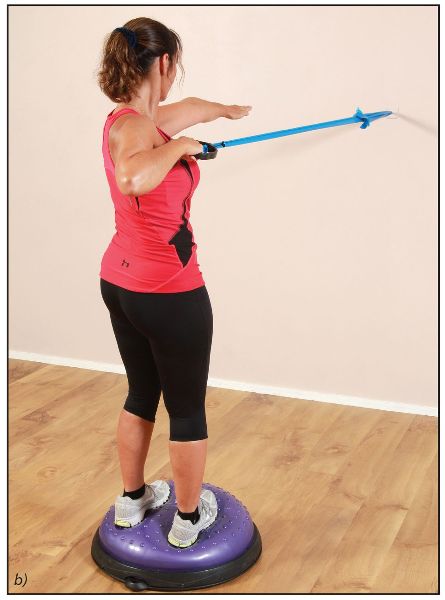
Figure 3.33. Bend to Extend with Rotation on Unstable Base: (a) start position; (b) finish position.
Bend High to Low (Wood Chop)
In the start position shown in Figure 3.34(a), the athlete holds the band simultaneously with their right and left hands at a point above shoulder height. The exercise motion is shown in Figure 3.34(b): the athlete pulls the band across their body to a low position, while at the same time performing a squatting motion. This movement is similar to chopping wood.
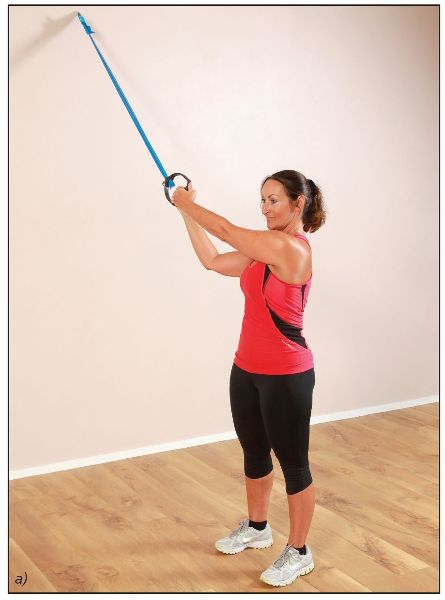
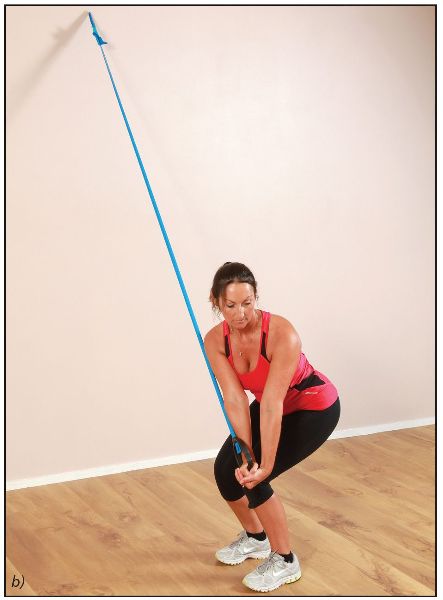
Figure 3.34. Bend High to Low: (a) start position; (b) finish position.
Bend Low to High (Reverse Wood Chop)
In the start position shown in Figure 3.35(a), the athlete squats down and holds the band simultaneously in the right and left hands at a point below shoulder height. The exercise motion is shown in Figure 3.35(b): the athlete pulls the band across their body to a high position, while at the same time rising from the squat to an erect position.
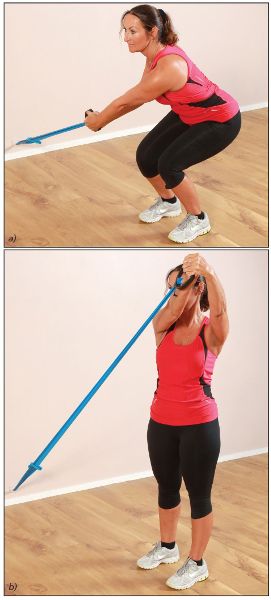
Figure 3.35. Bend Low to High: (a) start position; (b) finish position.
Bend Low to High (Single Arm)
A combination of a bend-low-to-high type of movement with a rotation and a squat is an excellent way of incorporating the posterior longitudinal sling as well as the posterior oblique sling, both at the same time. In the start position shown in Figure 3.36(a), you will see that the athlete is holding the exercise band/cable at a lower level with their right hand in a forward position, and the left arm is placed in a backward position; the trunk adopts a position of left rotation. The athlete has also adopted a squat position, which can vary in terms of depth: here the athlete has squatted to an angle of 45 degrees, but this angle can be smaller or greater, depending on requirements. Overleaf the exercise motion is shown in Figure 3.36(b): the athlete pulls the band backward and high across their body, using both of their posterior slings. At the same time, the left arm comes forward while the trunk rotates to the right as the athlete returns to the erect position.
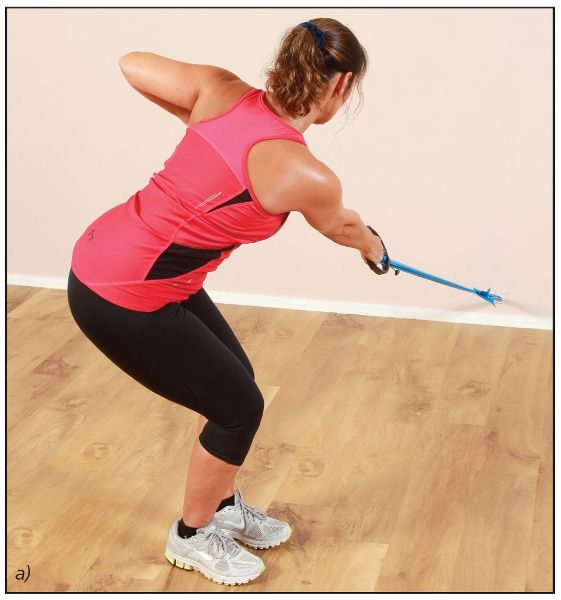
Figure 3.36. Bend Low to High (Single Arm): (a) start position.
Oblique Sling—Anterior Rotation on Unstable Base
In this demonstration shown in Figure 3.37(a), the athlete starts with their legs shoulder-width apart, and holds the exercise band with their right hand while stabilizing their inner core muscles. The athlete then rotates their body to the left, while maintaining stability on the unstable base, as shown in Figure 3.37(b). The arm should be relatively fixed, since the motion is from the trunk and not from the movement of the arm (the same exercise can be repeated for a posterior rotation; see Oblique Sling—Posterior Rotation).
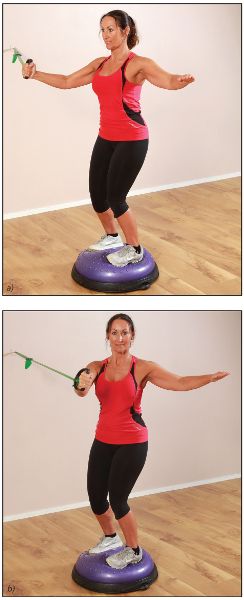
Figure 3.37. Oblique Sling—Anterior Rotation on Unstable Base: (a) start position; (b) finish position.
Oblique Sling—Anterior Rotation on One Leg
Figure 3.38(a) shows the athlete standing with their legs shoulder-width apart and holding the exercise band with their right hand, while stabilizing the inner core muscles. The athlete then rotates their body to the left while performing the exercise in a single-leg stance position, as shown in Figure 3.38(b). The arm should be relatively fixed, since the motion is from the trunk and not from the movement of the arm (the same exercise can be repeated for a posterior rotation; see Oblique Sling—Posterior Rotation).
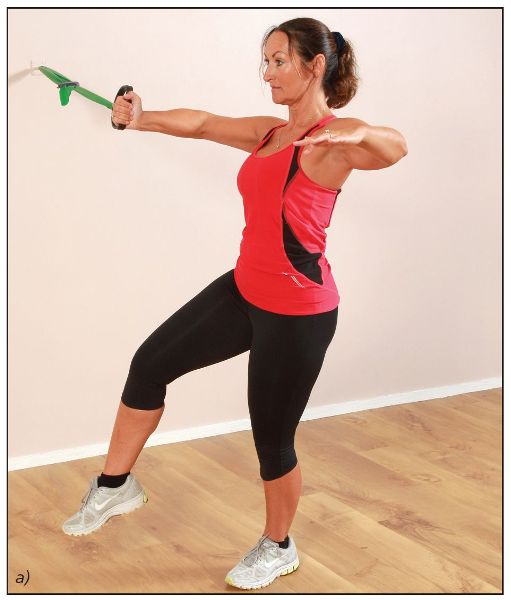
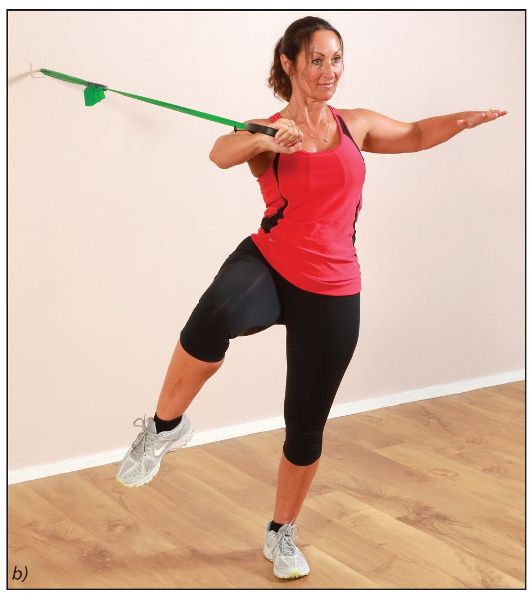
Figure 3.38. Oblique Sling—Anterior Rotation on One Leg: (a) start position; (b) finish position.
Rotation While Kneeling
For an anterior rotation, the athlete in Figure 3.39(a) kneels on an exercise mat, with their knees shoulder-width apart, and holds the exercise band with their left hand while stabilizing the inner core muscles. The athlete then rotates their body to the right while performing the exercise in a kneeling position, as shown in Figure 3.39(b). The arm should be relatively fixed, since the motion is from the trunk and not from the movement of the arm.
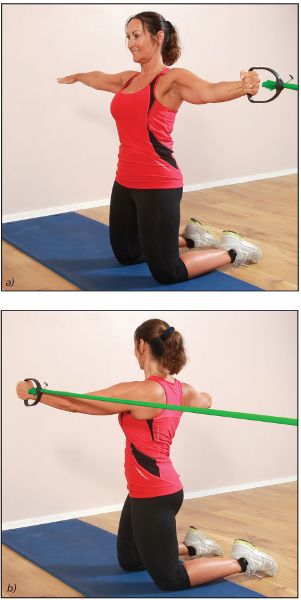
Figure 3.39. Oblique Sling—Anterior Rotation While Kneeling: (a) start position; (b) finish position.
The same exercise can be repeated for a posterior rotation, as shown in Figure 3.40.
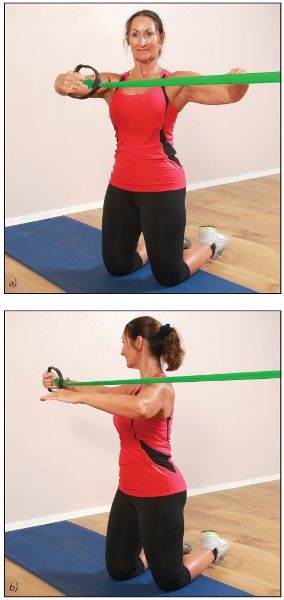
Figure 3.40. Oblique Sling—Posterior Rotation While Kneeling: (a) start position; (b) finish position.
Conclusion
We need the inner and outer core units to function synergistically to: (1) stabilize the body; and (2) create powerful and economic movement. Without efficient functioning of the inner unit there is no stability of the spine and SIJs. Moreover, the core will not be able to provide a stable base of contraction for the phasic muscles (outer core) to contract, which can result in a loss of limb power and a reduced economy of movement patterns, as well as an increased susceptibility to musculoskeletal injuries.
A well-conditioned inner core unit is very dependent on strong outer core unit systems, and vice versa, in order to protect the smaller inner unit muscles, the spinal ligaments, and the associated joints of the spine and pelvis.
Let me try to explain this concept with the following example. I have been fortunate to work with the Oxford University Boat Team for many years. When they have been rowing on very flat and calm lakes and rivers, I have mentioned to them many times (mainly during training sessions) that the outer core unit (i.e. the phasic muscles) is doing most of the work to propel the boat through the water, and the inner core unit is relatively relaxed (by comparison), especially on calm water.
I am currently the sports osteopath for the team, so when they finish rowing I always ask them how they feel (in terms of their lower back and pelvis, etc.); I can honestly say that most of the time there are no reports of musculoskeletal issues. However, when the team row on the “tideway” (the River Thames in London) in preparation for the annual Boat Race, it is a completely different story; this river can be very unpredictable—one minute the river is particularly choppy and the next it is calm. The River Thames is tidal fed from the sea, which alters the tone of the water; in addition, passing motorboats produce waves that can also affect the flow and manner of the water. Because of these variable circumstances, if the river appears rougher than usual, then I consider the inner core unit to be working a lot harder than normal, because it has to stabilize each of the individual rowers in their seats. Moreover, the inner core unit is trying to stabilize the rowing boat to prevent it from tilting from side to side, while at the same time the outer core unit is still being utilized to propel the boat forward. At the end of the training session, I ask the rowers the same question (relating to any issues with the lower back); in this case, probably around half of them say that they need to see me for treatment to help reduce the symptoms that they are experiencing.
In order to have a strong outer core unit, it is paramount that the inner core unit be stabilized first, as the most susceptible area in a rower’s musculoskeletal system is the lower lumbar spine—usually disk injuries occur to L4/5 (4th and 5th lumbar vertebrae) or to L5/S1 (5th lumbar vertebra/1st sacral vertebra).
Most of the rowers know a bit about core stability training, and some have done one or two exercises before, mainly abdominal trunk curls and planks (two exercises that I typically classify as non-functional and definitely not effective for the inner core—hence not recommended). During the times I have been involved in their training, I have tried to make the inner core training fun, as these exercises are generally not appealing to a bunch of fit young rowers who are used to doing only bench presses, squats, and lunges.
For example, I would get all the team (eight in this case, or nine including the cox) to sit on gym balls in a straight line, one behind the other, facing the same way—except for the cox at the end, who would sit facing them. While sitting on the ball, they would then place their feet on the ball in front and try to maintain stability by using their inner core muscles, which is especially challenging, as the feet are now lifted off the floor.
The idea of this exercise was to mimic sitting in a boat on water. From this position, each team member had to keep the line of eight rowers (nine including cox) stable by activating their inner core muscles. Once this had been achieved, we would then try to mimic the motion of rowing while still sitting on the gym balls. Apart from being fun, this is a great way of activating the inner core muscles without having to think about the processes involved.
This exercise is just one example that emphasizes to the team why training the inner core unit is every bit as important as training the outer core unit. The mentality of many athletes who I have come into contact with is to train only the muscles they can see and not the ones that they cannot.
Note: I haven’t included many inner core exercise explanations/demonstrations, as I feel it is not within the scope of this book. The reason for this is mainly that I wanted to focus my attention on training and stabilizing the outer core muscles in this text, because I feel that this particular area has been neglected in the past. There are numerous books on the shelves that offer specific inner core activation exercises, so may I suggest you consult one of them. I have discussed here only briefly some of the inner core exercises that I incorporate in the rowing training program—my strategy is to train the rowers’ inner core muscles, without them actually being aware that they are training them!
