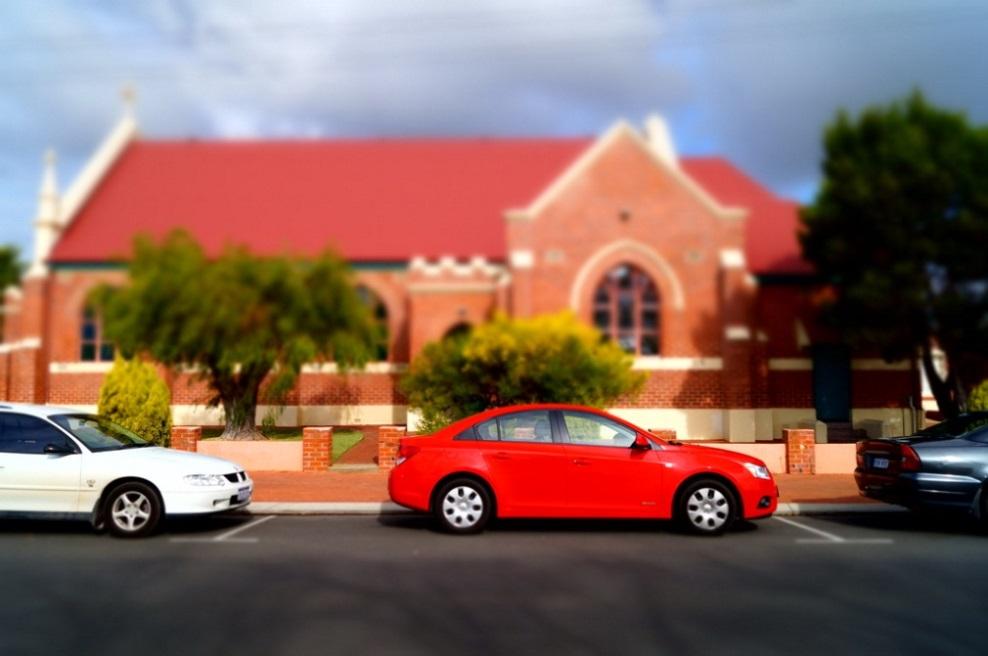
Figure 6-63 The Miniature effect is applied horizontally through the line of cars – and it actually looks like a miniature!
|
Figure 6-63 The Miniature effect is applied horizontally through the line of cars – and it actually looks like a miniature!
|
|
|
Figure 6-64: The Original, Illustration Mode (set to “High”), and Watercolor mode. TIP 1: Unlike most other Picture Effects, neither Watercolor nor Illustration can be applied in movie mode. (Actually, that’s true of every Picture Effect after High Contrast Monochrome.) TIP 2: Want to apply this effect to some old picture (printed or on your computer screen)? Just take a picture of the picture or your computer screen. The end results are such that you can’t tell if the original was low-res or not. (That’s how I created some of the examples shown here!) |
|
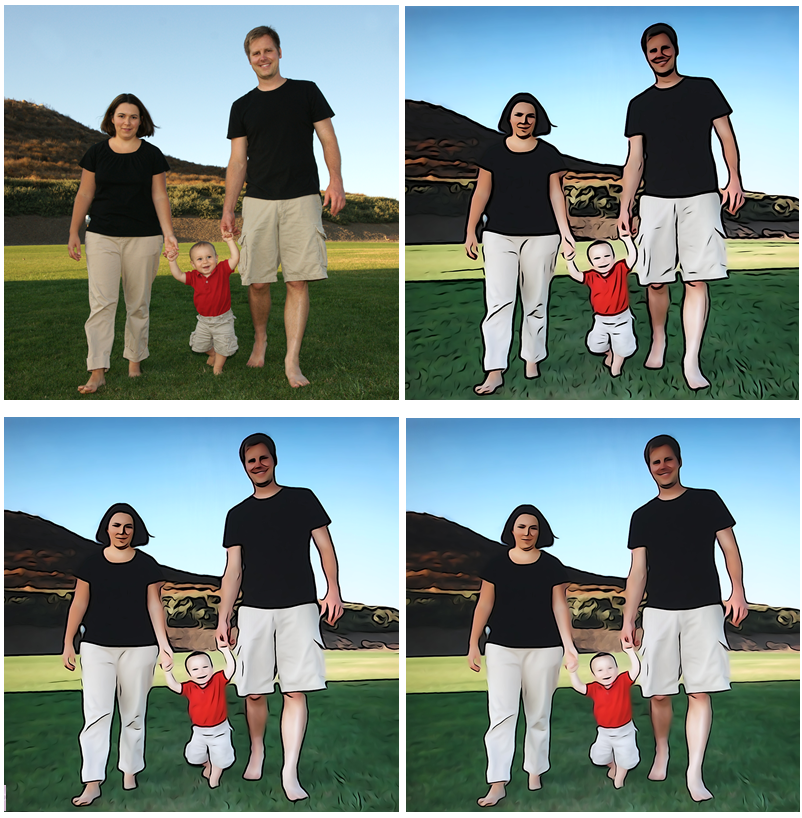
I have to say, of all the Picture Effects available, these are two of my favorites. Its effects are hard to see when you’re just reviewing them on the back of your camera (without zooming in); but when you get back to your computer and view them full-screen, whoa! That’s pretty awesome! (Examples can be seen in Figure 6-64 and Figure 6-65) The two effects are so similar (you can think of Watercolor as Illustration Mode set to “Really, Really Low” – just the heavy black lines are missing) so I’ll cover them both here.
To use, do  MENU -->
  5 --> Picture Effect --> Illustration (choose from Low, Mid, High). (Make sure the camera isn’t in RAW mode beforehand otherwise it will be greyed out). This will work well but it disables any sort of continuous drive mode (which makes sense – the effect is computationally expensive). Invoking Illustration mode this way only saves the modified image – there’s no way to get a “normal” plus an Illustration Mode image.
Watercolor mode handles identically to the above (just substitute “Watercolor” for “Illustrations” in the instructions above), the only difference is you can’t specify high-mid-low strength.
|
Figure 6-65: Illustration mode looks more impressive when you look at a large version of the image. Here is the original, then Illustration mode set to Hi, Mid, and Low. |
Menu Position MENU -->  5 --> Picture Profile
What it Does The equivalent of “Creative Styles” but for video
Recommended Setting: n/a
Just as your camera has “Creative Styles” (Section 6.26) which present several collections of image tweaks, each recallable at a moment’s notice, so too does it have a similar feature designed expressly for video. The Picture Profile setting presents seven instantly-recallable “slots” into which you can store a collection of video tweaks, including several gamma curves, color modes, and very specific changes you can specify to change how the camera handles highlights and shadows.
One of the variables in each Picture Profile slot enables you to choose a pre-set Gamma curve; others allow you to alter the characteristics of the chosen curve. These Gamma curve-altering features are designed for professional cinematographers and videographers who want better control over the dynamic range of their output and the “look” of the finished piece. The camera’s most famous Gamma curve flavor, the S-Log2 curve (Section 12.9.4), must be used in conjunction with a post-production process called “grading”, and probably its most important attribute is it can be used to capture more dynamic range of a scene than HDTVs can display (but not more dynamic range than your sensor can capture).
I talk about HDTV’s narrower dynamic range and how the S-Log 2 and S-Log3 curves compress that range in Section 12.1 (the chapter on Movies). It is recommended that you read that first and then come back here to talk about the specifics of this function.
TIP: Picture Profiles are really designed for video – you could use them to shoot stills, but there’s really no advantage compared to shooting RAW and post-processing. |
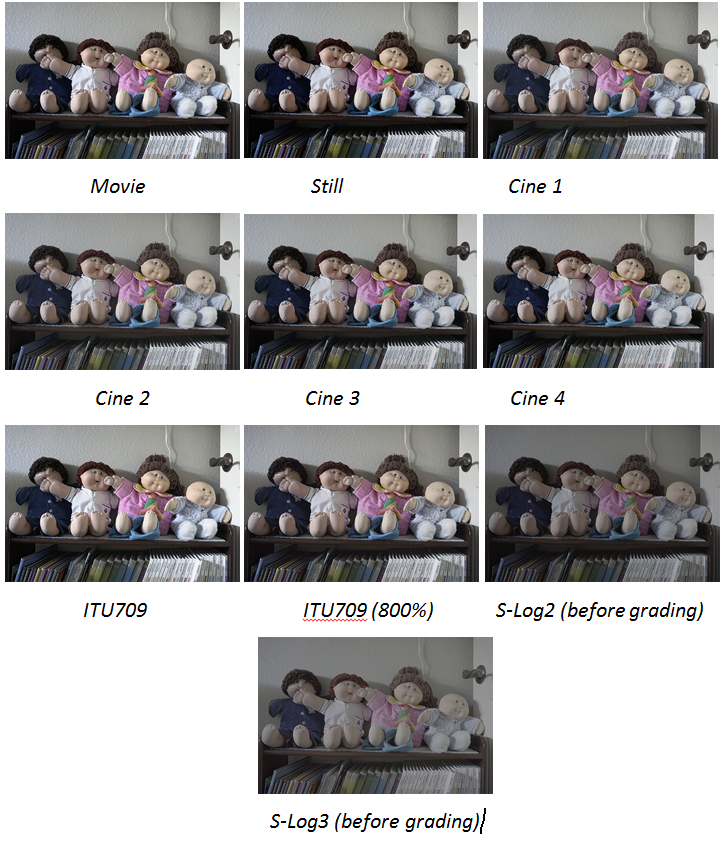
Figure 6-67: The camera offers several pre-configured Gamma curves which alter how the camera handles high-dynamic-range scenes. (This shows just 3 examples.) |
So in the Picture Profiles, if you still wanted to modify the Gamma setting, the camera will provide for you the following options:
Figure 6-68: A visual comparison of the different gamma curves available. |
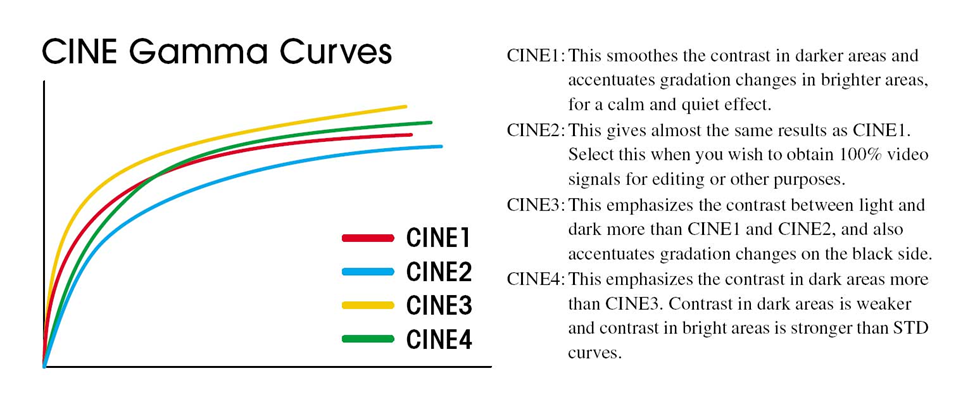
You can see just how similar some of these options are when viewing the curves in graph form (Figure 6-70).
There is also an outstanding 5-minute youtube video by Alister Chapman which compares some of the curves available on a Sony EX video camera at http://bit.ly/1ya4k1B. Here he shows the differences between Cinegamma 1-4, and also talks about how he changes the knee to help keep his highlights from blowing out.
Since I wasn’t able to come up with actual curves for all of these options, the next best thing is to take pictures in each of the modes and show you just how similar they are to each other (Figure 6-68).
As mentioned earlier, each of the 9 pre-defined profiles is a collection of tweaks to variables the camera uses to capture video. To get to them do MENU -->  5 --> Picture Profile, scroll to any profile, and then hit the Right-arrow button in order to change any of its parameters. Each of these settings can be changed; and below I describe what each of the variables do.
TIP: With the exception of the S-Log2 and S-Log3 gamma features (described in Section 12.9.4), several cinematographers I spoke with say that hardly anybody ever tweaks these features in-camera. It's easier and un-doable when you make these changes in post production. That makes these Picture Profiles the equivalent of the "Creative Styles" used in stills – nice, but it's better to do it later at your computer. |
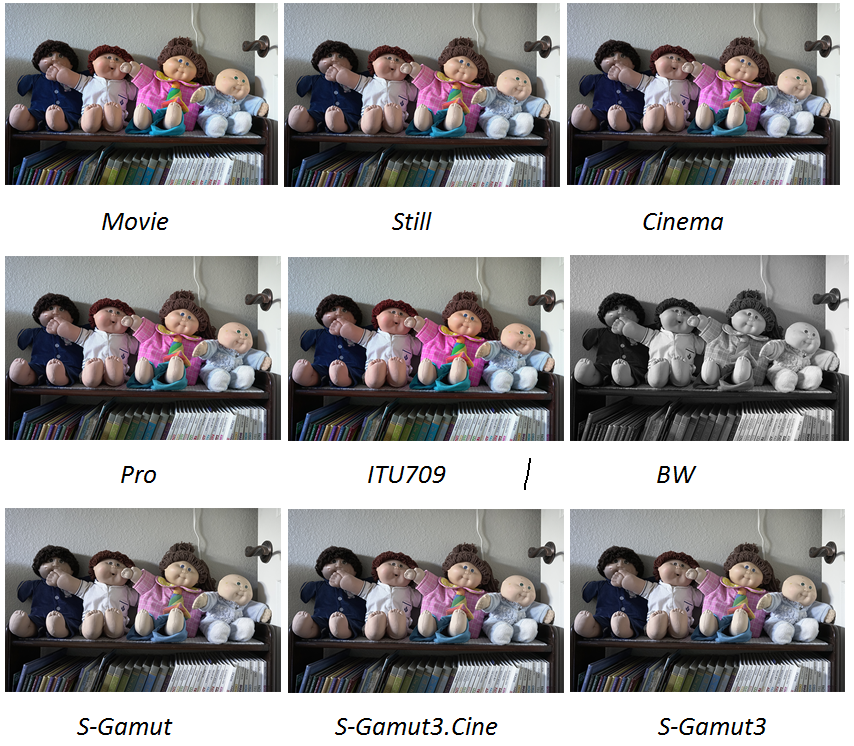
Figure 6-69: The different color modes available in Picture Profiles. These were all made with the Gamma set to "Movie". With the exception of the last two, the differences are very subtle. S-Gamut is designed to be used (and graded) along with S-Log2, whereas S-Gamut3.Cine and S-Gumut3 were designed to accompany S-Log3 gamma. |
Figure 6-70: In the Picture Profiles menu, one of the variables you can change is the Gamma curve. There are many similar-looking curves to choose from – CINE1-4 are displayed here, but there are others. Of all the choices, only S-Log2 and S-Log3 are worthwhile. The rest are very similar and you can achieve the same effect later on in post production. |
TIP: Okay, that was a lot to absorb, but it was also an overview. If you want to learn more about the use of S-Log curves and grading, I highly recommend this page from xdcam-user.com: http://www.xdcam-user.com/2014/08/exposing-and-using-slog2-on-the-sony-a7s-part-one-gamma-and-exposure |
Menu Position MENU -->  6 --> Zoom
What it Does Enables a Digital Zoom whose abilities are controlled by image size and the setting of MENU -->  3 --> Zoom Setting
Recommended Setting n/a
Constraints None except…
This feature allows you to zoom in up to 8x more than what your lens is naturally capable of. Just how much you’re allowed depends on the settings of Image Size (Section 6.1) and Zoom Setting (Section 7.16).
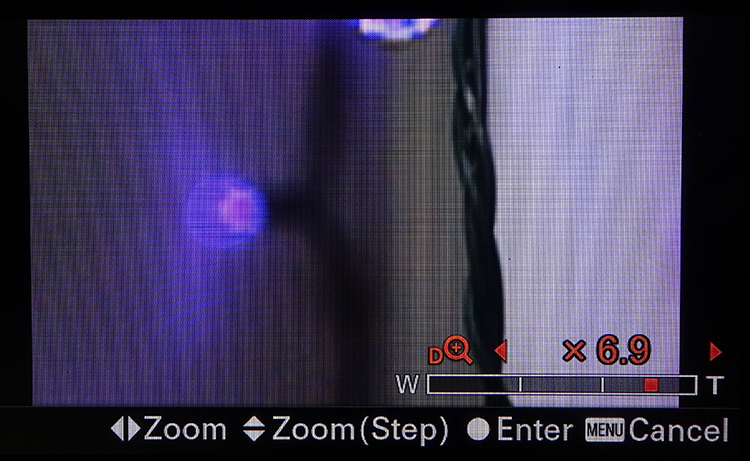
Let me quickly summarize the three different ways that the camera will do a digital zoom (each method represents one of the three boxes in the zoom scale in Figure 6-71):
Figure 6-71: The Zoom magnification scale is divided into as many as three quadrants corresponding to the three different digital zoom methods described in the text. |
1 --> Image Size is set to Medium or Small, then the camera zooms in by throwing pixels away from the perimeter of the frame. There’s no deterioration of quality since you’ve already asked the camera to produce a smaller image. You can zoom up to 2x via this method.As you use this function to zoom in via the right arrow key, you’ll see the total amount of magnification the camera is allowing you (which, again, is determined by the Zoom Setting and the Image Size settings).
Below is a table which summarizes the different zooms available via different settings:
Image Size |
“S” natural zoom |
Clear image Zoom |
w/ Digital Zoom |
Movie Mode |
L |
-- |
2x |
4x |
4x |
M |
1.5x |
2.9x |
6.1x |
4x |
S |
2x |
3.9x |
8x |
4x |
TIP: While I never use the zoom function myself (I prefer to do any cropping or upsampling in post-processing), you may find this feature particularly useful when shooting movies. Especially in the back of an auditorium with a lens of insufficient reach. The video function has to throw away pixels anyway to get the image down to the size of an HD frame anyway, and so this will just change which pixels get thrown away. The most digital zoom you can get with movies is 4x. And while there’s no image degradation when shooting HD movies, 4K movies benefit from this feature as well up to 2x zoom. (After that some image degradation starts to creep in.) |
Menu Position MENU --> 6 --> Focus Magnifier
What it Does Magnifies a small area of the image to allow you to focus critically
Recommended Setting [Frankly, I think the MF assist function is a better option]
TIP 1: Talk about feature redundancy! This function is nearly IDENTICAL to the MENU --> 1 --> MF Assist function described in Section 7.2. The only difference is “Focus Magnifier” needs to be invoked first, and you have to tell it where you want to zoom in to first. Why is this feature included, then? Because this function works in Movie mode, and MF Assist does not. Focus Magnifier is also the feature of choice to use with legacy glass, since the camera has no idea when you’re turning the focusing ring (and hence doesn’t know when to turn this feature on).
TIP 2: This feature now has a new twist: The camera can autofocus when the Focus Magnifier is active, allowing for very fast, very accurate critical focusing! Section 6.30.1 gives all the detail.
Normally, when you’re in Manual Focus or DMF mode, the A6300 automatically magnifies the Live View image whenever you turn the focusing ring so you can focus critically. (This, combined with the Peaking Level function make this camera a joy for manual focusing.)
But if you’re using a non-native E-mount lens, the camera has no idea when you’re focusing manually, and hence the need for this feature which should ideally be assigned to a button first for quick access. (I’ve assigned it to the C2 button.) When invoked (either from the menu or by assigning it to a button), it first asks you to specify where in the image you want to focus critically, and then it zooms in to allow you to focus.
Here’s how to use it:
TIP #1: If you also have Peaking Level enabled, you might need to set it to “High” since this feature doesn’t always see contrast when set to high magnification. TIP #2: The Focus Magnifier function works in movie mode too! But it only magnifies 4x regardless of the File Format setting, whereas it will magnify about 11x (for purposes of critical focusing) when taking stills.
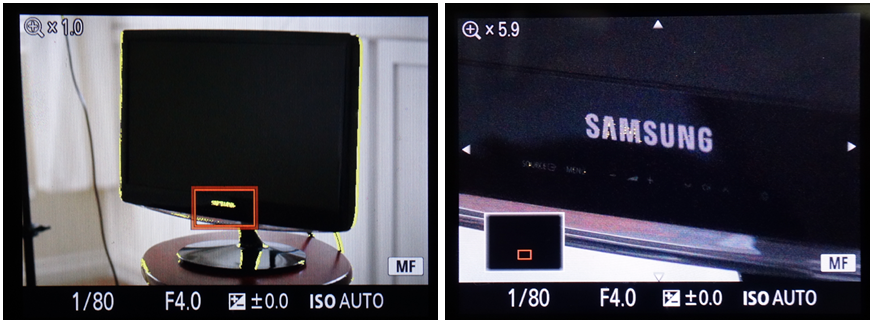
Figure 6-72: With the Focus Magnifier, you tell it where you want to zoom in, and then that area of the composition is magnified for critical focusing |
Okay, so the Focus Magnifier is most useful with non-native manual focus lenses. But now here’s a new feature that only works with native E-mount lenses.
Let’s say you’re taking a macro picture of a flower, and you really want to focus critically on just one part. Normally you’d just set your Focus Area to Flexible Spot: S, move the spot to the part you want to focus on, focus, and then shoot.
Now you have another option. Now you can press the button to which you’ve assigned Focus Magnifier, specify the part you want to focus on, hit the center button, and then you can press the shutter release button halfway and it will autofocus on the magnified area. Then take the picture and your Live View image will go back to its unmagnified glory.
Is this better than the first method? Well, the focus area isn’t nearly as small as the Spot Focus option; on the other hand with this new tool you can have visual confirmation that the camera is doing it right.
This new “AF in Focus Magnifier” mode won’t work when AF-A and Continuous Drive are being used together. Nor will it work in AF-C mode.
Menu Position MENU -->  6 --> Long Exposure NR
What it Does Tells the camera to do a “Dark Frame Subtraction” on exposures taking longer than 1 second
Recommended Setting: On (unless you just can’t wait to shoot the next frame)
This setting applies to Long Exposures, defined as those lasting more than one second. In such situations, digital image sensors tend to produce a lot of noise even though your ISO may be set to its lowest value. All digital cameras from all manufacturers address the problem in pretty much the same way: They employ -- in-camera -- a technique called “Dark Frame Subtraction”.
When Long exp. NR is set to “On” (which is recommended), the camera will take TWO pictures every time a shutter speed of 1 second or longer is used. The first picture is of your subject – as you would expect. The second picture is taken with the shutter closed, for the same duration, removing all light from the sensor, resulting in a black picture which contains only the natural noise from the sensor at the same temperature, ISO setting, and duration as the first picture. With this second “dark frame” picture, the camera has a clear idea of the kind of noise that is permeating the first picture. And then it can remove (to a certain degree) this characteristic noise from the image you just took. This technique is very worthwhile, BUT you are forced to wait twice as long until you can take your next picture. This means if you had set the camera on a tripod at night and took an exposure of a meadow on a moonlit night, the camera would be unresponsive for twice as long as your set exposure as it captures the sensor’s noise for subtraction.
People shooting fireworks get frustrated by this feature, since to them this feature makes their camera “lock up” and they can’t do anything until it’s done – meanwhile, the best fireworks bursts seem to be happening. (That will increase your stress!) If this describes you, just turn this feature off. Advanced users will take just one dark frame manually, and then do some post-processing on their computer later on to achieve the same noise-reduction effect. (I do show how to do noise reduction using Lightroom and Capture One Express (free for you!) later. The whole shebang is described in Section 15.8.)
Note that the Noise Reduction function will not work when the camera is set to Continuous Advance or any sort of bracketing mode (including sweep panorama).