Chapter 29. Windows Networking and Application Installation
This chapter covers the following A+ 220-1002 exam objectives:
• 1.8 – Given a scenario, configure Microsoft Windows networking on a client/desktop.
• 1.7 – Summarize application installation and configuration concepts.
To a certain extent Windows networking is automated —in a lot of scenarios the technician doesn’t have to configure very much. However, the larger and/or more complicated a network becomes, the more configuration is usually required.
This chapter goes over some of the basics of Windows networking including network types, sharing and connecting to data, establishing different networking connections, and modifying additional networking settings. It might seem like a lot, but the great thing about TCP/IP and computer networking in general, is that they work in essentially the same manner across the board, regardless of the operating system that is installed to the computer. So, the more you learn about networking, the easier it becomes to network any operating systems together.
At the end of the chapter we’ll briefly cover some application installation and configuration concepts and a couple of best practices. The objective order is backwards because I place a lot more importance on objective 1.8.
Let’s continue on our quest toward the A+ certification.
1.8 – Given a scenario, configure Microsoft Windows networking on a client/desktop.
ExamAlert
Objective 1.8 focuses on: Network types and settings (domain, workgroup, HomeGroup); shares and mapping; networking connections; proxy settings; Remote Desktop Connection; firewall settings; alternative IP address; and network card properties.
Workgroup, HomeGroup, and Domain
After you have configured your network adapter, you are ready to join a network. There are a few choices; in the business world, it’s either workgroup or domain. A home or home office that is inhabited by some Windows computers might be configured for HomeGroup, which is another type of workgroup. However, the HomeGroup option was removed from Windows 10 as of update 1803. You might still see it used in Windows 7 or 8, and potentially as part of Windows 10 computers that have not been updated.
Workgroups and domains are logical groupings of computers. A workgroup (sometimes also referred to as peer-to-peer) is usually a small group of computers that share the same network name. No one computer controls the network and all systems are considered equal. One of the disadvantages is that a computer storing data can be accessed only by a maximum of 20 other systems simultaneously. A domain builds on this by having one or more computers that are in control of the network and enabling for more computers, more simultaneous access, and centralized administration. Domains also get a name, such as dprocomputer.com, and are sometimes also referred to as client/server networks. You can select whether your computers will be part of a workgroup or a domain by opening the System Properties dialog box and selecting the Computer Name tab. (Or go to Run and type systemPropertiesComputerName.) Then click the Change button. This displays the Computer Name/Domain Changes dialog box, as shown in Figure 29.1.
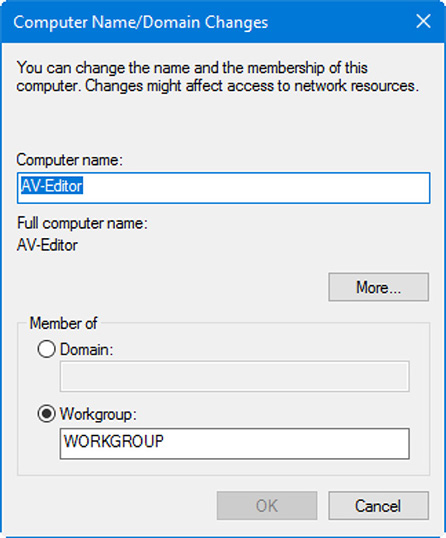
Figure 29.1 Computer Name/Domain Changes dialog box
From here, you can join a workgroup (which is the default, by the way) or attempt to join a domain. Your SOHO network will probably not have a domain, but who knows. If you are anything like me, you might end up running multiple domains, which is entirely possible even in a small SOHO network. However, most SOHO networks in the field will not use domains; they are more commonly found in larger organizations. The domain is controlled by a Microsoft server known as a domain controller. To connect to the domain from a client computer, you need to know the domain name (for example, dpro42.com) and the DNS server IP address for that domain. You also need an account on the domain and need to log on to that domain with a username and password assigned to you by the systems administrator or network administrator. It’s also a good idea to make sure that the workstation and server’s time is synchronized.
Note
The HomeGroup element of Windows 7 and 8 offers SOHO users a quick-and-dirty way to accomplish networking; it uses a single alpha-numeric password for people to join, as opposed to workgroups that have individual user accounts and passwords. The HomeGroup is aimed at easily sharing files, multimedia, printers, and so on. To configure HomeGroup, go to Control Panel > All Control Panel Items > HomeGroup, or go to the Network and Sharing Center > View your active networks. From either location, you can create, join, and leave HomeGroups.
ExamAlert
Be able to define the differences between a workgroup, domain, and HomeGroup.
Sharing Resources and Making Network Connections
Before anyone can view the amazing things you have to offer on your computer, you need to share them. Let’s discuss the sharing of data and then the sharing of printers.
Data Sharing and Access
First, sharing needs to be turned on in the Network and Sharing Center > Advanced sharing settings (or the HomeGroup Advanced Settings). From here you can turn on folder and printer sharing for private networks only, guest or public networks only, or all networks. You can also enable or disable password protected sharing. What you select will depend on your environment, the kind of network you have, and the security level you desire. We are not overly concerned with these settings in a domain environment (other than turning sharing off for the client computers), but in a workgroup environment you might opt to have sharing enabled on one or more network types. Some small offices will turn off password protected sharing to make it easier to share resources with other users on other computers, but there is a potential security risk in doing this.
Note
Some companies with small networks avoid Windows sharing altogether, and instead install a network-attached storage (NAS) device that has print server capabilities.
After sharing has been configured for the computer that will host the data, sharing can then be enabled for individual resources. For example, let’s say we had a folder named “data” and we wanted to share the contents of that folder to other users and computers. We would need to locate the folder, right-click it, and either select Share with or select Properties and then click the Sharing tab. Figures 29.2 and 29.3 show both of these.
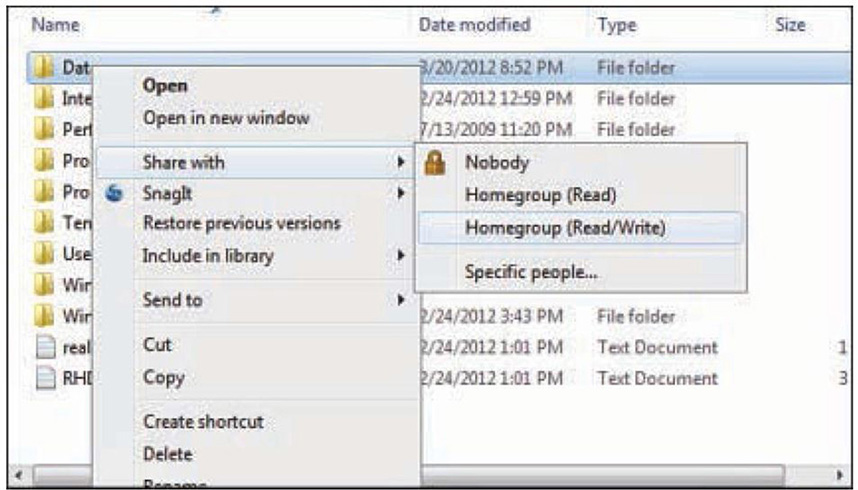
Figure 29.2 Right-clicking a folder and selecting Share with

Figure 29.3 The Sharing tab of the Data folder Properties window
In Figure 29.2, you can see that folders are locked by default and are shared with no one. However, you can opt to have other users in the workgroup or HomeGroup read the data or be able to read and modify the data. Figure 29.3 shows that we can share here as well; plus, we can enable Advanced Sharing and set custom permissions for users.
You can also create administrative shares, which can be seen by administrators but not by typical users. To do this, add a dollar sign ($) to the end of the share name. Drive letters are automatically shared as administrative shares (for example, C$). An example of a built-in Windows administrative share is admin$, which is the sharename for C:\Windows.
Now, if you want to access shares on another computer, you can do it in a couple of ways. First is browsing the network which is done in Explorer. Simply click Network in the left-hand window pane; you might have to wait while the computer browser refreshes the information before other systems and devices will show up. (If you are part of a HomeGroup, click HomeGroup on the left window pane.) Click to open a remote computer, and its shares (if any) should show up there.
Another way to access shares is to map a network drive. This makes a permanent connection to a shared folder using File Explorer and assigns it a drive letter. These network drives are mapped according to Microsoft’s universal naming convention (UNC), which is \\computername\sharename.
To map a drive, do the following:
1. Locate the Map Network Drive window.
• In Windows 10/8: Open Explorer, select This PC in the left window pane, and then click Map network drive.
• In Windows 7: Open Windows Explorer, click Tools on the Menu bar, and then click Map Network Drive. (If the Menu bar is not visible, press Alt+T on the keyboard.)
2. Select a drive letter (for example, F:).
3. Type the entire path to the share you want to map to. Use the naming convention mentioned previously or connect by \\IPaddress\sharename.
4. Click Finish.
Figure 29.4 shows an example. You’ll note the computer name is nasbox1 and the share name is datashare. In this case I mapped a drive to a NAS device instead of a Windows computer, but it works the same way. In the figure I used Y:. Some organizations like to use F: or M: or Z:, but it’s more of a preference. The key is to be consistent. If ten computers are going to map a drive to the same resource, consider using the same letter to do so; this makes it easier for the administrator to recognize where mapped drives are connecting to.
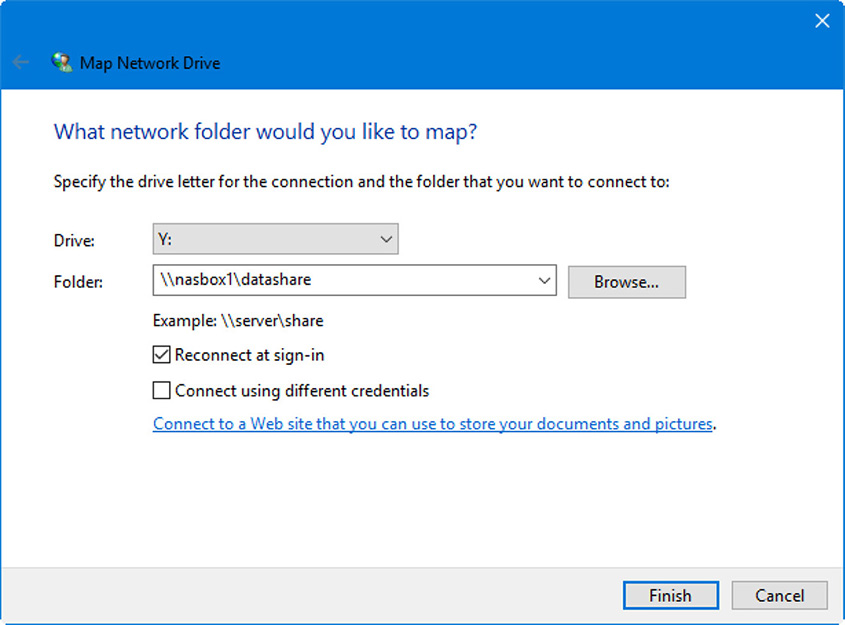
Figure 29.4 Map Network Drive window
Note that “Reconnect at sign-in” is check marked. This way, the user won’t have to reconnect and supply credentials every time that user wants to get to the data. There is another option: “Connect using different credentials”, which may be necessary if the remote share, or network policy, requires it. If this is selected, then the system will prompt the user to enter a username and password.
Mapping network drives can also be done in the Command Prompt with the net use command. For example, to map the same drive as shown in Figure 29.4, the syntax would be net use y: \\nasbox1\datashare. We discuss this more in Chapter 25, “Microsoft Command Line Tools”.
ExamAlert
Know how to map network drives in the GUI and in the Command Prompt.
Printer Sharing and Access
To share a printer, first make sure that printer sharing has been enabled in the Network and Sharing Center. Then, you can share the individual printer. Go to Devices and Printers, then locate the printer you want to share, right-click it and select Printer Properties, and access the Sharing tab. From there, check mark Share this printer and give it an easy to remember share name; preferably without spaces. (We discuss this more in Chapter 15, “Printers and Multifunction Devices.”)
To connect to the printer from a remote computer, users can attempt to browse for it, or add the printer by connecting via UNC. To do this, once again go to Devices and Printers (this time on the remote system), and click Add a printer. If Windows doesn’t find the printer on the network automatically, then click The printer that I want isn’t listed. You then have some options. First you can select the shared printer by name; for example, \\av-editor\hp-printer1, where the printer sharename is hp-printer1, and the computer it is connected to is AV-Editor. Figure 29.5 shows this configuration screen. HTTP and HTTPS connections can also be made if the computer that is controlling the printer supports it.
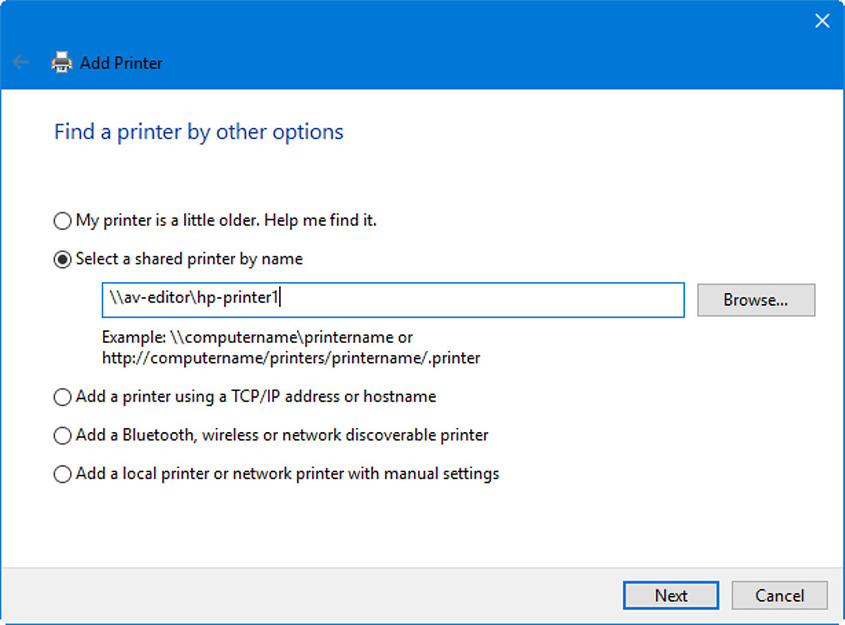
Figure 29.5 The Add Printer window
You can also connect via TCP/IP by clicking the Add a printer using a TCP/IP address or hostname radio button. From here you can connect to a stand-alone network printer by IP address directly, or utilize Web Services for Devices (WSD) to connect to a printer. Web Services for Devices (WSD), is a Microsoft API used to enable programming connections to web service enabled devices, such as printers, scanners and file shares.
ExamAlert
Know how to connect (map) to a network printer by printer share name or IP address.
Establishing Networking Connections
From within Windows a user can connect to a variety of networks. For the most part, the best way to do this is to go to the Network and Sharing Center and click the link Set up a new connection or network. This displays a window similar to Figure 29.6.

Figure 29.6 The Set Up a Connection or Network window
From here you can do several things. First, you can make Internet connections via broadband or dial-up. You can also create a new network by configuring a SOHO router (if available). In addition, you can manually connect to a wireless network; which might be necessary if the AP is not broadcasting the SSID. And then you can connect to the workplace via direct dial-up (which is uncommon) or virtual private network (VPN). To establish a wireless wide area network (WWAN)/cellular connection you would usually rely on third-party software that comes with the WWAN adapter. You also can make many of these connections in Windows 10 by going to Settings > Network & Internet.
For the most part, what you need to know is the IP address (or name) of the gateway or server that you need to connect to, as well as the appropriate passwords to get into the network, and possibly to establish encrypted networking sessions.
In general, whenever you establish a new networking connection, you will be asked to provide a network location. Windows 10 and 8 will ask you whether you want it to be private or public. A private profile means that network discovery is turned on (and that the system is searchable on the network), and file and printer sharing are enabled. Private is good for home connections or when connecting to a workplace where you trust the systems that you are connecting to (and their surrounding systems). A public profile means that network discovery and file/print sharing is turned off; this connection is good for when you need to connect to public networks that you don’t trust because you don’t know what computers will be on that network. Windows 7 uses the additional profile terms “home” and “work” which are essentially the same as the private profile in Windows 10/8; the difference between the two is that a home profile allows you to create and join HomeGroups, whereas the work profile does not.
Proxy Settings
Some organizations use proxy servers to cache HTTP, HTTPS, FTP, and other information. To connect to the Internet in this scenario, the client workstations must have the Proxy server setting configured. This allows the client to access the proxy server, which then forwards requests out to the Internet and to the corresponding web servers, or other types of servers.
The setting is located within the Internet Properties window, which can be opened from the browser, or by going to Control Panel > Internet Options. From there access the Connections tab, and click the LAN settings button. Click the Proxy server check box, and type the name or IP address of the proxy server that is being used. Figure 29.7 shows an example of this. Here you can see that the proxy server’s IP address is 172.18.0.105, and that we are using port 80. Even though the proxy server is usually stored on the LAN, this could be a security risk and you might want to consider using HTTPS and port 443. We discuss proxy servers more in Chapter 7, “Networked Hosts and Network Configuration.”

Figure 29.7 Proxy server setting in the LAN Settings dialog box
By default, the IP address and port selected is used for all protocols. But you can modify this by clicking the Advanced button, deselecting the checkbox named Use the same proxy server for all protocols, and then manually selecting separate servers and ports for different protocols.
ExamAlert
Know how to navigate to and configure the proxy settings in Windows!
Note
Remote Desktop Connection and Remote Assistance are covered in Chapter 42, “Basic Scripting and Remote Access Technologies.”
Firewall Settings are covered in Chapter 31, “Physical and Logical Security.”
Configuring an Alternate IP Address in Windows
We mentioned alternate IP addresses earlier in the book. Let’s expand on that a little bit and show how to configure them.
An alternate IP configuration allows you to have a secondary connection. For example, a user might work from home the bulk of the time, but once in a while the user is required to report to a satellite office that does not have a DHCP server. The primary TCP/IP configuration would be used when working at home, but an alternate configuration could be created for those uncommon visits to the office.
To do this, navigate to the IPv4 Properties dialog box for the network adapter to be configured. Access the Network and Sharing Center and click the Change adapter settings link. That opens the Network Connections window. You can get to his screen directly by accessing Run and typing ncpa.cpl. Right-click the appropriate network adapter —for example Ethernet, or Wi-Fi —and select Properties. In the Properties dialog box select Internet Protocol Version 4 and click Properties. Once there, click the Alternate Configuration tab. This is shown in Figure 29.8. By the way, this tab will only be visible if the primary configuration is obtaining an IP address automatically.
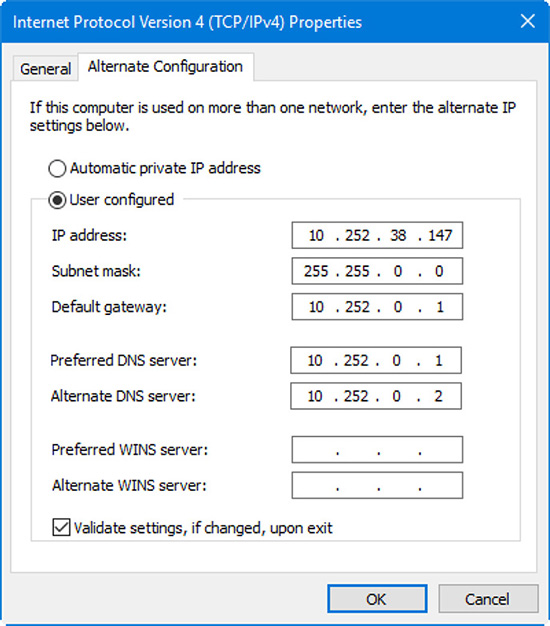
Figure 29.8 Alternate Configuration tab of the IPv4 Properties dialog box
The alternate configuration can be set up to use an automatic private IP address (APIPA, usually not desirable), or can be configured statically (manually) as is the case in Figure 29.8. Here we have a classless IP address: 10.252.38.147 using the 255.255.0.0 subnet mask. If the user wishes to connect to the Internet or domain-based resources, a gateway address and a DNS server address would have to be configured as well; we are using 10.252.0.1 as the gateway and the primary DNS, and 10.252.0.2 as a secondary DNS.
So, when the user is at home, the computer connects to the primary network and obtains an IP address automatically from a DHCP server. When not at home, the system will still search for a DHCP server as part of its primary configuration, but when at the satellite office, it won’t find one (because one doesn’t exist), and then the static configuration will kick in.
Note
This is not a very common configuration, because DHCP is available almost everywhere, and the Windows registry can store multiple profiles for a single network adapter’s TCP/IP configurations. If you are interested, these are stored in:
HKEY_LOCAL_MACHINE\SYSTEM\CurrentControlSet\Services\Tcpip\Parameters\Interfaces
You might actually troubleshoot there one day.
Network Card Properties
There are some advanced network adapter properties that can be configured in Windows such as duplex settings, Wake-on-LAN, QoS, and so on. These can be accessed from the network adapter’s Properties dialog box > Advanced tab. You can access a network adapter’s properties from the Device Manager —which is preferred —by simply right-clicking the network adapter and selecting properties. Or, by going to Network Connections, right-click the network connection and select Properties, then select Configure.
How well your network adapter operates depends on several factors (for example, the duplex setting it is configured for). There are two duplex settings that a network adapter can be set for: half-duplex and full-duplex. Half-duplex means that your network adapter can send or receive data but not at the same time; full-duplex means that the adapter can do both simultaneously, thus doubling the maximum data throughput. This can be configured by clicking the Speed & Duplex setting (or like name). This is normally set to Auto Negotiation, but you can modify the speed or duplexing settings to take full advantage of your network. Of course, this depends on the type of device your network adapter connects to and how that device is configured. If your router is capable of 1000 Mbps in full duplex mode, by all means select this on the network adapter! That will enable it to send and receive 1000 Mbps at the same time.
ExamAlert
Know the difference between half-duplex and full-duplex.
You might also decide to configure other settings, such as Wake-on-LAN (WoL), Power over Ethernet (PoE), and quality of service (QoS) —if your network adapter supports them. WoL is used so that the computer can be woken up by a remote computer when that remote system sends data to the network adapter. (This can be a special packet known as a magic packet.) This is great for small networks when you store data on one computer that is set to sleep after, say, 15 minutes. The data sent to the network adapter will wake up the computer, allowing the remote user to get the data required. (I have a video showing how to implement WoL on my website if you are interested.) As mentioned in Chapter 5, “Ports, Protocols, and Network Devices,” PoE is when a device is supplied power by the Ethernet networking connection. The power travels along the network cable along with the data. This is common for IP-based devices, such as WAPs, IP cameras, VoIP phones, and so on. As mentioned in Chapter 6, “SOHO Networks and Wireless Protocols”, QoS attempts to prioritize streaming media and other types of data. There are a ton of settings here that go beyond the A+ objectives, but try to familiarize yourself with what we covered so far.
Note
If you are interested in more of these advanced properties and their descriptions, go to Intel’s website and search for “Advanced Settings for Intel Ethernet Adapters”.
Sometimes, settings need to be configured in the BIOS if you have an integrated network adapter or “on-board NIC”. This might be instead of, or in addition to Windows. For example, sometimes there are options to configure whether PXE is functional, whether the NIC can boot from the network, and/or whether WoL will function. In some cases you might configure an IP address for remote administration such as Intelligent Platform Management Interface (IPMI), which allows an administrator to remotely control the entire system (OS, BIOS, and all) within a browser or other program. And that’s just the beginning, so, be ready to configure the BIOS.
Note
I deferred the cram quiz until after the next brief objective.
1.7 – Summarize application installation and configuration concepts.
ExamAlert
Objective 1.7 focuses on: System requirements; OS requirements; methods of installation and deployment; local user permissions; and security considerations.
If you are designing a system to use a particular program such as virtualization, graphic design, CAD, A/V editing, gaming, and so on, then it is important to carefully analyze the main program that will be used, and plan carefully for its installation and configuration —making sure that it will run properly within your hardware configuration and the operating system that is running.
Application Requirements
First we have to plan out system and OS requirements for the application. Some applications have versions for Windows and for Mac, but it’s important to think about platform compatibility regarding the main application you want to use. Many applications have a set of minimum requirements, but also have a set of recommended requirements. With any specific applications that will be resource intensive, I suggest you go with the recommended requirements (or more), otherwise, you could experience slow performance.
For example, on the PC side of things, an application might require Windows 7 SP1 or higher, .NET 4.6, 2 GB of hard drive space, a dedicated Windows-compatible audio device and speakers, and display resolution of at least 1024 x 768. But those are minimums. The application could recommend a 2.8 GHz quad-core CPU, 16 GB RAM, and a discrete PCIe video card that can be used for hardware acceleration. However, even the recommended requirements might not be quite enough, depending on your system and environment. For instance, I wish that every program I use would run faster. As of the publishing of this book, I run my programs on a system with a hex-core 3.3 GHz CPU, 32 GB of RAM, a powerful GPU, an M.2 drive for storage, and Windows 10 Pro; and I still wish I had more power —even though I am well past the recommended requirements of any programs that I use. That’s partially because I run so many other powerful applications simultaneously.
On the Mac side of the spectrum, you might find that a program wants macOS 10.12 or higher, and essentially the same type of hardware. Remember: Compatibility is key. And, when planning your system, you have to over-engineer. Make sure you have plenty of resources (and then some) based on the recommended requirements of an application.
Note
Recommended requirements will change over time, and new versions of applications are always being released which usually consume more resources! Be ready.
Method of Installation and Deployment
Many applications are simply downloaded and run through the installer for Windows, macOS, or Linux. But in some cases, the application you wish to install might be stored on a USB flash drive, or an optical drive, or perhaps it is located somewhere on the network. You might have to connect to a mapped network drive, or an FTP server, and possibly extract the content from a zip file or other compressed group of files. How the application will be installed should play into your planning stage. Be ready for multiple installation and deployment types. For instance, in the case of a program such as Microsoft Office, you might use a server to deploy the program (or new version of the program) to multiple clients at once. Finally, know where you are installing the program to. If you are using Windows for example, a 32-bit version of the program it will go to C:\Program Files (x86), and a 64-bit version of the program will be installed to C:\Program Files. In essence, know the source, but also know the target.
User Permissions
When you install an application in Windows, it will usually ask who you want to have access to the program. Quite often, the options are: the user who is installing the application only, or everyone on the computer. That can be somewhat limiting, especially if you have several users that share the system. Later, you can assign permissions to users/groups on the folder that contains the application’s executable file. Be ready to navigate C:\Program Files (x86) and C:\Program Files to do this for 32-bit and 64-bit applications respectively.
As an administrator, you might be called upon to install a special application to a user’s computer, where only that user may use the application —even you aren’t allowed, regardless of the fact that you are an admin. In that case, you would have to change permissions appropriately, or give the user permissions to install the application. Be ready to be called upon to make changes to ownership and permissions in Windows.
Security Considerations
I’d like you to consider this: every installed application increased the target surface of an operating system. The application in question could open up networking connections, or ports on the firewall, or create backdoors, each of which can be inviting to attackers. Plus, the availability of the rest of the system could be reduced by some applications that are not coded well. Consider running evaluation versions of software on a testbed (isolated network or VM network) before installing to live clients. Test the security of an application by scanning the system for malware, scanning for open ports, and run other applications side-by-side to find out if there will be any conflicts. Then, check how the application updates. You may or may not want it to auto-update. If it does not auto-update, then you should periodically check for updates that will address security vulnerabilities, and increase the functionality of the program. Depending on your organization’s policies, that could be every 6 months or less. The installation of the program and the program’s updates could also affect the network. The larger the program, the more the network will be affected. So, after you have tested an application thoroughly, be sure to run installations and upgrades off hours, unless they are absolutely necessary!
Cram Quiz
Answer these questions. The answers follow the last question. If you cannot answer these questions correctly, consider reading this section again until you can.
1. Which of the following are administrative share names? (Select the two best answers.)
![]() A. C$
A. C$
![]() B. C:\Windows
B. C:\Windows
![]() C. ADMIN$
C. ADMIN$
![]() D. System32
D. System32
![]() E. $print
E. $print
2. Which of the following requires a Windows-created password to gain access to?
![]() A. Workgroup
A. Workgroup
![]() B. Client/server
B. Client/server
![]() C. HomeGroup
C. HomeGroup
![]() D. Domain
D. Domain
3. You want to connect to a share on \\server1\data-share. Which of the following should be used to accomplish this?
![]() A. HomeGroup
A. HomeGroup
![]() B. Right-click the folder and select Share with
B. Right-click the folder and select Share with
![]() C. ipconfig
C. ipconfig
![]() D. net use
D. net use
4. You have been tasked with setting up a client Windows computer. It needs to gain access to the Internet, but all web traffic is cached and filtered by a go-between server on the LAN. What should you configure to enable Internet access for the Windows client?
![]() A. Alternate IP address
A. Alternate IP address
![]() B. Proxy server
B. Proxy server
![]() C. Duplex
C. Duplex
![]() D. WSD
D. WSD
5. Which of the following are important considerations when planning the installation of a new application? (Select the three best answers.)
![]() A. CPU speed
A. CPU speed
![]() B. Windows location
B. Windows location
![]() C. Program Files location
C. Program Files location
![]() D. User permissions
D. User permissions
![]() E. Warranty
E. Warranty
6. In Windows 10, which network location profile setting should you choose if you are not sure what computers will be on the network or if you can trust them?
![]() A. Private
A. Private
![]() B. Home
B. Home
![]() C. Work
C. Work
![]() D. Public
D. Public
Cram Quiz Answers
1. A and C. Every volume gets an administrative share by default including the C: drive which is assigned C$. ADMIN$ is another administrative share; it is the sharename for C:\Windows. System32 is simply a folder name within C:\Windows. $print is not an administrative share, but it could be used as a share name. An actual administrative share is print$.
2. C. HomeGroup connections require an alphanumeric password that was created by Windows automatically. Joining or creating a workgroup does not require a password. Client/server networks such as Microsoft Active Directory domains require a username and password, but these are created by the administrator of the network or selected by the user.
3. D. The net use command can connect to shares such as \\server1\data-share or any other share on the network. Of course, you could also do this by mapping a network drive in Explorer. HomeGroup uses a more user-friendly approach to sharing and connecting to shares. Right-clicking the folder and selecting Share with will share the folder but won’t make a connection to the share. ipconfig is used to find out the IP configuration of the network adapter in the Command Prompt.
4. B. Within Internet Properties > Connections > LAN Settings, configure a proxy server by entering the IP address of the proxy server and the port to be used. An alternate IP address allows a system to connect to a separate network while away from the primary network. The duplex setting is where you can configure a network adapter to send or receive data one at a time (half duplex), or simultaneously (full duplex). WSD stands for Web Services for Devices which is what Windows uses by default to connect to remote printers.
5. A, C, and D. When installing a new application, we should consider the CPU speed (and other minimum/recommended hardware requirements), the Program Files location (is it 64-bit or 32-bit), and user permissions. The Windows location isn’t really important; by default, it will be C:\Windows, but its location doesn’t really impact the installation of the application. The warranty (if there is one) can be important if there is a failure, but doesn’t play into the installation of the software.
6. D. A public profile means that network discovery and file/print sharing is turned off; this connection is good for when you need to connect to public networks that you don’t trust because you don’t know what computers will be on that network. Private is good for networks where you trust the systems. Windows 7 uses the additional profile terms “home” and “work” which are essentially the same as the private profile in Windows 10/8.