CHAPTER 9
FRUITS
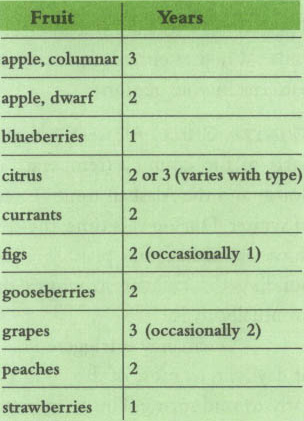
The first thing to understand about growing fruits is that it’s something of a commitment. With the possible exception of strawberries, which some people treat as annuals, plants that produce fruit need several years to become mature enough to bear their crop. Some may yield a few fruits in the second year, or even the first (see table below), but by and large it takes three years to really get the good stuff.
What you have in the meantime are some very handsome plants (some trees, some shrubs) with other virtues: lovely, fragrant flowers, striking fall color, pretty foliage, or all three. And you have a serious plant, something large enough to become the focal point around which you organize other, smaller containers into a coordinated garden design, or to stand regally on its own.
The greatest joy, though, comes with the fruit itself. Ripened to its fullest glory, it is unbelievably superior to anything store-bought. When you and your guests first experience the unique texture of a fresh fig, smooth and slightly crunchy in the same bite, or feel the sweet-tart burst of a fresh gooseberry on your tongue, or melt down to your socks at the honey-sweetness of a tree-ripened peach, you deserve to feel very, very proud of yourself.
It’s important to remember, though, that these plants will be around for years. The implications are worth reviewing.
First, we’re not talking about a petite little pansy here. Many mature fruit trees are large plants, in both height and spread. You need to plan for the future as you’re making your original selections, making sure that your space is large enough to do justice to the plant.
Also, the container itself needs to be large enough to hold a plant that will grow in it for years. (Size considerations are discussed in the individual plant sections.) The container should be made of a material that survives freezing weather: wood, plastic, or the new fiberglass material. And because you may need to relocate the container into a more sheltered spot for the winter, you should plan a way to make it easily movable: either add a set of casters, or invest in a heavy-duty plant dolly with wheels.
The second important point to keep in mind: because fruit trees and shrubs live for many years, they have to survive your winters. You need to learn about the climate patterns in your area and match them against the particular needs of the fruits you’re interested in growing.
The Crucial Questions About Climate
Two aspects of winter weather are crucial to fruit plants:
1. Exposure to the correct temperature range (32° to 45°F) for the right amount of time to send the plant into dormancy; this is known as winter chill.
2. Protection from prolonged, severe cold that could kill the plant.
These two factors are not interrelated except that they collide on the calendar. Whether either presents a problem for you is a matter of the weather patterns in your region.
WINTER CHILL. All trees and shrubs that produce fruit in the temperate parts of the country (temperate meaning everyplace between the Deep South and the Alaskan tundra) need to go through a period of dormancy in winter. During this time, the tree loses its leaves and its internal systems slow way down; the plant is alive, but resting. In this state, the plant is building the cellular structures that will in spring become flowers, and eventually fruits.
Dormancy is triggered by changes in temperature and in the hours of daylight. In most of the country, it begins in mid autumn and lasts until early to mid spring. This is an important phase in the plant’s natural annual cycle, and cannot successfully be either forced or curtailed.
Winter chill is the term used to describe a certain temperature range—between 32° and 45°F—that is necessary for the plant to set next year’s blossoms. This period of cold but not freezing weather is usually expressed in hours; and different types of fruits, even different varieties of the same fruit, need a different number of hours. For instance, apples (generally speaking) need around 600 hours of winter chill. That sounds like a lot until you realize that 600 hours translates to just 25 days, assuming that each 24-hour period remains within that 32° to 45°F range. Winter chill requirements are cumulative: sometime between when the leaves start to fall in autumn and when the new buds begin to open up in spring, the plant must be exposed to that many hours in total. Temperatures below freezing do not count.
In almost all parts of the country, except the Deep South and southern California, winter chill is not something you even need to think about. As long as you have mild to moderate winters, you will have enough winter chill hours for all the fruits in this section.
The difficulty comes in colder climates, where the dormant period includes bitterly cold months when the plant is in danger of freezing. That takes us to our second concern.
WINTER PROTECTION. Once the thermometer drops below 32°F for any prolonged period, your fruit trees and shrubs move beyond the “good” range that allows for winter chill; now they are in the danger zone where they could be killed.
This is far more of a problem for container gardeners because it is the roots that are at risk. Plants in traditional gardens are surrounded by a large mass of earth that serves to insulate the roots. In containers, the plant’s roots have just a few inches of soil, if that, between them and the surrounding air. When the air temperature is, say, 25°F, the soil in the container and the plant roots will freeze, and the plant may die—unless you take action.
We give cold protection special focus here because it’s something you have to be aware of for almost all fruits. But keep in mind that the ideas described here apply for any plants that you hope to carry through the winter. What you have to be concerned about is severe, unrelenting cold, the kind of weather where it’s 15° or 20°F or even colder at night and never gets above 32°F during the day. An occasional night at 25°F will not be fatal to the plant, as long as the temperature warms up to 32°F or above during the day.
If you live in an area that gets that kind of very cold weather in the winter, you surely know it. If your weather patterns are usually warmer than this, but occasional hard freezes are not unknown, then you need to discipline yourself to pay careful attention to the forecast and be ready to take action when needed. In both cases, you have two, maybe three, courses of action:
1. Move the entire container into a location where it will be protected from the worst weather. This may be a garage, an unheated room in your home, an outdoor shed, or something similar. It doesn’t matter if the area is dark, as long as the temperature is above freezing. Just be sure not to bring the plant indoors into a room that is heated for human comfort, or it will be too warm. During this time the tree, which is dormant, does not actively take up water, so you do not need to water it as you would outdoors; just check from time to time to be sure the soil has not completely dried out. In spring, when temperatures climb back above freezing, bring the container back outside.
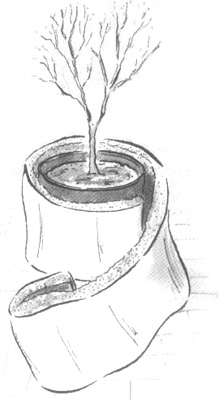
2. If you don’t have such a protected space, the tree will have to stay outside, and you’ll have to wrap it and the entire container in some kind of insulating material. What you use, and how much of it, will be a function of how low you expect the thermometer to drop. See box for several ideas.
3. For double protection, set the wrapped container down onto the ground, if possible. The surrounding soil mass will keep it about 5° warmer.
As we said previously, things will be much easier if you start your fruit trees in containers that are easily moved, either by attaching casters or by setting the containers on plant dollies with wheels. Do this from the get-go, and you’ll have no trouble moving your fruit trees during their first winter. You will also find that the gap created by the wheels gives welcome room to maneuver a blanket wrap, if that’s the route you take. So in either case—for moving or for easily getting underneath the bottom of the container—a wheeled base makes life much simpler. It all boils down to this:
• Unless you live in a subtropical climate, winter chill happens naturally; you don’t have to do anything to provide for it. If you do live in a subtropical climate, accept that there are some fruits you simply won’t be able to grow. If your climate is marginal in regard to winter chill, look for varieties with significantly lower winter-chill requirements.
• In extremely cold climates you won’t have to worry about winter chill, but you will have to worry about freezing. If you’re not able to provide protection, you’re better off not trying to keep any plant alive through the winter.
Planting Techniques
Another important consideration when growing fruit trees is how to plant them. Most fruit-bearing plants come into a gardener’s life in a condition known as bare-root. (Roses are also sold this way, and many landscape plants.) The term means just what you would think: the roots are bare—that is, not planted in soil. They are encased in some material that holds moisture around the roots, and then wrapped with plastic to hold that moisture-retaining material in place.
The first time you buy a bare-root plant and open the package, you may feel your heart sink. The poor thing looks completely dead, especially if there are no leaves or buds showing. But the plant isn’t dead, it’s merely dormant; it was intentionally harvested by the grower in its dormant state because it can be shipped more safely that way. Planted in soil, watered, and set in the sun, it will soon burst into life.
Most mail-order nurseries time their shipping so that the plant arrives at your door at the correct planting time for your climate. When you receive the plant, whether through the mail or purchased at the garden center, here’s what to do:
1. Open the package, pull away the packing material, and inspect the roots. They should look strong and healthy. If they are withered, rotten, or obviously dead, return the plant and ask for a replacement. Experience, however, tells us that most nurseries are extraordinarily careful, and in all probability your new plant will be healthy. Just be sure you proceed to the next step immediately,
2. Either plant the young tree (skip to Step 3) or, if you can’t get to it right away, use one of these temporary measures:
a. Soak the plant in a bucket of water to rehydrate the roots. This will hold it for a day or two.
b. Resoak the packing material and wrap it loosely around the roots, allowing for some air circulation. This will hold it for three to four days.
c. Put the plant in a temporary pot and cover the roots with damp potting soil. This will hold it for several weeks.
3. Unless its already soaking, set the plant in a bucket of water so the roots are submerged while you get your container and all your supplies ready.
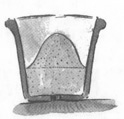
4. Prepare your soil mixture: potting mix, hydrogel crystals, slow-release fertilizer, and any extra soil amendments you might need (review Chapter 5 for details). Fill the container about one-quarter to one-third full. Add more potting mix and shape it into a mound like a volcano, with its top an inch or so below the rim of the pot.
5. Look closely at the roots of your plant, and cut away any that seem dead or mushy. If the roots are a tangled mess, use your fingers to pull them into separate strands. Trim any that are noticeably longer than the others. Your goal is to create a conical shape that will fit down over the “volcano” of soil.
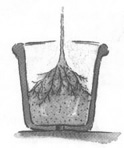
6. Loosely place the roots over the “volcano” and check for fit. The crown of the plant (the spot just above the highest roots where the stem becomes somewhat smaller and darker in color) should be at the ultimate soil line, just below the rim; make the mound larger or smaller if need be.
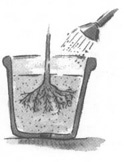
7. Add more soil over the roots and around the edges, tamping lightly as you go. Water thoroughly and let things settle; add more soil as needed.
If it is not bare-root, a young fruit tree or shrub will be planted in a temporary nursery pot filled with soil. Growers refer to these as “container plants,” but don’t expect a handsome container that you’d want to use as the plant’s permanent home—it will be an ordinary, utilitarian black plastic. Whereas bare-root plants are available for purchase only in the dormant season, from winter to early spring, container plants have no such limitations. Theoretically, they can be sold anytime, and you can plant them whenever you find them at the garden center.
Water the nursery pot thoroughly to loosen the soil and then gently slide out the entire contents of the pot—plant and soil. Try to keep the soil ball intact as much as possible. Fill your permanent container about one-third to one-half full with new potting soil, and set the plant-plus-soil in the center. Fill in around the edges with more potting soil, water thoroughly, and you’re set.
As you ponder your wish list for your new container garden, you might think you could never include something like apples. It’s hard to imagine that the substantial specimens you may have seen in old orchards could grow on a deck or balcony. And in reality, you could never handle those huge trees in a container. Fortunately, apple specialists have developed trees that never get higher than 8 feet, sometimes less. There’s also a new form of apple tree, called columnar, that slowly grows to about 8 feet high with little or no branching; this tall, ultraslender shape is very appropriate for small spaces that would not be able to accommodate a wide-spreading tree. With these new types of trees, container growing of apples has become not only possible, but easy. And the fruits you harvest will be fully ripe, rich in flavor, and without the chemical residues found on most commercially grown fruit.
Apple Basics. Most modern fruit trees are a combination of parts of two trees, physically fused together in a process called grafting. The upper portion of one tree, the scion, which produces the fruit, is grafted onto the lower stem of another tree, called the rootstock. This is how the qualities of a particular variety are preserved.
Take the Red Delicious apple, for example. A piece of a branch from an established Red Delicious tree (the scion) is tied to a cut surface on the stem of the rootstock, where they grow together. The resulting tree will produce exactly the same fruit as the original tree from which the scion branch was cut. But if you plant seeds from a Red Delicious apple and they eventually grow into trees, those trees may bear fruit, but they won’t look or taste like the apple you started with.
The scion, in other words, determines what type of apples the tree will bear. The rootstock, in contrast, determines important growing characteristics; fruit tree growers choose a particular rootstock for the qualities it gives the tree. Some rootstocks are better adapted to wet soils, some are more resistant to certain diseases, some cause a tree to bloom and bear fruit earlier, and so on. Also, most important for our purposes here, it is the rootstock that determines the ultimate size of the tree.
For container growing, then, it is very important to learn what root-stock has been used. Rather than being given colorful names, rootstocks are identified by a code made up of a letter and a number. The letter indicates where the particular stock originated (for example, an M indicates the breeding program at the Mailing Research Station in England), and the numbers are assigned in sequence (so M-27 is the one that was developed just after M-26).
Rootstocks that will keep an apple tree to 8 feet, small enough for container growing, are P-22, M-27, M-9, and possibly M-26. Don’t bother with anything else. Mail-order catalogs that specialize in fruit trees are usually careful to identify root-stock, but at a retail garden center you may have to do some double-checking. Some garden centers sell trees that have been labeled dwarf or semi-dwarf, terms that are so imprecise they have become meaningless. Before buying a tree labeled in this way, check with staff to verify the root-stock; if necessary, ask them to contact the grower and find out what root-stock the tree is on. This will save you many headaches in the future.
Columnar trees will surprise you the first time you see them. They do not have branches in the usual sense, but merely very short stems (called spurs) attached to the main trunk, on which the apples develop, so that in late summer the full-size apples seem to be growing directly from the tree’s trunk. Any branches that do form also tend to grow straight up. The trees grow slowly but bear fruit earlier: at two years, compared to three for most others. Because columnar varieties are naturally slow growing, rootstock is not really an issue.
Pollination. Some fruit trees can bear fruit by themselves; these are described as self-fertile. Others need a different variety nearby for cross-pollination, without which they will not bear fruit. Apples are in the second group: they need another variety of apple for pollination. With a few exceptions, any two apple trees that bloom at the same time are pollinators for each other. Ideally, the two varieties should be located within 20 feet of each other. The perfect solution, if you have the room, is to grow two varieties. If that is not possible, you will have to rely on cross-pollination from an apple tree nearby.
You may also find that your tree bears fruit without any obvious pollinator. Jim Gilbert of Northwoods Nursery in Oregon, an extremely knowledgeable grower who has seen just about every possible problem, loves to tell about an old Gravenstein apple tree he once had high in the Cascade Mountains. Growing all alone, without, as far as he could tell, another apple tree for miles around, the tree produced abundant crops of fruit for years.
Hardiness. Most apple varieties are technically hardy to –25°F, which means that almost anywhere in the United States you can have a nice apple tree in your backyard, providing you have a backyard. If you’re growing your fruit trees in containers, severe cold weather can be more of a challenge.
Bear in mind that the root system of an apple tree is hardy to only about 15°F. In the ground, the earth mass keeps the root temperature from falling to dangerous levels. But in a container outdoors, without protection, your apple tree will be killed if the soil temperature drops too low. You have two ways to protect against this: (1) insulate the container and, if possible, set it on the ground, or (2) bring it into a warmer environment. See page 289 for more on both techniques.
The bottom line is this: if your winter temperatures are consistently below 15°F, and you have no way to provide some sort of protection, you will in all likelihood lose your apple tree. Unless you believe this kind of challenge builds character, you’re better off not taking the gamble.
Chilling requirements. Like most other fruit trees, apples need to go through a period of winter chill: a certain number of hours between the temperatures of 32° and 45°F. During this dormant period the trees rest, getting ready to bloom and set fruit the following season. (See page 286 for a more detailed explanation of winter chill, and see specific requirements in the Varieties section below.)
This means that you cannot keep your apple tree at room temperature all winter and expect fruit the following year. It also means that if you live in the Deep South, where temperatures rarely go below 50°F, you should plan on getting your apples at the supermarket. Southerners in marginal climate zones may have success with low-chill varieties (see the special note in the Varieties section).
In more northerly areas, where there is a distinct winter but not horrific cold, just let the tree go dormant naturally (which you will recognize when it begins to lose its leaves). Between November and February, you will undoubtedly accumulate the number of winter-chill hours you need. Remember, though, that if there is a prolonged period of bitter cold in the winter months, the container must be moved into some protected area until the weather is not so severe.
Planting. You can plant your apple tree at almost any time of year, whenever you find a healthy specimen at the garden center. You’ll probably find the greatest selection in the spring, and most will be bare-root plants (see page 290). In summer and fall, you’re more likely to find small trees in nursery containers. In warmer climates, trees are often available in the winter as well, either bare-root or containerized. If you order from a mail-order nursery specializing in fruit trees, you will in all likelihood receive a bare-root plant.
Choose a large container for your apple tree; a 10- or 15-gallon pot is the minimum for long-term growth. A coarse planting mix that drains well is best.
With a bare-root tree, first trim the roots back to fit the pot without circling, then begin filling the pot with potting mix. As you fill, hold the tree in the pot so that the graft union (the swollen area near the base) is level with the rim of the pot. Fill the pot to within about 2 inches of the top, being careful that the graft union is well above the soil line.
If you are transplanting a containerized plant, remove it from its pot and inspect the root system. If it is quite dense and has circled around the pot, you’ll need to break up the root mass somewhat. Pull at larger exposed roots and try to separate them from the main body of roots. Sometimes you may have to beat on the roots with a stick to loosen the snarl. Once you have separated some of the main roots, prune them to fit the pot, and plant as you would for a bare-root tree.
After planting, prune back the branches and the top of the tree to about one-third their length (see details in the Pruning section, below), and water the container very thoroughly, until water runs out the bottom. Now you have one more task: staking.
The dwarfing rootstock that keeps your tree at a small size is, unfortunately, not strong enough to hold up the tree on its own. You need to add some extra support, in the form of a stout stake or trellis. Loosely tie the main stem of the tree to the stake or trellis with thick string or a similar material. Be sure to keep it loose during the life of your tree; tightly tying a tree can disfigure or even kill it.
Columnar apple varieties usually do not need staking.
Success with Apples. Apples are easy trees to grow if you follow a few basic guidelines about watering, fertilizing, pruning, and pest and disease control.
Watering. Proper watering is critical. Your apple tree will not live without water, yet can be damaged or even killed by too much.
When you first plant a bare-root tree in the spring, water it thoroughly as described above. After that it will probably not need water again for several weeks; the root system of a dormant tree is not active, and it cannot use any excess water. Check the potting soil every few days to be sure it is not drying out. Keeping the soil lightly moist is all you need to do until your tree is actively growing.
After your tree begins growing, it will start to use the water in the pot. Check the soil more frequently, and water whenever it shows signs of drying. If your tree is in a large pot, a deep watering every five to seven days should be enough, but be especially vigilant during extremely hot, dry summer days.
Starting in late August or early September, begin holding back on the water, providing just enough to keep the soil very lightly moist. This will slow down the growth rate and allow the tree to prepare for the colder temperatures of winter.
Fertilizing. When you plant a tree in the ground, nature does a pretty good job of providing all the nutrients and minerals necessary for the tree to survive. In a container, however, those essential nutrients must come from you in the form of added fertilizer. This is not an exact science.
Take a moment to review the basics of fertilizer formulas in Chapter 6. Remember, too, that container gardens require more frequent fertilizing than traditional gardens, because the requisite frequent waterings wash away the nutrients that were in the potting mix you started with.
What type of fertilizer you use is a matter of personal choice. Just remember that your goal is the production of flowers and fruit, so select a formulation high in phosphorus (see Chapter 6 for details). Many people report good results from the following program: once a week while the tree is actively growing, give it a drink of soluble synthetic fertilizer such as Miracle-Gro, but dilute it to half strength. Others like the simplicity of a slow-release fertilizer such as Osmocote, described in Chapter 6.
Organic gardeners can choose from a variety of commercial organic fertilizers. You can also apply blood meal and bone meal to the surface of the pot in late spring, for slow-release organic fertilizing. Use one handful of each per foot of height of the tree.
Your apple tree should grow 8 to 12 inches a year, and its leaves should be dark green in color. If this happens, your fertilizer program is working. If you are using homemade organic fertilizers such as manure or compost tea and the leaves turn a pale green or yellowish green, especially the older leaves, you may want to increase the frequency of fertilizing or make a more concentrated solution.
Late in the summer, as you are beginning to cut down on water, you should also gradually stop fertilizing. This allows the tree to harden off and get ready for winter.
Pruning. Let’s return to the day you first acquired your tree. After planting, staking, and watering, it is time to think about its form. If you are growing a columnar variety, the tree should be a straight spire with few or no branches. Any branches that do appear should be very short spurs from the main trunk. Basically, columnar varieties do not need pruning. If a columnar tree gets too tall for your space, you can cut it back to about half its height; it will grow back with one or more upright branches that will soon bear fruit.
Apple varieties other than columnar will usually come as a whip (that is, a single slender trunk without branches) or as a young tree with a clearly defined main trunk and a few branches. After planting, check all the branches. First, look for any that are broken and make a cut below the break, discarding the part you cut off. Next, wherever two branches cross and rub together, prune away the weaker one, cutting back to the trunk. It is also a good idea to balance the tree by pruning back any branches that are significantly longer than others.
There is some debate about whether it is useful to do any further pruning. Some growers think it’s best to leave the tree alone at this point, while others recommend pruning branches back to about half their length to compensate for the disturbance and shock of transplanting. We advocate the latter approach.
The next thing to think about is how you want to form your tree. Keep this general concept in mind: when you remove the growing tip of a branch, it sends out side branches. If you cut back the central leader of your new tree by about half (the central leader is the shoot growing straight up at the center of the tree, what will eventually become the trunk), you accomplish two things: you control its height, and you also encourage the tree to form side branches, which are generally stronger. Take note, however, that some trees have such a strong urge for a central leader that in a few years another branch will try to grow in that position.
Assuming you started with a dwarf rootstock, cutting back the central leader simply to keep the tree short will not be needed unless you miscalculated your space. You will find, however, that by regularly pruning the leader and the strong branches, you will encourage the tree to grow the short spurs on which fruit is produced. The best time to do this is in the spring; cut away one-third to one-half of the portion of the branches that grew last year.
It is also a good idea to keep branches as horizontal as possible, as this stimulates the formation of flower buds and fruit instead of vegetative buds that simply make longer branches. To accomplish this, you can insert a short piece of wood (a wooden clothespin works well) between the trunk and branch to gently force the branch downward, or you can tie the branch down toward the floor or ground to keep it in a more horizontal position.
As the tree gets older, most of your pruning will entail removing branches that are crossing, or controlling branches or central leaden that are growing too fast and causing the tree to become unbalanced.
Insects and Diseases. Probably the worst insect pest of apples is the codling moth. This is a worm that eats the core of the apple and then tunnels out to the surface, leaving a small hole. It leaves a mess at the core, but you can cut around the outside hole and still have apple to eat. This pest is difficult to control. If it becomes a problem for you, purchase a pheromone trap at the garden center, to attract the moth that lays the eggs of the larvae that do the damage.
Two other insects you may encounter are mites and aphids. They don’t eat the fruit itself, but can feed on the foliage and severely reduce the vigor of the tree. You may already have experienced aphids if you have a vegetable garden; the best way to control them is to knock them off the plant with a hard spray from the hose, or to apply insecticidal soap, which suffocates them. See Chapter 6 for more details.
Mites are smaller, spiderlike insects that also suck plant juices. They are so tiny that you may see their damage before you see them; you can use a magnifier to identify them. Damage shows as speckling on the leaves or as small webs underneath the leaves. Mites are harder to dislodge with water, but the soap compounds will also work on them. Predatory mites that can help keep the pest mites in check are also available.
Diseases that attack apple trees are a serious concern for commercial orchardists, but represent less of a threat for container gardeners. In the highly controlled environment of one carefully watched container, it is less likely that diseases will get a foothold. The very best advice we can give you is to search out apple varieties that have been bred for resistance to diseases. Apple scab is the biggest problem; read catalog descriptions closely for varieties that are resistant to it.
Harvesting. Now the real fun comes in, the result of all your tender loving care. In the third year, generally speaking (second year for columnar types), you can start picking your own apples. Compared with store-bought fruit, tree-ripened apples are far superior, sweet and delicious. You may find yourself saying, “Now this is what apples are supposed to taste like.”
All apples must be picked when fully ripe to appreciate their richness and flavor; they do not ripen after being picked. But how do you know when they are ripe? By their color, the ease with which they can be picked, and their firmness and taste. Yellow apples turn from a greenish yellow to a brighter yellow as they ripen; red apples turn a darker red. Apples are also usually ripe when they separate from the tree with just the tiniest tug, or when they begin falling. (However, insect-damaged fruit will sometimes drop prematurely, so you should try tasting one before picking the remainder.) Of course, once you have bitten into a fruit, it will spoil whether it is ripe or not.
Another sign of ripeness is firmness. Try pressing the fruit with your thumb; if it gives a tiny bit, it is probably ripe. Late-ripening varieties are often good keepers and can be stored in a cool room or garage for several months; a month or two of cool storage actually develops better flavor. Early-ripening varieties should be kept in the refrigerator and can usually be stored for a month or two.
Varieties. Apples can be easy trees to grow in containers, and a number of disease-resistant varieties bear delicious fruit. Concentrate on these varieties, and you’ll go a long way toward avoiding disease problems.
As you browse through mail-order catalogs, remember to focus first on trees with dwarfing rootstocks (unless you want to try columnar types). The next question is, what variety should you choose for the top of the tree? For container growing, it is best to stick with what are referred to as low- to medium-vigor varieties, meaning that they do not put on a great deal of lush growth but stay relatively small overall.
Here are some recommended varieties, listed in order of ripening. All require a minimum of 600 hours of winter chill.
• Dwarf Varieties. A very early ripening variety, Wynooche Early is disease-resistant and easy to grow. Selected by fruit enthusiast Howard Hughes in Aberdeen, Washington, it bears medium-size greenish yellow fruit with a red blush. Very flavorful and juicy, Wynooche Early ripens in early to mid August, and also stores well.
Akane, from Japan, is a disease-resistant variety that bears medium-size bright red fruit with snow white, juicy, flavorful flesh. A low-vigor tree, it is a good choice for container growing. Akane ripens in late August.
Free yourself of worries about apple scab and other diseases; Liberty is one of the best disease-resistant varieties. The large red fruit with firm and flavorful flesh is great for both eating out of hand and cooking. The tree has an attractive compact form and dark green glossy foliage. Ripens in mid September.
Spartan bears tasty, large, dark red fruit with flavorful, firm, juicy flesh. Very disease-resistant and of medium vigor, this is a good variety for container growing. Spartan ripens in late September into October and can be stored for several months in a cool room or under refrigeration.
Calville Blanc d’Hiver is a very large, tasty French dessert apple. The fruit is bright yellow with firm, pure white, sweet-tart flesh. It stores very well and is great for both fresh eating and cooking. Calville Blanc is quite disease-resistant and compact in size. The fruit ripens in mid to late October.
• Columnar Varieties. Two very fine new columnar varieties come to us from Canada: Scarlet Sentinel and Golden Sentinel. Both were bred for their disease resistance and high-quality fruit. Scarlet Sentinel bears attractive red-and-yellow medium-size fruit with sweet, flavorful flesh. Golden Sentinel has large yellow apples with crisp, juicy, flavorful flesh.
Scarlet Sentinel is a low-vigor tree, which makes it an easy plant for container growing. Golden Sentinel is somewhat more vigorous but still a good variety for containers. Both will flower and bear fruit the year after you plant them.
North Pole, also bred in Canada, has a Macintosh-type fruit with dark red, large, juicy apples. It ripens earlier than the Sentinels, but is somewhat more susceptible to apple scab.
• Crabapples. These can also make great container plants and are particularly pretty in bloom. Crabapple varieties to consider are Dolgo, Callaway, and Red Siberian (which also has red flesh).
Theme Garden
Dinner at the Four Seasons
Our mental image of lush vegetable gardens always includes a Norman Rockwell sense of hot summertime—the proud gardener wiping away a sheen of well-earned perspiration while lugging baskets spilling over with corn, potatoes, beans, and world-class tomatoes. It’s true that summer is the time of greatest bounty, but let’s not blindly assume that the other three seasons are barren. With careful planning and reasonable cooperation from the weather, it is possible to harvest homegrown goodies in all four seasons.
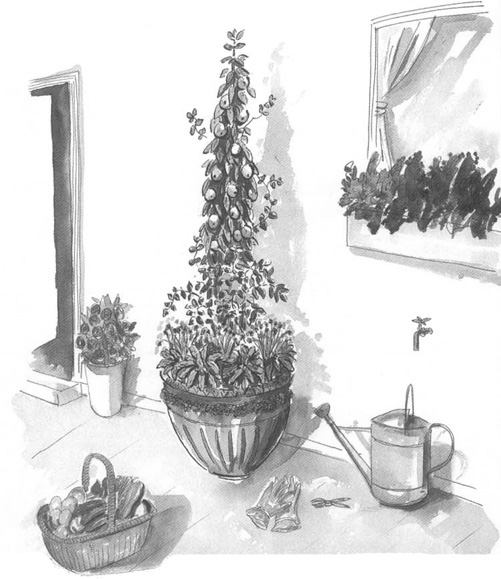
Everything in this garden will be planted in one large container, at least 2 feet across. In areas of severe winters the plants may require protection; see Chapter 1 for tips.
The centerpiece of this garden is a columnar apple tree. (Stop here, take a look at page 287, and decide whether your apple tree needs to be moved for the winter; if so, plan your strategy before planting the container.) Columnar apples don’t look anything like typical apple trees. They don’t have broad branches extending out from the trunk with apples dangling from the branches. In fact, they don’t have any branches to speak of, just very short stubs sticking out from the trunk; until you look closely, you would think the apples were growing directly from the trunk.
Jim Gilbert, a knowledgeable and generous nurseryman who specializes in fruit trees, once playfully described columnar apple trees as looking like Brussels sprouts. Did you ever see, at a farmers’ market or roadside stand, an entire harvested plant of Brussels sprouts? The farmer chops off the roots and removes all the big floppy leaves, and all that remains are the tight little sprouts spiraling around the otherwise bare stem, which looks a lot like a green club with knobby spurs. That’s very much what a columnar apple tree looks like, except the “stem” is longer and the “sprouts” are larger.
What’s amazing about these trees, though, is that they produce full-size apples, of whatever variety you selected when you purchased your tree. They may look unconventional, but the advantage they offer gardeners with limited space is immediately obvious.
Early in the spring, sow seeds of Malabar spinach at the base of the apple tree. This vining type of spinach will climb up into the tree, the better for you to enjoy the rich coloration of its stems and leaves. You’ll never get a huge harvest at any one time, but you will be able to take a few leaves of spinach now and then to jazz up your salads for months.
Also in springtime, plant several clumps of chives underneath the tree. They help prevent apple scab (a serious disease), provide you with delicious fresh chives practically forever, and in early summer produce endearing little puffball flowers in a soft shade of lavender. Put the chives in as soon as you can; they may die down in very cold winters, but they are a perennial and will come back next spring, stronger than ever.
Beside the chives, plant seeds of regular spinach, any variety. The contrast between the emerald green of standard spinach and the rich magenta of the Malabar is gorgeous. Sow the seeds as early in the spring as possible; enjoy fresh spinach all spring and early summer, until the weather gets so hot the plants fizzle out. At that point, yank out the bolted spinach and in its space set out one or more plants of dwarf basil and several Tagetes marigolds. The basil will do its magic up until the first cool days of fall, and the marigolds will last even longer than that.
When crisp autumn weather kills the basil plants, replace them with cheerful pansies. Select pansies in shades of purple and blue and mix them in among the bright yellow marigolds for a beautiful color combination. The pansies will outlast the marigolds, blooming all the way through early winter; if you clip them back and add a layer of mulch before a serious cold snap actually freezes them, they’ll sometimes come back with a new burst of blooms in early spring.
The harvest: chives in spring, summer, and fall; spinach in spring and early summer; basil and marigolds in summer; apples in early fall; pansies in autumn and early winter. All in one handsome container, taking up just 2 to 3 feet of floor space. Nice work!
Rose Marie says: A few years back, our friend Jim Gilbert, of Northwoods Nursery, introduced the variety North Pole into this country, and so last year I decided to try it.
Everything went extremely well at first. The young tree looked suspiciously like a buggy whip until it started leafing out, but once that happened it did indeed look like a tree, albeit a very skinny one. I had planted Malabar spinach at the base, and it looked wonderful vining up into the tree.
Then, disaster. One night, a deer from the nearby wooded area found the tree too strong a temptation and ate all the leaves—apple and spinach. A healthy young tree, growing like a champ, was transformed into a buggy whip again. I felt guilty about getting angry at Bambi, but angry I was.
This story has a moderately happy ending. With lots of coddling, the tree lived. It is not as vigorous as it would have been had it not been set back by the deer attack, but it did eventually recover—most plants are a lot tougher than we give them credit for. And we have since moved the container out of Bambi’s reach.
Plump blue beads dusted with a soft, silvery blue powder, hanging in clusters from a neat little shrub, just begging you to pick them. Can you imagine yourself stepping out onto the deck or patio on a summer morning and picking a handful of these sweet, dew-covered berries to plop into your breakfast cereal?
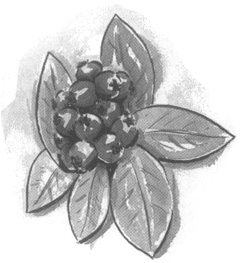
Blueberries are a real joy for container gardeners because they are so easy to grow and produce so well in small spaces. They are striking in appearance, so handsome that many traditional gardeners consider them ornamental plants that also produce delicious fruit. The dainty leaves bud out with reddish tips, then turn dark green with subtle hints of pink and aqua as they mature. They form a canopy over clusters of tiny white or pink flowers shaped like miniature Tiffany lamps. In the fall, the foliage turns a flaming red with brilliant yellows and oranges, a real visual treat. Artists like to paint pictures of blueberries on the bush because there are so many interesting colors intermingled. But the main reason for growing blueberries is because the berries are so delicious: sweet and just slightly tart when ripe, with a distinctive, nothing-like-it taste. One or two plants will provide plenty of berries for eating fresh, making syrup, adding to muffins or pancakes, and even some extra to pop in the freezer for later.
Blueberry Basics. Blueberries grow on small to medium-size twiggy bushes, and are grouped into three basic types: highbush, which reach 5 to 6 feet; lowbush, which creep by underground stems and get only a foot or so tall; and rabbiteye, which can top out at a lofty 15 feet. They’re all terrific in their place, but a container is not that place. (One exception is a highbush type that can be grown in a container if it’s large enough. You might think of it as something between a large shrub and a small tree, providing shade for more tender plants growing in containers beneath it. Highbush blueberries are the ones you’ll find in your supermarket.)
Fortunately for us container gardeners, breeders have developed a half-high blueberry (sometimes listed in catalogs as a dwarf blueberry) by crossing the high and low varieties; these are the ones most often chosen for containers.
Planting. If you order from a mail-order catalog, you’ll probably receive a bare-root plant. At the retail garden center in early spring, you may find either packaged bare-root plants or potted plants, usually in 1- or 2-gallon containers, that are just beginning to leaf out. Sometimes in early summer you can also find larger plants that actually have fruit on them. Pick bushy plants with multiple stems (if possible) and bright green branches. If a plant has only one main stem but looks really healthy, that’s okay; it probably just needs another year in good soil to send up more stems. But if you see a lot of brown or black brittle twigs at the ends of the branches, pass on that plant. Review the general directions on pages 290 to 291 for planting bare-root and container-grown perennials.
Large wooden planter boxes, the kind used for small trees, are excellent choices for blueberries because they drain well, aren’t damaged by the weather, and look great. They should be at least 2 feet by 2 feet by 2 feet, and larger wouldn’t hurt. Half whiskey barrels also are good choices, but make sure they have several drainage holes in the bottom. Clay pots are not the best choice, as they may crack in freezing weather.
Blueberries like soil that drains well (so the roots aren’t waterlogged) but holds a light, constant moisture level. Finding that delicate balance is not as difficult as you might think: it’s only a question of using a planting mix that has a high proportion of organic material such as peat moss or sphagnum moss. Those ingredients also give you something else blueberries require: a soil that is more acidic than alkaline (see the Soil section in Chapter 5 for more on this). Often in garden centers you will find potting soil marked as ideal for rhododendrons, azaleas, and camellias; that’s also perfect for blueberries.
Pick the spot for your container carefully, because once it’s filled with soil and planted it will be heavy and hard to move around (unless you add casters to your wooden container or set it on a wheeled base). Remove the plant from its nursery pot (if you start with a containerized plant) and fill the container partway with potting mix. Loosen the roots if they are compacted, but try to keep the original soil ball intact as much as possible. Set the plant in position so the top of the soil ball is about 3 to 4 inches below the rim of the new container. Fill in with soil, raising the level of the plant as you go if necessary; the crown of the plant (where the topmost roots end and the stems begin) should never be any deeper than it was in the nursery pot.
Blueberries like their roots right at the surface of the soil but with a light mulch over them. Water thoroughly to settle the plant, then lay 2 to 3 inches of coarse bark, moss, or pine needles over the surface of the soil. This will help hold in moisture and insulate against temperature extremes, while still letting air get to the surface roots.
Success with Blueberries. Blueberries are, by and large, quite easy to grow. But there are a few things that will help them thrive.
Watering. First, they must have almost constant moisture but not be standing in water. A drip watering system is ideal, if you can provide it; the slowly dripping water moistens, but passes on through, the porous soil. Otherwise, daily watering will be necessary in hot weather. Check the soil with your finger; it should always feel like a damp, wrung-out sponge.
Maggie says: The Pacific Northwest is blueberry heaven. Here in this land of gracious-plenty rainfall and acidic soil, you’d think all anyone would have to do is stick a blueberry stem in the ground and walk away, then stroll back in the summer to pick the berries. Yet I learned an important lesson from my friend Barbara Ashmun, whose gorgeous garden has several low-lying spots where water doesn’t drain. After years of struggling with these mini-bogs, she found that the secret of growing blueberries there was to put them in containers. So here she is, with all the room in the world (nearly an acre), growing 5-foot blueberry bushes in ordinary black plastic nursery containers, with tremendous success.
Soil. Even though blueberry plants love acid soil, it is possible for it to become too acidic. When that happens, the plant is unable to take up iron from the soil, creating an unhealthy condition called chlorosis. Fortunately, the plant gives you a very clear clue: the leaves turns yellow except for the veins, which stay dark green. You can correct this condition by adding a small amount of lime. The best is a form known as chelated iron (also called sequestered or micronized iron); it is readily absorbed by the plant and you see results quickly, thus eliminating the temptation to add too much lime, which would make the soil too alkaline.
The best course of all is to prevent this condition from happening by always using a fertilizer with the proper acid balance (such as those recommended for rhododendrons, azaleas, and camellias). Blueberries are heavy feeders, so starting in early spring, feed the plants once a month at the recommended rate. Around mid August, begin tapering off; do not fertilize at all during the fall and winter.
Winter protection is important if you live in a cold climate. Blueberries are naturally very hardy plants, but when grown in a container, their roots are exposed to cold air from all sides. If some of the branches die, new ones will grow; but if the roots die, the plant is gone. When cold weather arrives, move the container into a more sheltered location, or wrap it in some insulating material (see page 288) during the coldest times.
Winter chill is also a factor with blueberries (see page 286). Most blueberries need around 800 hours, although there is one that southern gardeners can grow successfully (see Varieties, below).
Pruning. Your blueberry plants will give you years of berries, especially if you prune the mature plants lightly. The pruning process is not as elaborate or as precise as with some of the tree fruits, and the improvement in production is noticeable. Don’t do anything the first two or three years. Each year thereafter, early in the spring, completely remove some of the very oldest branches (with the darkest and scraggliest-looking bark), and clip off any twigs that seem unusually thin and weak. You’ll have much larger berries (but fewer of them) if you cut back the remaining stems by about one-third to one-half. This forces new growth, and new growth bears the largest berries.
Harvesting. One of the surest signs that your berries are ripening will be the appearance of visiting birds. Robins, jays, starlings, and a few others love blueberries. When you see the very first berries starting to turn from green to blue, you’ll need to protect your crop by covering the whole plant with bird netting. The netting should be raised high enough over the plant that birds can’t reach through for a sneak attack, and the bottom should be secured so they can’t slip in under the net.
Different varieties of blueberries ripen at different times, but you can tell when they’re ripe when most of the berries in a cluster turn dark blue. Pick one of the darkest and taste it. If it’s very tart, wait a few days. When fully ripe, they should not make you pucker. The berries do not all ripen at the same time, so you can harvest over a period of two to three weeks for each variety you are growing.
Varieties. All blueberries are self-fertile, but you will get much larger crops if you plant at least two varieties for cross-pollination.
Earliblue, a highbush type, is a vigorous upright plant with good cold-hardiness. It has large fruit that ripens early (June). Bluecrop, another highbush, has large, light blue berries in midseason (July); it is very productive, cold-hardy, and more drought-tolerant than most.
Patriot, a half-high type with upright growth, is cold-hardy; it ripens midseason (July), with large, good-flavored fruit. Northblue, also a half-high type, is only 20 to 30 inches tall at maturity. For such a small plant it is extremely productive, with masses of large, slightly tart berries in mid summer.
Northsky is a half-high type especially recommended for very cold climates. It grows only about 18 inches high, but spreads to about 3 feet, and ripens in mid summer.
Sunshine Blue, a compact half-high with pretty pink flowers, is the one for southerners. It is less finicky about acid soil than most blueberries, and needs only 150 hours of winter chilling. (Interestingly, it does very well in colder climates, too.) About 3 feet tall, with large berries in July.
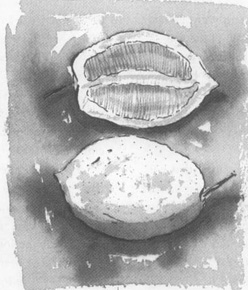
Citrus trees are considered almost exotic by those who live where citrus doesn’t grow naturally. When oranges were first introduced in Europe, they were so coveted that wealthy families built special glass houses to grow them in. These elaborate and expensive orangeries were the forerunners of present-day greenhouses. But you don’t need a fancy orangerie to grow a citrus tree. With reasonably cooperative weather and good winter stewardship, you can grow one in a pot on the patio.
Citrus trees have handsome foliage and deliciously fragrant flowers. In California and Florida, they are often massed together as hedges. Very small plants are also sold all around the country as houseplants, and those who grow them are happy with their good looks even if they never produce fruit. Somewhere between huge hedges and dainty houseplants are the diminutive citrus trees of container gardens, and they offer the same joys—beautiful foliage, luscious flowers, and, with any luck, wonderful fruit.
Citrus Basics. All citrus fruits grow on small to medium-size trees that thrive in subtropical climates where the days and nights are about equal in length and temperatures stay above freezing. Some of the hardier varieties of citrus will take a light frost of short duration, but none will survive freezing weather.
The fruits that must develop sugars to be palatable—orange, grapefruit, tangerine, tangelo—need longer time in hot weather, and so are questionable for colder areas unless you’re interested only in aesthetics. But fruits that are naturally sour, such as lemons and limes, are possible in all but the coldest climates, with some extra attention in winter.
Planting. The citrus trees you’ll buy for your container garden are grafted. The top portion is selected for its superior fruit quality, and the bottom portion, the rootstock, is selected for its dwarfing quality. This is what makes these trees small enough to grow in containers. You can see the graft as a diagonal scar on the trunk. If later on you see a vigorous branch suddenly zooming out from the trunk, look at it closely; if it’s coming from below the graft, prune it off completely, back to the trunk; any fruit it produces will be undesirable, and it will draw vigor from the “good” branches.
Citrus plants have a shallow, spreading root system with surface roots right at the top of the soil, which don’t like to be covered. Whether you start with a bare-root or potted plant, keep this in mind. And review page 290 for the basics of planting both types of perennial plants.
Use a large container that will hold at least 15 gallons of soil, such as a redwood tub, half barrel, or large terra-cotta pot. If you live in a cold climate, it’s a good idea to set the container on a plant trolley with wheels, as it will have to be brought inside for winter. Citrus plants like very rich, acid soil with a high content of organic matter. If you can find a commercial potting mix formulated for rhododendrons or camellias, that’s perfect. Otherwise, use an all-purpose soil and mix in some extra materials that will increase the organic content: peat moss, sphagnum moss, and commercial bagged compost all will work.
Fill your container about three-quarters full and spread the roots evenly over the top; fill in around them with more soil. When you’re done, you want the roots to be just below the surface of the soil. Tamp the soil in around the root ball and water it well to settle the roots. Spread a light, airy mulch such as wood chips over the exposed roots to keep them from drying out.
Success with Citrus. If you live in southern California, the Southwest, or Florida, you already have what citrus needs most: heat, and lots of it. Apartment dwellers in those parts of the country need not envy their friends with large yards; both can grow citrus with equal ease and equal success.
The farther north you live, the more attention you will have to pay to wintertime protection, and here container gardeners have something of an edge because they can move their trees inside for the winter.
Grow citrus outside during the frost-free months; they must have strong light and lots of moving fresh air plus all the heat you can give them. They love to be close to a wall or structure where they will get reflected heat. On the other hand, they need filtered light shade from the harshest summer afternoon sun to prevent sun scald.
Leave the citrus plants outside until the night temperature starts to drop to about 45°F. Then begin to move them gradually into a protected, moderately warm area for the winter. They need as much light as you can manage. Many people grow them inside in a south-facing window and provide supplemental light during stretches of dark, overcast days. Most citrus plants flower around New Year’s Day, and if they are indoors you get to enjoy the heavenly fragrance. Then in the spring, after there is no more danger of freezing, move the plants back outside.
These are heavy feeders. Every month (except during the winter) give them an application of fertilizer formulated specifically for citrus (anything labeled “high acid” or “for rhododendrons” will also work). They also respond well to an occasional booster of fish emulsion, two or three times per year.
Water frequently, but be very careful that your soil is draining well. Citrus roots are especially vulnerable to being smothered by waterlogged soil. Also, don’t wet the trunk while you’re watering.
Citrus do have some pest problems that you need to watch for. Red spider mites are one, and if you keep the plant misted and watered regularly you can spot them before they get ahead of you. If mites are present, you’ll see the water cling to very fine webbing at the point where a leaf stem is attached to a branch. Washing the plant with a mild soap-and-water solution will help (you can do this in the shower) but you’ll probably need to spray the leaves with an insecticidal soap spray (see Chapter 6) on a regular basis. Remember, never use a systemic insecticide (one that is taken up by the roots) on anything you are going to eat!
The other pest you may encounter is scale, an insect that is very hard to spot. They appear on the stems and underside of the leaves as small oval, translucent spots that look like drops of wax. Use a cotton swab dipped in rubbing alcohol to clean them off. Inspect every leaf, stem, and branch regularly to control scale.
If your tree starts to drop a lot of leaves, it’s hungry. Prune lightly and feed it; it should recover quickly.
Pruning is not a major chore with citrus, but since fruit forms on new growth, you want to prune regularly to encourage new branches. Starting about the third year, cut back all new branches by about one-third of their length. Also, check the plants regularly for broken or extremely weak branches, and cut them off.
Harvesting. It takes about a year for citrus fruit to ripen. This is why you often see blooms, green fruit, and ripe fruit all at the same time. Blossoms from last year will have formed ripe fruit just as the plant is beginning to bloom in the present year. Fruit is ripe when it is fully colored and comes away from the branch easily.
Varieties. All citrus are self-fertile; you don’t have to worry about planting two varieties for pollination as you do with some fruits.
• Grapefruit, Oranges. Ruby is the small, pink-fleshed grapefruit you see in the supermarket. Remember, if you hope to eat your fruit, all grapefruit varieties need lots of heat to sweeten up and color properly. The same is generally true of oranges, although the navel types take less heat to ripen than juice varieties. Robertson is one very productive variety of naval orange, and a fine small-size tree.
• Lemons, Limes. Container gardeners outside the Citrus Belt will probably have more luck with lemons and limes (although of the two, limes are far more tender and easily damaged by cold). Ponderosa lemon is a small tree that bears young, with very large fruit. Pink Lemonade is a beautiful lemon plant with green-and-white variegated foliage. The rind of the young fruit is striped and the flesh is pink. It does not, alas, make pink juice.
Perhaps the very best choice for marginal climates is the Meyer lemon. While not a true lemon in the botanical sense (it is a cross between a lemon and an orange), it makes a wonderful substitute. The tree is naturally small and thus good for containers; the fruit is rounder than the familiar pointed oval, and a darker golden yellow; and both the flesh and the peel have a somewhat sweeter, mellower taste. It is easy to grow, blooms and fruits almost constantly, and best of all is more cold-hardy than most citrus. The one you are most likely to find is called Improved Meyer Lemon, a disease-resistant cultivar.
The Key lime, also called Mexican lime, is very vulnerable to cold weather. An interesting alternative and a very good conversation piece is the Kaffir lime. This is the one to grow if you enjoy Southeast Asian cuisine. Its fresh leaves are widely used for seasoning, and the fragrant flowers are edible. The fruit itself is not used in cooking, although the peel sometimes is; the tree is grown for the leaves.
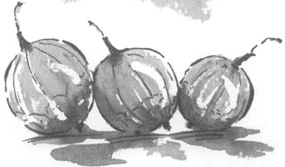
Bursting with flavor, exquisitely beautiful to look at, and very nutritious, currants and gooseberries are ideal for container gardens because the bushes are small; even when fully mature, they seldom get taller than 4 feet. Both make very attractive plants: handsome shrubs covered in season with small fruits that positively glow in the sunshine. But the real reason for growing them is the incomparable taste of the fruit; sweet and tart at the same time, they are like nothing else you’ve ever tasted. In fancy markets, you would pay an arm and a leg for a tiny basket of these gems. Imagine the pleasure of having your own supply right at hand.
It’s possible you have never tasted either of these fruits in their fresh form. Although they have been a staple in European gardens for centuries, where they are prized for fresh eating and for the wonderful preserves, pies, and other sweets made from them, they are not very well known to most Americans.
If your only experience of gooseberries is a jar of commercial jam from a gourmet shop, and the only currants you’ve ever tasted are the dried, wrinkled specks sold next to the raisins (which are made from small grapes and are not currants at all), you’re in for a delicious surprise. And if you grow the sweeter varieties, you can finish off your next dinner party by presenting a beautiful crystal dish filled with black currants, red currants, and pink and green gooseberries, glistening like jewels. Your guests will have an unforgettable treat.
Besides their exceptional taste, gooseberries and currants are rich in vitamins B and C, calcium, and potassium, and are a good source of dietary fiber. That may not be your primary reason for growing them, but it’s a nice extra benefit.
Currant and Gooseberry Basics. These two fruits are closely related, but there are important differences between them. Currants come in three colors: jet black, red, and white. Gooseberries can be either red or greenish yellow, with distinctive stripes running from top to bottom, like longitude lines on a globe. Gooseberries are bigger, about the size of a marble; currants are tiny, rarely more than ¼ inch in diameter. Currants are more strongly flavored; gooseberries are often sweeter. These minor differences aside, the two are botanically very similar, and they need the same growing conditions and care.
Size. Even when they reach their full size, currants and gooseberries are relatively small plants, 3 to 4 feet in height and diameter. Gooseberries tend to form round-headed bushes with branches close to the ground. Currants are typically more upright.
Pollination. All gooseberries are self-fertile, and will bear good crops without cross-pollination. So are most—but not all—currants. Read catalog descriptions for currants carefully. If you have a variety that is not self-fertile, you must plant another variety near it (ideally in the same pot) for cross-pollination by bees and other insects. The flowers themselves are small whitish bells, not especially noteworthy in appearance but essential for fruit.
Hardiness and Chilling Requirements. Both types of plants are deciduous, and will lose their leaves with the coming of fall. The autumn coloration is nothing to write home about, but it does serve as a signal that the plant is about to move into dormancy, which in turn is your cue to mobilize wintertime protection.
Currants and gooseberries are much hardier than most fruits. In traditional gardens they can withstand temperatures of –25°F and below, some as low as –40°F. Remember, though, that in containers roots are more vulnerable to damage from freezing than they would be if planted in the ground, and so those numbers need to be adjusted. To be on the safe side, make sure the roots of currants and gooseberries are kept above 20°F.
On the other hand, don’t be in too much of a hurry to tuck your plants in for the winter. With gooseberries and currants, which are native to colder regions of the earth, it’s a good idea to leave them in a natural environment, complete with hard fall frosts, as long as possible. This ensures they get the 600 to 700 hours of winter chill they need. (See page 286 for a complete explanation of winter chill.) Unfortunately, gardeners in the far southern parts of the country will have a hard time accumulating 600 hours at temperatures between 32° and 45°F.
It’s only when the thermometer drops below 20°F and threatens to stay there for a long period that you should swing into action. Complete details on the two basic strategies for winter protection—wrapping and moving the container—are described on page 289. Be sure to remove the insulating wrap, or bring the container back outside, once the danger of severe freezing is past. With the coming of warm weather, your plant will be ready to grow and reward you once again with a bountiful harvest of fruit.
Planting. You can plant your currant or gooseberry at almost any time of year (except the dead of winter), but the widest selection of varieties is available in the spring. From both mail-order and retail nurseries, what you’ll find in the spring will be bare-root plants (see page 290).
Potted plants are often available in summer and fall, usually in gallon-size pots. Before you buy one at the garden center, slip the whole thing out of the pot and inspect the roots. If you see a tangled mass of roots growing in circles, the plant is rootbound; pass on it. Plants that start with such a congested root system are more difficult to get established because the tangled roots have a hard time taking up water.
Because currant and gooseberry plants are smaller overall, you can use a smaller container for them than you would for another fruit tree. They are also shallow rooted, so a container that is proportionally wider rather than deeper is best. Even something as small as a squat 5-gallon size will do for several years; if you start with a 7- or 10-gallon container, the plant can grow even longer before it needs repotting.
Any planting mix that drains well will work. Fill the pot about halfway with soil and then prepare your plant. If you’re starting with a potted plant, remove it from the nursery container and loosen the roots by digging your fingers into the root mass and pulling out the larger ones; if any are noticeably longer than the others, trim them back to equal length. Unwrap bare-root plants and spread out the roots; prune back any that are broken or excessively long. Identify the crown of the plant; the point low down on the main stem, just above the topmost roots, where the stem becomes smaller and darker.
Set the plant in the pot, spread the roots out as evenly as possible, and begin filling the pot. When you’re done, you want the crown to be about 1 inch below the rim of the container. You may need to lift the plant gently as you add soil, to keep it at the correct height.
If you started with a potted plant, a good rule of thumb is to have the plant in the final container at the same level as it was in the nursery container. Finish by watering the container thoroughly to settle the plant and make sure the potting soil is in good contact with the roots.
For bare-root plants, it’s a good idea to cut back the top after planting. This helps balance the top with the root system, part of which was lost when the plant was dug up at the nursery. Cut each branch by about a third to half of its original length. At the same time, remove any branches that are broken or rubbing against other branches.
If you started with a container plant, you won’t have to do any pruning other than removing broken or crossing branches. The only exception to this would be if you purchased an older potted plant that was seriously rootbound or had lots of weak growth from the previous season. You should cut back this sort of plant severely, leaving only 2- to 3-inch stubs of the previous growth. This may seem to be harsh treatment, but it will help the plant generate healthy new growth (see the Pruning section below).
Success with Currants and Gooseberries. Currants and gooseberries make wonderful container plants. They take up little space, produce good crops of delicious fruit, and are bothered by few pests and diseases. Follow these basic growing practices, and you should enjoy many years of tasty harvests.
Watering. If you’re planting a bare-root plant in the spring, it will likely be dormant or just starting growth. Until the roots have begun active growth, they cannot take up much water, and overwatering can cause more harm than good. Check the soil every few days; just poke your finger down an inch or so. If it feels completely dry, give the container a deep watering, and then no more until the soil is dry again.
Within a week or two after planting, if the weather is warm, your plant will begin active growth. When you see buds and new leaves forming and the stems getting longer, you’ll know the roots are active, too. At that point, you should begin a regular watering schedule. Deep waterings once a week should be enough, except during the hottest weather, when you will need to keep a vigilant eye. At the first sign of wilting, water heavily.
If you start with a container plant in the spring or summer, you will need to water it more often at first than you would a bare-root plant. Keep in mind that the roots require several weeks to fully grow into the potting soil in the new container. During this time, the soil immediately around the root system (the soil that was in the original nursery container) can dry out while the surrounding oil in the new pot can feel moist. Be sure that you water close to the plant to get water into the root zone. After a few weeks, the roots should have grown into the new potting soil and you can begin the same watering schedule as described for a bare-root plant.
In late summer, begin holding back on water to help your plant harden off and prepare for winter.
Fertilizing. The fertilizer information given in the Apples section also applies to currants and gooseberries; see page 297.
Pruning. To continue looking good and pumping out berries, currants and gooseberries need to be pruned every year. The process is not difficult, but a quick botany review will help you understand why this is necessary.
In some plants, the cellular activity that produces buds for flowers (and ultimately fruit) begins a year in advance. So a branch that forms in year 1 will not actually bear fruit until year 2. The first year nothing of significance happens, at least on the surface; the second year, that same branch will set flowers and fruit.
Gooseberries and currants are of this type; they bear fruit on stems that are two years and three years old. But unlike some other fruit plants, the individual branches do not continue to bear fruit forever. After the third year they lose vigor, and productivity drops way off. To say this a different way, currants and gooseberries form fruits on two- and three-year-old branches—not on one-year-old branches (usually), and not on four-year-old branches. For a continuous supply of fruit, then, you need a continuous supply of new shoots. And that is accomplished by regular pruning. Prune when the plant is dormant, either in winter if your winters are relatively mild, or in early spring before the plant starts growing for the season.
For these two fruits, pruning has three objectives:
1. To shape the plant in the form of an open bush.
2. To maintain equal proportions of one-, two-, and three-year-old shoots.
3. To distribute the fruit-bearing shoots and the current year’s growth evenly around the bush.
The difficulty in explaining the process is that we humans tend to think of age in human terms. In a baby’s first year of life, we say the baby is so many months old, and doesn’t become one year old until the end of the twelfth month. So in its second year of life, a baby is one year old. With plants, we calculate differently. The stem or branch that grows in one season is one year old that same season; the following year, that same branch is considered to be two years old. (Gardeners use the term “wood” for all branches and stems; you’ll hear them refer, for example, to “two-year-old wood.”)
It’s obvious, then, that to properly prune these bushes, you need to be able to tell the older from the newer stems. The short answer is that the older they are, the darker and more scaly the bark.
The pruning process is not complicated. With just a bit of practice, you can probably do it in less time than it takes us to explain it. We will describe how to prune, one year at a time, using imaginary colored ribbons to distinguish each year’s growth. You could also use ribbons literally, although in bright sun the colors may fade over time. An alternative is to circle each stem with a strip of tape for each year of growth.
1. Early spring, year 1. Plant your new plant; if you started with a bare-root plant, shorten the stems as described in the Planting section above.
2. Summer, year 1. Whether you have planted a bare-root or potted plant, let it grow freely the first year. Mentally (or literally) mark all the new stems that grow this spring as “red” stems. There is a chance of a few fruits being produced the first summer, but primarily this is the year for the plant to get established.
3. Early spring, year 2. Select five or six strong “red” stems that are well spaced around the plant; cut off the rest, down to the base.
4. Summer, year 2. The “red” stems are two years old and bear fruit. Mentally designate the new stems that grow this year as “blue.”
5. Early spring, year 3. Prune away several of the “red” stems, leaving three or four good ones. Choose five or six strong “blue” ones, evenly spaced around the bush, and cut out the rest.
6. Summer, year 3. The “red” stems are three years old and the “blue” ones are two years old; both bear fruit. Designate the stems that grow this summer as “yellow.”
7. Early spring, year 4. Prune away all the remaining “red” stems; their productive life is over. Also, prune away about half the “blue” stems, leaving the rest for this summer. Select five or six well-spaced “yellow” stems, and remove the others.
8. Summer, year 4. This summer the “blue” stems are three years old and the “yellow” ones are two years old; both will bear fruit. This year’s new growth is designated “purple” and will be the source of fruit-bearing stems next year.
And so on.
This is the basic idea. With each year’s pruning, you can leave more or fewer shoots than the numbers suggested here, depending on how big you want your plant to be.
To put this entire process in a nutshell: each spring, remove the shoots that are more than three years old, and thin out the others so the plant doesn’t get too crowded. What is important is continuous shoot renewal, so that vigorous new growth is always coming on to replace the old.
Insects and Diseases. The most bothersome disease of both gooseberries and currants is powdery mildew, which shows up as a white coating on the leaves (see Chapter 6). Severe infections can stop shoots from growing, which reduces the crop of fruit for the following year. While it doesn’t usually bother the fruit of currants, powdery mildew can seriously damage gooseberries. The best preventive measure is to plant disease-resistant varieties; at the first sign of mildew on your gooseberry bush, begin treatment as described in Chapter 6.
Insects that bother gooseberries and currants include currantworm and aphids. Currantworm is easy to control but hard to see at first. The worm is a green caterpillar that seems to be able to make itself the exact color of the leaves. It starts by eating the edge of the leaves and, if not controlled, can defoliate the plant. Rotenone spray, a natural insecticide, gives excellent control of this pest. Aphids cause discoloring and puckering of the leaves. They are not always easy to control, but insecticidal soaps and simply spraying them off the leaves with your garden hose can be effective; see Chapter 6 for more specifics.
Harvesting. Most varieties of currants and gooseberries ripen in mid summer. Your cue is the change in color. Currants change from the green of young fruit to the color of the variety you have planted: black currants will become jet black, red currants will become beautiful bright red and translucent, and white currants (which are basically a white version of red currants) will become pale white and strikingly translucent, with their tan seeds visible inside the berries.
After the fruit has changed color, the next test of ripeness is taste. When fully ripe, all currants will have a complement of sweet and tart flavors. Ripened currants are easy to pick. Some varieties will be in long clusters called strigs; you can simply pinch off the entire strig. Others will come off easily individually. After harvesting, the berries will keep at room temperature for a day or two, and a week or so in the refrigerator. For longer storage they can be frozen or dried.
Gooseberries also change color when ripe, from green to yellowish green or red, depending on the variety. They also soften a bit when fully ripe. Again, the best way to determine their ripeness is to taste one. Gooseberries are usually sweeter than currants, with a milder flavor. They are picked individually and will keep somewhat longer than currants. They can also be frozen or dried for long-term storage.
Varieties. Because currants and gooseberries have been cultivated for so long, many varieties have been developed. In recent years growers have concentrated on improving disease resistance while maintaining large fruit size and good flavor. The varieties listed here are just a sample of the many available. All varieties listed are self-fertile.
• Black currants. Black Down originated in England. The source of many currant and gooseberry varieties, it is vigorous and disease-resistant, and produces good crops of large, sweet, flavorful berries. The fruits are jet black and come in short strigs that are easy to harvest, ripening in early to mid July.
One of several varieties that originated at a breeding program in Scotland, Ben Lomond is a medium-vigor disease-resistant plant. A very productive variety, it bears shiny, jet black, sweet-tart berries that ripen in mid to late July. This is a particularly good variety for making preserves.
Also from England, Black September is a medium-vigor, disease-resistant variety that bears abundant crops of sweet, strong-flavored berries. The jet black fruits ripen in mid to late July,
Jostaberry is a unique cross of black currant and gooseberry. The plant is very vigorous and disease-resistant, and quickly grows to a height of 3 to 4 feet. The jet black fruit has an attractive sweet-tart flavor. Berries are larger than black currants, and are harvested individually.
• Red and White Currants. Both red and white currants belong to the same species (Ribes rubrum), but they have different-colored berries. With their translucent, bright-colored fruit, they are quite spectacular both in the container and on the table. They all ripen in mid July, and should be picked in clusters as they will leak and spoil if picked individually. They are pruned in the same manner as gooseberries.
Red Jade originated at a breeding program in New York, and is sometimes listed in catalogs as NY 68. It is very disease-resistant and productive, bearing long strigs of bright red fruit. The delicious sweet-tart berries make a striking sight on the table. This is a good variety for making red currant jam, a rare delicacy,
A new variety from Holland, Rovada is disease-resistant and very productive, bearing long and attractive strigs of translucent, bright red berries.
Swedish White is a new disease-resistant variety from Sweden, this attractive small bush bears large crops of very attractive berries. You can actually see the tan-colored seeds through the translucent fruit.
• Gooseberries. An English variety, Colossal bears large amounts of very large, sweet berries. The attractive fruits are greenish yellow when ripe, and are very good for fresh eating. Colossal is a medium-vigor plant and grows to about 4 feet in height at maturity.
A new English introduction, Invicta features very large, sweet berries and a high degree of disease resistance. The very pretty greenish yellow fruit is good for fresh eating and also makes delicious pies and preserves. Invicta is vigorous and easy to grow, and will reach up to 4 feet in height when mature.
A classic red-fruited English variety, Whinhams Industry features large, sweet, delicious fruit on a medium-vigor plant. By itself or with another variety for contrast, the purplish red fruit is very attractive both on the bush and in the serving dish.
Figs are ideal container plants. Striking in appearance with their large tropical-looking leaves, they grow slowly, are easy to train, and bear abundant, delectable fruit. They have been part of the landscape in southern Europe and the Middle East for centuries—translation: they like hot climates—but now those of us who live in more northerly parts of the world can enjoy this treat by growing them in containers. We can let the plant soak up the warm summer weather it needs, and then move it to a sheltered location for the winter.
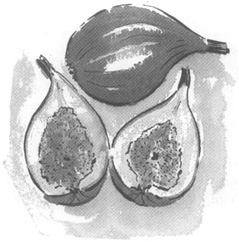
A fresh fig is a gourmet’s delight, and a far cry from Fig Newtons, which is how most of us have experienced figs. They are as different from each other as a fresh, crisp apple is from dried apple rings, or a fresh grilled tuna steak is from the stuff in the can. Soft and tender when ripe, figs are delicious fresh, especially chilled, and they make wonderful preserves—if you can keep from eating them all first.
Fig Basics. Most fig trees will bear two crops of fruit, the first ripening in mid summer on branches that grew the previous year, and the second crop ripening on the current season’s growth in the fall. The ripe fruit can be either yellowish green or dark brown on the outside, with strawberry pink or honey-colored flesh.
Size. When grown in the ground in southern climates, figs develop into trees 15 feet or more in height. In a container they tend to grow more slowly, and with minimal pruning can be kept to 8 feet or less. Different varieties grow at different rates; the ones we suggest below are low- to medium-vigor types, meaning that they grow slowly and thus are the best choices for containers.
Hardiness. Figs are subtropical plants and when planted in the ground will withstand frost to about 5°F. Temperatures lower than this will freeze the fig back to the soil surface and possibly even kill the plant. Determined Italian Americans in Cleveland and other northern cities have successfully grown figs in their gardens by laying them sideways and covering them with plastic and soil to protect them from cold.
As a container gardener, all you will have to do, once the plant has lost its leaves (signaling the start of dormancy), is move your fig to a warmer location for the winter. Your best bet is something like a sun porch or garage where temperatures are cool but above freezing. This will allow your tree to remain dormant until you move it outside again in the spring. The leaves of a fig tree cannot stand any frost, so don’t move the plant outside until you’re sure the temperatures will stay above freezing.
If you don’t have a coolish storage area like a garage or sun porch, you can try bringing your fig indoors for the winter. Kept at room temperature, though, it will likely begin growing in early spring, well before it’s warm enough outside to move it back outdoors. In that case, your job is to give it as much light as possible, and keep your fingers crossed.
Pollination. Gorgeous to look at and bearing delicious fruit, fig trees are also interesting botanically. You will never see a fig bloom. The part we eat and call a fruit is actually a modified flower stem; the true flowers are deep inside, invisible to us. Fortunately, most figs are self-fertile and do not need another variety for pollination. For those varieties that do need pollination, Calimyrna, for example, nature has provided a specialized wasp to do the job. This tiny wasp actually crawls inside the fig and pollinates the flowers with pollen from a wild fig provided by the grower.
Chilling Requirements. As with virtually all fruits that can be grown in temperate climates, figs need a period of time at temperatures between 32° and 45°F after they have gone dormant, to rest and be ready to grow and bear fruit again. (See page 286 for a full explanation of winter chill.) Good news for those who live in the warmer regions of the country: figs require only 100 hours at these temperatures, much less than most other fruits. Figs are also sensitive to light levels and will not start growing until the daylight hours increase in spring. In nature, this protects them from late-spring frosts.
Planting. Young fig trees are available as bare-root plants in the spring and as container-grown plants from spring until fall. The best time to plant your fig is in the spring. You’ll likely have a greater choice of varieties then, especially from mail-order nurseries, and spring planting will allow your tree to develop a good root system before going dormant in the fall. If you’re purchasing a potted plant, be sure to remove the pot and inspect the root system before buying. If the root system is tight and packed full of roots, avoid that plant; it will have difficulty taking up water.
Choose a good-size container; the larger it is, the longer you can go without repotting. A fig can stay happily in a 5-gallon container for two or three years, but if you start with a 10-gallon size or larger, both you and your fig will be much better off. A coarse, fast-draining potting soil will work best.
Prepare the young tree for planting as described on page 290. Loosen the root mass and trim away any roots that are broken or excessively long. The root system should fit comfortably in the pot without crowding. Fill the pot partway with potting soil, place the plant in the pot with its roots spread out evenly, and begin filling the pot.
As you fill, pay attention to the height of the plant. On a bare-root plant there will be a place just above the roots where the color of the stem changes from orange to brown. This is the crown of the plant, and when you’re finished it should be at soil level. Finish filling the pot to about 1 inch below the rim. With a nursery-potted plant, keep the soil level in the new container the same as it was in the original nursery pot.
The last step is to water the plant well to settle the soil around the roots. It’s also a good idea to cut back the top to balance it with the roots lost in transplanting. To prepare your fig for later formation into a vase shape (see Pruning, below), cut the top back to about 2 feet in height and remove any branches below this level.
Success with Figs. The single most important ingredient for growing luscious figs is giving them the heat they crave. All too often this sad scene unfolds: the gardener carefully plants and nurtures the young fig tree, joyfully watches as it leafs out, and proudly counts every single one of the tiny, hard green fruits as they form. But that’s as far as it goes, because there isn’t enough warm weather for the fruits to reach full size and ripen. The trick is to start with the variety that is best suited for your climate; see the Varieties section below.
You can also help things along by placing the plant on the south side of a building where it will get lots of heat during the day and stay warmer during the night. If the wall is white or light colored and thus will reflect sunlight back toward the plant, so much the better.
Watering. Your fig cannot live without water, and it can die with too much of it. After the deep watering you did on planting day, don’t water thoroughly again until you see that the tree is starting to grow. If you started with a plant that was dormant—which is our recommendation—this could be days or even weeks. In the meantime, water only enough to keep the soil from becoming completely dry.
There is, however, one situation where additional watering may be necessary. If you plant a container-grown tree that was already showing signs of new growth in the nursery container, the soil immediately around the root system (what came from the nursery container) may dry out while the surrounding soil in its new container still feels moist. In that case, pay special attention to the soil near the trunk of the tree and water there when it begins to dry out. Eventually, the root system will grow into the new potting soil and regular watering can be done.
Once your fig tree has begun actively growing, it will start to use up the moisture in the potting soil. During cool weather, the tree uses less water and you may need to water the container only every other week, perhaps even less. During hot weather, your fig may need water every four or five days.
The moral is, you must monitor the soil moisture. The easiest monitoring tool is one you always have with you—your finger. Dig down an inch or so; if the soil is damp, don’t water. The point is to give the plant adequate water supplies without creating waterlogged soil that will deny the roots oxygen and eventually kill them.
When you water, do so deeply and thoroughly; this helps keep the roots growing toward the bottom of the pot. Frequent shallow waterings can actually encourage the roots to grow upward and weaken your tree.
One other factor to consider is hardening off your plant for the fall and winter. Beginning in mid August, start watering a little less frequently. This will give your fig tree the message to begin slowing down growth. At this time of year, you want the tree to grow more slowly and produce strong sturdy wood capable of withstanding the first frosts of fall.
Fertilizing. Fertilizing is not difficult, nor is it an exact science. Most potting mixes contain enough trace elements and basic fertilizer to help your plant get started and to grow for a couple of months. Your tree will not need any extra fertilizer until it starts growing vigorously. At that point, you can begin fertilizing with an all-purpose, balanced fertilizer formulated for vegetables and fruits (see details in Chapter 6).
Your fig tree should grow 12 to 18 inches a year, and its leaves should be dark green in color. If the lower leaves begin to pale, you may have a deficiency of nitrogen; try using your regular fertilizer more often, or adding a bit of fertilizer high in nitrogen (the first number). Figs also seem to like a little extra phosphorus; mix a handful of bone meal into the top inch of potting soil. Also, as with watering, stop adding fertilizer in mid August. This will help your plant develop strong, frost-hardy branches.
Pruning. Figs are actually fun to prune. Their wood is soft and easy to cut, and they don’t develop a thicket of branches as do some other fruit trees. What you want to achieve is a vase shape: open in the center, with branches all around the trunk growing upward and outward at a 30-degree angle. Picture a flower vase that is narrow at the bottom and wide at the top, and you have the idea.
To create the vase shape, first cut off the main stem to about a 2-foot height. This in itself will force the plant to develop side branches. As soon as several young shoots begin to appear, choose three or four that will become the main branches and form the basic vase shape. They should be evenly spaced around the trunk and should be 1½ to 2 inches apart vertically.
The young shoots will naturally grow at an angle from the trunk, but you can help them reach the 30 degrees that is considered ideal by inserting small sticks between the shoots and the trunk, or tying the young branches down to stones or bricks. As your chosen shoots become branches, prune off any competitors back to the trunk. These new branches may even ripen a fig or two in the fall.
As your tree grows, it will continue to develop more and more new branches, to the point that eventually the newest branches will be small and weak. Cut these weak branches back all the way to their base, and new, more vigorous, more fruitful branches will form. As a rule, when a branch has not grown more than 6 inches in a season, it is too weak to produce good fruit and should be removed.
Always keep your main framework branches to maintain the vase shape. If your tree tries to grow new branches from the roots or low down on the trunk, prune them away; they will only weaken the overall tree. And for general good maintenance, always remove any branches that grow into the center of your tree or that cross others, and any broken or dead ones.
Remember that most fig varieties bear two crops, one in summer and one in fall. The summer crop will appear on the branches that grew the previous season, so don’t prune last year’s growth too heavily or you won’t have any summer figs.
Insects and Diseases. Figs are one of the easiest fruit trees to grow. There are no significant diseases that bother them in North America, and only a few insect pests. The biggest insect problem is ants, which are attracted to the sugar in the fruit when it is very ripe. You can prevent ants from climbing the trunk of your tree by applying a coating of sticky material (one familiar brand name is Tanglefoot) around the trunk below the branches. Ants will not cross this barrier. Try to apply the material when the figs are large and close to ripening, as it has the strongest repellent qualities when it is fresh. Birds also are fond of the ripe fruit, and you may have to cover your tree with bird netting to keep some for yourself. If your fig tree is spending a lot of time indoors or in a greenhouse, it may attract mites or aphids. These insects usually disappear or travel to more appealing plants once you put your fig outside, but if they persist, check Chapter 6 for ways to control them.
Harvesting. You’ll know the figs are getting ripe when the skin begins to change color, from green to greenish yellow or dark brown. The second sign is that the fruit becomes softer. When fully ripe, a fig is quite soft to the touch and droops downward. To harvest a fig, simply break or clip the fruit away from the branch.
Summer figs ripen from the end of June into August, depending on your location. Fall figs should ripen from late August to late September. Figs do not ripen all at once, so you can usually enjoy them for two weeks or more.
Ripe figs are very perishable. If you don’t plan to eat them right away, they’ll keep for several days in the refrigerator in a shallow container. Dried figs keep for months and are a great high-energy snack.
Varieties. Choosing just the right fig variety for your area is something of a challenge. On one hand, there are many varieties available. On the other, this is one fruit that is not widely grown, known, or understood. The staff at your local nursery may not know much about figs, and few mail-order catalogs offer complete information about the varieties they sell.
The most important consideration is climate. While most fig varieties will grow satisfactorily where other fruit trees grow, they may or may not ripen their fruit. If you live in the Deep South or in central or southern California, you can grow and ripen just about any fig variety. In cooler regions, choose one of the varieties from the list below; they demand less heat.
Lattarulla was developed and named by a nurseryman in Portland, Oregon, in the 1920s. He had experimented with nearly 100 varieties, trying to find ones that would ripen in his cooler climate, and this was one of the best. It is a medium- to low-vigor tree with large, glossy green leaves. It can bear two crops of juicy, large, sweet greenish yellow figs with light honey-colored flesh.
Peter’s Honey is a very special variety brought to America by an Italian gardener, Peter Danna of Portland, Oregon, who grew up in Sicily and knew this variety from childhood. Peter’s Honey is a medium-vigor tree with large dark green foliage. The fruit, produced in two crops, is large and golden yellow when ripe, and has dark amber, tender, and very sweet flesh. For most successful fig ripening, give Peter’s Honey a warm, protected location in cooler regions.
Brown Turkey is a very overused name for figs. It seems that every time a grower found a fig with brown skin, he or she would name it Brown Turkey. Vern’s Brown Turkey was distinguished from the others by naming it in honor of Vern Nelson, a Portland, Oregon, gardener who was among the first to discover its qualities. A medium-vigor tree, it produces two crops of very large dark brown fruit with honey-colored flesh.
Later-ripening than the figs listed above, Black Mission is a familiar variety in California, where it is grown in both backyards and commercial orchards. A medium-vigor tree, it bears abundant crops of dark purple fruit with sweet and flavorful strawberry-colored flesh. This is an excellent fig for drying as well as fresh eating. Black Mission needs a very warm location to ripen its fruit in cooler regions.
Do you know anyone who doesn’t like grapes? Sweet, juicy, flavorful, and attractive, they are a treat for everyone. Beautiful on the vine, the long clusters of translucent fruit are equally spectacular on your table. They’re available in many colors, from dark purple to pink, green, and even white, and also offer a multitude of flavors. In fact, grapes have been so popular for so long that they have their own branch of horticultural science: vinology.
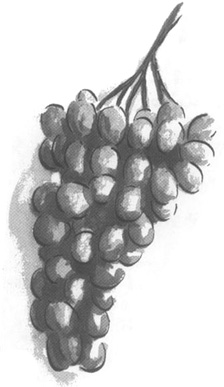
Grape Basics. Unlike fruits that grow on trees or bushes, grapes require their own specialized growing system. Grapes are vines, and will scamper up just about any support you give them. Their vining habit is also a gift as they can quickly cover a trellis and form a beautiful curtain or sunscreen. You can put your potted grape by the corner of your patio cover, for example, and with a little training and tying, it will quickly cover the patio roof, creating shade and a spectacular display of foliage and fruit.
The leaves are large and lovely, and create a shimmering green effect even before the grapes show themselves. Sunlight pouring through the bright green leaves and spattering on the floor below is a glorious sight. Then in the fall, as the grapes reach their peak of ripeness, the leaves begin to turn autumn colors. Even in winter, there is a kind of stark beauty to the weathered vines with their curly tendrils.
Size. Grapes need room to spread, and will quickly cover whatever support structure you provide. Unless you want to grow the vines a long distance horizontally, allow for at least 6 feet of trellis to support the vertical growth. Because you’ll need to prune annually for good crops, it will be easy to keep your grape at this 6-foot height.
Pollination. Virtually all grapes that you will want to grow are self-fertile. That means you will receive abundant crops of grapes without having to have another plant for pollination.
Hardiness. In areas of the world with very cold winters, grapes are usually taken down from their trellis and covered with soil to protect them from freezing. As a container gardener, you can accomplish the same thing simply by moving your container to a protected location for the winter. To make this possible, you’ll need to do two things: make sure the container is easily moved (casters are a good idea), and have this portability in mind when you plan your pruning pattern (see below).
Don’t forget that the roots of container plants are more vulnerable to cold temperatures than they would be if the plants were growing in the ground. The roots of grape plants will be killed at temperatures below 20°F. If your winter temperatures rarely fall below that, you will probably not need to protect your plant. Where minimum winter temperatures fall between 20° and –15°F, you can keep your plant outside but you must protect the roots by wrapping the pot with an insulating material (see box). But if your winters are colder than –15°F, you’ll have to move your grape plants, after they go dormant, to a protected location for the winter; see page 289 for suggestions. This is the point at which the form of your container, or your pruning style, becomes an issue.
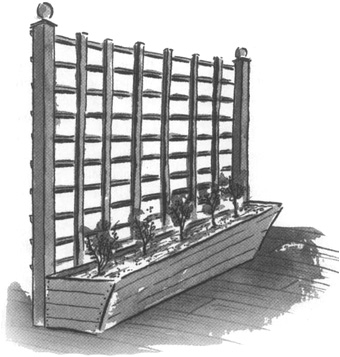
Grapes need a sturdy trellis to hold their heavy, luscious bounty.
Chilling Requirements. Grapes are grown in many regions of the world, from the humid tropics to Canada and Russia. Yet with all this experience, there is little detailed information on their chilling requirements.
What we do know is that in warmer areas where there is no frost, grapes will grow continuously if the vines are repeatedly pruned. If you live in a warm region of the country, you’ll probably get good crops by just leaving your grapevine outside all winter. If you live in a colder region, be sure to let your grapevine go through a period of light frost and go dormant outside before bringing it to a protected area; when the leaves fall, that’s your cue that dormancy has begun.
Planting. You will find grapevines for sale as bare-root plants in the spring, or in nursery containers in spring, summer, or fall. Theoretically, you could plant them anytime they’re available, but you’ll probably find a large selection of varieties in spring.
The larger the pot you use for your grape, the longer it can remain there without replanting. For long-term growth, a 10-gallon pot will suffice, but a 15-gallon pot or a half whiskey barrel is ideal. Grapes have deep roots, so a deep pot is preferable to a shallow one. Use a coarse potting mix that drains well.
If you are planting a bare-root grape, it will probably be about a foot tall with a relatively small root system. Grapes are very sturdy plants and will grow quite a bit the first year. If you are not ready to plant immediately, you can keep the grape in a cool place for several days with the roots wrapped in wet paper. Before planting, inspect the vine. If there are any broken roots or roots that are too long to fit comfortably in the pot, prune them back. Fill the pot about halfway with potting mix and place your new grape plant in the center.
Continue filling the pot, holding the plant upright. Just above the topmost roots of the plant, you should see a place where the stem changes color. This is the crown, the point to which soil covered the plant in its previous location; it should be planted at this depth in the new pot. Fill the pot with soil to about 1 inch from the top, adjusting the plant to the proper depth as you go.
If you’re planting a nursery-potted grape, inspect the root system. If it has been in the pot for some time and the root mass is quite dense, be sure to loosen the roots somewhat. You can pull at larger exposed roots to separate them from the main body of roots; sometimes you’ll have to beat on the roots with a stick to loosen them. Once you have freed up some of the main roots, you can prune them if necessary to fit the pot and plant the grape in the same way as you would a bare-root plant. After planting, water the grape well to eliminate air pockets and settle the planting mix.
If you haven’t done so already, now is the time to consider how you want to train your grape plant. Because it is such a vigorous vine, it will need serious support. If you have it near a patio roof, arbor, wall, or fence, you can let it grow where it is, although you may need to add some latticework or similar construction so the vine will have something to grab onto. If you are intent on growing grapes but do not have a good climbing structure in place, you’ll have to build a freestanding trellis and fasten it to your container. Make it strong.
You will have to do a fair amount of pruning to keep your plant confined to such a trellis, but it can look quite spectacular covered with bunches of grapes and fall foliage. A handsome system that we have admired uses a rectangular planter box, longer than it is tall, with sturdy cross beams attached to the back; the grapevine is trained to grow horizontally along the beams.
Take a moment now to familiarize yourself with the basic principles of grape pruning (below), and you’ll see that you should have your support structure clearly in mind—better yet, in place—when the plant is put into the container.
Success with Grapes. The key to growing grapes is proper pruning, which we’ll discuss shortly. Otherwise, your grape needs pretty much the same good, commonsense growing practices as other plants. By following a few basic rules, you can grow and enjoy colorful and delectable grapes almost anywhere in North America.
Watering. Water is a dangerous thing. Your grape needs enough of it to grow well, yet too much can damage or even kill the plant.
If you have planted a bare-root grape, its roots cannot use water for days or even weeks. After you have watered the vine well after planting, it will usually need no additional water until it starts to grow. During this time simply check the soil every few days to be sure it is not getting dry. Once the grape starts growing, it will begin using the water in the pot. Check the potting soil more frequently and water when it shows signs of drying. If the plant is in a large pot, a deep watering every five to seven days should be enough. You want to water just enough to keep it from wilting.
If you planted a grape that was in a nursery container, pay special attention to the area directly around the vine, where the original planting soil is. Because all the roots are concentrated here at first, this old soil can dry out very quickly while the surrounding new soil still feels moist. If you notice this, be sure to concentrate your watering close to the plant. Eventually the root system will grow into the new potting soil, and you can water normally.
In late August, start holding back on the water, providing just enough to keep the soil moist. This will slow down the growth rate, which is an important part of the plant’s preparation for the colder temperatures of winter.
Fertilizing. Your grapevine should grow 3 to 5 feet a year and show healthy-looking, medium to dark green leaves. Your goal is to fertilize just enough to keep the foliage green. More than that leads to trouble: scads of beautiful lush leaves but not much fruit.
Follow the same basic pattern of fertilizing as described for apples (see page 297), with one twist: grapes also need extra potassium when they are bearing fruit. You can meet this requirement by using a fertilizer high in potassium (the third number) or by adding greensand (see page 68), if you prefer the organic approach. Stop fertilizing altogether in late summer, as the vines are moving toward dormancy and need to slow down.
Pruning. Proper pruning is all-important for getting good crops from a grapevine. If you don’t do it, you will have a beautiful, lush vine that gives lovely shade but nary a grape to eat. Grape growers around the world have developed several basic techniques and patterns for pruning. The one we describe here, known as spur pruning, is not the only option; but we chose to feature it because it is a good all-purpose system and the best for containers that must be moved for winter shelter.
Spur pruning, like most other pruning styles, is based on a foundation of permanent branches trained into a T-formation. The location of the point where the main vertical stem branches out sideways to form the crossbar of the T is up to you, and making that decision depends on whether the container will need to be moved for the winter. So the first thing you must do is familiarize yourself with your winter weather patterns. If you’ll be moving the container into a sheltered area for the winter, you will find that it is much easier to do if the branching point is relatively low, say 4 or 5 feet above the soil level.
Let’s assume you planted your young grape in the spring; that’s the most common time. Once the weather has warmed up, several shoots will begin growing from the base. When they are approximately 18 inches long, select one strong shoot, tie it gently to a bamboo stake, trellis, or other support, and prune off all the other shoots.
Allow this main stem to grow up the support until it reaches the point where you would like it to branch out sideways. Then let it grow about a foot longer, and cut back the shoot at your desired height. This extra foot of growth guarantees that the buds will have time to develop their full strength. (If winter shelter is not a concern, you may wish to let the main stem grow taller, to reach the top of a patio roof, perhaps. In that case, it may take two growing seasons to reach that height, but in every other way the following instructions apply.)
Below the cut you made, buds will begin growing. Select two that are pointing in opposite directions and remove all the others lower down. When the two chosen buds start to grow, tie them to your support in such a way that they are held horizontally. These will become what are called cordons, the permanent cross-piece of your T-structure. Keep training the cordons on a horizontal plane, and allow them to grow as far as they want the first year.
Now that you have established the basic T-framework for your grapevine, pruning for fruit production can begin. Early in the spring of the second year (or the first winter in milder climates), prune back the cordons to the point where they are about as thick as your index finger, which will more than likely leave them around 2 feet long. It is best to make these cuts just past a downward-facing bud.
During the second summer, shoots will sprout from the cordons. Sometimes they will bear your first crop of grapes. The following spring (or second winter), prune back these shoots to the cordon, leaving just two buds on each one. If the shoots had fruit on them the previous fall, make the cut this way: find the point where the fruit clusters were, and go two buds beyond that point. New shoots will grow out from these buds during the third summer, and produce your first large crop of fruit. (The long stems that carry the fruit are sometimes called canes.)
After that, your annual pruning has two components: (1) completely remove the old canes that bore fruit the previous summer (you can use them to make grapevine wreaths, which is amazingly easy (see box); and (2) identify the new canes that grew the previous summer but did not produce fruit (the bark will look smoother), and cut them back so that just two buds remain. These new canes will produce fruit this summer.
If your container is staying put for the winter, prune early in spring. If you must move it for winter protection, you’ll need to do the pruning in fall, after the leaves drop, in order to free the plant from its support. Similarly, you can allow the cordons to grow longer or keep them short, depending on the size and shape of your support and the need to simplify moving.
Insects and Diseases. Fortunately, grapes are not bothered by serious insect pests, and many varieties are disease-resistant.
Probably the most serious disease of grapes is powdery mildew. This fungus shows as a powdery grayish white coating on leaves, shoots, and fruit. It causes the leaves to curl and wither and the fruits to drop or split. Most American grape varieties (the ones that are recommended for most regions of the country) are not affected by powdery mildew, but European-type grapes, which are best for warm areas of California, Arizona, and the Deep South, do suffer from it. The best control is to dust your plant with sulfur, starting when shoots are 6 inches long and continuing about every two weeks until harvest. Be sure to follow label directions when using sulfur or any other spray or dust.
Harvesting. You should have your first crop of sweet, delicious vine-ripened grapes in the third summer after you planted your vine. Grapes ripen late, from September to late October depending on the variety and your climate. During summer and early fall, they will be hard, unappetizing little green berries. The first sign of ripening is a change in color and a softening of the fruit. From this point to full ripening is about four to six weeks. The final test is taste. You can’t tell by appearance, for grapes will look ripe before they are fully sweet, so try a few before you pick full clusters.
After harvest, grapes can be stored for a couple of weeks in the refrigerator. For a beautiful dessert presentation, clip entire bunches from the vine, chill lightly, and serve on a white platter or shallow dish, perhaps with a rich, gooey cheese. The beautiful leaves from your grapevine can also earn a place on the dinner table, as liners for the cheese plate or hors d’oeuvres tray. The leaves have other uses too: if you enjoy making dolmathes, you’ll appreciate having an endless supply of fresh grape leaves to stuff. And one or two leaves added to the bottom of jars of your home-canned pickles helps keep the pickles crisp.
Varieties. Grapes are such an important horticultural crop worldwide that growers have produced over 8,000 named varieties; of these, about 2,000 are grown in California. Of course, you won’t need to choose from such a vast number. In the cold-winter areas of the United States, the choice of varieties is probably limited to fewer than a dozen.
There are two main types of grapes, and many varieties in each type. The American grapes and their hybrids are best for northern growers. They are self-fertile, hardy, and able to ripen fruit in a short growing season. European-type grapes are well adapted to warm-season regions of California, the Southwest, and the Deep South. Listed below are a few of the best varieties of each type.
• American Grapes and Hybrids. Canadice is a very sweet red seedless grape that was introduced in 1977 by the New York Agricultural Experiment Station in Geneva, New York. A popular variety with gardeners, it produces abundant clusters of attractive and delicious fruit. Canadice is a very hardy plant, surviving temperatures to –15°F when planted in the ground, although in a container you will not subject it to such cold weather. This variety is great for fresh eating, and makes delicious juice, jelly, and wine.
A large blue-black seedless grape with a delicious spicy flavor, Glenora was introduced in 1976 by the Agricultural Experiment Station in Geneva, New York. Sweet and richly flavored, the grapes are produced in abundant, very large and showy clusters. Glenora is mildew-resistant and hardy, and puts on a beautiful show of red-and-orange leaf color in the fall.
Himrod is a very hardy white seedless grape that bears good crops of medium-size fruit, sweet, juicy, and delicious. Produced in large striking clusters, the grapes are absolutely wonderful for fresh eating, make delicate sweet juice, and can be dried into tasty raisins. The fruit ripens early, but it can be stored until Christmas in the refrigerator. Another introduction from the Agricultural Experiment Station in Geneva, New York, Himrod is somewhat disease-resistant.
Introduced by Oregon grape grower Bill Schulz, Sweet Seduction is an unusual variety with exceptional flavor. It produces beautiful golden yellow seedless grapes with a muscat-like taste that we usually associate with European grapes, making it unique among American types. Vigorous and productive, Sweet Seduction bears large and attractive clusters of its seductively flavored fruit.
• European Varieties. A very popular variety with both home gardeners and commercial growers, Flame bears large and heavy clusters of sweet, light red seedless grapes with uniquely crisp flesh and delicious flavor. You can purchase this variety in stores, but you’ll find that homegrown fruit is sweeter and more flavorful. Flame is self-fertile, vigorous, and productive. It is well adapted to warm regions and requires long, hot summers to ripen its fruit.
The attractive Black Monukka produces striking long clusters of reddish black, seedless, oval fruit. The medium-size grapes are crisp and sweet, and are delicious for fresh eating. You can also dry the fruit for large, tasty raisins. When you see large raisins in specialty food markets, often they are from Black Monukka. Quite hardy for a European variety.
Muscat, also known as Muscat of Alexandria, is the variety associated with strong-flavored sweet grapes from the Middle East. It is one of the sweetest and most aromatic grapes you can grow at home. Muscat bears abundant crops of large, greenish amber, seeded grapes that hang in attractive, long loose clusters. You can enjoy these grapes fresh, and also make delicious wine and raisins from them. Muscat is self-fertile and requires a long and very warm summer to ripen its fruit.
Sweet, delectable, and oh, so juicy, peaches and nectarines are a real summertime treat. They’re right up there with vine-ripened tomatoes as the ultimate vehicle for a gardener’s bragging rights. Like tomatoes, peaches grown for the supermarket have to be harvested early, while they are tough enough to withstand shipping, and like tomatoes, they never develop the rich, full, died-and-gone-to-heaven flavor of those that reach full ripeness while still on the plant. Imagine having your own tree-ripened fruit right outside your door!
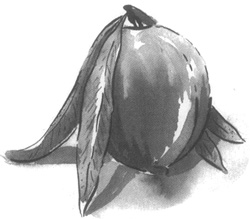
Did you think that peach trees are too big for container growing? It’s true that traditional trees, grown in the ground, reach 15 feet tall or more, but breeders have developed natural dwarf varieties (see Peach and Nectarine Basics, below) that don’t exceed 6 feet; that makes container growing eminently doable.
With peaches and nectarines, container gardeners have an advantage over in-ground gardeners. Both these fruits are difficult to grow in wet climates, where diseases can damage tree and foliage. By growing them in containers, you can move the small trees to a protected location where leaf and bark diseases won’t bother them.
With natural dwarf varieties and movable containers, just about anyone can grow peaches and nectarines. The rewards are priceless: in the spring you get to drink in the beauty and fragrance of the blossoms, and in summer you have the incomparable treat of biting into peaches and nectarines so lusciously ripe that the juices dribble down your chin and so wonderfully sweet that you won’t care a bit.
Peach and Nectarine Basics. Nectarines are basically peaches without fuzz. Both fruits are grown as grafted young trees, in the same way as apples (see page 292), with one important difference. Whereas apple rootstocks control the mature size of the tree, there is no rootstock for peaches and nectarines that can make a dwarf tree. Fortunately, fruit-tree specialists have found a way to create trees that naturally maintain a dwarf size. These natural dwarfs (also called genetic dwarfs) are much less vigorous than standard trees (most top out at 6 feet), but they produce full-size fruit with all the juicy sweetness and flavor of their larger cousins.
Pollination. Most peaches and nectarines are self-fertile, meaning they can bear fruit without the need of pollen from another tree. Some varieties, however, do need pollination from another variety, and those are noted in the Varieties section below. Where pollinators are needed, any other variety will work, as long as the two are within 20 feet of each other.
Hardiness and Chilling Requirements. Peaches and nectarines, when grown in a container, need their tender roots protected from cold weather. Anytime the temperatures fall below 20°F for more than a day or so, you should take protective measures (see page 289 for details). With peaches and nectarines, there is one additional element that must be protected against cold weather: the flowers.
The beautiful pink blossoms of peaches and nectarines appear earlier in the spring than do the flowers of many other fruit trees. In more northerly parts of the country, this early bloom can be hurt by frost, sometimes so severely that no fruit is produced that year. Commercial orchardists use heaters to raise temperatures out of the danger zone. Since you probably have just one or two trees, and smaller ones at that, your trees are very easy to protect. Simply toss a blanket or sheet of plastic over the tree so that it reaches the ground all around the pot. Plastic alone will keep the temperature 5 degrees warmer than the air: a blanket will do even more. Be sure to remove the covering the next morning as soon as the air temperature is above freezing.
As with most other fruit trees, peaches and nectarines need to go through a period of winter chilling when the temperature is between 32° and 45°F (read the full story of winter chill on page 286). For most peaches and nectarines, the magic number is 500 hours. Almost anywhere in the United States your trees will get those hours automatically without any extra effort on your part; your only concern may be providing protection against severe cold (see page 289). For southern gardeners, there are dwarf peach and nectarine varieties that do not need as much winter chilling.
Planting. The basic process of planting fruit trees, whether bare-root or containerized, is described in detail in the section on apples (see page 290). Some of the naturally dwarfed peaches and nectarines are so small and slow growing that you may be able to use a smaller, shallower pot than you would use for apples. Many of these dwarfed trees are quite short and stand well without staking. However, if your tree is 3 or 4 feet tall and does not have a root system that can hold it upright, you should add a stake or some kind of lattice structure to support it.
Success with Peaches and Nectarines. For general care, peaches and nectarines need the same commonsense attention as other fruit trees: adequate fertilizing, adequate watering, and watchful attention in very cold weather, with protective measures if needed. For all these topics, the basic information given in the section on apples will also apply to peaches and nectarines, with just a few additions.
Peaches and nectarines are subject to a couple of diseases, described below, that thrive in damp conditions. So when you water these plants, make sure you put the water directly onto the soil and avoid sprinkling the tree itself. And as with other plants that go dormant in winter, start tapering off the watering and fertilizing in late summer.
Two aspects of growing peaches and nectarines need explicit discussion: pruning and diseases.
Pruning. Most peach and nectarine trees are pruned to form what is referred to in the nursery trade as a vase shape: the trunk is short, and at its top grow three or four evenly spaced branches, trained to grow up and out at a shallow angle (no more than 45 degrees). The center of the tree is open, with no main vertical branch or trunk. The basic shape is rather like an upside-down cone or a flower vase that is broad at the top and narrow at the bottom. This flared shape allows good air movement through the tree, lets plenty of light in for optimum leaf and fruit growth, and helps keep the tree healthy and vigorous.
Most dwarf peaches and nectarines can be formed into vases. There are some dwarf varieties, however, that grow as a charming small shrub and don’t need this intensive pruning. In fact, you couldn’t train them to a vase shape if you tried. See pages 339 to 340 for more on these.
The process of forming a young tree into a vase shape is not difficult, even though some people get weak in the knees when you put pruners into their hands. Let’s start from when you first plant your tree. What you get from the nursery or garden center will be either a very lightly branched young tree or what is called a whip—a single, thin trunk without branches. After planting your young tree, measure up 18 to 24 inches from the rim of the container and look for a place to cut. With a whip, this will be just above a bud. With a branched tree, it will be just above a branch. The idea is to keep the trunk permanently at this height, and to encourage side branches that will eventually become the main structure of the “vase.”
Once you cut off the stem above your chosen point, all the buds below the cut will open and start to grow into branches. A month or two after the buds begin to grow, when the new blanches are about 12 inches long, select three or four that are well spaced around the trunk and 2 to 4 inches apart vertically. They will be the permanent framework of the tree. Remove all the other young branches.
If you planted a whip, keep an eye on the branch that grows from the highest bud. Sometimes it tries to grow straight up and become a replacement trunk. You don’t want that. Prune it off, back to the trunk. Also prune off the portion of the trunk below it, to the point just above where your next highest branch begins. Make this cut at a slight angle away from the direction of the branch to allow water to drain off and speed healing.
As the chosen branches grow, you may need to train them to keep them at the proper angle, no steeper than a 45-degree angle from the trunk. Young branches can be spread out by gently inserting a short piece of wood between the young branch and the trunk; some people use a clothespin.
After the vase shape is formed, you will need to do some maintenance pruning on the tree once a year. Do it when the tree is dormant: in winter if your winter weather is mild, or in early spring before buds begin to open. Start by removing any branches that cross and rub together, and any that have broken. When removing a branch, cut almost all the way back to the trunk or larger branch, but leave a short collar of raised stem just at its base. This collar contains actively growing cells that will help to quickly heal the cut. When cutting back a broken branch, you need only remove the part that is broken; find a spot below the break and about half an inch above a bud. This also promotes speedy healing.
After you have removed crossing branches and cut back broken ones, the next task is to reduce the new growth—the part of the branch that grew last summer—to about half its length. You can identify this new growth by its smooth, shiny bark. If you start at the tip of a branch and follow it back toward the trunk, you will see a point where the shiny new bark ends; farther back past that point, the bark is darker and rougher. That is the portion of the branch that grew two years ago. The dividing point is quite obvious. Measure the part of the branch that is new, and cut off half of it. This will stimulate more growth and a better fruit crop.
No matter what anyone says, there will always be some gardeners who would rather go to the dentist than tackle a major pruning job. If you’re one (and there’s no shame in it), we have some very good news. How about a peach tree that you don’t have to prune at all, beyond a tender touch-up now and then?
Some varieties of dwarf peaches and nectarines grow more like a little bush than a tree. They have scads of small branches that are difficult, if not impossible, to form into a vase shape. These trees are very small, usually not more than 3 or 4 feet tall, and quite attractive, especially when loaded with full-size fruit. To prune these varieties, you need be concerned only with removing any dead or broken branches, thinning out crowded branches to at least 2 inches apart, and cutting back new growth annually (as with the other type, make the new growth shorter by half) for better fruit production.
Insects and Diseases. Peaches and nectarines have few insect problems but unfortunately can be affected by two potentially serious diseases: bacterial canker and peach-leaf curl. Both can severely damage peaches and nectarines, especially in a wet climate.
Bacterial canker shows up as an amber-colored blob on twigs, branches, or trunk. It is a sign that diseased tissue on the interior of the plant has broken into a surface wound, and the blob is actually sap that is trying to heal the wound. If you scrape the nearby bark, you will likely find dead tissue material, brown instead of a healthy green.
Bacterial canker is most prevalent in regions with lots of winter and spring rain. There are two principal ways you can prevent this disease from damaging your tree. One is to physically shelter the tree from rain, which we’ll address shortly. The other is to spray the tree with a copper fungicide in combination with a second product known as a “sticker,” which helps the fungicide adhere to the tree. This treatment won’t kill the infection but will help prevent it from spreading, giving your tree time to heal itself. For best results, apply at least three sprays, the first in the fall before the rainy season begins, the second in December or January during a break in the weather, and the third in March.
Copper fungicide, also known as Bordeaux mixture, is marketed under several trade names. The sticker is a potassium resinate, and its only function is to keep the fungicide from immediately washing away in the rain. Stickers are sold under various trade names; one is called Sta-Stuk (you get the idea). The fungicide and the sticker are in separate containers, sometimes packaged as a duo; be sure to follow label directions for both.
The last two fungicide applications can also help prevent the second main disease of peaches and nectarines: peach-leaf curl. You can easily identify peach-leaf curl by the characteristic red splotches on the leaves, which cause the leaves to curl and become deformed. Different varieties of peaches and nectarines vary in the degree to which they are affected by peach-leaf curl. The most susceptible ones can be so impaired that they will not set fruit, or they may even be killed. This disease is also much more of a problem in regions with long, wet springs. A spray of copper fungicide in January, with another in February and again in March, will help prevent the opening buds from being infected.
As container gardeners, you have a way to deal with the threat of these two diseases that is not available to traditional gardeners: you can simply move the plant out of the rain. Put your peach or nectarine under a patio roof or under the eaves of your house or garage in the winter and spring. This will greatly reduce or even eliminate the damage from both these diseases.
Harvesting. Dwarf peaches and nectarines will often bloom and set fruit the year after you plant them, and they bear full-size fruit of surprisingly good quality.
To tell if your fruit is ripe, use the same test you would in the supermarket: press gently with your thumb. If the flesh gives slightly, it’s ripe. Other signs of ripeness to watch for: the skin color changes (peaches go from green to golden orange; nectarines from green to red); if you tug gently, the fruit comes away from the branch easily; and the peaches give off a heavenly aroma.
Varieties. All of the following varieties were developed in a breeding program in California.
• Nectarines. An attractive dwarf nectarine, Necta-Zee produces flavorful freestone fruit, bright red when ripe. It can grow to 6 feet tall and is self-fertile. Needs about 500 chilling hours.
Nectar Babe is another excellent dwarf nectarine that reaches 5 to 6 feet in height. Fruit is yellow-and-red freestone, large, sweet, and juicy. Nectar Babe requires about 500 hours of chilling and needs pollination by another peach or nectarine variety.
• Peaches. A very attractive bush form of dwarf peach with sweet yellow freestone fruit, Honey Babe will grow to only about 4 feet in height. The branches naturally grow downward (a growth pattern known as weeping), and are covered with foliage so dense it conceals the fruit. This is one of the types that do not need forceful pruning. Honey Babe is self-fertile but will produce a heavier crop if pollinated by another peach or nectarine variety. Requires about 500 hours of chilling.
Early ripening and self-fertile, Pix Zee produces large, delicious freestone fruits with orange-yellow skin and a delightful fragrance. This dwarf variety will grow to about 6½ feet tall, and is an excellent choice for gardeners in warm climates, for it needs only about 150 chilling hours.
Another good variety for growers in the Deep South, Bonanza is a dwarf peach that requires only 250 chilling hours or less to properly bloom and set fruit. Bonanza is self-fertile and bears large yellow freestone fruit, sweet and flavorful. It grows to about 4 or 5 feet tall.
The first fruit of summer, strawberries hold a special spot in a gardener’s heart. As soon as we see those snow-white blossoms we start the countdown, tenderly checking the plants every day, eagerly watching as the berries slowly turn from green to pink to red, and finally, unable to bear it any longer, picking the ripest one and biting into it right there on the spot. Your tongue knows, and your heart knows, that summer has arrived.
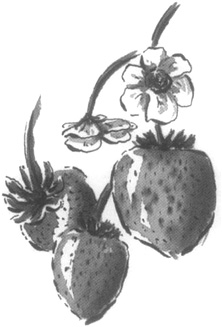
Strawberry Basics. Strawberries grow on leafy plants that stay relatively small: low mounds about 12 inches in diameter. The leaves are divided into three lobes, like clover, but they are much larger, slightly ribbed, and toothed along the edges. The flowers grow up out of the center of the plant on a stiff little stem that bears several small white flowers with centers of bright yellow stamens. As the berries begin to form and get heavier with size, they will droop down and be partially hidden among the leaves, where they will enlarge and ripen out of direct sun.
The main plants, the ones you’ll be planting, are called mother plants; each mother plant sends out long, thin runners (they look like green string) that form smaller plants at the end, called daughter plants. It’s this growth habit that makes strawberries especially suited to container growing; they are perfect in hanging baskets or tall tubs where the runners can hang down.
Strawberry plants are actually perennials, but their productive life is only about three years. Commercial growers continually replace mother plants with their daughters, which in turn produce their own daughters. In your container garden, you might want to consider just growing them as annuals, replacing old plants with vigorous new ones each year.
Strawberries are classified into three groups, based on how and when they make berries. June-bearing types produce one crop of large, high-quality berries starting in late May through late June. Another type is traditionally called everbearing, which is a bit of a misnomer; they usually produce two crops, one early in the summer and one in late summer, when the days are relatively short and relatively cool. The third type is day-neutral (a term that means their ability to flower and set fruit is not affected by the length of the daylight hours). Day-neutral varieties begin to bear in mid to late June and produce a continuous, light crop of berries all summer long, until cold temperatures and frost stop them. In some catalogs, the day-neutrals are consolidated with the everbearing types, with little distinction between them. Berries from these types are not usually as large as the June bearers, and are best eaten fresh rather than preserved as they tend to be a little softer in texture. The flavor, however, is excellent.
A fourth, very different type is the Alpine strawberry, a much smaller plant that does not produce runners. The dainty white flowers and sweet, intensely flavored, ½-inch fruits are produced throughout the growing season. It is possible to grow them from seed, but you will undoubtedly find that starting with plants is easier. In a container or window box they look quite stylish. You won’t be picking quarts at any one time, but there will usually be a handful available—a true delicacy.
Planting. Strawberries are sold in 4-inch or 6-inch plastic pots at the nursery in early spring, and are easy to transfer from these pots into your containers. Containers need to be at least 8 inches deep, but more is better. Hanging baskets should be at least 12 inches across.
Fill the container with potting mix, and set the plants in place with the crown (the center core, where the leaves originate) just at the soil surface. When you’re done, water the container thoroughly to settle everything in place. Add more soil if necessary to make sure the roots are well covered, but do not cover the crown or it can rot.
Success with Strawberries. Strawberries are about the easiest fruit there is to grow. With just regular watering and fertilizing, they’ll produce a crop the first year. The best way to tell if a plant needs water is to stick your finger down into the soil; if the top inch is dry, it needs a drink. Let the plant get too dry, and it will alert you by wilting.
Once your baby berries start actively growing, give them fertilizer every couple of weeks; use a formula meant for flowers or vegetables, with a ratio of approximately 1:2:1 (see Chapter 6),
As long as you start with clean, healthy plants and use a commercial potting mix, you aren’t likely to have a problem with diseases, viruses, or insect pests. But slugs are everywhere, and you do need to watch out for them if your container is on a ground-level patio where these little devils might be lurking. If you see their silvery slime trail, take action (see Chapter 6) or they will decimate your beautiful strawberries. Birds may also try to steal them, but a drape of netting over the plant will keep them out.
Harvesting. This is easy: when the berries are bright red, pick them! Strawberries form in clusters, so be sure not to break off or damage any nearby green ones as you’re picking the red beauties. That’s all there is to it, except the part where you put one into your mouth, tilt your head back, close your eyes, and smile.
Varieties. All varieties seem to do equally well in containers, so you just need to decide if you want June-bearing or everbearing, and then select a variety suited to your area.
For the Northwest, Hood is the number one June-bearer for its excellent flavor and high yield of large berries. Quinault tops the list for an everbearing type. Allstar is a good June-bearing variety for the Northeast and Mid-Atlantic regions. Tristar is an everbearing type with excellent flavor for all regions. It’s pretty much a given that your local nursery will stock varieties that are appropriate to your area. Trust it.
Theme Garden
Hanging Gardens of Babylon
Professional garden designers work with a charming concept called “borrowed landscape.” It means that they incorporate into their planning the visual impact of nearby sights, be they a lovely tree in a neighbor’s yard or a dramatic view in the distance. It’s a way of making any garden seem larger and more cohesive, which makes this idea especially valuable to those whose garden space is limited.
Maggie started thinking about applying this notion to container gardens one day when she was visiting her mother, who lives on the sixteenth floor of a high-rise apartment building and has a small balcony that faces east. Anyone who lives in Portland, Oregon, instantly understands what that means: any balcony that is a few stories high and faces east provides a view of “our mountain”—the beautiful Mt. Hood, 11,235 feet high, with its distinctive upper profile perpetually covered in snow. This gorgeous sight is so cherished by Portlanders that they have been known to stop dead in the middle of the sidewalk to gaze at it when a (rare) blue sky gives them a clear view, grabbing fellow pedestrians—total strangers—and saying, “Look—the mountain’s out.” On such a day, Maggie’s mother has only to step out onto her balcony to enjoy this picture-postcard scene.
Once, when Maggie was sharing this visual treat with her mother, it occurred to her that the sight could be enhanced with an archway framing the view, a living arch made of plants. In that way, her mother could make the mountain part of her balcony garden.
To make such a garden, you need (1) a balcony with a lovely view or an attractive focal point in the distance, and (2) permission from the building’s management to install hooks in the ceiling of your balcony, along the outer edge. Suspend hanging baskets at staggered heights, with the lowest at the outer edges and the highest in the center, creating the sense of an arch framing the view.
We think you’ll like the results better if the containers and their contents are visually similar; use containers of the same size and type, and choose plants within just one color family (one in addition to green, of course). This is a situation where a monochromatic color scheme could be quite striking. To accentuate the arch effect, use deeply trailing plants at the edges and more rounded forms in the center.