Understanding the Outlook Journal 568
Using Automatic Journaling 570
Adding Journal Items Manually 577
Creating and Using Custom Entry Types 581
Connecting Journal Activities to Individual Contacts 585
Sharing Journal Information 594
Using the Journal Effectively 596
REMEMBERING everything that you’ve done during the course of a busy day—email messages sent, phone calls made, appointments set up—can be difficult. However, the Journal feature in Microsoft Outlook 2010, which records your daily activities, can help you keep track of it all. In addition to tracking Outlook 2010 items such as email messages and appointments automatically, you can use the journal to monitor every Microsoft Office 2010 system document that you create or modify. You can also manually record an activity that occurs away from your computer—a phone conversation, for example, or a handwritten letter that you mailed or received.
The Journal folder provides a single place to track all your work and your daily interactions. For example, you can use the journal to list all items related to a specific contact: email messages sent and received, meetings attended, and tasks assigned. You can track all the hours you’ve spent on activities related to a particular project, or you can use the journal to retrieve detailed information based on when you performed an action—for example, if you know that you worked on a Microsoft Excel 2010 document last Tuesday but can’t remember the path to the file, you can look up the document quickly if you’ve configured the journal to record work automatically on Excel 2010 files.
This chapter shows you how to record your work in the journal both automatically and manually. You’ll also learn how to view and print your journal in standard and customized views.
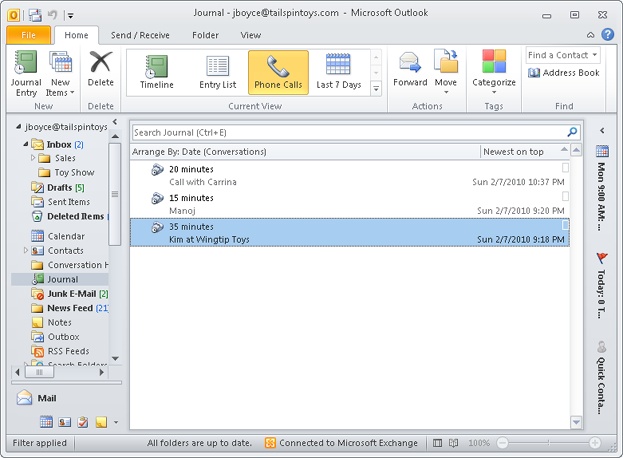
The Journal folder, shown in Figure 22-1, provides you with tools to track and record daily activities. Although other components of Outlook 2010 provide similar note-keeping capabilities, only the journal provides a full (and optionally automatic) means to date and timestamp an activity, log the entry type (for example, a phone call or a meeting request), and even track the time spent on an activity for billing purposes.
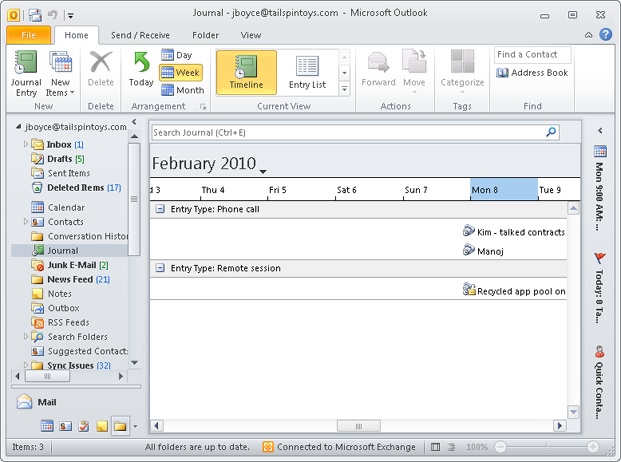
Figure 22-1. Use the journal as an electronic diary of events, phone calls, tasks, and other daily items.
Outlook 2010 records entries in your Journal folder based on when an action occurs. For example, a Microsoft Word 2010 document is recorded on the journal timeline when you create or modify the document. You can organize journal entries on the timeline into logical groups—such as email messages, meetings, phone calls, or any items related to a specific project. You also can assign categories to journal items and organize the folder view by category. For example, you could assign a project name as a category to all journal items associated with that project, which would allow you to group journal entries by project easily.
You can open a journal entry form, as shown in Figure 22-2, and review details about an activity, or you can use the journal entry as a shortcut to go directly to the Outlook 2010 item or the file referred to in the journal entry.
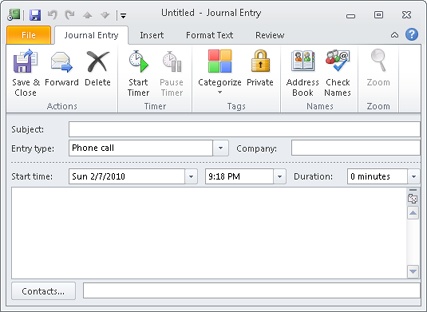
Figure 22-2. The journal entry form contains many fields to help you organize, store, and find your journal entries.
The Outlook 2010 journal is an electronic diary. Everything that you normally write in your calendar or day planner (what you did, when you did it, and all the details that you want to remember) you can record in the journal.
To open the Journal folder, click the Journal icon in the Navigation pane. Figure 22-1 shows the journal Timeline view, which you see the first time that you open the journal. Figure 22-3 shows Entry List view, another way of organizing your Journal folder.
Note
For information about the views available to organize your Journal folder, see the section Viewing the Journal, on page 586.
You can have Outlook 2010 create automatic journal entries for a wide range of items, including email messages (both sent and received), task requests, and files that you create or open in other Office system applications. In fact, you can use automatic journaling to record activities based on any contact, Office system document, or Outlook 2010 item that you select.
For example, suppose that you routinely exchange important email messages with a business associate, and you want to track all exchanges for reference. Incoming messages from this associate arrive in your Inbox. You read them, reply to them, and then archive the incoming messages to another folder. Now, however, your associate’s messages are stored in one folder and your replies are in another. (By default, replies are stored in the Outlook 2010 Sent Items folder.) Configuring the journal to track all your email exchanges with your associate automatically places a record of all messages relating to this contact (both received and sent) in one convenient location. Instead of hunting for your response to your associate’s question from two weeks ago, you can open the journal and find the entry associated with the message. Double-click the link embedded in the journal entry, and Outlook 2010 takes you to the message containing your response. Figure 22-4 shows a journal entry automatically added from an email message.
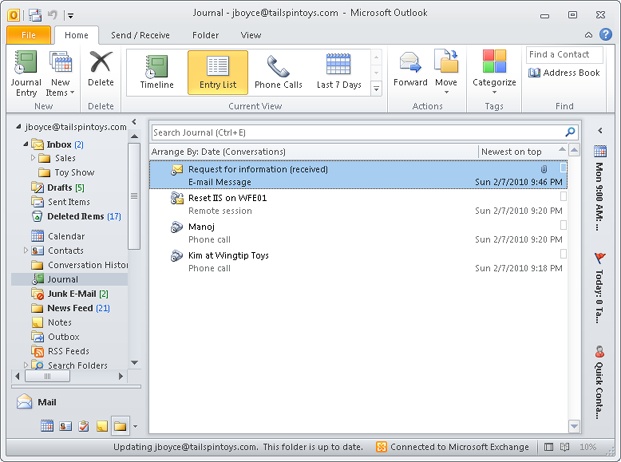
Figure 22-4. The journal can note automatically when you send or receive email messages to or from specific contacts.
Tip
INSIDE OUT Organize messages using search folders
Search folders are another useful tool for organizing messages. You might set up a search folder that lists all the messages to or from a specific contact to help you quickly find those messages. See Chapter 10, for a complete discussion of search folders.
Tip
INSIDE OUT Find email items quickly
To find email items in the journal more quickly, select Entry List view, and then click the Contact column to sort the view according to contact. This helps you see all journal items associated with a specific contact, including those items created automatically from email messages.
As another example, let’s say you deal with several different types of Word documents in a day, such as contracts, quotes, or other documents. Turning on automatic document tracking for this application could provide some interesting insight into how your workday is allocated and which documents are the most demanding. The same holds true for other Office system applications that you use frequently.
If you use document tracking in such a scenario, however, you should be aware of the distinction between how Outlook 2010 tracks a document and how Word 2010 itself records editing time. In Word 2010, you can click File and then view the Total Editing Time property on the Backstage view. Outlook 2010 tracks the time that a document is open, whereas Word 2010 tracks the time spent physically editing a document (that is, pressing keys). The Outlook 2010 journal automatically records the entire span of time a document is open, even if you are away from your desk tending to other matters.
If a record of the actual time spent working on a document is important to you (whether you’re mulling a paragraph, reading a lengthy section, or editing or entering new text), the journal offers a more realistic record. However, if you fail to close the document when you move on to other things, you’ll end up adding time to the document’s journal entry that wasn’t really spent on the document. It’s best to use a combination of the Word 2010 Total Editing Time field and the Outlook 2010 journal’s tracking to get a realistic picture of how you spend your time.
Overall, the best choice is usually to use automatic tracking for your critical contacts and for specific applications that benefit from an automatic audit trail. You can place other items in the journal manually as required.
Note
After you set it up, the journal’s automatic tracking is always on. A piece of Outlook 2010 code runs in the background and monitors the Office system applications that you’ve selected to track—even if Outlook 2010 itself is closed.
Another issue to consider in relation to journaling is latency. When you use automatic tracking for documents, you’ll often notice a significant lag between the time that you close a document and the time that the entry appears (or is updated) in the journal. Also, keep in mind that if you’ve opened the document previously, the most recent tracking entry doesn’t appear at the top of the list. By default, journal entries are ordered according to start date, which in this case would be the first time the document was opened or created, not the most recent time.
Note
Using automatic journaling can have a significantly negative impact on the performance of your applications because of the added overhead involved in journaling. This might not be apparent on your system, depending on its capabilities and the types of documents you use. However, if you see a significant decrease in performance after turning on automatic journaling and can’t afford the performance drop, you’ll need to stop automatic journaling and resort to adding journal entries manually.
The journal has many options that allow you to control what is recorded, how it is recorded, and when it is recorded. To set journal options, click File, Options. On the Notes and Journal page, click Journal Options to open the Journal Options dialog box, shown in Figure 22-5. The choices that you make in this dialog box determine how your journal is set up and what it tracks.
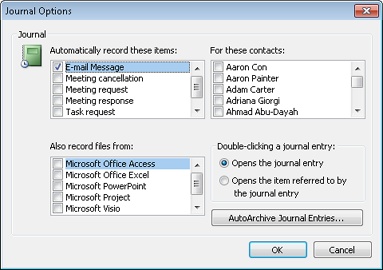
The following list summarizes the options in the Journal Options dialog box:
Automatically Record These Items Select from a list of Outlook 2010 items that can be tracked as journal entries. All options here involve three forms of messaging: regular email, meeting notifications, and task delegation. Item types selected in this list are tracked for the contacts that you specify in the For These Contacts list. Selecting an item to track without choosing an associated contact has no effect for that tracking option.
For These Contacts Here, you link items that you want to track with those contacts you want to track them for—task requests from your boss, for example. Outlook 2010 then automatically creates journal entries for the selected contacts and related items. Only contacts in your main Contacts folder can be selected for automatic journaling. You’ll need to move (or copy) contact entries from subfolders to the main Contacts folder if you want to track items for them.
Also Record Files From Outlook 2010 creates an automatic journal entry every time an Office system application selected in this list creates or accesses a document. The selections available depend on which Office system applications are installed on your system. Documents from Microsoft Access, Microsoft Excel, Microsoft PowerPoint, Microsoft Word, and Microsoft Project can be tracked.
Caution
When you set up automatic tracking for a particular document type (for example, Word 2010 documents), this setting applies to all documents that you create, open, close, or save with the selected application. Thus, automatic tracking can also create many journal entries filled with information you might not need to preserve. Make this selection with care.
Double-Clicking A Journal Entry Double-clicking a journal entry can open either the entry itself or the item referred to by the entry, depending on your selection in this area of the dialog box. Use this option to specify which action you prefer as the default. You can later override this setting by right-clicking the journal entry in any journal view.
AutoArchive Journal Entries Click to open the Journal Properties dialog box and configure archive settings for the Journal folder.
Note
For details on archiving Outlook 2010 items, see Chapter 30.
You won’t find a one-click solution when you want to turn off automatic journaling. To turn off this feature, you must open the Journal Options dialog box and clear all the check boxes in the Automatically Record These Items and Also Record Files From lists. It’s not necessary to clear contacts selected in the For These Contacts list. Because automatic journaling consists of tracking specific Outlook 2010 events for a contact as well as when specific types of Office system files are accessed, breaking the link for items to track is enough.
TROUBLESHOOTING
Automatic journaling is causing delays
Automatic journaling can cause very long delays during manual or automatic save operations as well as when you exit the application. Although it might appear that the application has stopped responding, in fact it is simply saving the journal information. If your system stops responding during these procedures, check Outlook 2010 to see whether automatic journaling is turned on for the specific application involved. If so, wait a minute or two to give the application a chance to save your data, and then turn off automatic journaling if it has become too inconvenient to use. You can continue to add journal items manually for the application, if needed.
Recording email to and from colleagues in the journal is a great way to keep track of discussions and decisions concerning a project, and it’s easy to locate those messages later.
To record email messages exchanged with a specific contact, follow these steps:
In Outlook 2010, click File, Options, and then, on the Notes And Journal page, click Journal Options to open the Journal Options dialog box.
In the Automatically Record These Items list, select the E-Mail Message check box.
In the For These Contacts list, select the contact whose email you want to record.
Click OK twice to close both dialog boxes.
You can configure your journal to keep track of your interactions with any one of your contacts automatically. If you’re working with a colleague on a specific project, for example, you might want to monitor your progress by recording every email message, meeting, and task that involves this colleague.
To set up your journal to keep such a record based on the name of the contact, follow these steps:
In Outlook 2010, click File, Options, and then, on the Notes And Journal page, click Journal Options to open the Journal Options dialog box.
In the Automatically Record These Items list, select the types of Outlook 2010 items that you want to record in the journal.
In the For These Contacts list, select the relevant contact. (You can select more than one.)
Click OK twice to close both dialog boxes.
Suppose that you create and maintain custom Excel 2010 workbooks for the different divisions in your corporate enterprise. In the course of a busy day, it’s easy to forget to write down which files you worked on and for how long. There’s a better way than keeping track on paper: you can have the journal automatically record every Office system file you open, including when and how long you had each file open. Outlook 2010 can monitor your files and create a journal entry for every document you open and work on from other Office system applications such as Microsoft Visio, Word, Excel, Access, PowerPoint, and Project.
Note
Although the journal can record work automatically only in these Office system programs, you can enter your work from other programs manually.
Follow these steps to record automatically files that you create or open:
In Outlook 2010, click File, Options, and then, on the Notes And Journal page, click Journal Options to open the Journal Options dialog box.
In the Also Record Files From list, select the programs for which you want to record files automatically in your journal. When you create, open, close, or save a document from any of the selected programs, the journal will record a new entry.
By default, double-clicking an icon on the journal timeline opens the journal entry. If you’d rather be able to open the associated file when you double-click the icon, select the Opens The Item Referred To By The Journal Entry option.
Tip
INSIDE OUT Add items manually
If you’ve set up automatic journaling for all entries created by an application (Excel 2010, for example), every document you create in that application generates a journal entry. If you right-click an entry and choose Open Item Referred To, Outlook 2010 opens the document that created the journal entry. However, this behavior can change. If you add a document item manually to the entry and the icon for that item appears before the original document’s icon in the entry, Outlook 2010 opens the manually added document. In other words, Outlook 2010 always opens the first document referenced in the entry when you choose Open Item Referred To on the entry’s shortcut menu. This can be confusing because the subject continues to reference the original document. In addition, the manually added document does not appear in the View Attachments list on the entry’s shortcut menu unless you inserted it as a file instead of as a shortcut. So when you add entries manually, make sure to place the icon for the document added manually after the original document’s icon and insert the document as a file.
Tip
INSIDE OUT How the journal handles changes to tracked items
Because journal entries contain links to your documents instead of copies of the actual documents, the entries might reference documents that no longer exist on your system. The journal has no way to record the deletion, moving, or renaming of files, so while the journal entries for the deleted objects still exist, the referenced objects don’t open.
Similarly, the journal can’t find email messages that have been moved from the Inbox to another folder. If you change the text on the subject line of a tracked email message, the journal entry keeps the old subject line, but it can still find and open the message.
Automatic journaling can be tremendously useful, but what if some of the work that you need to track is done in applications other than Office system applications? You can’t record the files automatically in your journal, but you can record them manually. Alternatively, what if you want to track your work only in a specific Word 2010 file rather than in every Word 2010 document? Instead of turning on automatic recording for all Word 2010 files, you can record your work manually in only specified files.
Likewise, if you want to record a nonelectronic event in your journal—a chat at the water cooler, a box of chocolates sent to a client, or your approval of a printed proposal—you can add a journal entry manually. You can also use this method if you’d prefer to pick and choose which documents, messages, meetings, and task requests are entered in the journal rather than having Outlook 2010 routinely record all such items.
To keep a record of when and how long you worked in a file (along with any extraneous notes to yourself), follow these steps:
Locate the file that you want to work in. You can browse to the folder that contains the file using any technique you like.
Drag the file icon in the folder window to the Journal icon in the Navigation pane. It’s easiest to drag the file if you resize both the Outlook 2010 window and the folder window so that you can clearly see both.
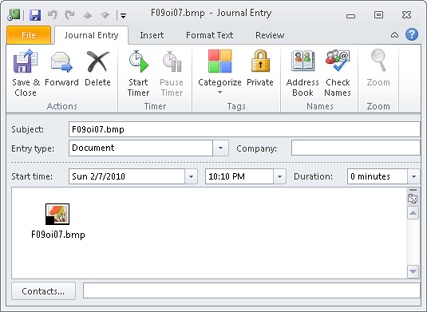
Click Start Timer to begin recording your working hours, as shown in Figure 22-6, and then double-click the file shortcut icon to open the file. At any time, you can enter notes to yourself in the area where the shortcut icon is located.
When you finish working in the file, remember to stop the journal timer by clicking Pause Timer and then clicking Save & Close.
Recording an Outlook 2010 item such as a task in the journal is even easier than recording a file: Open the Outlook 2010 window where the item is listed and then drag the item to the Journal icon in the Navigation pane. For example, suppose that you want to record how much time you spend cleaning out your filing cabinets, a task that you’ve entered in the Tasks folder. Open the Tasks folder and then drag the task item to the Journal icon in the Navigation pane. Click Start Timer and go to work. Then click Pause Timer to take a break. When you finish, click Save & Close.
Any activity that you want to record can be entered in your journal. For example, you can monitor the time that you spend on the Internet (which can be considerable) as well as recording any web page addresses you want to save and other notes you need to jot down.
To do so, follow these steps:
Double-click a blank area in your Journal folder. A new journal entry form opens.
In the Subject box, type a description of your activity.
In the Entry Type box, select an appropriate entry type for the activity. You can’t create your own entry type on this screen, but you can choose among several available types. For example, you could classify an Internet search as Remote Session. Type any notes, including hyperlinks, in the body of the journal item.
Note
For information about custom entry types, see the section Creating and Using Custom Entry Types, on page 581.
When you’ve finished with your activity, click Pause Timer to stop the timer, and then click Save & Close to close the journal entry.
When you use automatic dialing to call a contact, you can time the phone call, type notes in Outlook 2010 while you talk, and create a journal entry for the call. This feature can come in handy if, for example, you bill clients for your time spent on phone conversations.
Follow these steps to keep a record of an outgoing call in the journal:
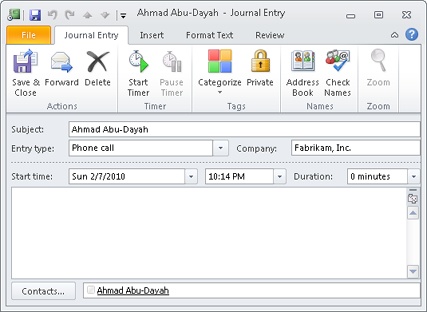
Open the Contacts folder and select the contact entry for the person that you want to call.
In the Communicate group on the Contact tab, click More, Journal Entry. Doing so opens the Journal Entry form with the Entry Type set to Phone Call (Figure 22-7).
Start your call and click Start Timer. You can type notes in the body of the journal entry while you talk.
When you’ve finished with the call, click Pause Timer to stop the clock, and then click Save & Close.
You also can create journal entries for incoming calls, although Outlook 2010 currently offers no means of automatically creating journal entries when you pick up the phone and start talking. Instead, when you answer the call and realize that you want to track it, you can open the journal as you begin the conversation, start a new journal item, and click Start Timer. Make notes as needed, and click Pause Timer when you hang up. Add any necessary details to the journal entry form, and then click Save & Close to create the item.
Tip
INSIDE OUT Use the journal as an inexpensive stopwatch
You can start a new journal item and use the timer to time any activity, assuming that you don’t need to-the-second timing. Just stop the timer and close the form without saving it unless you actually want to save the information in the journal.
Note
For information about setting up automatic phone dialing and making calls from the Contacts folder, see the section Working with Contacts, on page 440.
You can assign categories to all Outlook 2010 items to provide a means of sorting and organizing those items. The journal is no exception: Each journal item can have multiple categories assigned to it. Journal items, however, can also be classified by entry type, which defines the purpose of the journal item. In many respects, entry types are like categories, because you can use them to sort and search for journal items.
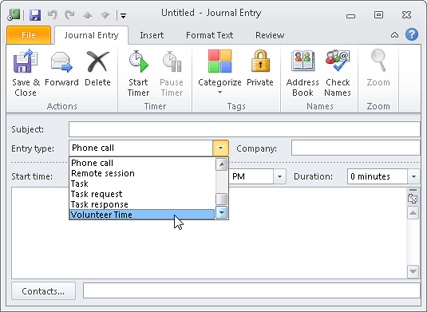
When you create a journal item manually, Outlook 2010 assumes that you’re creating a phone call journal entry and automatically selects Phone Call as the entry type. However, you can select a different entry type in the Entry Type drop-down list. Figure 22-8 shows some of the available entry types.
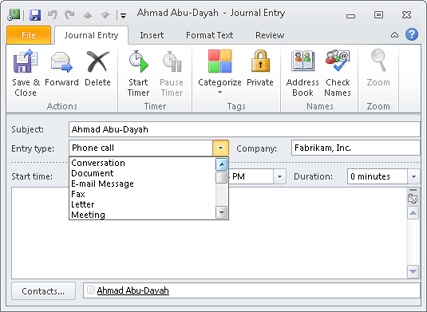
Unlike categories, which you can create on the fly, journal entry types are limited to those types found in the predefined list in Outlook 2010. Although the default entry types cover a lot of bases, they don’t offer much flexibility. For example, you might want to use the journal to track your activity in an application that isn’t included in the list, or you might need to keep track of trips to the doctor, school programs, or other events. Although you don’t have the ability to add entry types directly when you create a journal entry, you can modify the registry to add journal entry types. You can use these user-defined entry types for journal items that you enter manually.
Here’s how:
Open the Registry Editor by choosing Start, clicking in the Search box, typing regedit, and then pressing Enter. (In Microsoft Windows XP, click Run, type regedit in the Open box, press Enter, and then accept the UAC prompt.)
Open the key HKEY_CURRENT_USER\Software\Microsoft\Shared Tools\Outlook\Journaling.
Right-click Journaling, and then choose New, Key.
Rename the key based on what the new entry type will be. For example, you might name the type Volunteer Time.
Right-click the key that you just created, and then choose New, String Value. Rename the string value Description.
Double-click the Description value that you just created, and then set its value to the text you want to appear in the Entry Types drop-down list, such as Volunteer Time.
Close the Registry Editor.
After you have edited the registry to add the new entry type, it appears on the journal entry form in the Entry Type drop-down list, as shown in Figure 22-9.
You can modify any details of a journal entry—for example, adding more notes to yourself, adding a contact’s names or categories, or changing the duration of your activity. You can also move the entry to a different position on the journal timeline if you entered the wrong start date or time when you began recording the activity.
Note
For information about timeline views in the Journal folder, see the section Viewing the Journal, on page 586.
Suppose that in the middle of your department budget meeting, you realize that you didn’t stop the journal timer when you stopped working on a spreadsheet to come to the meeting. You know that you worked on the spreadsheet for about three hours, however, so you can change the journal entry to reflect your actual work time.
To change the duration or any other property of an existing journal entry, follow these steps:
Open the Journal folder, and double-click the entry to open it.
Select the information that you want to change and then enter the correct data. For example, to change an incorrect record of how long you spent on an activity, click in the Duration box, change the value, and press Enter.
Make other changes as needed in the journal entry form.
Click Save & Close.
Suppose that you belatedly created a journal entry for a phone call that you made yesterday and inadvertently entered the wrong date. When you later notice that the journal entry is in the wrong spot on the timeline, you can move the entry to the correct date.
Follow these steps to do so:
Open the Journal folder, and double-click the entry to open it.
In the Start Time box, type or select a date.
Click Save & Close. Outlook 2010 then moves the entry to the correct spot on the timeline.
Deleting a single entry from your journal timeline is easy: Either click the entry’s icon to select it and then press Delete, or right-click the entry’s icon and choose Delete on the shortcut menu.
What if you’ve been recording your work automatically in Excel 2010 workbooks but have also been experimenting with Excel 2010, creating several test workbooks that you don’t want to save or track? Now you have numerous useless entries cluttering up your Journal folder. You can delete them one at a time, but it’s faster to switch to a table view of your entries, sort them so that all the useless entries are in one group, and delete them all at once.
Note
For information about the various views in the Journal folder, including table views and timeline views, see the section Viewing the Journal, on page 586.
Follow these steps to delete a group of entries:
On the Home tab on the ribbon, in the Current View group, select Entry List. The view switches to a table view of all your journal entries.
To sort the entries so that all the ones that you want to delete appear together, click the Entry Type column header. To sort specific entries by subject within a group of entry types, hold down the Shift key while you click the Subject column header.
Note
You can sort by as many as four fields using this method of holding down the Shift key while you click column headers. Clicking the Contact header or Categories header will group the journal items by that category and clear the other sort settings. Once the list is grouped, you can sort on multiple categories as described earlier.
To select and delete multiple journal entries, press Shift or Ctrl while you select the entries that you want to delete, and then click the Delete button on the toolbar. (Alternatively, you can press the Delete key to delete selected entries or right-click any of the selected entries and choose Delete on the shortcut menu.)
When you finish deleting the journal entries that you don’t want, you can select the view you were using previously on the Current View list in the Navigation pane.
If you work on a project with a colleague, you can associate your journal entries for the project with that colleague’s contact entry. All the journal entries that are associated with the contact will appear when you select Activities view on the contact form.
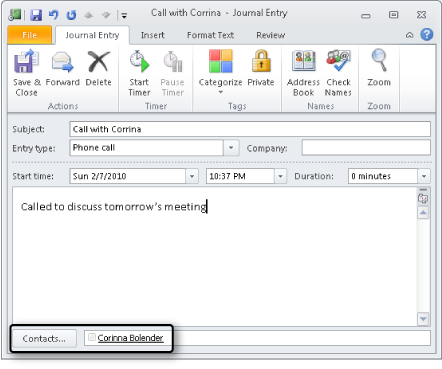
For example, Figure 22-10 shows a journal entry for a phone call to an associate. To connect a journal entry to a contact, click Contacts at the bottom of the journal entry form. In the resulting Select Contacts dialog box, click the names of the contacts with whom the journal entry should be associated, and then click OK. The selected names will appear in the Contacts box at the bottom of the journal entry form.
So what does this do for you? When you open the contact entry for an associated contact and click Activities in the Show group on the Contact tab, as shown in Figure 22-11, you’ll see a list of every Outlook 2010 item associated with that contact. You can open any of these items by double-clicking it. This is just one more way that Outlook 2010 keeps all your information interconnected.

When you look at the Journal folder in a monthly timeline view, you get a good overall picture of your recorded activities, but you must point to an individual icon to identify the activity. (When you point to an icon, a subject label appears.) You can make a few changes to a journal timeline view—for example, you can choose to always display the subject labels for icons in a monthly view, or you can specify a more useful length for the labels. You can also show week numbers in the timeline heading, which is useful for planning in some industries.
Because the Outlook 2010 journal creates a record of your activities, the standard views available in the Journal folder differ considerably from the views in other types of Outlook 2010 folders. The following sections introduce you to each of the Journal folder views.
Note
You can choose whether to view a timeline in a journal view in day, week, or month increments by clicking the Day, Week, or Month button on the toolbar. These buttons are available only in the journal views that show a timeline and are not available in list views.
The default view for the Journal folder is Timeline view, shown in Figure 22-12. In this view, the journal entries are arranged in a timeline and are categorized by the entry type. To select Timeline view, click Timeline in the Current View group on the Home tab on the ribbon.
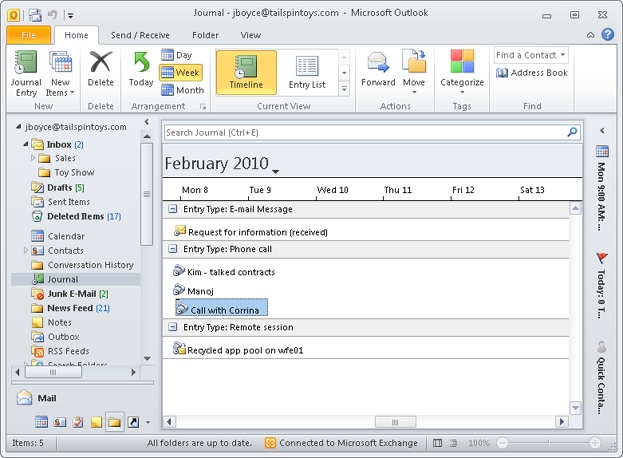
Each entry type is indicated in a title bar. You can click the small box on the left in the title bar to expand or contract the type. A plus sign (+) in the box means that the type is collapsed, whereas a minus sign (–) indicates that the type is expanded. You might need to use the vertical scroll bar to see the complete list. When you expand a type, you can view any journal entries for that type in the area below the title bar.
Note
If you’re surprised to find no entries when you expand a particular entry type, that’s because Outlook 2010 displays the entries as a timeline. If no entries for the selected entry type were created recently, you might need to use the horizontal scroll bar to find the most recent entries.
Timeline view is most useful if you want to find out which documents you worked on during a specific period. This view is not particularly useful for locating documents based on any other criteria. For example, you wouldn’t want to use Timeline view to locate all documents relating to a particular contact.
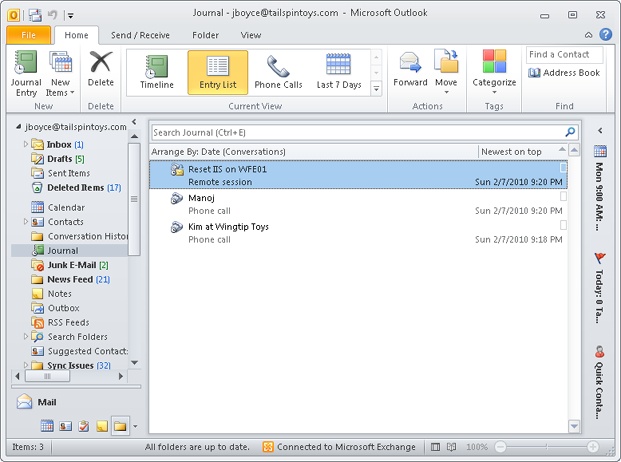
Entry List view, shown in Figure 22-13, might be the most useful view of all. This view dispenses with the timeline and instead displays all journal entries in a table.
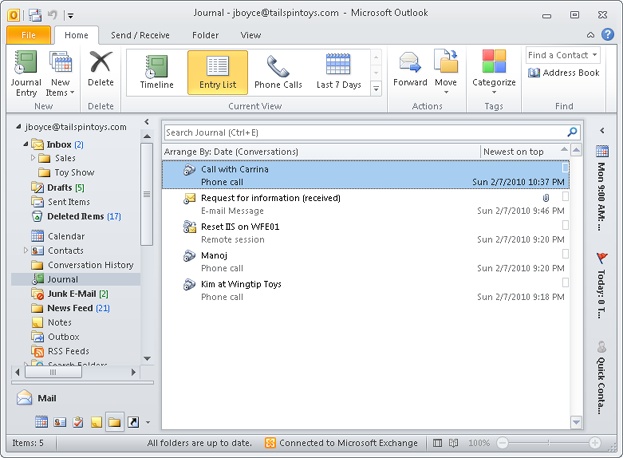
Because Entry List view does not use the timeline to display entries, it’s much easier to view the list of entries—you don’t have to use the horizontal scroll bar to locate the items. By default, this view is sorted in descending order based on the start date, but you can sort the list quickly using any of the column headers. Simply click a column header to sort the list; click the header a second time to reverse the sort order.
The paper clip icon in the second column of Entry List view indicates that an entry contains an item or shortcut such as document or email. Note that this column will not be displayed if the width of the window is too narrow.
Last Seven Days view resembles Entry List view. This view is useful when you need to locate items that you’ve worked on recently—especially if you can’t quite remember the file name, contact, or category.
When you look closely at Last Seven Days view, you might notice that something doesn’t look quite right: The dates shown for the journal entries clearly span much more than a week. The explanation is that the dates shown are the start dates for the journal entries, not the dates when the items were last accessed. Outlook 2010 is displaying the journal entries that have been created, accessed, or modified within the past week. Each entry shown in this view was accessed in some way during the past week, although the original entries might have been created quite some time ago.
Tip
INSIDE OUT Change the period of time shown in
Last Seven Days view You can customize Last Seven Days view to specify a different time period, such as the past month. To do so, click the View tab on the ribbon, click View Settings, click Filter in the Advanced View Settings dialog box, and then click the Advanced tab. Remove the existing Modified criteria and add your own that reference the desired time range.
Phone Calls view, shown in Figure 22-14, displays only journal items that are associated with phone calls. Tracking phone calls and viewing them in the Journal folder can be extremely helpful. You can, for example, monitor the time you spend on billable calls. Even if you don’t bill for your time, you’ll find that phone call journal entries make it easier to recall phone conversations.
All the standard views in the Journal folder are customizable in a variety of ways. The changes you make to these views are persistent, however, so proceed with care. If you end up mangling a standard view beyond repair, it can be restored to its default by using the Reset button in the Manage All Views dialog box, which you can open by clicking Change View on the View tab and choosing Manage Views.
Note
For information about creating custom views in Outlook 2010, see Chapter 26.
Displaying the subject line of each journal item in a timeline view gives you additional information about those items without requiring you to point to each item with your mouse to display the ScreenTip-style label.
To display item labels on a monthly timeline, follow these steps:
In a timeline view, right-click in an empty area of the Journal folder, choose View Settings on the shortcut menu, and click Other Settings in the Advanced View Settings dialog box.
In the Format Timeline View dialog box, select the Show Label When Viewing By Month check box.
Note
By default, the label width is 80 characters, but if you find that your labels are too short or too long, return to this dialog box and change the number in the Maximum Label Width box. The label width applies to the labels in the day and week timeline, as well as the month timeline. To hide the display of week numbers as well, you can clear the Show Week Numbers check box.
Click OK to close the dialog box.
In some industries, it’s important to know schedules based on weeks of the year. You can show week numbers in your timeline view by following these steps:
With the journal displayed in a timeline view, right-click in an empty area of the Journal folder, click View Settings, and then, in the Advanced View Settings dialog box, click Other Settings.
In the Format Timeline View dialog box, select the Show Week Numbers check box.
Click OK twice to close the dialog box. In a monthly timeline, week numbers replace dates. In week and day views, both the week number and dates are displayed in the timeline header.
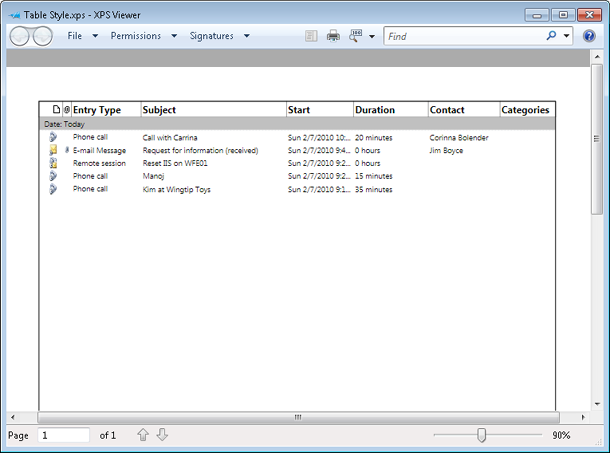
The options available when you print from the Journal folder depend on whether a timeline view or a table (list) view is currently open. In a table view, you can open and print individual items, print the entire list, or print only selected rows. Printing the table is useful if you want a snapshot of the journal for a specific period of time. You can print list views using either Table Style or Memo Style print styles (explained shortly).
Tip
You don’t have to open an item to print it. Simply right-click the item, and then choose Print from the shortcut menu.
In a timeline view, you can print individual journal items or several items at a time (hold down the Ctrl key and click to select multiple items). You can print one or more items, each on an individual page, in Memo Style, and you can print attached files along with the journal entry details. To print the attached files, select the Print Attached Files check box in the Print dialog box.
Note
For more information about printing views in Outlook 2010 and creating custom print styles, see Chapter 27.
Table Style, shown in Figure 22-15, is available from any table view. It prints the selected view just as you see it in Outlook 2010: each item in a separate row, with the fields displayed as columns. Table Style has limited configuration options. Note that in Figure 22-15, all the Journal items were printed to an .xps file using Table Style.
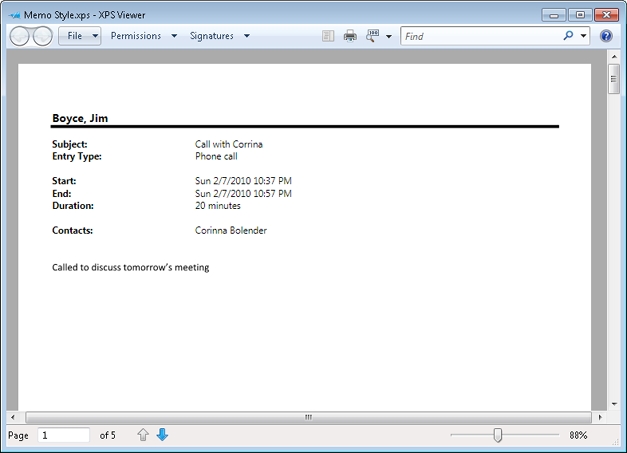
Memo Style, shown in Figure 22-16, prints one item per page, with your name as the title and the details of the record after that. Memo Style is a simple and quick one-item-at-a-time print style. You can specify the title and field fonts, paper options, and the contents and fonts used by the header and footer.
Printing from the Journal folder is not a particularly difficult task for anyone who has used and printed from any Windows-based application. However, you might be wondering how you can print just a selection of a table view. For example, you might need to print only the items that fall within a specific range or those associated with a particular contact.
Follow these steps to print a selection of a table view:
Open the table view.
Click columns as needed to sort the data to help you locate the items you want to print. For example, click the Start column header to locate items that fall within a certain time range, or click the Contact column header to locate items associated with a specific contact.
Select the first item in the range, hold down the Shift key, and then select the last item in the range.
Select Table Style in the Print Style area, and then click Print Options to open the Print dialog box.
Select the Only Selected Rows option.
Set other print options as needed, and then click Print.
Because the Outlook 2010 journal keeps track of activities using a timeline, you might find that it is one of the most useful of the Outlook 2010 folders to share. If you’re working on a project with several people, a shared Outlook 2010 Journal folder might be just what you need to make certain everyone is on track.
If you and all the people with whom you want to share the Journal folder use Microsoft Exchange Server, you can share the Journal folder.
Follow these steps to share a personal Journal folder:
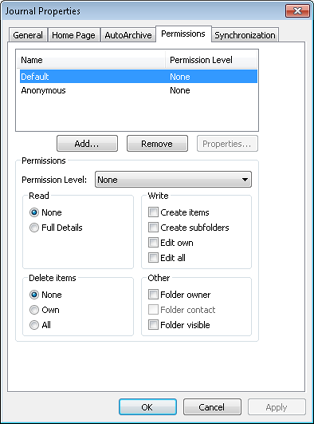
Right-click the Journal folder, and then choose Share, Folder Permissions to open the Permissions tab of the Journal Properties dialog box, as shown in Figure 22-17.
Click Default, and then select the desired options in the Permissions area to specify the types of tasks that all users can perform if they have no explicit permissions set.
Click Add to open the Add Users dialog box, select a user (or more than one), click Add, and then click OK to return to the Permissions tab.
With the user selected in the Name list, select permissions in the Permissions area to specify the tasks that this user can perform. You can select a Permission Level and then customize the permissions as needed.
Click OK to apply the permissions.
Note
For details about sharing folders, see the section Granting Access to Folders, on page 842.
If you want to invite specific people to share your journal, you can send them an email message to let them know that you have granted them permission to view your journal. You can also request to share their journals as part of this message. The permissions that you set control the types of access that will be allowed. The recipients of the message can accept or decline the invitation to share your journal and also decide whether to share their journals with you.
To invite someone to share your journal, follow these steps:
In Outlook 2010, open the Folder List.
Right-click the Journal folder, and then choose Share, Share Journal to create a Sharing Invitation email message.
Select the recipients, and then click Send to send the message.
If the recipients share their journals with you, there will be an Open This Journal option on the Sharing tab of the ribbon. When you view another person’s journal, a new group named People’s Journals is created in the Navigation pane, and a link to the other journal is added to it.
The journal can be a useful tool, helping you track how you spend your time over the course of the workday. This information, collected over time, can be used for a range of things such as reporting, billing, and staffing allocation. You can analyze your work activities to get a clearer picture of which projects and activities occupy your time and then use that data to optimize your time and productivity.
The more information that a journal item contains, the more useful it is. Get in the habit of entering critical information when you create a journal item, especially contacts, categories, and the contents of other fields used for organization and retrieval of journal items. It takes only a minute to make notes or update the time spent on an activity while it’s fresh in your mind, and by providing as much information as possible, you ensure that you have all the information you might need.
By using the journal regularly, you will also become more familiar with how it operates and what sort of data it is recording. Although the journal can accumulate a lot of information, both automatically and manually, it’s unlikely that it will store exactly what you want right after you start using it. Taking a few minutes on a regular basis to fine-tune your journal settings will pay off when it comes time to analyze the accumulated data. If you find yourself deleting a specific sort of entry more often than not, stop automatically recording it.
The journal offers automatic recording of certain Outlook 2010 activities and time spent editing Office system documents. Enabling automatic tracking of those items provides you with quite a bit of data with no additional effort. These options should be used judiciously, however, to ensure against collecting so much information that it becomes difficult to find the important items among the unneeded ones.
Tip
INSIDE OUT Set up automatic journaling for a new contact
When you create a new contact entry in your Outlook 2010 Contacts folder, click All Fields on the Contact tab. In the Select From drop-down list, select Frequently Used Fields, and then set the Journal field to Yes. This is the same as selecting the contact in the Journal Options dialog box; the journal will then record the types of activities that you selected.
It might be tempting to turn on all the automatic recording options for the journal so that you collect the maximum possible amount of information. Although you can do this, you might discover that doing so introduces a lot of unnecessary journal items. Outlook 2010 automatically records email messages, journal items, notes, and upcoming tasks and appointments for each entry in the Contacts folder, so in general you don’t need to record these items in the journal. You can view these items by opening the Contacts folder and selecting Activities in the Show group.
Note
If you want to export a file containing records of items like email messages and notes to work with in an Excel 2010 workbook or an and 2010 database, you must track these items using the journal. Although these activities can be viewed on the Activities page for a contact, you cannot export information to a file from there.
Similarly, you might want to be careful about automatically recording all work that you do in a certain type of document. If most of your work in Excel 2010 is on projects that you want to track with the journal, turning on automatic recording for Excel 2010 files is a good idea; you can delete the occasional unneeded journal item. If, on the other hand, most of your time in Word 2010 is spent on projects or tasks that don’t need to be tracked, you should create journal items manually for those few Word 2010 documents that actually need them.
The automatic recording feature of the journal works only with the contents of your primary Contacts folder, not with the Exchange Server Global Address List (GAL) or any secondary Contacts folders. If you want to record automatically journal items associated with people whose email addresses are in a secondary Contacts folder or provided by the GAL, you must first add them to your primary Contacts folder.
To copy or move contacts between folders, open the Outlook 2010 Contacts folder, and then select the source folder in the My Contacts list in the Navigation pane. Right-click an entry and drag it to the destination Contacts folder (by default, the primary Contacts folder is the top one in the list), and then select Move or Copy.
Although there are a number of entry types in the default journal configuration, there are likely to be additional entry types that you would find useful. You might want the ability to track things such as travel time or research as discrete entry types to make billing for those activities easier and more accurate. You should add custom entry types so that your journal reflects how you spend your time in greater detail. See the section Creating and Using Custom Entry Types, on page 581, for detailed information about creating additional entry types.
Once you have started to use the journal to track your activities, you can analyze your current time usage to find ways to increase your productivity. You are likely to discover some unexpected time leaks—things that consume an inordinate amount of your time. Identifying these time leaks is the first step in correcting them and getting better control over your work time.
By examining journal items in a variety of views, you can assess how much time a given project, client, or activity is currently taking. If you need more extensive analysis and reporting functionality, journal information can be exported to a file for use with external programs.
Choosing the right view for the job will make it easier for you to understand and use the information collected by the journal. There are a number of predefined views available, allowing you to choose the view that makes it easiest to review a particular set of items.
The journal provides two types of views by default:
Timeline views Journal items are displayed on a timeline, which can be set to show a single day, a week, or a month at a time, with items grouped by Entry Type, Contact, or Category. Timeline views are particularly good for looking at the specific tasks that occupied a given period of time and can be used to assess time usage and predict time allocation needs.
List views These views display journal items in a simple tabular format, making them useful for reviewing a large amount of data quickly. Entry List view displays all journal items, Last Seven Days view limits the display to the past week, and Phone Calls view shows only that type of entry.
Although the existing journal views provide a number of ways to look at your journal, you will probably want your own customized views of the information. To create a custom view, on the View tab, click Change View, Manage Views. In the Manage All Views dialog box, select New. Give the view a name, specify where the view can be used and to whom it will be visible, and then click OK. In the Advanced View Settings dialog box, configure the available options for your custom view, and then click OK.
Note
For detailed information about creating custom views in Outlook 2010, see Chapter 26.
You might want to analyze the information contained in the journal using a database or a spreadsheet application, each of which offers certain capabilities not available in Outlook 2010. If you need to perform mathematical calculations on your journal data, for example, you can export the information to Excel 2010. For database style analysis and reporting, you can create an Access 2010 database from journal information.
To export your journal, follow these steps:
In Outlook 2010, click File, Open, and choose Import to open the Import And Export Wizard.
In the Choose An Action To Perform list, select Export To A File, and then click Next.
In the Create A File Of Type list, select the Microsoft Access or Microsoft Excel file format, and then click Next.
In the Select A Folder To Export From list, select the Journal folder, and then click Next.
Enter a name for the exported file, and then click Next.
At this point, you can either click Finish to create the exported file or select Map Custom Fields if you want to customize the field mappings for the exported data. If you select Map Custom Fields, the Map Custom Fields dialog box will open, as shown in Figure 22-18, allowing you to drag a value from Outlook 2010 to a field in the exported document. To change the name of a mapped field, click the Field name in the To box and type the new name. After you have completed mapping the fields, you can click Next and review individual journal entries to verify that the mapping is correct. When you are satisfied with the field mappings, click OK to return to the Export To A File dialog box, and then click Finish to create the file.
