In this chapter, you will learn how to
• Research and spec out specialized PCs
• Install and upgrade Windows
• Describe Windows post-installation best practices
Techs build computers. We fix them too, of course, but very little beats the chance to show off our knowledge, research skill, and technical savvy like creating excellent custom PCs for clients.
This chapter puts together a lot of what you know about hardware from the previous 11 chapters and layers on the essential component that makes Windows PCs so excellent: Windows. Let’s start with customized PCs for specialized jobs, then turn to installing and upgrading Windows. The final section covers post-installation tasks.
Specialized computing needs require specialized PCs to get the job done well. Many techs specialize in rolling out (or deploying, in IT speak) PCs that do exactly what the customer needs.
This section looks first briefly at hardware considerations you should make, then turns to workstation PCs, such as thick clients and media workstations. The section finishes with a look at some specialized consumer PCs, such as home servers, home theaters, and gaming boxes.
The most difficult (and most fun) part of buying a PC is picking which parts you want. Knowing which parts to buy for each type of PC is essential. Let’s take a moment to consider the processes and steps you can use to discover and evaluate the right parts for specialized systems.
Every component has a review somewhere. Go to Google, type in the name and model number of a part, and add the word “review” at the end. There are two types of reviews: industry reviews written by professionals, and personal reviews written by people who purchased and use the part. Let the Google search I described show you how to the find the professional reviews. Newegg.com is one of my favorite places to read personal reviews.
Learn everything you can about the part. Take some time to read the technical specifications. Check the return and warranty policy of both the manufacturer and retailer. Make sure you have some recourse if the part breaks or doesn’t function as advertised.
Before you buy a part, see what folks say about the competitors’ parts. Are there other parts that cost less, have better reviews, or use less power?
If you’re lucky enough to live near a big retailer like Fry’s Electronics or Micro Center, go check out the part. Look for a display model. Look at the back of the box. See what extra parts are included. Talk to the salespeople about their experiences, the returns they’ve seen, and alternatives they like better.
In modern times, people need computers to get work done. The type of workstation a person needs depends on what types of tasks they need to perform with it and how the IT department has configured the organization’s network. The CompTIA A+ 901 exam defines the standard workstation types: thick clients, thin clients, virtualization workstations, and media workstations.
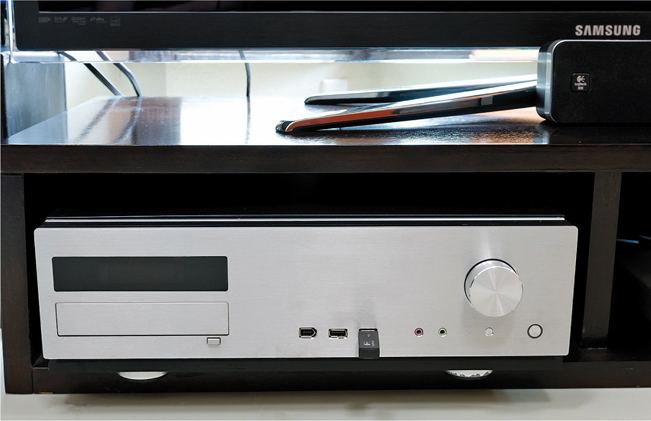
A standard thick client runs a modern operating system and general productivity applications to accomplish the vast majority of tasks needed by office and home users (see Figure 12-1). When most folks hear the term “PC,” the thick client comes to mind. Thick clients are the quiet workhorses of modern computing.
Figure 12-1 A typical thick client
The “thick” part of thick client doesn’t necessarily refer (these days) to the physical thickness of the computer case or system unit that houses everything. It means more that the computer can do what the user needs to get done, be it sending e-mail, searching the Web, writing papers, or doing taxes. With thick clients, you can readily add all sorts of capabilities just by installing new software.
A trip to a computer or electronics store will reveal that most contemporary components are powerful enough to build a useful thick client. Every mainstream motherboard designed for a PC, for example, has a ton of necessary features built in, such as memory slots, mass storage support, video, sound, networking, and plenty of USB ports for extensibility.
The key to a good thick client is sufficient core hardware to support the operating system and applications typical of an office or home-office environment. Table 12-1 shows the minimum hardware requirements for modern Windows (including up to Windows 10).
Table 12-1 Hardware requirements for Windows

EXAM TIP A standard thick client should meet or exceed the recommended hardware specifications for Windows and offer typical desktop applications, such as office productivity and network applications (like a Web browser and an e-mail client).
With just enough hardware and power to run the selected operating system and a few basic applications, a thin client is a system designed to outsource much of its work. Thin clients usually rely on resources from powerful servers, so they may not have hard drives, for example, or store any data. Thin clients often serve as single-purpose systems, like point of sale machines (cash registers). Another common example today is office workstations. A thin client might look like a thick client, but it requires fewer resources, thus making it cheaper and easier to deploy. Figure 12-2 shows a typical thin client.
Figure 12-2 Thin client in an office
Because the classic thin client relies on network connectivity and access to servers over those networks, we’ll revisit them when we get to networking in Chapters 20–23.
Virtualization is a powerful technology that enables you to run more than one operating system at the same time on a single computer. With virtualized servers, you can consolidate multiple, power-hungry machines into one box, saving floor space, electricity, and a lot of running around. With virtualization workstations, virtualization is most often used to run a second OS within the OS installed on the computer’s hard drive.
For good performance on a virtualization workstation, install lots and lots of RAM. Each virtualization workstation needs enough memory to run the native operating system, the guest operating system, and any applications running in either OS, so RAM is the most important thing in virtualization. A powerful 64-bit CPU with many cores also helps virtual machines run smoothly. Many desktop computers can run virtual machines, but if you want the best possible performance, you want lots of RAM and a good CPU.
EXAM TIP You’ll need lots of RAM—think maximum RAM—and a fast CPU with many cores to get great performance out of a virtualization workstation.
Chapter 18, “Virtualization,” discusses virtual machines in great detail. We’ll take the opportunity there to flesh out the discussion of virtualization workstations.
When George Lucas made the first Star Wars movie, he used camera tricks, miniature models, and stop-motion animation to create the illusion of massive spaceships and robots battling it out in a galaxy far, far away. Twenty years later, he filmed the Star Wars prequels in front of massive green screens and used computer-generated imagery (CGI) to transform the bland sets into exotic planets and space stations. I won’t get into an argument about which approach produced better movies, but the fact remains that the act of creating films has changed. It’s not just films, either—computers have changed the way we create all types of media, including movies, television shows, photography, music, and more.
If you want to get involved in this creative revolution, you’re going to need a powerful computer. Workstations for creative professionals are customized for the type of media they create. We’ll start by looking at graphics workstations and then move on to audio-/video-editing workstations.
Graphics Workstations Professional photographers and graphic designers generally work with pretty hefty files, so at its core, a graphics workstation requires a fast, multicore CPU and maximum RAM. Because designers work visually, add to that mix the need for high-end video components. Finally, throw in specialized software to make it all work. Professional photographers use Adobe Photoshop and Adobe Lightroom. Graphics engineers have a few other options, but they fall into computer-aided design (CAD) and computer-aided manufacturing (CAM) categories.

NOTE CAD/CAM software programs enable engineers to create and build components in an industrial setting.
Graphics designers need to have the clearest view possible of their images and image-editing software. Whether you’re editing photos in Adobe Photoshop or drafting mechanical components in SolidWorks, you need to make sure you can see what you’re working on! Because of this, a primary need for a graphics workstation is a large, high-quality monitor. A $200 LCD panel from Best Buy won’t help you here—you need to make sure that the colors you see on the screen are as accurate as possible.
Chapter 19, “Display Technologies,” covers all the various high-end video components, such as IPS monitors and multi-thousand-dollar graphics workstation video cards. We’ll reopen the discussion on graphics workstations in that chapter.
Audio Editing Workstations The requirements for audio editing workstations are very similar to those for graphics workstations—a fast, multicore CPU, gobs of RAM, and a large monitor. Plus, you need a large, fast hard drive. Add to that the need for a high-quality audio interface.
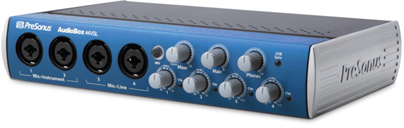
An audio interface is a box that you hook up to a PC with inputs that enable you to connect professional microphones and instruments (see Figure 12-3). Functionally, an audio interface is just a really high-end sound card, though they usually connect to your computer via USB or FireWire rather than plugging into the motherboard. Audio interfaces range in size from an interface you can fit in your hand to one that will take up most of your desk. A more expensive interface includes more inputs and produces higher-quality sound, though you’ll also need some expensive speakers to hear the difference.
Figure 12-3 Audio interface device (photo courtesy of PreSonus)
Just like with graphics workstations, audio editing workstations frequently make use of specialized input devices. These devices, referred to as control surfaces, mimic the look and feel of older, analog mixing consoles. They have a large number of programmable inputs that make controlling the software much faster and more accurate than with just a mouse and keyboard. These control surfaces range in size from small desktop units, all the way up to room-filling behemoths that are used in recording studios. Some of these boards also contain an audio interface.
Video Editing Workstations Video editing workstations combine the requirements of a graphics workstation and an audio editing workstation. Video editors often use two or more color-calibrated monitors so they can view the video stream they’re working on with one monitor and see their video editor open on the other, making multiple monitors very useful. Video editing workstations require a very powerful CPU paired with as much RAM as possible, since video editing is a far more intensive process than graphics or audio editing. High-speed, high-capacity hard drives are also life-savers, since video files often take up multiple gigabytes of space. Many video editing workstations have multiple hard drives set up in a RAID array for added storage capacity and enhanced read/write speed.
Video editing workstations, like CAD/CAM workstations, benefit enormously from a professional-level graphics card. This is almost as important as the fast CPU and piles of RAM, and you’ll rarely see a video editing workstation without one.
Because video editing workstations are frequently used as audio editing workstations, too, you will often find video editing workstations with the same audio interfaces and control surfaces as you’d see on an audio editing workstation. There are also video interfaces that enable editors to connect to various cameras. Additionally, many video editors use custom keyboards that have special labels and controls for popular video editing software.
EXAM TIP The CompTIA A+ 901 objectives combine audio and video editing workstations into a single thing. They often do double duty, so that’s cool, and keep that in mind for the exam. In practice, you’ll find dedicated audio editing workstations and dedicated video editing workstations, as well as the combined units.
Once you move away from the office and into the house, computing needs change. Home is for leisure, and the workplace is for, well, work! The three common types of home systems are home servers that store everything from your music collection to last year’s income tax return, home theater PCs to play music and movies, and gaming PCs to play powerful, video-intensive games.
How many computing devices are in your house right now? If you’re like me, the answer is “a lot.” Between multiple smartphones, iPods, tablets, portables, and desktop computers, you might shock yourself with the count.
As more and more computing devices move into the home environment, there’s a need for a centralized storage space, a home server PC to dish out files and folders on demand—a place for all your media to stream to multiple devices. This home server PC has very specialized needs that take it beyond the typical thick client.
A home server PC supplies three discrete functions: media streaming, file sharing, and print sharing. Media streaming can use specialized software, but, just like file and print sharing, it works fine through the default tools in Windows and Mac OS X. The home server PC has to have a very fast network connection and gobs of storage. Plus, that storage needs to be fault tolerant. Losing your video collection because of a hard drive crash would make for a very bad day.
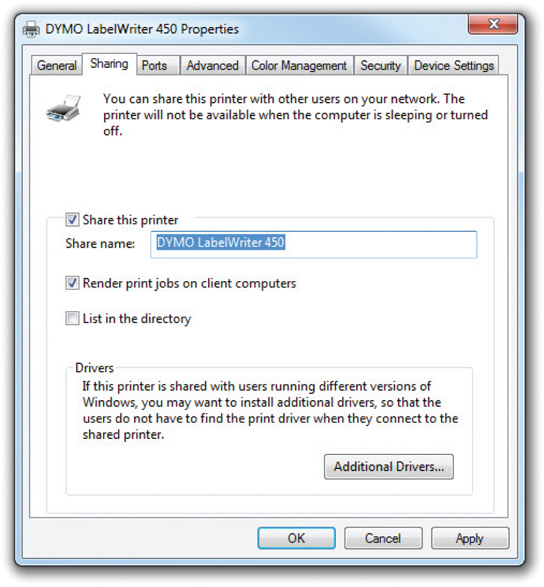
Software Any modern operating system enables you to share files and folders through standard sharing features. The same is true of sharing a printer. To turn a PC into a print server, open the Devices and Printers applet in the Control Panel, right-click on an installed printer, choose Printer properties, and then check the Share this printer checkbox on the Sharing tab (see Figure 12-4).
Figure 12-4 Sharing a printer
You can easily turn a Windows PC into a media streaming server by selecting that option in the Control Panel. Open the Network and Sharing Center, select the Change advanced sharing settings link from the left Task menu, and then click the Home or Work option to get to the Advanced sharing settings screen (see Figure 12-5).
Figure 12-5 Advanced sharing settings
Half way down the screen you’ll find a link to Choose media streaming options. Click it. Figure 12-6 shows the Media streaming options screen. By default, Windows wants to share everything, though you can customize what’s shared in case you have young children and don’t want them to have access to inappropriate content.
Figure 12-6 Media streaming options
Finally, both Windows Media Player and iTunes have a feature to share media files on a local network. Figure 12-7 shows iTunes sharing via the Bonjour protocol.
Figure 12-7 Streaming with iTunes
Hardware Hardware needs on a home server PC apply primarily to the network speed and hard drive redundancy, at least according the CompTIA objectives. If you have a very active server, you should also pay attention to the amount of RAM it has and the speed of the CPU. Beefing both up above the standard thick client can help if you start getting some lag.
EXAM TIP You don’t need to care at all about the video card in a home server PC. Anything will do because you’re not going to run anything visual directly on the server.
For the network, a wired Gigabit Ethernet NIC should be standard issue. Although it sounds cool to go wireless, you should limit the use of wireless to the single connection between the wireless access point and the client. The home server should connect via Ethernet to minimize any lag or dropped frames.
A file server’s hard drives do the heavy and sustained lifting for the PC, so you should not stint on them. At a minimum, get two drives of identical size that have as much capacity as you can afford. No one reduces the amount of media in his or her collection over time, after all, especially if it’s stored electronically. Plus, because you need fault tolerance on the data, you simply must use a RAID 1 configuration at a minimum (and thus the need to get two identical drives). If your budget can afford it and your motherboard supports it, get four identical drives and run in RAID 10.
You’ll recall from Chapter 10 that Windows 8/8.1/10 offer Storage Spaces and storage pools where you can toss in any number of drives and create an array. If you do this sensibly, like putting three 4-TB drives into a pool and creating a single Storage Space, you’re essentially creating an excellent RAID 5 array.
A home theater system enables you to play music and watch movies and television. If done well, the experience can rival that of watching a movie at a fine movie house. When coupled with a home theater PC, the home theater system enables the full computing experience as well.
An optimal home theater has five components:
• A monitor, television, or projector
• Surround sound speakers
• A stereo receiver
• A home theater PC
• Network connectivity (such as a cable box or Ethernet)
This section looks at the specific components and issues involved with creating a home theater PC and connecting it to other components.
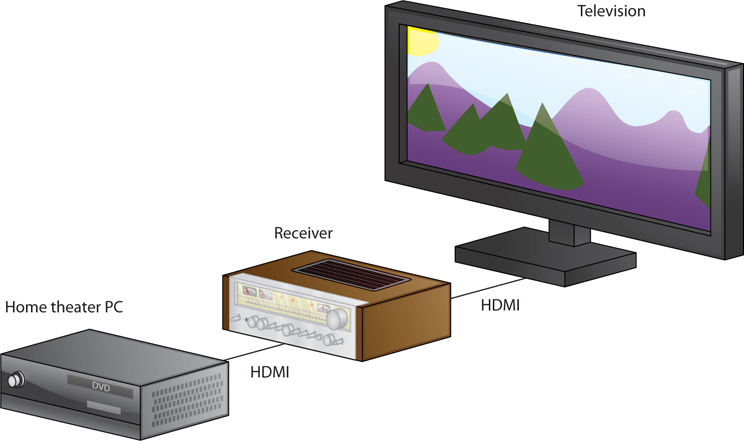
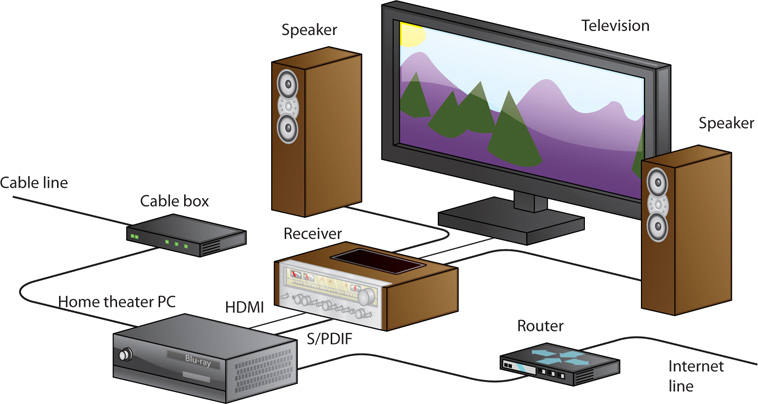
Output Killer Video A home theater PC must provide support for large monitors at high resolution, a requirement that usually involves an HDMI connector on the video card (see Figure 12-8). The HDMI cable connects the home theater box to the stereo receiver, which then pushes the signal to the television. Figure 12-9 shows the basic home theater schematic.
Figure 12-8 HDMI output on video card
Figure 12-9 Television, receiver, home theater PC
Play It Loudly A great home theater system simply must have surround sound and a thumping subwoofer, so the home theater PC needs a sound card or built-in sound processor that supports 5.1 or 7.1 stereo. For the best output, the sound card connects to the stereo receiver via S/PDIF, through either the optical connector or coaxial connector. The speakers then connect to the receiver. Figure 12-10 shows the schematic with speakers added.
Figure 12-10 PC, receiver, speakers
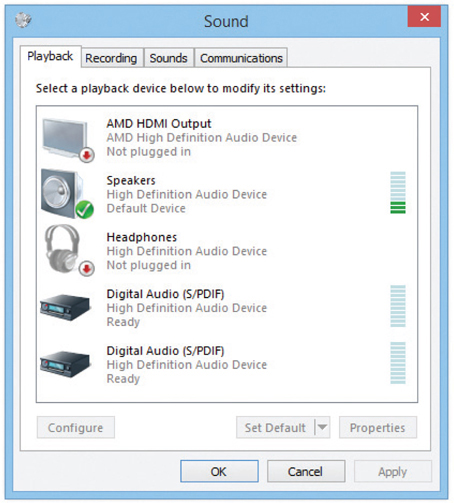
HDMI carries both the video signal and the surround sound audio signal, so if you plug it into the television directly from the PC, the rig will use the television’s speakers by default. If you have the surround sound speakers plugged into the computer rather than a receiver, you need to go into the Sound applet in the Control Panel to select the playback device you prefer (see Figure 12-11).
Figure 12-11 Sound applet for choosing playback device
Look Cool in the Process Home theater components look like traditional stacking stereo components, such as a receiver, equalizer, DVD player, and so on. It simply won’t do to put a beige office computer case alongside your sleek, black-clad components (see Figure 12-12).
Figure 12-12 This is not right!
You can get a case for a PC that stacks nicely with other home theater components (see Figure 12-13). CompTIA calls this style of case an HTPC, although that’s not an industry-standard form factor. The letters stand for home theater PC.
Figure 12-13 HTPC case
Access the Media—Streaming and TV The home theater PC needs access to content, usually through Gigabit Ethernet to get streaming media from the home server PC you created in the previous section of the chapter. The home theater could use Wi-Fi (802.11n or 802.11ac), though wired is best, especially for high-definition (HD) content. (See Chapter 22, “Wireless Networking,” for the details on … wireless networks.)
The home theater PC wouldn’t normally have anything to do with a signal from the cable company or from a dedicated optical disc player, like a Blu-ray Disc box. Those signals go from the applicable box to the stereo receiver directly.
The only time the home theater PC should receive a television signal directly is through broadcast over the air. For this signal, the PC needs a TV tuner, like you learned about in Chapter 11, “Essential Peripherals.” You would use this to catch local news or sports programs.
Figure 12-14 shows the home theater schematic with all the media access methods included.
Figure 12-14 Final home theater
Software Tools for Playback Once you have the media center hardware set up properly, you need software to access streaming media. Microsoft includes Windows Media Center in some editions of Windows. If you don’t have one of those editions, then you need to use a third-party tool, such as the excellent Kodi (XBMC) or Plex.
NOTE Microsoft dropped support for both DVD playback and Windows Media Center in Windows 10. If you want to use a Windows 10 machine for a home theater system, you’ll need to use Kodi or Plex.
Kodi in particular enables you to customize the look and feel of the interface, and many people have made awesome skins available. Figure 12-15 shows the default skin for Kodi; Figure 12-16 shows the same content but displayed with a completely different skin. Plex is not flashy, but it’s totally functional. There are versions of Kodi and Plex available for Windows, Mac OS X, and Linux. You can download Kodi from http://kodi.tv. Get Plex at http://plex.tv.
Figure 12-15 Default Kodi feeling retro on YouTube
Figure 12-16 Kodi sporting the Arctic: Zephyr skin
And now for the grand finale, the PC you’ve been waiting for, the system you’ve always wanted to build. As an aspiring PC tech, you probably took your first apprehensive steps into the dark underbelly of PCs with a game: Minecraft, Grand Theft Auto, Team Fortress 2, Borderlands 2, World of Warcraft … you’ve played at least one of them. While casual gamers can get by with a standard desktop PC (like the thick client you read about earlier), those who take their gaming seriously want a powerful PC ready to pump out the latest graphics. A gamer goes through a game’s graphics settings and sets everything to the max. And since games aren’t all about how good they look, you’ll also want a good sound card and headphones. Okay—you also need a good game, but one thing at a time.
So here’s a list of essential features for a gaming PC:
• Fast, multicore processor
• A lot of memory, at least 8 GB, 16 GB for good measure, and 64 GB if you plan to play five games at once
• High-end video card with a specialized graphics processor unit (GPU) for gaming
• High-definition sound card to provide optimal positional audio
We haven’t covered the GPUs yet, so I’ll leave those until Chapter 19. The rest of the pieces should make a lot of sense at this point. Remember the high-end CPUs from Chapter 4, “Microprocessors”? Crank them up and throw on some high-end cooling, like a purpose-built water cooling rig, to give a gaming system the foundation for greatness.
Once you have the hardware lined up for whichever specialized PC you want to build, it’s time to install an operating system. For most computers, you’ll want to install a version of Windows—and the appropriate edition within each version. This section looks at media selection, types of installation, then the installation and upgrade process. It completes with a discussion on troubleshooting installations.
At its most basic, a Windows installation has two steps. First, boot the system from the OS installation media. Second, answer the installation wizard’s initial queries and let it do its thing. At the end of the 10- to 40-minute process, you’ll be looking at a Welcome screen (see Figure 12-17) and be ready to begin your love affair with the PC.
Figure 12-17 Windows 10 welcome screen
EXAM TIP Successful installation results in a properly formatted boot drive with the correct partitions/formats.
Windows offers a surprising number of boot methods, giving you many options to get the process started. The most common way to start—historically at least—is to insert a Windows DVD, change the boot order in the System Setup Utility (CMOS), and power up the system. Current systems make this even easier; most have a hot key you press just after the system powers on to enable you to select the preferred boot device. No need to mess with the System Setup Utility at all.
Alternatively, you can boot to any number of other removable drives that plug into USB, FireWire, eSATA, or Thunderbolt ports. That includes flash-media drives, external hard drives, or external solid-state drives. Any number of external/hot-swappable drives will do the job.
NOTE Microsoft has shifted with the times. The primary way to install Windows 10 is downloading an ISO image and writing that image to some bootable media. With the Windows Media Creation Tool (a quick download from Microsoft), you can easily make that bootable media a DVD or USB flash drive.
Don’t have an optical drive? No problem. You can access Windows installation files over a network. See “Installing Over a Windows Network,” a little later in this chapter, for details.
Finally, many system builders add a small, hidden partition to the primary hard drive containing an image of the factory-fresh version of Windows. In the event of a corrupted or very messy instance of Windows, you can reboot, access this recovery partition, and reinstall Windows. Chapter 17, “Troubleshooting Operating Systems,” covers recovery partitions and other forms of restoration in some detail.
EXAM TIP The CompTIA A+ 220-902 exam objectives offer “internal hard drive (partition)” as a viable boot method for installing Windows. My best guess is that they mean the hidden recovery partition.
You can install Windows in several ways. A clean installation of an OS involves installing it onto an empty hard drive or completely replacing an existing installation. An upgrade installation means installing an OS on top of an earlier installed version, thus inheriting all previous hardware and software settings. You can combine versions of Windows by creating a multiboot installation. Installing usually involves some sort of optical disc, but other methods also exist. Let’s look at all the options.
A clean installation means your installation ignores a previous installation of Windows, wiping out the old version as the new version of Windows installs. A clean installation is also performed on a new system with a completely blank hard drive. The advantage of doing a clean installation is that you don’t carry problems from the old OS over to the new one. The disadvantage is that you need to reinstall all your applications and reconfigure the desktop and each application to the user’s preferences. You typically perform a clean installation by setting CMOS to boot from the optical drive before the hard drive. You then boot off of a Windows installation disc, and Windows gives you the opportunity to partition and format the hard drive during the installation process.
NOTE The CompTIA A+ 902 objectives mention refresh/restore as an appropriate method of installing Windows, and in some scenarios this is true. Both refresh and restore install some or all of an operating system as an attempt to fix an OS that’s not functioning properly. We’ll cover System Restore in detail in Chapter 15 and tackle Refresh your PC when we hit troubleshooting in Chapter 17.
In an upgrade installation, the new OS installs into the same folders as the old OS, or in tech speak, the new installs on top of the old. The new OS replaces the old OS but retains data and applications and also inherits all of the personal settings (such as font styles, desktop themes, and so on). The best part is that you don’t have to reinstall your favorite programs.
Microsoft makes a compatibility tool called the Windows Upgrade Advisor for each version of Windows that enables you to scan your current hardware to see if it can handle upgrading to a new version of Windows. (It’s called the Upgrade Assistant in Windows 8/8.1. Inexplicably, CompTIA calls it the Windows upgrade OS advisor.) Do a quick search and download the tool from Microsoft if you’re thinking about upgrading.
Many tech writers refer to the upgrade process as an in-place upgrade. Upgrades aren’t always perfect, but the advantages make them worthwhile if your upgrade path allows it.
EXAM TIP Microsoft often uses the term in-place upgrade to define an upgrade installation, so you might see it on the CompTIA A+ 902 exam. On the other hand, Microsoft documentation also uses the term for a completely different process, called a repair installation, so read whatever questions you get on the exam carefully for context. For repair installations, see Chapter 17.
To begin the upgrade of Windows, you should run the appropriate program from the optical disc. This usually means inserting a Windows installation disc into your system while your old OS is running, which autostarts the installation program. The installation program will ask you whether you want to perform an upgrade or a new installation; if you select new installation, the program will remove the existing OS before installing the new one.
A third option that you need to be aware of is the dual-boot or multiboot installation. This means your system has more than one Windows installation and you may choose which installation to use when you boot your computer. Every time your computer boots, you’ll get a menu asking you which version of Windows you wish to boot.
You’ll recall from Chapter 10 that Windows enables you to shrink the C: partition, so if you want to dual boot but have only a single drive, you can make it happen even if Windows is already installed and the C: partition takes up the full drive. Use Disk Management to shrink the volume and create another partition in the newly unallocated space. Install another copy of Windows to the new partition.
Apple makes an excellent tool called Boot Camp that enables you to install Windows on an Apple machine. Once you run through the Windows installation, Boot Camp enables you to decide when you start up the computer each time whether you want to run Mac OS X or Windows. Choose Boot Camp if you have some Windows-only program that you simply must run and your only computer is an Apple.
You can also multiboot Windows and Linux. The Linux installers add this multiboot capability by default. Just note that the reverse is not true. You need to install Windows first, then install Linux.
NOTE When configuring a computer for multibooting, there are two basic rules: first, you must format the system partition in a file system that is common to all installed operating systems; and second, you must install the operating systems in order from oldest to newest (or from Windows to other).
In medium to large organizations, more advanced installation methods are often employed, especially when many computers need to be configured identically. A common method is to place the source files in a shared directory on a network server. Then, whenever a tech needs to install a new OS, he or she can boot up the computer, connect to the source location on the network, and start the installation from there. This is called generically a remote network installation. This method alone has many variations and can be automated with special scripts that automatically select the options and components needed. The scripts can even install extra applications at the end of the OS installation, all without user intervention once the installation has been started. This type of installation is called an unattended installation.
Another type of installation that is very popular for re-creating standard configurations is an image deployment. An image is a complete copy of a hard drive volume on which an operating system and any desired application software programs have been pre-installed. Images can be stored on optical discs or USB flash drives, in which case the tech runs special software on the computer that copies the image onto the local hard drive. Images can also be stored on special network servers, in which case the tech connects to the image server by using special software that copies the image from the server to the local hard drive. A leader in this technology for many years was Norton Ghost, which was available from Symantec. Symantec now offers Symantec Ghost Solution Suite. Other similar programs are Clonezilla and Acronis’s True Image.
At the most basic level, installing any operating system follows a fairly standard set of steps. You turn on the computer, insert an operating system disc into the optical drive or access the media some other way, and follow the installation wizard until you have everything completed. Along the way, you’ll accept the End User License Agreement (EULA) and enter the product key that says you’re not a pirate; the product key is invariably located on the installation disc’s case.
With four (or five) active Windows versions in the wild (plus the officially retired Windows XP on a zillion machines), all with multiple editions in both 32- and 64-bit, techs can spend a lot of time figuring out if a client’s computer can upgrade from X to Y. The following tables outline the upgrade options from Windows Vista and 7 to Windows 8 and 8.1. (See the “Beyond A+” section at the end of this chapter for the scoop on Windows 10.) Note that you can always do a clean install as long as the system meets the hardware requirements for the new OS. Just make sure everything important is backed up first.
The first thing to note is that the bit size of the currently installed OS must match the bit size of the upgrade OS. So you can upgrade from 32-bit Windows Vista to 32-bit Windows 7, or from 64-bit Windows 7 to 64-bit Windows 8. You can’t upgrade from 32-bit anything to 64-bit anything else, or vice versa. When we get into the versions and editions, it gets a little more complicated.
Table 12-2 outlines the upgrade paths from Windows Vista to Windows 7.
Table 12-2 Upgrading from Windows Vista to Windows 7
If you have Windows 7 and you want to upgrade to a higher edition with more features—from Windows 7 Home Premium to Windows 7 Ultimate, for example—you can use the built-in Windows Anytime Upgrade feature. You can find this option pinned to the Start menu. Don’t forget your credit card!
Table 12-3 outlines the upgrade paths from Windows 7 to Windows 8.
Table 12-3 Upgrading from Windows 7 to Windows 8
You can upgrade from Windows 8 to Windows 8.1 pretty easily, keeping all your applications and personal files. Upgrading from previous versions? I suggest you back up your stuff and do a clean installation. Table 12-4 outlines the upgrade paths from Windows 7/8/8.1 to various Windows 8.1 editions.
Table 12-4 Upgrading from Windows 7/8/8.1 to Windows 8.1
The Windows installer in Vista and all later versions of Windows has a full graphical interface, making it easy to partition drives and install an operating system. You already saw some of this process back in Chapter 10, but this chapter will go into a bit more detail.
The installation methods for Windows Vista/7/8/8.1/10 are so close to identical that it would be silly to address them as separate entries in this book. Only the splash screens and the product-key entry dialog box have changed between Windows Vista and Windows 8! Because of this trivial difference, showing the installation process for all operating systems would waste paper. This walkthrough uses the Windows Vista screenshots just because you might never see them anywhere else.
Start by booting your computer from some sort of Windows installation media. Usually, you’ll use a DVD disc, though you can also install Windows from a USB drive, over a network, or even off of several CD-ROMs that you have to specially order from Microsoft. When you’ve booted into the installer, the first screen you see asks you to set your language, time/currency, and keyboard settings, as shown in Figure 12-18.
Figure 12-18 Windows Vista language settings screen
The next screen enables techs to start the installation disc’s repair tools (see Figure 12-19). You’ll learn more about those tools in Chapter 17, but for now all you need to know is that you click where it says Repair your computer to use the repair tools. Because you’re just installing Windows in this chapter, click Install now.
Figure 12-19 The Windows Vista setup welcome screen
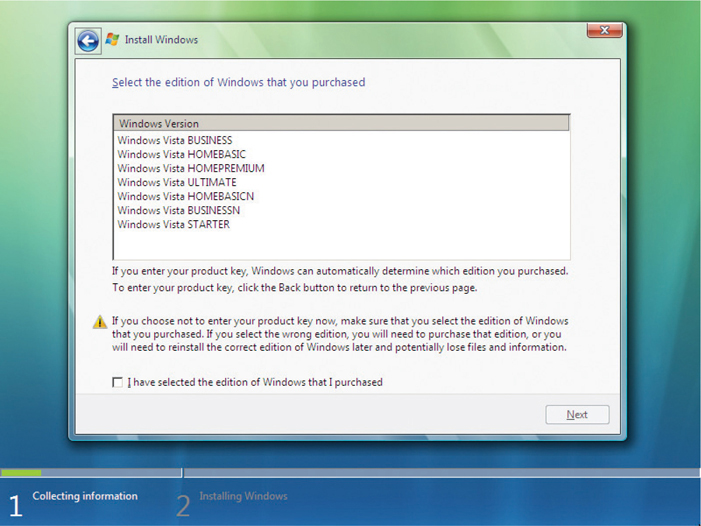
The next screen on Vista will prompt you to enter your product key before you do anything else, as you can see in Figure 12-20. Starting with Windows 7, this doesn’t come until much, much later in the process, and there’s a very interesting reason for this change.
Figure 12-20 The Windows Vista product key screen
Every Windows installation disc contains all of the available editions within a version. The product key not only verifies the legitimacy of your purchase; it also tells the installer which edition you purchased.
If you leave the product key blank and click the Next button, you will be taken to a screen asking you which version of Windows Vista you would like to install (see Figure 12-21). (Windows 7/8/8.1, however, disables this option—while every version is on the disc, you can only install the edition named on the box or disc label.) And lest you start to think that you’ve discovered a way to install Windows without paying for it, you should know that doing this simply installs a 30-day trial of the operating system (at least for Windows Vista and Windows 7–starting with Windows 8 a key is required to install). After 30 days, you will no longer be able to boot to the desktop without entering a valid product key that matches the edition of Windows you installed. Microsoft ditched the 30-day grace period in the retail copies of Windows 8, mandating that users provide a product key during setup.
Figure 12-21 Choose the edition of Vista you want to install.
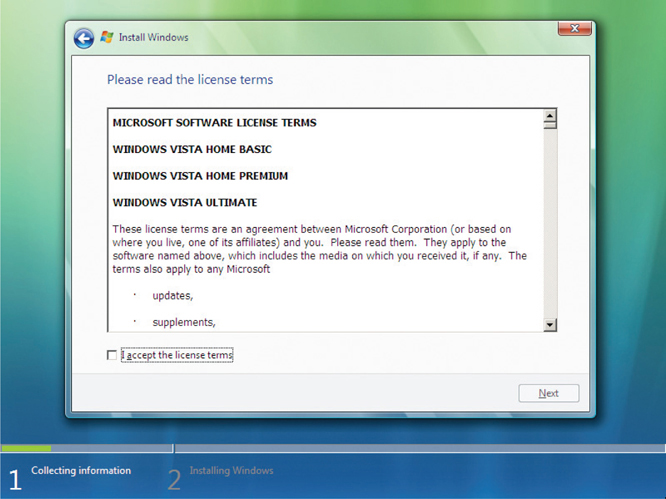
After the product key screen, you’ll find Microsoft’s EULA, shown in Figure 12-22, which you can skip.
Figure 12-22 The Vista EULA
On the next page, you get to decide whether you’d like to do an upgrade installation or a clean installation (see Figure 12-23). As you learned earlier, you have to begin the installation process from within an older OS to use the Upgrade option, so this option will be dimmed if you’ve booted off of the installation disc. To do a clean installation of Windows, edit your partitions, and just generally install the OS like a pro, you choose the Custom (advanced) option.
Figure 12-23 Choose your installation type.
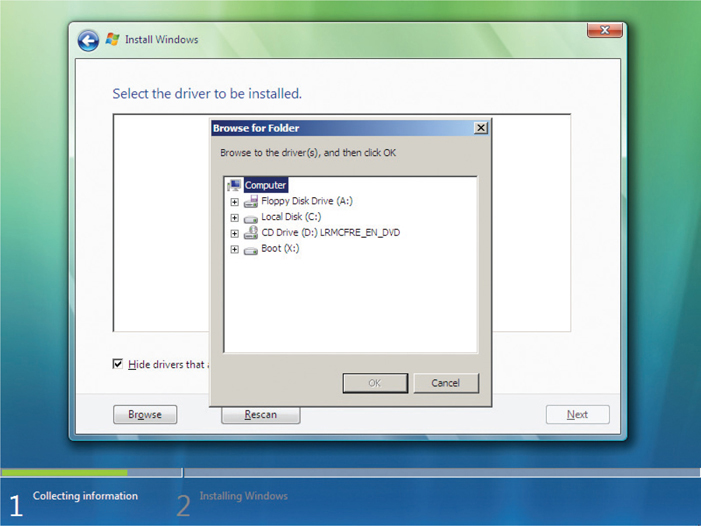
You may remember the next screen, shown in Figure 12-24, from Chapter 10. This is the screen where you can partition your hard drives and choose the partition to which Windows will install. From this screen, you can click the Drive options (advanced) link to display a variety of partitioning options, and you can click the Load Driver button to load alternative, third-party drivers. The process of loading drivers is pretty straightforward: you just browse to the location of the drivers you want by using Windows’ very familiar browsing window (see Figure 12-25).
Figure 12-24 The partitioning screen
Figure 12-25 Browse for drivers.
Of course, you will most likely never have to load drivers for a drive, and if it is ever necessary, your drive will almost certainly come with a driver disc and documentation telling you that you’ll have to load the drivers.
Once you’ve partitioned your drives and selected a partition on which to install Windows, the installation process takes over, copying files, expanding files, installing features, and just generally doing lots of computerish things. This can take a while, so if you need to get a snack or read War and Peace, do it during this part of the installation.
NOTE It doesn’t take that long to install Windows. Each version so far is snappier than its predecessor, especially on an SSD.
When Windows has finished unpacking and installing itself, it asks you to choose a user name and picture (see Figure 12-26). This screen also asks you to set up a password for your main user account, which is definitely a good idea if you’re going to have multiple people using the computer.
Figure 12-26 Choose a user picture.
After picking your user name and password, and letting Windows know how much you like pictures of kitties, you’re taken to a screen where you can type in a computer name (see Figure 12-27). By default, Windows makes your computer name the same as your user name but with “-PC” appended to it, which in most cases is fine.
Figure 12-27 Choose your computer name.
This is also the screen where you can change the desktop background that Windows will start up with. You can change this easily later on, so pick whatever you like and click the Next button.
At this point, Windows 7/8/8.1 will ask for your product activation key. On Windows Vista, you did this at the beginning of the installation.
The next page asks you how you want to set up Windows Automatic Updates (see Figure 12-28). Most users want to choose the top option, Use recommended settings, as it provides the most hassle-free method for updating your computer. The middle option, Install important updates only, installs only the most critical security fixes and updates and leaves the rest of the updates up to you. This is useful when setting up computers for businesses, as many companies’ IT departments like to test out any updates before rolling them out to the employees. You should only select the last option, Ask me later, if you can dedicate yourself to checking weekly for updates, as it will not install any automatically.
Figure 12-28 The automatic updates screen
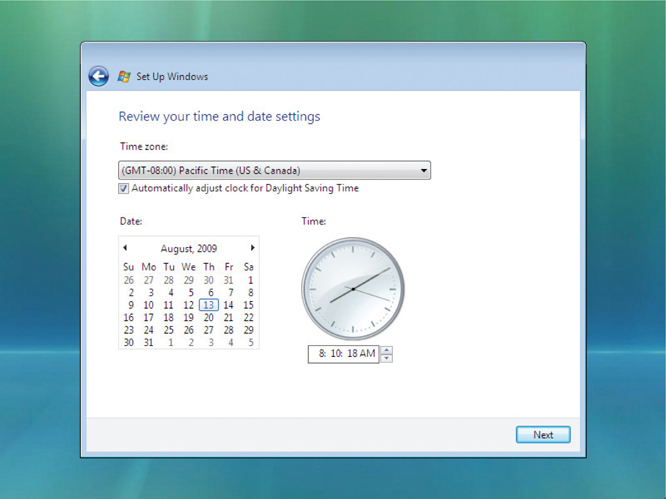
Next up is the time and date screen, where you can make sure your operating system knows what time it is, as in Figure 12-29. This screen should be pretty self-explanatory, so set the correct time zone, the correct date, and the correct time, and move to the next screen.
Figure 12-29 Vista pities the fool who doesn’t know what time it is.
If you have your computer connected to a network while running the installer, the next screen will ask you about your current location (see Figure 12-30). If you’re on a trusted network, such as your home or office network, make the appropriate selection and your computer will be discoverable on the network. If you’re on, say, a Starbucks’ network, choose Public location so the caffeine addicts around you can’t see your computer and potentially do malicious things to it.
Figure 12-30 Tell Windows what kind of network you’re on.
Once you’re past that screen, Windows thanks you for installing it (see Figure 12-31), which is awfully polite for a piece of software, don’t you think?
Figure 12-31 Aw, shucks, Microsoft Windows Vista. Don’t mention it.
Lest you think you’re completely through the woods, Windows Vista and 7 will run some tests on your computer to give it a performance rating, which, in theory, will tell you how well programs will run on your computer. You’ll sometimes see minimum performance ratings on the sides of game boxes, but even then, you’re more likely to need plain, old-fashioned minimum system requirements. This process can take anywhere from 5 to 20 minutes, so this is another one of those coffee-break moments in the installation process.
Once the performance test finishes, Windows Vista or 7 boots up and you have 30 days to activate your new operating system if you didn’t do so during installation. After 30 days, Windows will go into a non-genuine mode, which reduces the functionality of unverified Windows installations.
NOTE When it comes right down to it, you don’t need a performance rating on your computer (and the option doesn’t even exist beyond Windows 7). If you don’t want to waste your time, use the ALT-F4 keyboard shortcut to skip this step.
Techs working for big corporations can end up installing Windows a lot. When you have a hundred PCs to take care of and Microsoft launches a new version of Windows, you don’t want to have to walk from cubicle to cubicle with an installation disc, running one install after the other. You already know about automated installations, but network installations take this one step further.
Imagine another scenario. You’re still a tech for a large company, but your boss has decided that every new PC will use an image with a predetermined set of applications and configurations. You need to put the image on every workstation, but most of them don’t have optical drives. Network installation saves the day again!
The phrase “network installation” can involve many different tools depending on which version of Windows you use. Most importantly, the machines that receive the installations (the clients) need to be connected to a server. That server might be another copy of Windows Vista, 7, 8, 8.1, or 10; or it might be a fully fledged server running Windows Server 2008, 2008 R2, 2012, and so on. The serving PC needs to host an image, which can either be the default installation of Windows or a custom image, often created by the network administrator.
All of the server-side issues should be handled by a network administrator—setting up a server to deploy Windows installations and images goes beyond what the CompTIA A+ exams cover.
Booting with PXE On the client side, you’ll need to use the Preboot Execution Environment (PXE). PXE uses multiple protocols such as IP, DHCP, and DNS to enable your computer to boot from a network location. That means the PC needs no installation disc or USB drive. Just plug your computer into the network and go! Okay, it’s a little more complicated than that.
To enable PXE, you’ll need to enter your BIOS System Setup. Find the screen that configures your NIC (which changes depending on your particular BIOS). If there is a PXE setting there, enable it. You’ll also need to change the boot order so that the PC boots from a network location first.
NOTE Not every NIC supports PXE. To boot from a network location without PXE, you can create boot media that forces your PC to boot from a network location.
When you reboot the PC, you’ll see the familiar first screens of the boot process. At some point, you should also see an instruction to “Press F12 for network boot.” (It’s almost always F12.) The PC will attempt to find a server on the network to which it can connect. When it does, you’ll be asked to press F12 again to continue booting from the network, as you can see in Figure 12-32.
Figure 12-32 Network boot
Depending on how many images are prepared on the server, you’ll either be taken directly to the Windows installation screen or be asked to pick from multiple images. Pick the option you need, and everything else should proceed as if you were installing Windows from the local optical drive.
[cue interlude]
I know, I know. CompTIA 220-902 exam objective 1.2 specifically poses a scenario where you install a Windows PC OS, but CompTIA snuck in one tiny Mac OS X option. So let’s take a very brief detour from Happy Town and look at an important Apple tool.
NetBoot enables you to do some amazing installation types for Mac OS X over a network. With this tool, you can boot a bunch of identical Mac OS X machines remotely—so they have the look and feel you want. Any user-generated content on them simply goes away when you reboot the machines. This is a great tool for a classroom or conference.
Secondly, you can load identical images on multiple Macs, installing OS X on the hard drives of many remote systems. This is great when you’re rolling out a new corporate default build, for example, at the enterprise level.
Finally, you can use NetBoot to push specific applications to many computers at once. This is huge for product rollout throughout any organization.
Expect to see Netboot (capital N only) on the CompTIA A+ 902 exam, rather than capitalized all fancy like the Apple folks do it (i.e., NetBoot).
[cue end of interlude]
The term “installation problem” is rather deceptive. The installation process itself almost never fails. Usually, something else fails during the process that is generally interpreted as an “install failure.” Let’s look at some typical installation problems and how to correct them.
If you’re going to have a problem with a Windows installation, have a media error, like a scratched DVD. It’s always better to have the error right off the bat as opposed to when the installation is nearly complete.
RAID Array Not Detected If Windows fails to detect a RAID array during installation, this could be caused by Windows not having the proper driver for the hard drive or RAID controller. If the hard drives show up properly in the RAID controller setup utility, then it’s almost certainly a driver issue. Get the driver disc from the manufacturer and run setup again. Press F6 when prompted very early in the Windows installation process. Nothing happens right away when you push F6, but later in the process you’ll be prompted to install drivers.
No Boot Device Present When Booting Off the Windows Installation Disc Either the startup disc is bad or the CMOS is not set to look at that optical drive first. Access the system setup utility as discussed in Chapter 6, “BIOS.”
Not Ready Error on Optical Drive You probably just need to give the optical drive a moment to catch up. Press R for retry a few times. You may also have a damaged installation disc, or the optical drive may be too slow for the system.
Once the graphical part of the installation begins, errors can come from a number of sources, such as hardware or driver problems.
Hardware Detection Errors Failure to detect hardware properly by any version of Windows Setup can be avoided by simply researching compatibility beforehand. Or, if you decided to skip that step, you might be lucky and only have a hardware detection error involving a noncritical hardware device. You can troubleshoot this problem at your leisure. In a sense, you are handing in your homework late, checking out compatibility and finding a proper driver after Windows is installed.
Every Windows installation depends on Windows Setup properly detecting the computer type (motherboard and BIOS stuff, in particular) and installing the correct hardware support. Microsoft designed Windows to run on several hardware platforms using a layer of software tailored specifically for the hardware, called the hardware abstraction layer (HAL).
Lockups are one of the most challenging problems that can take place during installation, because they don’t give you a clue as to what’s causing the problem. Here are a few things to check if you get a lockup during installation.
Unplug It Most system lockups occur when Windows Setup queries the hardware. If a system locks up once during setup, turn off the computer—literally. Unplug the system! Do not press CTRL-ALT-DEL. Do not press the Reset button. Unplug it! Then turn the system back on, boot into Setup, and rerun the Setup program. Windows will see the partial installation and restart the installation process automatically. Microsoft used to call this Smart Recovery, but the term has faded away over the years.
Disc, Drive, or Image Errors Bad media can mess up an installation. Bad optical discs, optical drives, or hard drives may cause lockups. Similarly, faults on a USB-based drive can stop an installation in its tracks. Finally, problems with a downloaded ISO image—also part of the media—can cause lockups. Check each media component. Check the optical disc for scratches or dirt, and clean it up or replace it. Try a known-good disc in the drive. If you get the same error, you may need to replace the drive or perhaps the ISO.
Log Files Windows generates a number of special text files called log files that track the progress of certain processes. Windows creates different log files for different purposes. The Windows installation process creates about 20 log files, organized by installation phase. Each phase creates a setuperr.log file to track any errors during that phase of the installation.
Windows stores these log files in the Windows directory (the location in which the OS is installed). These operating systems have powerful recovery options, so the chances of ever actually having to read a log file, understand it, and then get something fixed as a result of that understanding are pretty small. What makes log files handy is when you call Microsoft or a hardware manufacturer. They love to read these files, and they actually have people who understand them. Don’t worry about trying to understand log files for the CompTIA A+ exams; just make sure you know the names of the log files and their location. Leave the details to the übergeeks.
Try This!
Locating Windows Setup Log Files
1. Go to the following Microsoft TechNet Web site:
https://technet.microsoft.com/en-us/library/Hh824819.aspx
2. Identify the specific log file locations and descriptions.
3. Using Windows Explorer or Explorer on your own PC, navigate to the specific log file locations and see if you can find your setup log files.
Who knows, you may be on your way to becoming a Microsoft log file reader!
You might think that’s enough work for one day, but your task list has a few more things. They include updating the OS with patches and service packs, upgrading drivers, restoring user data files, and migrating and retiring systems.
Someone once described an airliner as consisting of millions of parts flying in close formation. I think that’s also a good description for an operating system. And we can even carry that analogy further by thinking about all of the maintenance required to keep an airliner safely flying. Like an airliner, the parts (programming code) of your OS were created by different people, and some parts may even have been contracted out. Although each component is tested as much as possible, and the assembled OS is also tested, it’s not possible to test for every possible combination of events. Sometimes a piece is simply found to be defective. The fix for such a problem is a corrective program called a patch.
In the past, Microsoft provided patches for individual problems. They also accumulated patches up to some sort of critical mass and then bundled them together as a service pack, but Windows 7 was the last version to get one.
Immediately after installing Windows, install the latest updates on the computer. The easiest way to accomplish this task it to turn on Windows Update. Chapter 15, “Managing and Optimizing Operating Systems,” covers this process more thoroughly.
During installation, you may decide to go with the default drivers that come with Windows and then upgrade them to the latest drivers after the fact. This is a good strategy because installation is a complicated task that you can simplify by installing old but adequate drivers. Maybe those newest drivers are just a week old—waiting until after the Windows installation to install new drivers gives you a usable driver to go back to if the new driver turns out to be a lemon.
Remember when you backed up the user data files before installation? You don’t? Well, check again, because now is the time to restore that data. Your method of restoring depends on how you backed up the files in the first place. If you used a third-party backup program, you need to install it before you can restore those files, but if you used the Backup and Restore Center, you are in luck, because they are installed by default. If you did something simpler, such as copying to optical discs, USB or other external drive, or a network location, all you have to do is copy the files back to the local hard drive. Good luck!
Seasons change and so does the state of the art in computing. At a certain point in a computer’s life, you’ll need to retire an old system. This means you must move the data and users to a new system or at least a new hard drive—a process called migration—and then safely dispose of the old system. Microsoft offers a few tools to accomplish this task, and because it’s important to know about them for the CompTIA A+ exams (not to mention for your next new computer purchase), I’m going to go over them.
If you’re the sort of computer user who demands maximum functionality and power from your operating system, you’ll probably want to use the User State Migration Tool (USMT). The USMT’s primary use is in businesses because it has to be run in a Windows Server Active Directory domain. If you need to migrate many users, the USMT is the tool. If you only need to migrate a few, Windows Easy Transfer, described next, is the way to go.
NOTE USMT is extremely handy for large-scale Windows operating system deployments. Microsoft provides a detailed overview that includes the benefits and limitations of USMT. Take a look here:
Windows Easy Transfer enables you to migrate user data and personalizations quickly. In Windows Vista/7, it is located in the System Tools subfolder of the Accessories folder in the Programs menu. To locate it in Windows 8/8.1, open the Start screen, type Windows Easy Transfer, and then click on Windows Easy Transfer from the results. Unfortunately, it is not available in Windows 10.
The first screen of Windows Easy Transfer simply gives you information about the process, so there’s not really much to do there. When you click on Next, you’re taken to a screen that asks if you want to start a new transfer or continue an old one (see Figure 12-33). If you’ve already set up your old computer to transfer the files, select the latter option; if you haven’t, select the former.
Figure 12-33 Start a new transfer or continue one?
If you choose to start a new transfer, select whether you’re using your new or old computer and then follow the prompts.
When talking about migration or retirement in terms of security, you need to answer one question: What do you do with the old system or drive?
All but the most vanilla new installations have sensitive data on them, even if it’s simply e-mail messages or notes-to-self that would cause embarrassment if discovered. Most PCs, especially in a work environment, contain a lot of sensitive data. You can’t just format C: and hand over the drive.
Follow three principles when migrating or retiring a computer. First, migrate your users and data information in a secure environment. Until you get passwords properly in place and test the security of the new system, you can’t consider that system secure. Second, remove data remnants from hard drives that you store or give to charity. Third, recycle the older equipment; don’t throw it in the trash. PC recyclers go through a process of deconstructing hardware, breaking system units, keyboards, printers, and even monitors into their basic plastics, metals, and glass for reuse.
The easiest way for someone to compromise or access sensitive data is to simply walk up and take it when you’re not looking. This is especially true when you are in the process of copying information to a new, unprotected system. Don’t set a copy to run while you go out to lunch, but rather be there to supervise and remove any remnant data that might still reside on any mass storage devices, especially hard drives.
You might think that, as easy as it seems to be to lose data, you could readily get rid of data if you tried. That’s definitely not the case with magnetic media such as hard drives. When you delete something in Windows, or even empty the Recycle Bin, the “deleted” data remains on your storage device (you’ll see it as free space in Windows) until new data overwrites it, or replaces it. This can be a big security hole when you dispose of a drive.
Cleaning a drive completely is very difficult. You can either physically destroy the hard drive or sanitize it using a software utility. Physical destruction isn’t complicated—you bust up the drive into tiny little bits or melt it. Tools to accomplish this include drive shredders, drills, hammers, electromagnets, and degaussing tools (which reduce or remove the magnetic fields that store data on HDDs). Incineration pretty much clears all data. Keep in mind that, as hard drives advance and pack more data into smaller spaces, you’ll need to break the hard drive into smaller pieces to prevent anyone from recovering your data.
EXAM TIP Professional hard drive disposal services will guarantee they have truly, thoroughly destroyed drives by issuing a certificate of destruction. This certificate brings peace of mind, among other things, that precious data won’t slip into unwanted hands.
Sanitizing your drive means the hard drive will still function once the data has been destroyed. There are several more or less effective ways to do this. The CompTIA A+ exams want you to know the difference between a standard format and a low-level format. You already learned about standard formatting back in Chapter 10, so how is low-level formatting different? With older drives (pre-1990s), low-level formatting would create the physical marks on the disk surface so that the drive knew where to store data; in the process, it erased the data from the drive. This was initially done at the factory, but utilities existed to repeat this operation later. As drives became more complex, hard drive manufacturers disabled the ability to perform low-level formats outside the factory.
Today, the term “low-level formatting” is often used to describe a zero-fill or overwrite operation. This process returns the drive to a state as close to like-new as possible by writing zeros to every location on the drive.
You can also use a drive wiping utility to erase any old, deleted data that hasn’t been overwritten yet. Simply put, this overwrites the free space on your drive with junk data that makes the original data harder to recover. Piriform’s CCleaner is a data-sanitizing utility that can erase your Web browsing history, erase your recent activity in Windows (such as what programs you ran), and even scrub your hard drive’s free space to make deleted files unrecoverable (see Figure 12-34).
Figure 12-34 Piriform’s CCleaner showing files to be removed
An important and relatively easy way to be an environmentally conscious computer user is to follow recycle or repurpose best practices. Recycling products such as paper and printer cartridges not only keeps them out of overcrowded landfills but also ensures that the more toxic products are disposed of in the right way. Safely disposing of hardware containing hazardous materials, such as computer monitors, protects both people and the environment.
Anyone who’s ever tried to sell a computer more than three or four years old learns a hard lesson: they’re not worth much, if anything at all. It’s a real temptation to take that old computer and just toss it in the garbage, but never do that!
First of all, many parts of your computer—such as your computer monitor—contain hazardous materials that pollute the environment. Luckily, thousands of companies now specialize in computer recycling and will gladly accept your old computer. If you have enough computers, they might even pick them up. If you can’t find a recycler, call your local municipality’s waste authority to see where to drop off your system.
An even better alternative for your old computer is donation. Many organizations actively look for old computers to refurbish and to donate to schools and other organizations. Just keep in mind that the computer can be too old—not even a school wants a computer more than five or six years old.
Even when the installation seems smooth, issues may slowly surface, especially in the case of upgrades. Be prepared to reinstall applications or deal with new functions that were absent in the previous OS. If things really fall apart, you can go back to the previous OS. Or, if you have an OEM computer (one built by, for example, Dell or HP instead of by you), your computer likely came with a special recovery partition on its hard drive, a recovery disc, or a recovery USB flash drive; you can use any of these to restore your operating system to its factory settings. You usually invoke a system recovery by pressing a certain key during boot-up—usually F10 or F11—and then following a set of prompts.
The procedures I’ve laid out in this chapter may seem like a lot of work—how bad could it be to grab an installation disc, fling a copy of Windows onto a system, and, as the saying goes, let the chips fall where they may? Plenty bad, is how bad. Not only is understanding these procedures important for the CompTIA A+ certification exams, but these procedures can also save your, ah, hide once you’re a working PC tech and tasked to install the latest version of Windows on the boss’s new computer!
Even though Windows 10 isn’t on the CompTIA A+ 220-901/902 exams, techs need to know it. Windows 10 is slick, easy to use, and considered by many (including me) to be the best Windows version Microsoft has ever produced.
Microsoft rolled out Windows 10 in an interesting fashion, granting free upgrades to licensed users of Windows 7, 8, and 8.1—if they upgrade before July 29, 2016. For installations on new hardware (and for Enterprise users), Redmond charges a nominal fee for the OS.
To encourage users to upgrade from Windows 7 or Windows 8/8.1, Microsoft pushes a Get Windows 10 app through Windows Update. Clicking on it brings up a reservation system that, once you queue up, will download Windows 10 installation media.
The steps for installing Windows 10 from a tech’s standpoint are pretty minimal. Microsoft automates the process to the point that you have to answer only a few questions at the end, but those questions are essential.
All of the positives of Windows 10 are countered by Microsoft’s unprecedented and questionable use of what many consider private data. One of the most controversial questions is why Windows 10 seemingly requires you to log in using a Microsoft (Hotmail or Outlook) account. Savvy techs discovered that logging in with a Microsoft account enables Windows to grab a disturbing amount of personal information, including data such as your Wi-Fi passwords. Security-conscious users should consider creating and using an old-style local user account. Be warned that not using a Microsoft account disables the Microsoft Cortana voice command feature.
There are a number of privacy issues beyond the Microsoft account issue. Here’s a list of features you should consider turning off. Most of these features may be shut down using the Privacy utility in the Settings app.
• Let apps use my advertising ID for experiences across apps This gives Microsoft the right to create, use, and share a unique advertising ID that will at the very least create custom advertising on Web sites.
• Send Microsoft information about how I write to help us improve typing and writing in the future Microsoft doesn’t clearly state the purpose of this option, but suffice it to say they may capture all of your keystrokes. Scary!
• Let websites provide locally relevant content by accessing my language list Why does Microsoft need to access language settings given that a Web site can easily tell your default language? Unless you go between multiple languages, it’s a good idea to turn this off.
• Location Location services enable Microsoft to track your location unless this setting is disabled.
• Getting to know you This happy-sounding feature tracks a large amount of information about you such as your contacts, calendar events, speech, handwriting, and more. Turn it off.
• Wi-Fi Sense This feature offers two settings. First is Connect to suggested open hotspots. If you don’t turn off this setting, Windows will automatically connect you to any hotspot. Second is Connect to networks shared by my contacts. This feature lets any of your contacts have your Wi-Fi password, and vice versa.
The bottom line is this: Windows 10 is easy to use and full of features, plus the free price (for most users) is tempting. But just remember, “when software is free, you are no longer the customer, you are the product!”
1. What is a thin client?
A. A computer with a 32-bit-wide address bus
B. A portable computer
C. A system designed to handle only very basic applications with the minimum hardware required by the operating system
D. A computer in a narrow, small form-factor case
2. What three functions does a home server PC provide? (Select three.)
A. Media streaming
B. File sharing
C. Web hosting
D. Print sharing
3. What does CompTIA call a PC case built for a home theater?
A. Media center case
B. XBMC
C. HTPC
D. Stereo case
4. What is the most important component for building a virtualization workstation?
A. CPU
B. Power supply
C. RAM
D. Large monitor
5. What is the most common boot method for installing Windows 8?
A. Boot to a Windows DVD
B. Boot to a Windows CD-ROM
C. Boot to a PXE drive
D. Boot to a recovery partition
6. When you install an operating system alongside an existing operating system, what do you create?
A. A clean installation
B. An upgrade installation
C. A multiboot installation
D. A network installation
7. If you do not complete the activation process for Windows 7, what will happen to your computer?
A. Nothing. Activation is optional.
B. The computer will work fine for 30 days and then Windows will be disabled.
C. Microsoft will not know how to contact you to provide upgrade information.
D. It will work if you check the “I promise to pay for Windows later” box.
8. If Windows locks up during the installation, what should you do?
A. Press CTRL-ALT-DEL to restart the installation process.
B. Push the Reset button to restart the installation process.
C. Press the ESC key to cancel the installation process.
D. Unplug the computer and restart the installation process.
9. Which term describes a combination of many updates and fixes in Windows Vista/7?
A. Hot fix
B. Hot pack
C. Service pack
D. Service release
10. You’ve just replaced Jane’s Windows 7 PC with a new Windows 8.1 machine. What post-installation tool should you run to make the transition as painless as possible for her?
A. Windows Activation
B. Repair installation
C. Windows Easy Transfer
D. User State Migration Tool
1. C. Thin clients rely on servers to perform anything beyond the most basic computing tasks.
2. A, B, D. Home servers share files, stream media, and share printers.
3. C. HTPC cases enable your PC to blend in with your home theater equipment.
4. C. Every virtual machine you run consumes a large share of RAM, so the more RAM you have, the more VMs you can run.
5. A. Although in-place upgrades happen with more frequency, it’s still very common to boot to the Windows 8 DVD and install from there.
6. C. An OS added alongside an existing OS creates a multiboot system.
7. B. If you do not complete the activation process for Windows 7, the computer will work fine for 30 days and then Windows will be disabled.
8. D. If Windows locks up during the installation, you should unplug the computer and restart the installation process.
9. C. A service pack is a combination of many updates and fixes in Windows Vista/7.
10. C. Run the Windows Easy Transfer tool to move all her Windows 7 personal files and familiar settings, like her desktop, to the new Windows 8.1 computer.