Chapter 3
It’s Never Too Late: Yoga for Midlifers and Older Adults
In This Chapter
 Going into Prime of Life Yoga with the proper attitude
 Discovering yoga benefits and routines for midlife
 Taking older practitioners’ needs into consideration
If you’re on the senior side of the life curve and you’re considering taking up yoga, you’re not alone. A 2012 Yoga Journal study reported that approximately a third of the 20.4 million adults in America who practice yoga are older than age 45.
This chapter presents safe yoga routines for people in their middle-aged and senior years. The Prime of Life Yoga discussion addresses folks who fall within the vast expanse of the middle years — generally between 40-something and 70-something. The “Cherishing the Chair” section addresses the needs of folks who are generally older than 70; however, people of any age can follow these routines.
Reaping the Benefits of Yoga through Midlife and Beyond
Midlife, as the word suggests, refers to the middle of life. It’s not, as some people think, “The End,” but rather a new beginning. Yoga helps you navigate the physical and emotional changes associated with midlife and allows you to age gracefully, healthfully, and actively. Consider these benefits:
- Working through menopause: Regular yoga practice can help alleviate the physiological side effects of menopause and help you cultivate a forgiving, accepting, and positive attitude important for your emotional well-being. Inversions (see Book II, Chapter 6), which have a profound effect on the glands and inner organs and (both literally and figuratively) allow you to view things from a new perspective, are especially helpful. For soothing rest and whole-person recovery, cultivate the corpse posture described in Book II, Chapter 10.
- Navigating andropause: Men experience something similar to menopause called andropause. When they see their vitality and hairline recede a little, men are often thrown into an existential crisis. Regular yoga practice can buffer the unpleasant physiological side effects of andropause and stabilize the emotions triggered during this period.
- Promoting bone health: With regular exercise, you can prevent the bone loss (osteoporosis) associated with midlife and old age.
Developing User-Friendly Routines for Midlifers
As you age, mobility is the new flexibility. So although you may have been able to do the most acrobatic postures in your youth, the important goal now is to maintain the mobility to remain fit and active. In the Prime of Life approach to yoga postures, spinal freedom and movement take precedence over form. Adjustments to the posture, such as bending the knees a lot if necessary, encourage movement of the spine. This section presents routines for two different skill levels, both of which are equally ideal for men and women.
 The attitude you bring to your practice is critical. The right attitude on the mat allows you to practice postures safely and spills over to your life off the mat. For key yoga principles that ensure a safe and fulfilling practice, refer to Book I, Chapter 3.
Prime of Life Yoga routine: Level I
 This routine is a nice general-conditioning routine for midlifers and even younger folks who want to ease back into physical activity. This user-friendly sequence strings together a series of safe postures that work each side of the body separately, helping to achieve greater balance. This routine takes about 30 to 35 minutes. You can see an abbreviated version at
 www.dummies.com/go/yogaaiofd.
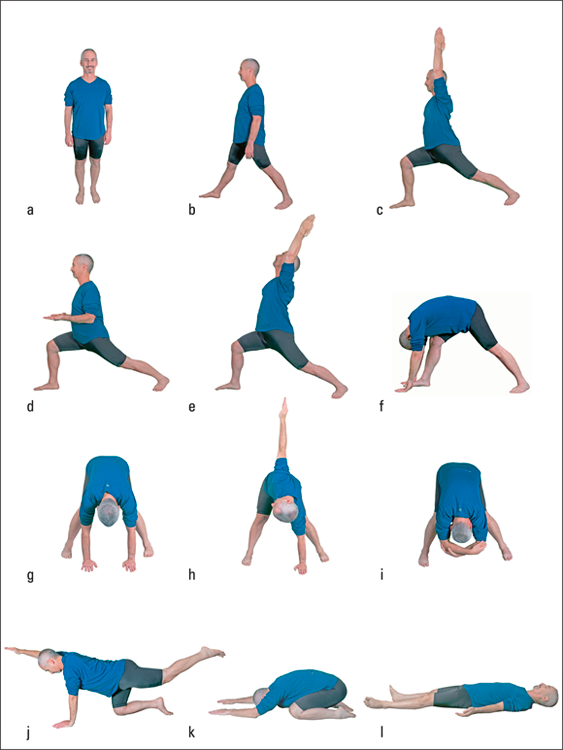
You can find detailed instructions for each of these poses or their variations in Chapters 3, 4, and 10 of Book II as well as Chapter 2 of Book VII. Choose a breathing technique from Book II, Chapter 1. Hold each posture and its variation for 6 to 8 breaths, with the exception of warrior I (Steps 2 and 3) and revolved triangle variation (Steps 9 and 10). For each of these postures, move into and out of the postures three times, and then hold for 6 to 8 breaths.
- Start in the mountain posture (see Figure 3-1a); initiate the yoga breathing style of your choice for 6 to 8 breaths (see Book II, Chapter 1).
- As you exhale, step forward with the right foot about 3 to 3½ feet (or the length of one leg). Your left foot turns out naturally; turn it out more to increase stability. Place your hands on the tops of your hips, and square the front of your pelvis; release your hands and hang your arms (see Figure 3-1b).
- As you inhale, raise your arms from the front up and overhead, and bend your right leg into a right angle for warrior I, as Figure 3-1c illustrates.
- Repeat Steps 2 and 3 three times, and then stay in warrior I for 6 to 8 breaths.
- As you exhale, bend both arms downward and draw your elbows back, as you turn your palms up and lift your chest (see Figure 3-1d); hold this proud warrior posture for 6 to 8 breaths.
- As you inhale, keep your right leg bent, and join your palms together in front of you and bring them up and overhead as you look up and back (see Figure 3-1e); stay in the exalted warrior posture for 6 to 8 breaths.
-
As you exhale, come down over your bent right leg and place your hands on the floor for the standing asymmetrical forward bend (see Figure 3-1f); stay in the posture for 6 to 8 breaths.
Work on straightening your right leg based on your flexibility in the moment. A soft or bent leg is okay.
 If you want to feel the stretch more, square your hips by pulling your right hip back and putting your left hip forward. A more challenging option is to rotate the back foot inward, called paralleling the feet.
- As you inhale, roll your body up vertebra by vertebra, and then step your feet together back into the mountain posture from Step 1.
- Repeat Steps 1 through 8 on the left side.
- From the mountain posture, step out with your right foot about 3 to 3½ feet (or the length of one leg); as you exhale, bend forward from the hips, hang down, and place the palms of both hands on the floor directly below your shoulders, as in Figure 3-1g.
-
As you inhale, raise your right arm toward the ceiling and look up at your right hand for the reverse triangle variation, as Figure 3-1h illustrates.
-
Repeat Steps 10 and 11 three times, and then remain with your right arm up for 6 to 8 breaths; repeat on your left side.
Soften your knees and arms. Turn your head down if your neck gets sore.
- As you exhale, hang your torso, head, and arms down, holding your bent elbows with opposite-side hands for the standing spread-legged forward bend (see Figure 3-1i); stay for 6 to 8 breaths.
-
Transition to your hands and knees, and slide your right hand forward and your left leg back as you exhale, keeping your hand and your toes on the floor; as you inhale, raise your right arm and left leg to a comfortable height for the balancing cat posture (see Figure 3-1j).
Stay up for 4 to 8 breaths, and then repeat with opposite pairs, lifting your left hand and your right leg.
 If you want a bigger challenge in this posture, raise your bottom foot just off the floor.
- As you exhale, come back to all fours and fold down into the child’s posture variation (with your arms in front of you), as in Figure 3-1k; hold for 6 to 8 breaths.
- Lie flat on your back, with your arms along the sides of your torso, your palms up, and your eyes closed for the corpse posture, as in Figure 3-1l.
- To finish, use belly breathing from Book II, Chapter 1 or a relaxation technique from Book VII, Chapter 2 for 3 to 5 minutes.
Prime of Life Yoga routine: Level II
After you master the level I sequence in the preceding section, enjoy the challenge of this section’s level II sequence. It’s a little longer and more physically demanding. Like the other routine, it brings balance by working each side of the body separately.
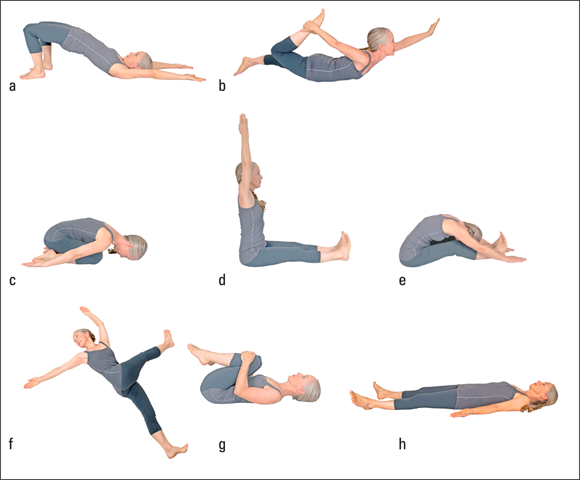
Plan to spend approximately 45 minutes to complete this sequence, which has two parts: standing postures and postures on the floor.
For detailed information on the postures in this section or their variations, head to Book II, Chapters 3, 4, 7, 8, and 10. Select a breathing technique from Book II, Chapter 1. Hold each posture and variation for 6 to 8 breaths, with the exception of the warrior II posture (Steps 3 and 4) and the seated forward bend posture (Steps 12 and 13) — in both of those postures, you move into and out of them three times before holding for 6 to 8 breaths.
-
Start in the mountain posture (see Figure 3-2a).
Initiate the yoga breathing style of your choice from Book II, Chapter 1 for 6 to 8 breaths.
- As you exhale, step out to your right with your right foot about 3 to 3½ feet (or the length of one leg); turn your right foot out 90 degrees, and turn your left foot slightly inward, or keep it straight if a slight inward turn isn’t available to you.
- As you inhale, raise your arms out to your sides in a T parallel to the line of your shoulders and the floor, for the warrior II ready posture (see Figure 3-2b).
- As you exhale, bend your right knee to a right angle with the floor, and turn your head to the right, as in Figure 3-2c; repeat Steps 3 and 4 three times, and then remain in the warrior II posture for 6 to 8 breaths.
- As you inhale, raise your right arm and turn your right palm up; as you exhale, reach back with your left hand (palm down) and hold the outside of your left leg, looking up at your right hand for the reverse warrior posture (see Figure 3-2d). Stay for 6 to 8 breaths.
- As you inhale, move back briefly to the warrior II position, and then bend your right arm, lay your right forearm across the top of your right thigh, and extend your left arm over your head in alignment with your left ear, as in Figure 3-2e; stay in this extended right angle posture for 6 to 8 breaths.
- Repeat Steps 1 through 6 on the left side.
- From your wide stance, roll your body up, turn both feet forward (to the right), and hang your arms at your sides; as you exhale, bend forward from the hips and hang your torso, head, and arms down, holding your bent elbows with opposite-side hands in the standing wide-legged forward bend (see Figure 3-2f). Hold for 6 to 8 breaths.
- Return to the mountain posture (refer to Figure 3-2a.)
- As you inhale, raise your arms from the front up and overhead; as you exhale, bend forward from the hips, and raise your left leg back and up until your arms, torso, and left leg are all parallel to the floor and you’re balancing on your right leg in the warrior III posture (see Figure 3-2g). Hold for 6 to 8 breaths.
- Repeat Steps 9 and 10, balancing on the other side with your left leg.
-
Lie on your back, with your knees bent and feet flat on the floor at hip width, and place your hands at your sides palms down; as you inhale, raise your hips and your arms overhead to touch the floor behind you in the bridge variation with arm raise posture (see Figure 3-3a). Hold for 6 to 8 breaths.
- Lie on your abdomen with your left arm forward (palm down) and your right arm back at your right side (palm up), and then bend your right knee and hold your right foot with your right hand; lift your chest, left arm, and right foot to a comfortable level as you inhale into the half bow posture (see Figure 3-3b). Stay up for 6 to 8 breaths, and then repeat with opposite pairs, holding your left foot with your left hand and extending your right arm forward.
-
Move to your hands and knees, with both at hip width; as you exhale, sit back on your heels and fold your head and hips down into a comfortable position for the child’s posture variation (see Figure 3-3c). Stay folded for 6 to 8 breaths.
- Transition to a seated position, with your legs stretched out in front of you, and bring your back up nice and tall, moving your arms forward and up alongside your ears as you inhale (see Figure 3-3d).
-
As you exhale, bend forward from your hips, bringing your hands, chest, and head toward the floor, as in Figure 3-3e; repeat Steps 15 and 16 three times, and then stay down and folded for 6 to 8 breaths.
Soften your legs and arms as needed.
 Take extra caution or avoid seated straight-legged forward bends if you have back problems that rounding the back may exacerbate.
-
Lie flat on your back, with your legs stretched out and your arms extended into a T, with your palms up; as you exhale, bring your right leg up and across your torso to the opposite side, slide your left arm overhead, and turn your head to the right until you’re in the Swiss army knife (see Figure 3-3f). Stay in the posture for 6 to 8 breaths, and then repeat with opposite pairs.
Soften your limbs as needed.
-
Stay on your back, and hug both knees to your chest with your hands as you exhale for the knees-to-chest posture (see Figure 3-3g); hold for 6 to 8 breaths.
 Hold under your thighs if you have knee problems. As an alternative, rock gently from side to side.
- Lie flat on your back in the corpse posture (refer to Figure 3-3h), with your arms along the sides of your torso, your palms up, and your eyes closed to finish; use belly breathing from Book II, Chapter 1 or a relaxation technique from Book VII, Chapter 2 for 3 to 5 minutes.
Cherishing the Chair: A Safe Routine for Older Adults
As a form of exercise, yoga has many benefits specific to seniors. Improved balance and flexibility reduce the risk for (and fear of) injury and increase mobility. Yoga also improves circulation and your ability to sleep, and adding even light weights to the postures increases bone density and lowers the risk of fracture. Plus, group practice promotes social interaction and a sense of connectedness.
If you’re hesitant to try yoga because you’re not as limber as you used to be, keep in mind that you don’t have to practice yoga on the floor. If getting down to the floor or getting up and down is difficult, chair yoga offers spinal freedom while allowing you to remain in your comfort zone. The postures in the seated yoga routine offered in this section give you the same main benefits of a regular yoga class, including stress reduction, improved circulation, better concentration, and an overall sense of well-being. This routine takes about 15 to 20 minutes. Choose one of the yoga breathing techniques in Book II, Chapter 1, and use it for this entire routine.
 Before you begin your journey into yoga, first check with your physician. After you get the green light, seek out a class that focuses on your age group, both for the social benefits and to be guided by a teacher who can adapt postures to your needs and abilities. (Book I, Chapter 3 offers advice on picking a teacher and a class.)
 You’re in charge of whether you do a particular posture. If it doesn’t feel right for you, don’t do it. The National Institute of Aging provides a wealth of information to help guide you on what may be safe for you and what you may want to avoid. Educate yourself, and enjoy the benefits of breath and movement.
 Place blankets or a block under your feet if they don’t sit flat on the floor in any of the chair postures.
Seated mountain posture
Check out Figure 3-4 and the following steps for a visual of this posture.
- Sit comfortably in a chair, with your back extended and your eyes either open or closed.
- Hang your arms at your sides, and visualize a vertical line down the middle of your ears, shoulders, hips, and backs of your hands; stay for 8 to 10 breaths.
Seated mountain arm variation
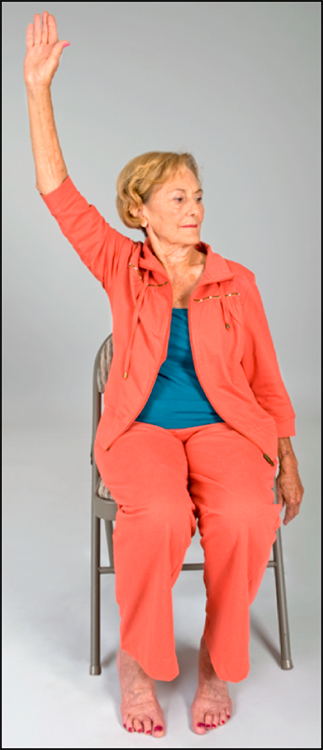
You can see how to do this posture in Figure 3-5. Just follow these steps.
- Start in the seated mountain posture from the preceding section; raise your right arm and turn your head to the left as you inhale.
- As you exhale, return to the seated mountain posture.
- Repeat Steps 1 and 2 with your left arm and a right head turn, alternating right and left sides slowly for a total of 4 to 6 repetitions on each side.
Seated karate kid variation
Figure 3-6 illustrates this posture. Executing it is easy.
- Start in the seated mountain posture, and raise your arms forward and up alongside your ears as you inhale.
- As you exhale, bend your right knee and raise it toward your chest to a comfortable level.
- Take another breath and then, as you exhale, lower your right knee and your arms back to the seated mountain posture.
- Repeat Steps 1 through 3 with both arms and your left knee, alternating both your knees slowly as you raise your arms, for a total of 4 to 6 repetitions on each side.
 Be careful with this posture if you’ve have a hip replacement. If you aren’t sure whether your hips can handle it, check with your doctor first.
Seated wing-and-prayer
 Figure 3-7 shows you this posture. You can also see a demonstration of the seated wing-and-prayer posture at
 www.dummies.com/go/yogaaiofd. Here’s how you do it.
- Start in the seated mountain posture, with your hands together in prayer position and your thumbs at your breastbone.
- As you inhale, open your hands outward and lift your chest like wings.
- As you exhale, bring your hands and arms back together into the prayer position.
- Repeat Steps 1 through 3 slowly for 4 to 6 repetitions.
Seated butterfly posture
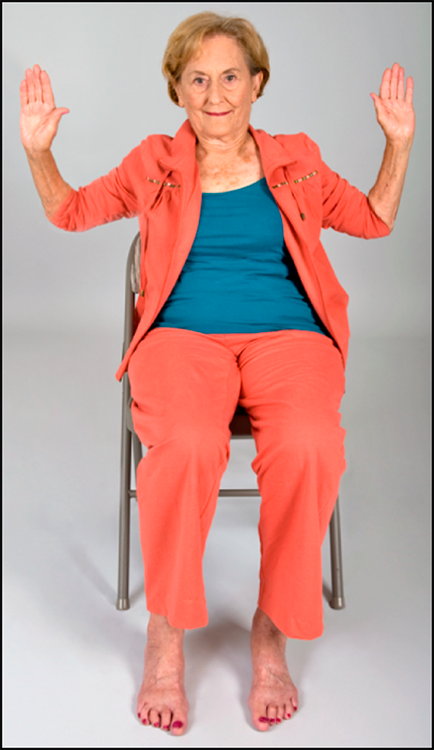
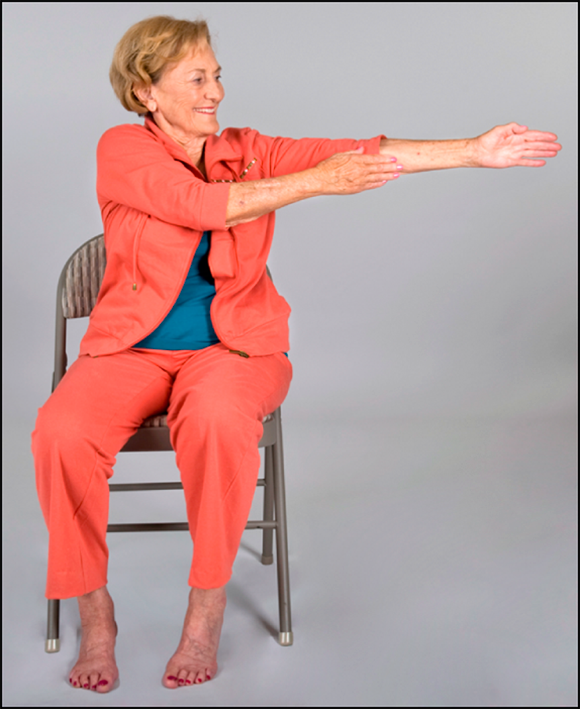
Check out the seated butterfly in Figure 3-8, and then follow these steps to try it on your own.
- Start in the seated mountain posture, with your arms extended fully to the sides and parallel to the floor, and your palms facing forward.
- Inhale and then, as you exhale, bring your right hand toward the inside of your left arm in a twisting motion.
- Repeat Steps 1 and 2 slowly for 4 to 6 repetitions, and then do the same with your left hand and right arm.
Standing warrior I chair variation
Use Figure 3-9 and the following steps to guide you through this posture.
- Stand in the mountain posture (see Figure 3-2a earlier in the chapter), facing the back of your chair from about 3 to 3½ feet away.
-
As you exhale, step forward with your right leg, place your hands on the back of the chair, and bend your forward leg into approximately a right angle.
You can keep your back foot flat or pivot on the ball of your back foot. Don’t be tempted to force the angle.
- Stay in Step 2 for 4 to 6 breaths, and then repeat with your left leg forward for 4 to 6 breaths.
Seated sage twist
Check out Figure 3-10 and the following steps for the seated sage twist.
- Sit in your chair sideways, with the back of the chair to your right and your feet flat on the floor.
- As you exhale, turn to your right and grasp the sides of the chair back with your hands.
- As you inhale, bring your back and head up nice and tall; as you exhale, twist deeper.
- Continue this sequence three times, or until you reach your comfortable maximum, and then stay for 4 to 6 breaths; repeat Steps 1 through 4 on the left side.
Seated forward bend
These steps help you achieve this bend; see Figure 3-11 for an illustration.
- Start in the seated mountain posture.
- As you exhale, bend forward from your hips and slide your hands forward and down your legs.
- Let your head and arms hang down, and relax in the folded position for 4 to 6 breaths.
- For a nice ending, use the seated mountain posture; close your eyes and choose focus breathing (Book II, Chapter 1) or a relaxation technique (Book VII, Chapter 2) for 2 to 5 minutes.
 Going into Prime of Life Yoga with the proper attitude
 Discovering yoga benefits and routines for midlife
 Taking older practitioners’ needs into consideration
 The attitude you bring to your practice is critical. The right attitude on the mat allows you to practice postures safely and spills over to your life off the mat. For key yoga principles that ensure a safe and fulfilling practice, refer to Book I,
  This routine is a nice general-conditioning routine for midlifers and even younger folks who want to ease back into physical activity. This user-friendly sequence strings together a series of safe postures that work each side of the body separately, helping to achieve greater balance. This routine takes about 30 to 35 minutes. You can see an abbreviated version at
 Take extra caution or avoid seated straight-legged forward bends if you have back problems that rounding the back may exacerbate.
 Before you begin your journey into yoga, first check with your physician. After you get the green light, seek out a class that focuses on your age group, both for the social benefits and to be guided by a teacher who can adapt postures to your needs and abilities. (Book I,
