
There is a growing trend for ‘DIY’ weddings and it’s easy to understand why. Apart from the obvious fact that economic times are tough globally, a DIY wedding gives you the freedom to create a truly magical and unforgettable occasion – exactly as you’ve visualised it. You also have far more flexibility, allowing you to put your personal stamp on all aspects of your big day. Don’t be intimidated! Initially the mere thought of taking on such an enormous task may seem daunting, but careful budgeting, planning and preparation make it totally possible. You’ll also be surprised at how many of your friends (or family) are able to help, thanks to their own creative talents.

Where do you begin? First look at where you could economise. For example, cake decorating is a growing trend with plenty of information available, so consider making and icing your own wedding cake. Next, save on the cost of invitations by making them yourself; a vast array of stationery and designs may be downloaded off the internet at very reasonable prices (and sometimes free), allowing you to customise. However, the biggest saving, perhaps, is in self-catering.
If you decide to take up that challenge, rope in family or friends as much as you can, and use the guidelines and countdown section in this chapter to help you. The key is to keep things simple, yet with stylish presentation. Remember, it’s not necessary to make everything yourself. Among the items that can be outsourced are canapés, pâtés, quiches, baguettes, cheese, preserves and chutneys. This leaves you more time to concentrate on the most important item, the main course.
If you don’t have enough fridge or freezer space, ask friends to help with the storing of items. You might also consider hiring or borrowing an extra fridge for a few days, should this be necessary.

While a sit-down dinner may be your first choice, bear in mind that this type of meal requires careful timing and additional people to assist with the serving of the food. Plated hot food needs to be served immediately, and all guests served in quick succession, which requires a certain amount of practice and skill on the part of the caterer. All plates should be heated to ensure that the food remains hot.
If you opt for a plated set menu, make sure you provide your guests with a certain amount of choice; people have vastly different tastes and preferences. Establish in advance who requires a vegetarian option or if there are any specific dietary requirements. The menu ideas here are a guide to assist you.
A lunch or dinner buffet is a popular choice as it gives guests greater flexibility in deciding what to eat (in my experience, people love variety when it comes to food). There are many benefits to a buffet meal: you avoid the headache of plating simultaneously, most of the food can be made in advance, and you can outsource some items for the buffet. You’ll need a couple of people in the kitchen to see to the timeous reheating of certain dishes, but this should not be too onerous or stressful for them if they follow my suggestions.
Because the ‘Catering countdown’ covers both menus, items relevant to the sit-down menu are indicated with an asterisk (*) for easy reference in the countdown, even though they may also be part of the buffet menu.
On the Menu
Blue cheese crème brûlée served with red onion mar malade, or fig preserve, or chutney, and sliced warm baguette
Karoo lamb tagine and/or aubergine, butternut and cickpea tagine, served with couscous with peppers, coriander and feta
Frozen meringue roulade
Perfect lace cupcakes
Starters
Choose at least four of the following, allowing for 1 serving per person of each item or at least 2 per person of the individual snack items (e.g. sausage rolls, sushi).
A selection of hot canapés: crispy spring rolls, prawn parcels, sausage rolls, cheese puffs, crispy calamari (these can all be purchased, and simply heated and served)
A selection of sushi (pre-ordered from a reputable supplier)
Spicy tomato soup with a swirl of cucumber raita and coriander, served with crunchy croutons
Individual quiches (roasted Mediterranean vegetable; mushroom, bacon and herb; etc.)
Swiss Gruyère, thyme amd caramelised onion tartlets
Bruschetta with a variety of toppings, such as crème fraîche; tomato, balsamic and basil; or mushrooms with grated Parmesan
Rösti with salmon and sour cream
Warm phyllo parcels with Brie and cranberry or fig preserve
Roasted red pepper roulade
Salmon and cucumber mousse
Selection of breads, crackers and/or crostini
Main courses
Karoo lamb tagine (and/or aubergine, butternut and chickpea tagine), served with couscous with peppers, coriander and feta
Fillet of beef with a mushroom and port reduction
Honey- and port-glazed gammon
Chicken and mushroom phyllo pie
Salads and side dishes
Crunchy broccoli salad with a balsamic glaze
Joan’s refreshing summer salad
Cheesy potato gratin and/or polenta
Mediterranean roasted vegetables
Desserts
Choose at least three of the following:
Chocolate fondue (with all the accompaniments)
Coffee and hazelnut meringue gâteau
Frozen meringue roulade
Mum’s never-go-wrong chocolate profiteroles
Refreshing pineapple mousse
Coffee cream gâteau
Duo of Swiss chocolate mousse
Selection of macaroons, romantic rose meringues or cupcakes
Cheese board
Assorted cheeses, fruits and nuts served with a selection of breads, crackers, crostini, etc.
Blue cheese crème brûlée, served with red onion marmalade or fig preserve
Cheese mousse with preserved figs
Plated set menu: see Entertaining to Impress without Stress (pages 76, 77) for menu ideas.
Wedding brunch: fresh fruit and yoghurts; Home-made granola (page 106); Rösti with salmon and sour cream (page 93); Visually appealing cheese platter (page 46); quiches (page 110); a selection of tea cakes.
Wedding high tea: Tea is Served (pages 8, 9) has some ideas to inspire you.
| Somebody to make your wedding dress and bridesmaids’ dresses (or reserve hired dresses, if applicable) | |
| Photographer and/or videographer | |
| Caterer (if the reception venue does not provide catering or you intend to outsource some aspects of your own catering) | |
| Somebody to bake and ice the wedding cake (or individual cakes, if preferred) | |
| Florist for the bouquets and/or the ceremony and reception venues | |
| Entertainment (e.g. a pianist, band or DJ) and somebody to run the bar | |
| Design and printing of wedding stationery (invitations, order of service, menus etc.) | |
| Hairdresser, makeup and nail artist |
| 1–2 months before the wedding | |
|---|---|
| Confirm all arrangements with people supplying food, entertainment, flowers, etc., for the big day. | |
| Meet with your marriage officer. Finalise readings and music prior to printing an order of service (if applicable), remembering to allow sufficient time for this to be printed. Schedule a wedding rehearsal for closer to the day. | |
| Arrange regular fittings for the bride’s dress and all other outfits, and schedule final fittings and collection dates. | |
| If you are giving gifts to the bridal retinue and others who have assisted with the wedding, purchase these now. Finalise the speeches. | |
| Confirm the number of guests attending your wedding. Finalise the table seating arrangements (you can do this in advance, but be prepared for last-minute changes). | |
| Finalise honeymoon arrangements and ensure that you’ll have any documentation or foreign exchange in time. | |
| Wear in your wedding shoes! | |
| Organise or make the wedding favours. | |
| A week or so before the wedding | |
|---|---|
| Confirm all arrangements for the service and attend a rehearsal in the church/temple/ceremony venue (if applicable). | |
| If using a caterer, confirm the number of guests for catering purposes, including the number of vegetarian meals required. | |
| Follow the detailed guide on pages 140–143 (if you are catering your own wedding). | |
| Confirm the table seating arrangements. | |
| Pack for your honeymoon. | |
| Attend final dress fittings, and collect suits for the groom and male retinue. | |
| Get your nails and other beauty treatments done; have a practice hair and makeup session. | |

A surprising amount of preparation can be done well in advance.
| A month or more before the wedding | |
|---|---|
| Place orders for sushi, canapés, cakes, cupcakes, biscuits and other decorated items (wedding cakes may need to be ordered a lot earlier). | |
| If you plan on making cakes such as a Buttermilk vanilla sponge (page 178), Ultimate white chocolate cake (page 27) or Chocolate and coffee cake (page 179), freeze them (un-iced), then decorate 2–3 days beforehand. | |
| * Make Perfect lace cupcakes (page 155). | |
| * Make edible sugar paste/tylose decorations (page 191). | |
| A traditional iced fruit cake must be made well in advance as it needs time to mature in flavour (don’t forget to feed it with a teaspoon or so of brandy once a week). | |
| * Make the Red onion marmalade (page 47). | |
| Up to 1 month before, make and freeze the following savoury items | |
|---|---|
| Whole or individual quiches (Roasted Mediterranean vegetable; Mushroom, bacon and herb; etc.) (page 110) | |
| Roasted red pepper roulade, unfilled (page 167). (Roll up while still warm after baking, then wrap and freeze without filling. Defrost 3 hours ahead and, once it is completely defrosted, unroll and fill it with avocado and cream cheese filling.) | |
| Swiss Gruyère, thyme and caramelised onion tartlets (page 170) | |
| Warm phyllo parcels with Brie and cranberry or fig preserve (page 19) | |
| * Karoo lamb tagine or Vegetarian tagine (pages 150, 151) | |
| Spicy tomato soup with a swirl of cucumber raita and coriander (page 86). Do not freeze with the raita or garnish | |
| Chicken and mushroom phyllo pie (page 42) | |
| Up to 1 month before, make and freeze the following sweet items | |
|---|---|
| Mum’s never-go-wrong chocolate profiteroles (page 22); these can be frozen filled or unfilled. | |
| * Frozen meringue roulade (page 152) | |
| Macaroons (page 128) and Romantic rose meringues (page 180) | |
| Coffee cream gâteau (page 95) | |
| * Cupcakes (page 65) and Basic buttercream icing (page 181). If you freeze these with the buttercream icing, take care that the icing is not messed up in the freezer. Allow the icing to set hard before gently wrapping the cupcakes. Carefully remove any wrapping before defrosting. | |
| 3–5 days before the wedding | |
|---|---|
| Make the meringue layers for the Coffee and hazelnut meringue gâteau (page 44) and store in an airtight container (ready to be filled/stacked on the day). | |
| Purchase drinks (and organise ice and containers to store the ice and drinks that need to be kept cold). | |
| Make Macaroons (page 128) and Romantic rose meringues (page 180) (if you have not already made and frozen them). | |
| 2 days before the wedding | |
|---|---|
| Check that you have all the ingredients to ice and decorate the cakes and sweet items from your menu. | |
| Check that you have all the ingredients for the savoury items, including salads or herbs for garnishing. | |
| The day before the wedding | |
|---|---|
| * Ice the cupcakes and cover them with sugar paste toppers and/or buttercream icing (this can be done either on the day or the day before). If the cupcakes were frozen, allow 2–3 hours to defrost prior to icing them. | |
| * Make the Blue cheese crème brûlée (page 148) and Red onion marmalade (page 47). | |
| Prepare the toppings for the bruschetta and slice the ciabatta (wrap the bread tightly so that it does not dry out). | |
| Make the Refreshing pineapple mousse (page 113). | |
| Prepare accompaniments for the Chocolate fondue (page 43) (marshmallows, fruit, skewers, etc.). Cover and chill the fruit. | |
| Make the raita and croutons for the Spicy tomato soup (for warm croutons, they can be retoasted slightly). | |
| * Prepare the Couscous with peppers, coriander and feta (page 149), and keep refrigerated. | |
| Make Joan’s refreshing summer salad (page 106). | |
| Make the Coffee cream gâteau (page 95), if you have not already done so. | |
| Make the Salmon and cucumber mousse (page 87). | |
| Make the Cheese mousse with preserved figs (page 124). | |
| Make the Duo of Swiss chocolate mousse (page 94). | |
| Prepare the filling for the Chicken and mushroom phyllo pie (page 42). | |
| Roast and glaze the Honey- and port-glazed gammon (page 168) (this can be placed under the grill just before serving); serve at room temperature or slightly reheated. | |
| Set the tables for the wedding function and put out glasses, cutlery, serviettes, cups and saucers, teapots, milk jugs, etc. Fill and cover sugar pots and put out the teas and coffee that you will be offering, and an urn, if you are using one. | |
| Arrange any flowers that you might be using. | |
| On the day of the wedding | |
|---|---|
| * At least 3 hours ahead, defrost any remaining sweet and savoury items. Small items, like cupcakes, defrost quickly, but larger cakes need 3–4 hours, depending on the room temperature. The Frozen meringue roulade can be served frozen, semi-frozen or defrosted (defrost in the fridge). | |
| * Defrost the tagine/s and Spicy tomato soup in the morning (if serving that night), or in the fridge the night before. | |
| Fry the beef fillets to just sear them (the final cooking will be done in the oven later) (page 90). | |
| Top the Chicken and mushroom phyllo pie with phyllo brushed with butter, and place it in the fridge until ready to bake (if you have not made and frozen ahead of time). | |
| Prepare the Cheesy potato gratin (page 92) and/or Polenta (page 89) if you intend to grill it. | |
| Prepare the Mediterranean roasted vegetables (page 89). | |
| Whip the cream for the Coffee and hazelnut meringue gâteau and keep refrigerated as long as possible. (Use a cream stabiliser if you do this a few hours in advance and the cake will be standing out for a while.) | |
| Assemble the Coffee and hazelnut meringue gâteau. (Place the assembled meringue in the fridge if this is done more than an hour in advance, and especially in the summer months.) | |
| If you have not already done so, ice the cupcakes. | |
| Fill the chocolate profiteroles and keep them refrigerated. | |
| Make the Crunchy broccoli salad (page 109) and assemble it, but add the dressing just before serving. | |
| Fill milk jugs and put out drinks an hour or two before the wedding party begins. Keep cold drinks on ice. | |
| Fill the Roasted red pepper roulade. | |
| Place the cream and chocolate for the Chocolate fondue in a heatproof dish (ready to be slowly melted just before serving). | |
| * Put the topping of your choice on the Blue cheese crème brûlée. You can place these under the grill for a few minutes to warm slightly (optional) or until the topping starts to bubble. | |
| Half an hour to an hour before the wedding reception | |
|---|---|
| Heat up the quiches (these take about 30 minutes at 180°C; if reheated from frozen, allow for extra heating time). | |
| Heat small savouries, like tartlets, Warm phyllo parcels, sausage rolls, etc., just before the wedding reception begins. | |
| Toast ciabatta slices under the grill and garnish as desired for the bruschetta. | |
| Put out the breads, crackers and/or crostini. | |
| Put out the cakes and sweet items, and decorate or dust with icing sugar. | |
| * Slowly heat up the tagine/s and Spicy tomato soup and garnish when ready to serve. | |
| * Put out the salads and dressings, including the Couscous with peppers, coriander and feta. | |
| Put out the sushi selection and the Cheese mousse with preserved figs. | |
| Grill the polenta. | |
| Place the beef fillets in the preheated oven just before you intend to serve these. | |
| Bake the Cheesy potato gratin and Mediterranean roasted vegetables about 1 hour before you intend to serve them. | |
| Bake the Chicken and mushroom phyllo pie 30 minutes before you intend to serve this. | |
| * Heat and slice the baguette. | |
| * Slice the Frozen meringue roulade. | |
| Put out any cold desserts just before serving. | |


When it comes to bridal arrangements, there’s a trend towards informality, with many brides opting for casually arranged flowers in different containers that work harmoniously together. The containers don’t have to be vases; you could use an interesting assortment of glass, crystal or china bottles, glasses, jugs or teapots, depending on the wedding theme.
Silver is also a popular choice. Items such as vintage jugs, sugar-basins, sports trophies and other containers, make striking vessels for floral displays. An arrangement becomes unified when it is grouped together on a silver tray or mirror. The addition of shimmering tea lights can also add to the atmosphere.
If you opt for a rustic wedding venue (such as a beautiful barn), use earthy containers made out of wood, tin or enamel, or interesting bottles contained within small crates. Potted plants or simple bunches of flowers can also be very effective.
There’s simply no doubt that cut flowers add fragrance and a magical ambience to a venue, but it is possible to create an appealing atmosphere without using flowers at all. For an evening wedding, use plenty of candles instead, choosing shapes and colours to match your theme (candlestick holders can be hired). Whatever your table settings, make sure that guests are able to see one another across the table without the decorations getting in the way.
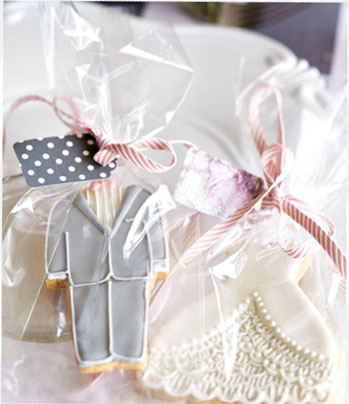
Use the ideas below to create appealing gifts for your guests. Depending on the type of party you’re having, try to tie in the wedding favours with your overall theme.
Look for interesting ways to indicate the table seating plans. On the table, old-fashioned tags elegantly tied around starched table napkins still have appeal. Apples and pears or vegetables (baby butternut or gem squash) make interesting ways to display individual name cards, as do sea shells, paper boats (for a beach-inspired theme), small pieces of wood, old bottles or keys, and so on.
A simple way to organise the overall table layout, is to use a pretty tray and cover it with rock salt. Arrange the name cards alphabetically, ensuring that they stand up in the rock salt. (Name cards should include the table number, e.g. Sam Smith, Table 2.) Hang an old-fashioned picture frame on a convenient wall and display name tags alphabetically (with the appropriate table number). Be creative and have fun. Bearing in mind that last-minute table seating adjustments are usually inevitable, the latter options allow for more flexibility in moving the cards around.
One taste, and everyone is hooked! In my experience, even people who don’t particularly like blue cheese enjoy these because the cheese flavour is extremely subtle. Traditional crème brûlée consists of cream and eggs; this is a savoury version of that, with a contrasting topping that isn’t burnt.
If you’re serving these as part of a cheese platter, choose a topping that will partner well with your cheese selection, such as chutney, green fig preserve (drizzle some fig syrup over the crème, too) or Red onion marmalade (page 47). You could also top the pots with a traditional caramelized sugar topping.
This extremely simple ‘blitz and bake’ recipe can be made a day or two in advance, but don’t top the pots until an hour or two before serving.

Serves 6–8
Serving suggestions
Garnish the crèmes with green fig or melon preserve, fig chutney or Red onion marmalade (page 47). If you are using chutney, flash-grill the pots very briefly. Serve with savoury biscuits or warm slices of baguette.
This is a perfect accompaniment with Karoo lamb tagine (page 150) or Aubergine, butternut and chickpea tagine (page 151), but it is also delicious on its own as a salad, or with chicken or other meat dishes. It is best served at room temperature. You can make it a day ahead and store in the fridge until required; just take it out 30–60 minutes before serving.

Serves 4–6
* If you are serving this as a salad (not as an accompaniment to the Karoo lamb tagine), add 50g chopped dried apricots. The tagine already contains apricots, so it is not necessary to add them when serving the two together.
This is the perfect ‘make-ahead’ dish for a wedding or any other special occasion. It needs very little attention, apart from last-minute seasoning and garnishing, so you can prepare it beforehand, then pop it into the oven to bake slowly while you’re doing other things. It freezes perfectly and, with gentle reheating, tastes just as good as when it was first made. Serve with Couscous with peppers, coriander and feta (page 149).
Serves 4–6
If you are using an authentic tagine pot, follow the heating instructions to ensure that it does not crack on the stove-top.

Vegetarian alternative
Follow the steps for the recipe opposite, but omit all instructions relating to the lamb. In step 4, simply replace the lamb with 1 large butternut, cut into cubes, adding the butternut with the aubergine cubes. Cook for about 1 hour or until the butternut is just tender. Fifteen minutes before the end of the cooking period, add 1 × 400g can of chickpeas (drained and rinsed).
This popular, easy-to-prepare dessert with a choice of three fillings is elegant and carries that ‘wow’ factor. It is best when served frozen or semi-frozen; a real bonus, as it can be made and assembled well in advance then, at the right moment, simply sliced and served.

Serves 6–8


Cooking is like love: it should be entered into with abandon or not at all.
– Harriet van Horne
A lovely idea for a take-home gift: simply add piping-hot milk (or cream) for a mug of wonderful hot chocolate.

Makes ± 14 ice-cube size blocks
Place two chocolate-coated digestive biscuits, two marshmallows, a bit more chocolate and a skewer (if desired) into a small cellophane bag. Tie with a pretty ribbon and add a tag printed with the instruction: ‘Toast the marshmallows over a flame until their centres are just melting. Place between the biscuits, chocolate side inwards, and squish gently until the chocolate starts to melt. Eat immediately!’


Place fondant over mat
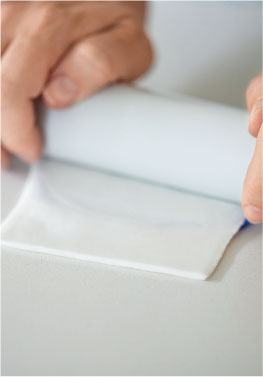
Press and roll over fondant

Cut out shape
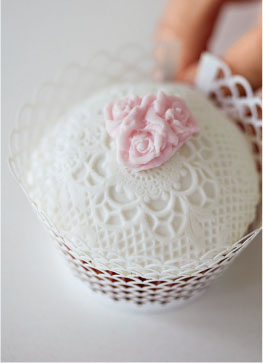
Decorate cupcake


Cover each tier in fondant (pages 68–69)

Make and remove edible lace from silicone mat according to package instructions
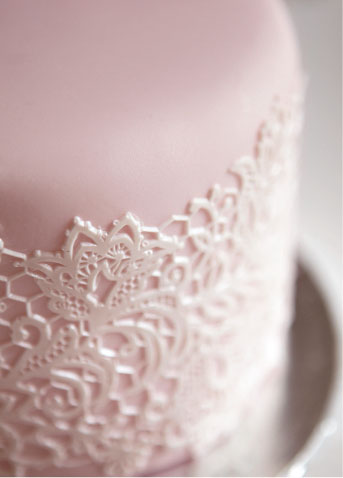
Attach edible lace to cake (using a little water if necessary)
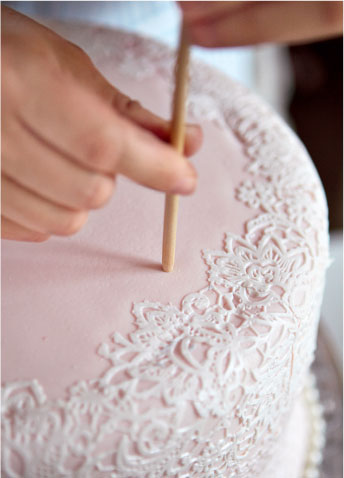
Insert dowels to support tiers (pages 68–69)
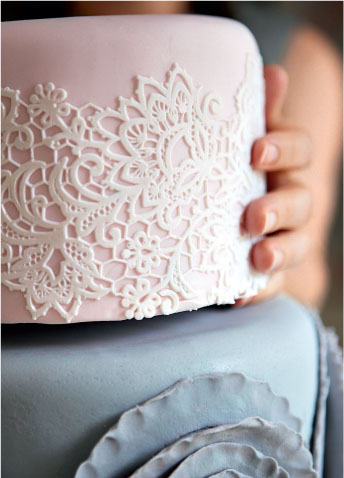
Place tiers on top of one another

Decorate as desired (see page 191 for tylose paste ideas)