Chapter 1. Welcome to Node.js
- What is Node.js?
- Defining Node applications
- The advantages of using Node
- Asynchronous and nonblocking I/O
Node.js is an asynchronous, event-driven JavaScript runtime that offers a powerful but concise standard library. It’s managed and supported by the Node.js Foundation, an industry consortium with an open governance model. Two actively supported versions of Node are available: Long-Term Support (LTS) and Current. If you want to learn more about how Node is managed, the official website has plenty of documentation (https://nodejs.org/).
Since Node.js appeared in 2009, JavaScript has gone from a barely tolerated browser-centric language to one of the most important languages for all kinds of software development. This is partly due to the arrival of ECMAScript 2015, which solved several critical problems in previous versions of the language. Node uses Google’s V8 JavaScript engine that’s based on the sixth edition of the ECMAScript standard, which is sometimes called ES6 and abbreviated as ES2015. It’s also due to innovative technologies such as Node, React, and Electron, which allow Java-Script to be used everywhere: from the server to the browser, and in native mobile applications. Even big companies such as Microsoft are embracing JavaScript, and Microsoft has even contributed to the success of Node.
In this chapter, you’ll learn more about Node, its event-driven nonblocking model, and some of the reasons that JavaScript has become a great general-purpose programming language. First, let’s look at a typical Node web application.
1.1. A typical Node web application
One of the strengths of Node and JavaScript in general is their single-threaded programming model. Threads are a common source of bugs, and although some recent programming languages, including Go and Rust, have attempted to offer safer concurrency tools, Node retains the model used in the browser. In browser-based code, we write sequences of instructions that execute one at a time; code doesn’t execute in parallel. This doesn’t make sense for user interfaces, however: users don’t want to wait around for slow operations such as network or file access to finish. To get around this, browsers use events: when you click a button, an event fires, and a function runs that has previously been defined but not yet executed. This avoids some of the issues found in threaded programming, including resource deadlocks and race conditions.
1.1.1. Nonblocking I/O
What does this mean in the context of server-side programming? The situation is similar: I/O requests such as disk and network access are also comparatively slow, so we don’t want the runtime to block business logic from executing while reading files or sending messages over the network. To solve this, Node uses three techniques: events, asynchronous APIs, and nonblocking I/O. Nonblocking I/O is a low-level term from a Node programmer’s perspective. It means your program can make a request for a network resource while doing something else, and then, when the network operation has finished, a callback will run that handles the result.
Figure 1.1 shows a typical Node web application that uses the web application library Express to handle the order flow for a shop. Browsers make requests to buy a product, and then the application checks the current stock inventory, creates an account for the user, emails the receipt, and sends back a JSON HTTP response. Concurrently, other things happen as well: an email receipt is sent, and a database is updated with the user’s details and order. The code itself is straightforward, imperative JavaScript, but the runtime behaves concurrently because it uses nonblocking I/O.
Figure 1.1. Asynchronous and nonblocking components in a Node application
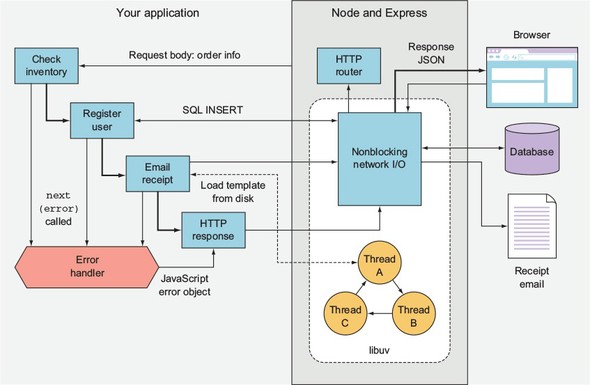
In figure 1.1 the database is accessed over the network. In Node, that network access is nonblocking, because Node uses a library called libuv (http://libuv.org/) to provide access to the operating system’s nonblocking network calls. This is implemented differently in Linux, macOS, and Windows, but all you have to worry about is your friendly Java-Script database library. While you’re writing code such as db.insert(query, err => {}), Node is doing highly optimized, nonblocking networking underneath.
Disk access is similar, but intriguingly not the same. When the email receipt is generated and the email template is read from the disk, libuv uses a thread pool to provide the illusion that a nonblocking call is being used. Managing a thread pool is no fun at all, but writing email.send('template.ejs', (err, html) => {}) is definitely much easier to understand.
The real benefit to using asynchronous APIs with nonblocking I/O is that Node can do other things while these comparatively slow processes happen. Even though you have only a single-threaded, single-process Node web app running, it can handle more than one connection from potentially thousands of website visitors at any one time. To understand this, you need to look at the event loop.
1.1.2. The event loop
Now let’s zoom into a specific aspect of figure 1.1: responding to browser requests. In this application, Node’s built-in HTTP server library, which is a core module called http.Server, handles the request by using a combination of streams, events, and Node’s HTTP request parser, which is native code. This triggers a callback in your application to run, which has been added using the Express (https://expressjs.com/) web application library. The callback that runs causes a database query to run, and eventually the application responds with JSON using HTTP. This whole process uses a minimum of three nonblocking network calls: one for the request, one for the database, and another for the response. How does Node schedule all these nonblocking network operations? The answer is the event loop. Figure 1.2 shows how the event loop is used for these three network operations.
Figure 1.2. The event loop
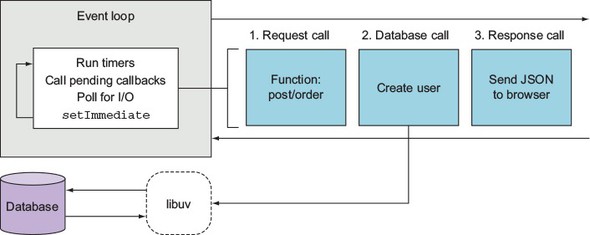
The event loop runs one way (it’s a first-in, first-out queue) and goes through several phases. Figure 1.2 shows a simplified set of the important phases that run on each iteration of the loop. First, the timers execute, which are the timers scheduled with the JavaScript functions setTimeout and setInterval. Next, I/O callbacks run, so if any I/O has returned from one of the nonblocking network calls, this is where your callback is triggered. The poll phase is where new I/O events are retrieved, and then callbacks scheduled with setImmediate run at the end. This is a special case because it allows you to schedule a callback to run immediately after the current I/O callbacks already in the queue. This might sound abstract at this stage, but what you should take away is the idea that although Node is single-threaded, it does give you tools to write efficient and scalable code.
Over the last few pages, you might have noticed that the examples have been written using ES2015 arrow functions. Node supports many new JavaScript features, so before moving on, let’s look at what new language features you can use to write better code.
1.2. ES2015, Node, and V8
If you’ve ever used JavaScript and been disheartened by the lack of classes and strange scoping rules, you’re in luck: Node has fixed most of these problems! You can now make classes, and using const and let (instead of var) fixes scoping issues. As of Node 6, you can use default function parameters, rest parameters, the spread operator, for...of loops, template strings, destructuring, generators, and more. A great summary of Node’s ES2015 support can be found at http://node.green.
First, let’s look at classes. ES5 and earlier versions required the use of prototype objects to create class-like constructs:
function User() {
  // constructor
}

User.prototype.method = function() {
  // Method
};
With Node 6 and ES2015, you can now write the same code by using classes:
class User {
  constructor() {}
  method() {}
}
This uses less code and is a little easier to read. But there’s more: Node also supports subclassing, super, and static methods. For those versed in other languages, the adoption of class syntax makes Node more accessible than when we were stuck with ES5.
Another important feature in Node 4 and above is the addition of const and let. In ES5, all variables were created with var. The problem with var is it defines variables in function or global scope, so you couldn’t define a block-level variable in an if statement, for loop, or other block.
When deciding whether to use const or let, you almost always want const. Because most of your code will use instances of your own classes, object literals, or values that don’t change, you can use const most of the time. Even instances of objects that have properties that change can be declared with const, because const means only that the reference is read-only, not that the value is immutable.
Node also has native promises and generators. Promises are supported by lots of libraries, allowing you to write asynchronous code with a fluent interface style. You’re probably familiar with fluent interfaces already: if you’ve ever used an API such as jQuery or even JavaScript arrays, you’ll have seen it. The following short example shows you how to chain calls to manipulate an array in JavaScript:
[1, 2, 3]
  .map(n => n * 2)
  .filter(n => n > 3);
Generators are used to give a synchronous programming style to asynchronous I/O. If you want to see a practical example of generators in Node, take a look at the Koa web application library (http://koajs.com/). If you use promises or other generators with Koa, you can yield on values rather than nesting callbacks.
One other useful ES2015 feature in Node is template strings. In ES5, string literals didn’t support interpolation or multiple lines. Now by using the backtick symbol (`), you can insert values and span strings over several lines. This is useful when stubbing quick bits of HTML for web apps:
this.body = `
  <div>
    <h1>Hello from Node</h1>
    <p>Welcome, ${user.name}!</p>
  </div>
`;
In ES5, the previous example would have to be written like this:
this.body = '\n';
this.body += '<div>\n';
this.body += '  <h1>Hello from Node</h1>\n';
this.body += '  <p>Welcome, ' + user.name + '</p>\n';
this.body += '<div>\n';
The older style not only used more code but also made introducing bugs easy. The final big feature, which is of particular importance to Node programmers, is arrow functions. Arrow functions let you streamline syntax. For example, if you’re writing a callback that has a single argument and returns a value, you can write it with hardly any syntax at all:
[1, 2, 3].map(v => v * 2);
In Node we typically need two arguments, because the first argument to a callback is often an error object. In that case, you need to use parentheses around the arguments:
const fs = require('fs');
fs.readFile('package.json',
  (err, text) => console.log('Length:', text.length)
);
If you need to use more than one line in the function body, you need to use curly brackets. The value of arrow functions isn’t just in the streamlined syntax; it has to do with JavaScript scopes. In ES5 and before, defining functions inside other functions makes the this reference become the global object. Here’s an ES5-style class that suffers from a bug due to this issue:
function User(id) {
// constructor
  this.id = id;
}

User.prototype.load = function() {
  var self = this;
  var query = 'SELECT * FROM users WHERE id = ?';
  sql.query(query, this.id, function(err, users) {
  self.name = users[0].name;
  });
};
The line that assigns self.name can’t be written as this.name, because the function’s this will be the global object. A workaround used to be to assign a variable to this at the entry point to the parent function or method. But arrow functions are bound correctly. In ES2015, the previous example can be rewritten to be much more intuitive:
class User {
  constructor(id) {
    this.id = id;
  }

  load() {
    const query = 'SELECT * FROM users WHERE id = ?';
    sql.query(query, this.id, (err, users) => {
    this.name = users[0].name;
    });
}
}
Not only can you use const to better model the database query, but there’s also no need for the clumsy self variable. ES2015 has many other great features that make Node code more readable, but let’s look at what powers this in Node and how it relates to the nonblocking I/O features that you’ve already looked at.
1.2.1. Node and V8
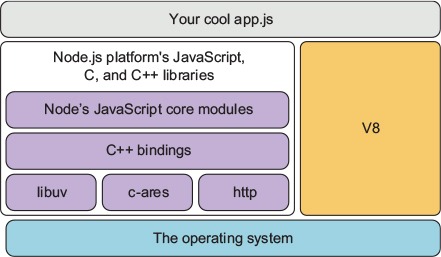
Node is powered by the V8 JavaScript engine, which is developed by the Chromium project for Google Chrome. The notable feature of V8 is that it compiles directly to machine code, and it includes code-optimization features that help keep Node fast. In section 1.1.1, we talked about the other main native part of Node, libuv. That part handles I/O; V8 handles interpreting and running your JavaScript code. To use libuv with V8, you use a C++ binding layer. Figure 1.3 shows all of the separate software components that make up Node.
Figure 1.3. Node’s software stack
The specific JavaScript features that are available to Node therefore come down to what V8 supports. This support is managed through feature groups.
1.2.2. Working with feature groups
Node includes ES2015 features based on what V8 provides. Features are grouped under shipping, staged, and in progress. The shipping features are turned on by default, but staged and in progress can be enabled using command-line flags. If you want to use staged features, which are almost complete but not considered complete by the V8 team, then you can run Node with the --harmony flag. In-progress features, however, are less stable and are enabled with specific feature flags. Node’s documentation recommends querying the currently available in-progress features by grepping for in progress:
node --v8-options | grep "in progress"
The list will vary between Node releases. Node itself also has a versioning schedule that defines which APIs are available.
1.2.3. Understanding Node’s release schedule
Node releases are grouped into Long-Term Support (LTS), Current, and Nightly. LTS releases get 18 months of support and then 12 months of maintenance support. Releases are made according to semantic versioning (SemVer). SemVer gives releases a major, minor, and patch version number. For example, 6.9.1 has a major version of 6, minor of 9, and patch of 1. Whenever you see a major version change for Node, it means some of the APIs may be incompatible with your projects, and you’ll need to retest them against this version of Node. Also, in Node release terminology, a major version increment means a new Current release has been cut. Nightly builds are automatically generated every 24 hours with the latest changes, but are typically used only for testing Node’s latest features.
Which version you use depends on your project and organization. Some may prefer LTS because updates are less frequent: this might work well in larger enterprises that find it harder to manage frequent updates. But if you want the latest performance and feature improvements, Current is a better choice.
1.3. Installing Node
The easiest way to install Node is to use the installer from https://nodejs.org. Install the latest Current version (version 6.5 at the time of this writing) by using the Mac or Windows installer. You can download the source yourself, or install it by using your operating system’s package manager. Debian, Ubuntu, Arch, Fedora, FreeBSD, Gentoo, and SUSE all have packages. There are also packages for Homebrew and Smart-OS. If your operating system doesn’t have a package, you can build from source.
Note
Appendix A provides more details on installing Node.
The full list of packages is on Node’s website (https://nodejs.org/en/download/package-manager/), and the source is on GitHub (https://github.com/nodejs/node). Bookmarking the GitHub source is worthwhile in case you want to poke around in the source without downloading it.
Once you’ve installed Node, you can try it out straight away by typing node -v in the terminal. This should print out the version of Node that you just downloaded and installed. Next, create a file called hello.js that looks like this:
console.log("hello from Node");
Save the file and run it by typing node hello.js. Congratulations—you’re now ready to start writing applications with Node!
If you’re fairly new to programming in general and you don’t yet have a preferred text editor, then a solid choice for Node is Visual Studio Code (https://code.visualstudio.com/). It’s made by Microsoft, but it’s open source and a free download, and supports Windows, Linux, and macOS.
Some of the beginner-friendly features in Visual Studio Code include JavaScript syntax highlighting and Node core module completion, so your JavaScript will look clearer and you’ll be able to see lists of supported methods and objects as you type. You can also open a command-line interface where Node can be invoked just by typing Node. This is useful for running Node and npm commands. Windows users might prefer this to using cmd.exe. We tested the listings with Windows and Visual Studio Code, so you shouldn’t need anything special to run the examples.
To get started, you can follow a Visual Studio Code Node.js tutorial (https://code.visualstudio.com/docs/runtimes/nodejs).
When you install Node, you also get some built-in tools. Node isn’t just the interpreter: it’s a whole suite of tools that form the Node platform. Let’s look in more detail at the tools that are bundled with Node.
1.4. Node’s built-in tools
Node comes with a built-in package manager, the core JavaScript modules that support everything from file and network I/O to zlib compression, and a debugger. The npm package manager is a critical piece of this infrastructure, so let’s look at it in more detail.
If you want to verify that Node has been installed correctly, you can run node -v and npm -v on the command-line. These commands show the version of Node and npm that you have installed.
1.4.1. npm
The npm command-line tool can be invoked by typing npm. You can use it to install packages from the central npm registry, but you can also use it to find and share your own open and closed source projects. Every npm package in the registry has a website that shows the readme file, author, and statistics about downloads.
That doesn’t cover everything, though. npm is also npm, Inc.—the company that runs the npm service and that provides services used by commercial enterprises. This includes hosting private npm packages: you can pay a monthly fee to host your company’s source code so your JavaScript developers can easily install it with npm.
When installing packages with the npm install command, you have to decide whether you’re adding them to your current project or installing them globally. Globally installed packages are usually used for tools, typically programs you run on the command line. A good example of this is the gulp-cli package.
To use npm, create a package.json file in a directory that will contain your Node project. The easiest way to create a package.json file is to use npm to do it for you. Type the following on the command line:
mkdir example-project
cd example-project
npm init -y
If you open package.json, you’ll see a simple JSON file that describes your project. If you now install a module from www.npmjs.com and use the --save option, npm will automatically update your package.json file. Try it out by typing npm install, or npm i for short:
npm i --save express
If you open your package.json file, you should see express added under the dependencies property. Also, if you look inside the node_modules folder, you’ll see an express directory. This contains the version of Express that you just installed. You can also install modules globally by using the --global option. You should use local modules as much as possible, but global modules can be useful for command-line tools that you want to use outside Node JavaScript code. An example of a command-line tool that’s installable with npm is ESLint (http://eslint.org/).
When you’re starting out with Node, you’ll often use packages from npm. Node comes with lots of useful built-in libraries, which are known as the core modules. Let’s look at these in more detail.
1.4.2. The core modules
Node’s core modules are similar to other languages’ standard libraries; these are the tools you need to write server-side JavaScript. The JavaScript standards themselves don’t include anything for working with the network, or even file I/O as most server-side developers know it. Node has to add features for files and TCP/IP networking at a minimum to be a viable server-side language.
Filesystem
Node ships with a filesystem library (fs, path), TCP clients and servers (net), HTTP (http and https), and domain name resolution (dns). There’s a useful assertion library that’s used mostly to write tests (assert), and an operating system library for querying information about the platform (os).
Node also has libraries that are unique to Node. The events module is a small library for working with events, and it’s used as a basis for much of Node’s APIs. For example, the stream module uses the events module to provide abstract interfaces for working with streams of data. Because all data streams in Node use the same APIs, you can easily compose software components; if you have a file-stream reader, you can pipe it through a zlib transform that compresses the data, and then pipe it through a file-stream writer to write the data out to a file.
The following listing shows how to use Node’s fs module to create read- and write-streams that can be piped through another stream (gzip) to transform the data—in this case, by compressing it.
Listing 1.1. Using core modules and streams
const fs = require('fs');
const zlib = require('zlib');
const gzip = zlib.createGzip();
const outStream = fs.createWriteStream('output.js.gz');

fs.createReadStream('./node-stream.js')
  .pipe(gzip)
  .pipe(outStream);
Networking
For a while, we used to say that creating a simple HTTP server was Node’s true Hello World example. To build a server in Node, you just need to load the http module and give it a function. The function accepts two arguments: the incoming request and the outgoing response. The next listing shows an example you can run in your terminal.
Listing 1.2. Hello World with Node’s http module
const http = require('http');
const port = 8080;

const server = http.createServer((req, res) => {
  res.end('Hello, world.');
});

server.listen(port, () => {
  console.log('Server listening on: http://localhost:%s', port);
});
Save listing 1.2 as hello.js and run it with node hello.js. If you visit http://localhost:8080, you should see the message from line 4.
Node’s core modules are minimal but also powerful. You can often achieve a lot just by using these modules, without even installing anything from npm. For more on the core modules, refer to https://nodejs.org/api/.
The final built-in tool is the debugger. The next section introduces Node’s debugger with an example.
1.4.3. The debugger
Node includes a debugger that supports single-stepping and a REPL (read-eval-print loop). The debugger works by talking to your program with a network protocol. To run your program with a debugger, use the debug argument at the command line. Let’s say you’re debugging listing 1.2:
node debug hello.js
Then you should see the following output:
< Debugger listening on [::]:5858
connecting to 127.0.0.1:5858 ... ok
break in node-http.js:1
> 1 const http = require('http');
  2 const port = 8080;
  3
Node has invoked your program and is debugging it by connecting on port 5858. At this point, you can type help to see the list of available commands, and then c to continue program execution. Node always starts the program in a break state, so you always need to continue execution before you can do anything else.
You can make the debugger break by adding a debugger statement anywhere in your code. When the debugger statement is encountered, the debugger will halt, allowing you to issue commands. Imagine you’ve written a REST API that creates accounts for new users, and your user creation code doesn’t seem to be persisting the new user’s password hash to the database. You could add debugger to the save method in the User class, and then step over each instruction to see what happens.
Node supports the Chrome Debugging Protocol. To debug a script using Chrome’s Developer Tools, use the --inspect flag when running a program:
node --inspect --debug-brk
This will make Node launch the debugger and break on the first line. It’ll print a URL to the console that you can open in Chrome so you can use Chrome’s built-in debugger. Chrome’s debugger lets you step through code line by line, and it shows the value in each variable and object. It’s a much better alternative to typing console.log.
Debugging is covered in more detail in chapter 9. If you want to try it right now, the best place to start is the Node manual page on the debugger (https://nodejs.org/api/debugger.html).
So far in this chapter, we’ve talked about how Node works and what it provides to developers. You’re probably also itching to hear about the kinds of things that people are using Node for in production. The next section looks at the types of programs you can make with Node.
1.5. The three main types of Node program
Node programs can be divided into three typical types: web applications, command-line tools and daemons, and desktop applications. Web applications include simple apps that serve up single-page applications, REST microservices, and full-stack web apps. You may have already used command-line tools written with Node—for example, npm, Gulp, and webpack. Daemons are background services. A good example is the PM2 (www.npmjs.com/package/pm2) process manager. Desktop applications tend to be software written with the Electron framework (http://electron.atom.io/), which uses Node as the back end for web-based desktop apps. Examples include the Atom (https://atom.io/) and Visual Studio Code (https://code.visualstudio.com/) text editors.
1.5.1. Web applications
Node is server-side JavaScript, so it makes sense as a platform for building web applications. By running JavaScript on both the client and server, opportunities exist for code reuse between each environment. Node web apps tend to be written with frameworks such as Express (http://expressjs.com/). Chapter 6 reviews the major server-side frameworks available for Node. Chapter 7 is specifically about Express and Connect, and chapter 8 is about web application templating.
You can create a quick Express web application by creating a new directory and then installing the Express module:
mkdir hello_express
cd hello_express
npm init -y
npm i express --save
Next, add the following JavaScript code to a file called server.js.
Listing 1.3. A Node web application
const express = require('express');
const app = express();

app.get('/', (req, res) => {
  res.send('Hello World!');
});

app.listen(3000, () => {
  console.log('Express web app on localhost:3000');
});
Now type npm start and you’ll have a Node web server running on port 3000. If you open http://localhost:3000 in a browser you’ll be able to see the text from the res.send line.
Node is also a big part of the front-end development world, because it’s the main tool used when transpiling other languages such as TypeScript to JavaScript. Transpilers compile languages from one high-level language to another; this contrasts with traditional compilers, which compile from high-level to low-level languages. Chapter 4 is dedicated to front-end build systems, where we look at using npm scripts, Gulp, and webpack.
Not all web development involves building web apps. Sometimes you need to do things such as extract data from a legacy website to use when rebuilding it. We’ve included appendix B, which is all about web scraping, as a way of showing how Node’s JavaScript runtime can be used to work with the Document Object Model (DOM), as well as showing how to use Node outside the comfort zone of typical Express web apps. If you just want to quickly make a basic web app, chapter 3 provides a self-contained tutorial on building Node web applications.
1.5.2. Command-line tools and daemons
Node is used to write command-line tools such as process managers and JavaScript transpilers that are used by JavaScript developers. But it’s also used as a convenient way to write handy command-line tools that do other things, including image conversion, and scripts for controlling media playback.
Here’s a quick command-line example that you can try. Create a new file called cli.js and add the following lines:
const [nodePath, scriptPath, name] = process.argv;
console.log('Hello', name);
Run the script with node cli.js yourName and you’ll see Hello yourName. This works by using ES2015 destructuring to pull out the third argument from process.argv. The process object is available to every Node program and forms the basis for accepting arguments when users run your programs.
You can do a few other things with Node command-line programs. If you add a line to the start of the program that starts with #!, and grant it execute permissions (chmod +x cli.js), then you can make the shell use Node when it invokes the program. Now you can run your Node programs just like any other shell script. Just use a line like this for Unix-like systems:
#!/usr/bin/env node
By using Node this way, you can replace your shell scripts with Node. This means Node can be used with any other command-line tools, including background programs. Node programs can be invoked by cron, or run in the background as daemons.
If all of this is new to you, don’t worry: chapter 11 introduces writing command-line utilities, and shows how this type of program plays into Node’s strengths. For example, command-line tools make heavy use of streams as a universal API, and streams are one of Node’s most powerful features.
1.5.3. Desktop applications
If you’ve been using the Atom or Visual Studio Code text editors, then you’ve been using Node all along. The Electron framework uses Node as the back end, so whenever I/O such as disk or network access is required, Electron uses Node. Electron also uses Node for managing dependencies, which means you can add packages from npm to Electron projects.
If you want to quickly try Electron now, you can clone the Electron repository and start up an application:
git clone https://github.com/electron/electron-quick-start
cd electron-quick-start
npm install && npm start
curl localhost:8081
To learn how to write an app with Electron, flip ahead to chapter 12.
1.5.4. Applications suited to Node
We’ve walked through some of the types of applications you can build with Node, but there are certain types of applications that Node excels at. Node is commonly used to create real-time web applications, which can mean anything from user-facing applications such as chat servers to back ends for collecting analytics. Because functions are first-class objects in JavaScript, and Node has a built-in event model, writing asynchronous real-time programs feels more natural than other scripting languages.
If you’re building traditional Model-View-Controller (MVC) web applications, Node can do this well. Popular blogging engines are built with Node, such as Ghost (https://ghost.org/); Node is now a proven platform for building these types of web applications. The style of development is different from WordPress, which is built with PHP, but Ghost supports similar features, including templates and a multiuser administration area.
Node can also do things that are much harder in other languages. It’s based on JavaScript, and it’s possible to run browser JavaScript in Node. Complex client-side applications can be adapted to run on a Node server, allowing servers to pre-render web applications, which speeds up page rendering time in the browser and also facilitates search engines.
Finally, if you’re considering building a desktop or mobile app, you should try Electron, which is powered by Node. Now that web user interfaces are as rich as desktop experiences, Electron desktop apps can rival native web applications and cut down development time. Electron also supports three major platforms, so you can reuse your code across Windows, Linux, and macOS.
1.6. Summary
- Node is an evented and nonblocking platform for building JavaScript applications.
- V8 is used as the JavaScript runtime.
- libuv is the native library that provides fast, cross-platform, nonblocking I/O.
- Node has a small standard library known as the core modules that add network and disk I/O to JavaScript.
- Node comes with a debugger and a dependency manager (npm).
- Node is used for building web applications, command-line tools, and even desktop applications.