Master the Interface
In this chapter, I cover the many Slack interface controls that you’ll see often. Once you are familiar with what they do, where you find them, and how to use them, you’ll be ready to dive into the next chapters.
Most desktop apps take advantage of interface conventions and system menus provided by the operating system, but for the most part, Slack’s desktop apps don’t: they’re very much like the Web app. Thus, a Control-click or right-click in Slack’s Mac and Windows apps has no real effect—though it may bring up a Back or Copy command, as if you were in a Web browser—and the system menus, such as File and Edit, contain almost nothing. Most of the controls are directly within the Slack window.
The upside of this is more consistency across every platform. The downside comes when you click and stare at interface elements, wondering how you get to options and settings. That’s especially true as you work back and forth between the desktop and mobile apps, since the mobile apps—particularly when viewed on a phone-sized screen—lack the space for the same interface elements. Most of the functionality appears in the mobile apps, but it tends to require an additional tap or swipe to access.
Examine the Slack Window
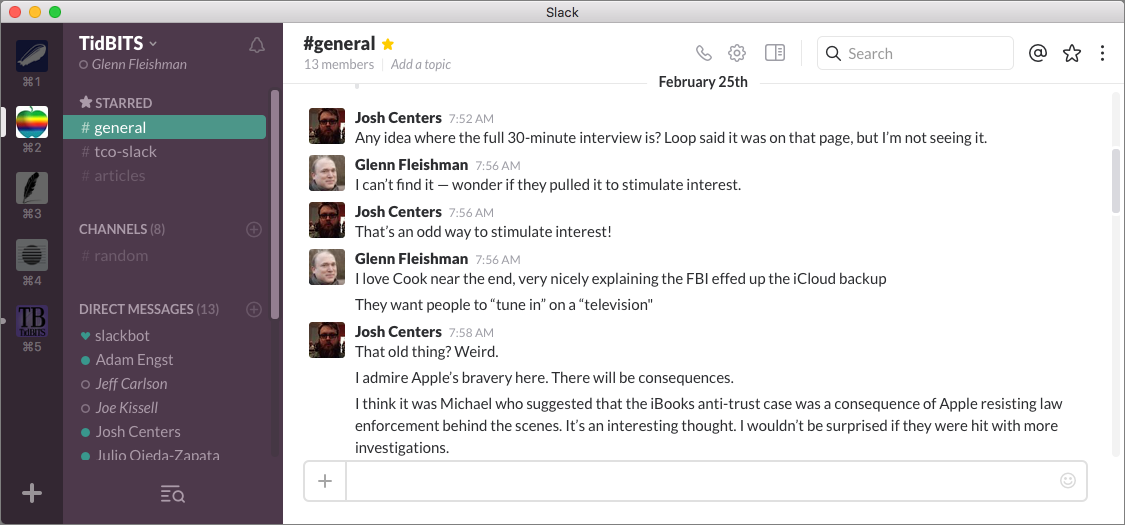
Although what you see where depends on which Slack app you are using, Slack’s interface has at its heart three elements: the Teams sidebar, the Main Sidebar, and the Messaging Area (Figure 22).
Teams Sidebar
In the desktop Slack apps, this far-left sidebar appears if you are signed in to more than one team, showing an icon for each team you’re logged into, as well as the keyboard shortcut for each team.
A red badge appears on a team icon where you have unread messages. The Add  button at the bottom lets you log in to more teams.
The mobile Slack apps lack space for an equivalent sidebar, but they do offer team-switching commands (Figure 23). In Android or iOS, tap the Slack ![]() icon at the upper left and then tap the Teams button, which is the current team icon in iOS and the Teams
icon at the upper left and then tap the Teams button, which is the current team icon in iOS and the Teams ![]() button in Android. In iOS, you can also swipe left and then tap Switch Teams.
button in Android. In iOS, you can also swipe left and then tap Switch Teams.
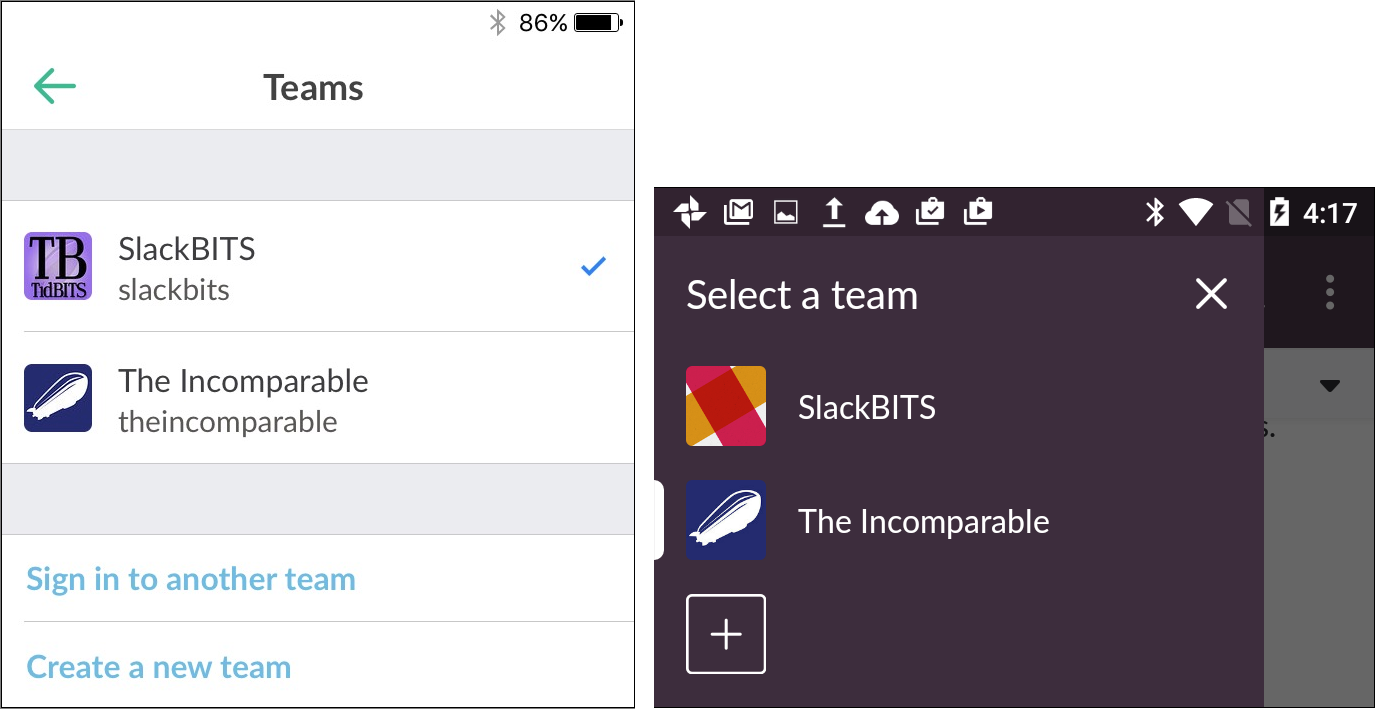
To find the equivalent team-switching commands in the Web app, from the team-interaction side of the app, click the team name at the upper left to open the Team menu, which lists all your signed-in teams. You can also go to the Home page and click the Teams ![]() button on the toolbar.
button on the toolbar.
Main Sidebar
The main sidebar is always present in the desktop and Web versions of Slack and in the mobile apps running on tablets, like an iPad. In the mobile apps in phone-sized devices, tap the Slack ![]() icon at the upper left of the main Slack screen to reveal the sidebar (Figure 24). In iOS, you can also just swipe right.
icon at the upper left of the main Slack screen to reveal the sidebar (Figure 24). In iOS, you can also just swipe right.
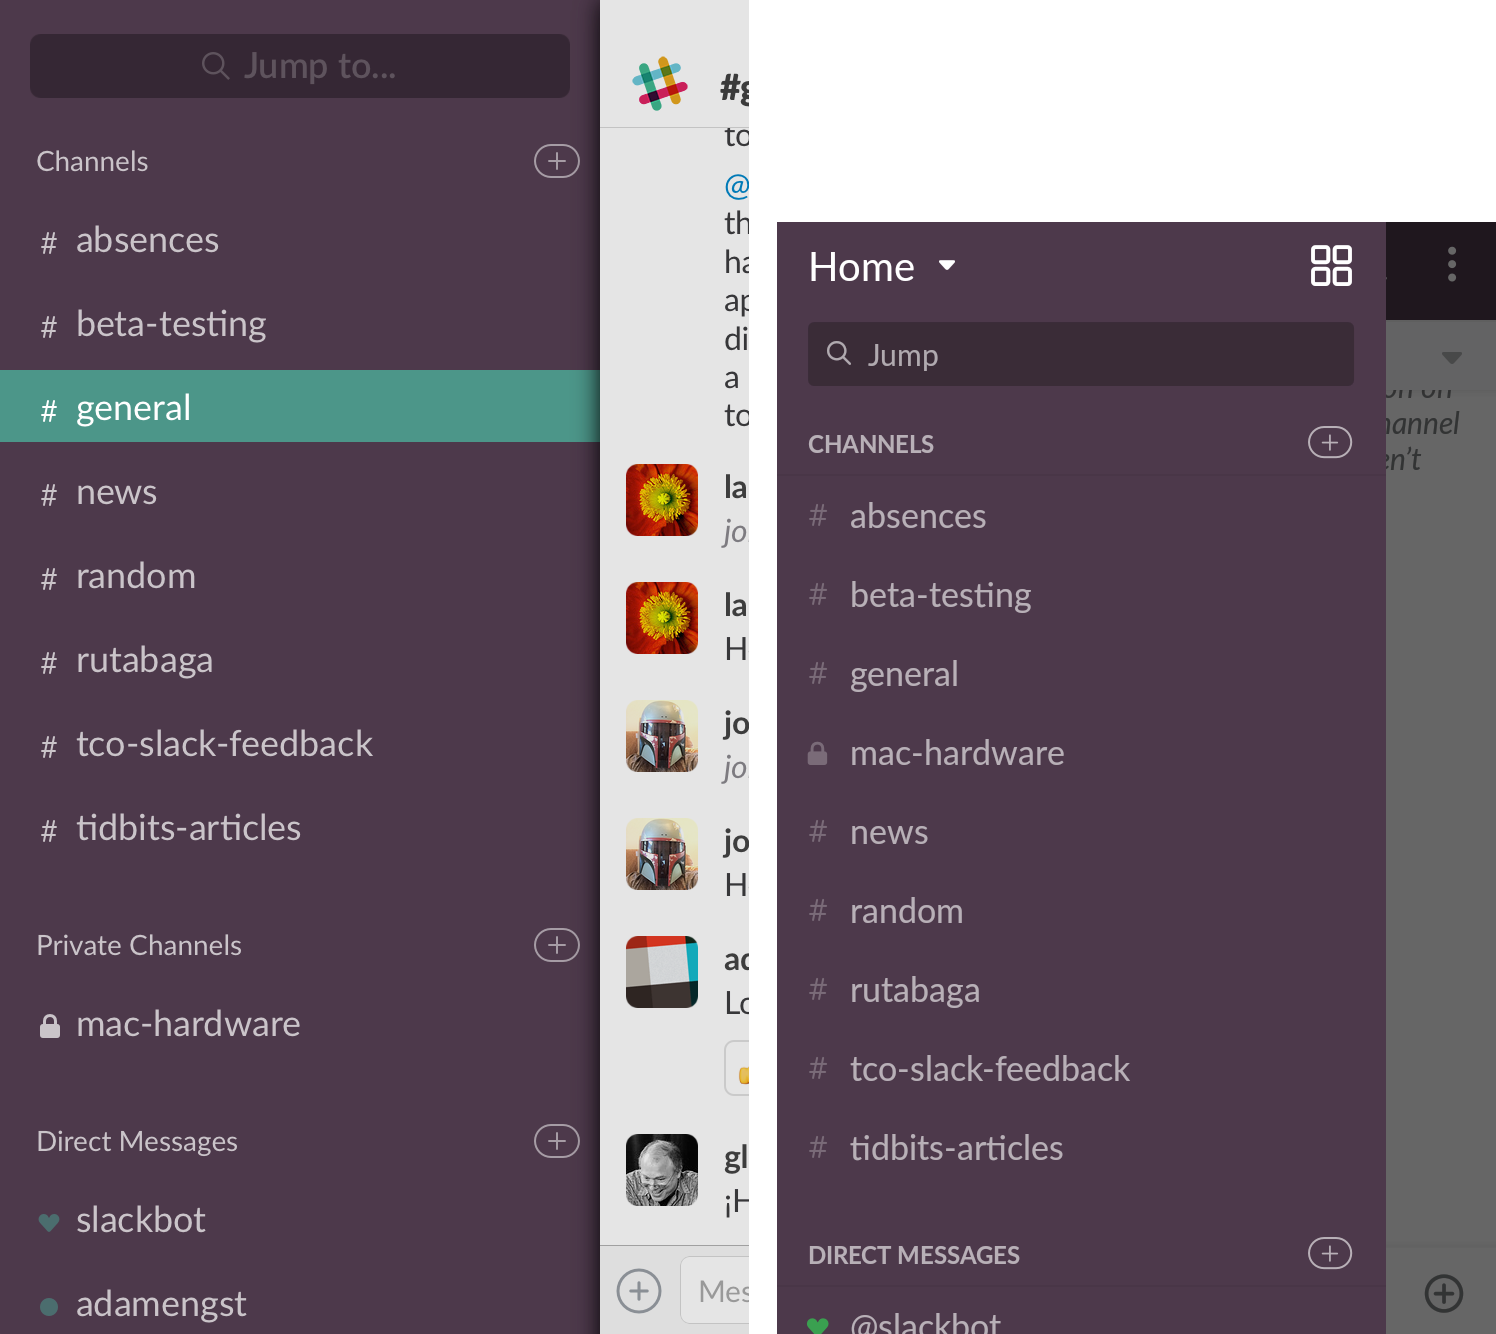
At the top of the sidebar, the desktop and Web versions show the selected team with your logged-in username and status—click here to open the Team menu. Adjacent to the Team menu is a handy Notifications ![]() menu, which I discuss in Do Not Disturb.
menu, which I discuss in Do Not Disturb.
Most of what you do in the sidebar is navigate into conversations. You can select an item directly or work in the Quick Switcher (its ![]() icon is found at the bottom of the sidebar in the desktop and Web apps) or by typing in the Jump field (found at the top of the sidebar in the mobile apps). In either case, enter the first few characters of a channel, conversation, or person’s name.
icon is found at the bottom of the sidebar in the desktop and Web apps) or by typing in the Jump field (found at the top of the sidebar in the mobile apps). In either case, enter the first few characters of a channel, conversation, or person’s name.
Generally, the sidebar’s conversation categories include:
- Unread: This area lists conversations containing unread messages. (Depending on the app, the heading may be Unreads.)
- Starred: This area lists both any channels that you’ve “favorited” and any private channels. To find out how to populate it, read the sidebar Which Star Does What?, slightly ahead.
- Channels: Slack’s term for a topic is channel. A team can contain many channels, but only the channels you’ve added to your team account appear here. I share a few basics about channels later in this chapter, in How Do I Subscribe to a Public Channel?, and I cover them fully in Work with Channels.
- Direct Messages: Recent direct message conversations appear here. Slack’s nomenclature varies between “direct message,” “DM,” and “conversation.” For the purpose of this book, I’ll refer to direct message conversations as “conversations,” regardless of whether they’re one-on-one or among a group of three or more people. I give you a few basic pointers later in this chapter, in How Can I Start a Conversation?, and I delve into the details in Conduct Direct Message Conversations.
Messaging Area
Found in all Slack versions, this is where the action occurs. From top to bottom, there’s a toolbar containing status information and various controls, a message list that goes from newest-at-the-bottom to oldest-scrolling-off-the-top, and a Message field where you enter new messages (and more).
Toolbar
Found just above the message list, the toolbar serves several purposes (Figure 25).

In the desktop Slack apps, the toolbar shows the name of the selected channel at the left (#general in the figure above), as well as how many people are channel members and the topic, if one is set. Next come the Call and Channel Settings ![]() buttons, as well as the Channel Details
buttons, as well as the Channel Details ![]() button, which you can click to display a pane with more information. For conversations, the left portion of the toolbar is slightly different. The toolbar also sports a Search icon or field.
button, which you can click to display a pane with more information. For conversations, the left portion of the toolbar is slightly different. The toolbar also sports a Search icon or field.
Additional buttons appear to the right of the Search field in the desktop and Web apps:
-
Mentions & Reactions (
 ): This button reveals a pane of chronologically organized responses to your messages in all channels and conversations. (I’ll discuss this shortly, in Where Can I See Mentions and Reactions?)
-
Starred Items (
 ): Tap this button to view a pane showing messages you’ve marked as important, as discussed in Mark a Message for Later. This button has an entirely different function from the star that you may see adjacent to the current channel or conversation name, described above in the sidebar Which Star Does What?
-
More Items (
 ): Clicking this button shows a menu that provides access to attached files in the Files pane (described in Manage Uploaded Files), the team directory, online help, details about what’s new in Slack, and a list of any files that you’ve downloaded.
As you can tell, there are inconsistencies and peculiarities across platform versions—and even at different widths and device rotations in the Web app. Android, in particular, is out of sync with the interface conventions, locations, and item names in most of the other versions. I’ll touch on some of these later, but part of the charm of Slack is that alongside rapid improvements and changes, some inconsistencies are to be expected.
Message List
The message list contains Slack’s interactions with you in the current channel or conversation, and all messages you and other people send in that channel or conversation. It’s a continuously scrolling chronological stream of discussion with the newest posts at the bottom.
Each message—as well as any inserted files, snippets, and posts—has associated metadata and actions. The metadata includes the time and date posted, the poster or uploader, and other information.
Action buttons appear when you hover over or press and hold on a message. You can add an icon-based (emoji) reaction or mark the message as a favorite for later referral, share a message with another channel or conversation, or use menu items that let you edit, delete, copy the message’s archive link, and more.
I cover messages, reactions, actions, and related concepts in Post Basic Messages. In Go Beyond Basic Messages, I explain enhanced text (snippets and posts) and file uploads.
Message Field
You’ll spend most of your time in the Message field, at the bottom of the message list. You type and paste text in that field, and you can also drag items in, at least in the desktop and Web apps. An Add File  button at the left lets you add files in various forms (uploads, cloud-service links, snippets, and posts), while in most apps, a smiley face
  at the right lets you insert emoji in the message you’re entering.
This field is discussed extensively in Post Basic Messages.
Learn Slack Shortcuts
In a nod to its messaging forebear Internet Relay Chat, Slack provides a significant amount of functionality from the keyboard through two types of shortcuts: slash commands—items typed after a slash (/) character—and traditional keyboard shortcuts.
The slash commands focus more on messaging and channel management, whereas the keyboard shortcuts generally provide faster ways of navigating the interface. There’s some overlap, but not much.
Use Slash Commands
In all the Slack apps, you can issue quite a few different commands from the Message field at the bottom of the Slack window.
In the Message field, type a forward slash (/) (but do not press Return) to bring up a scrolling/swipeable list of commands (Figure 26).
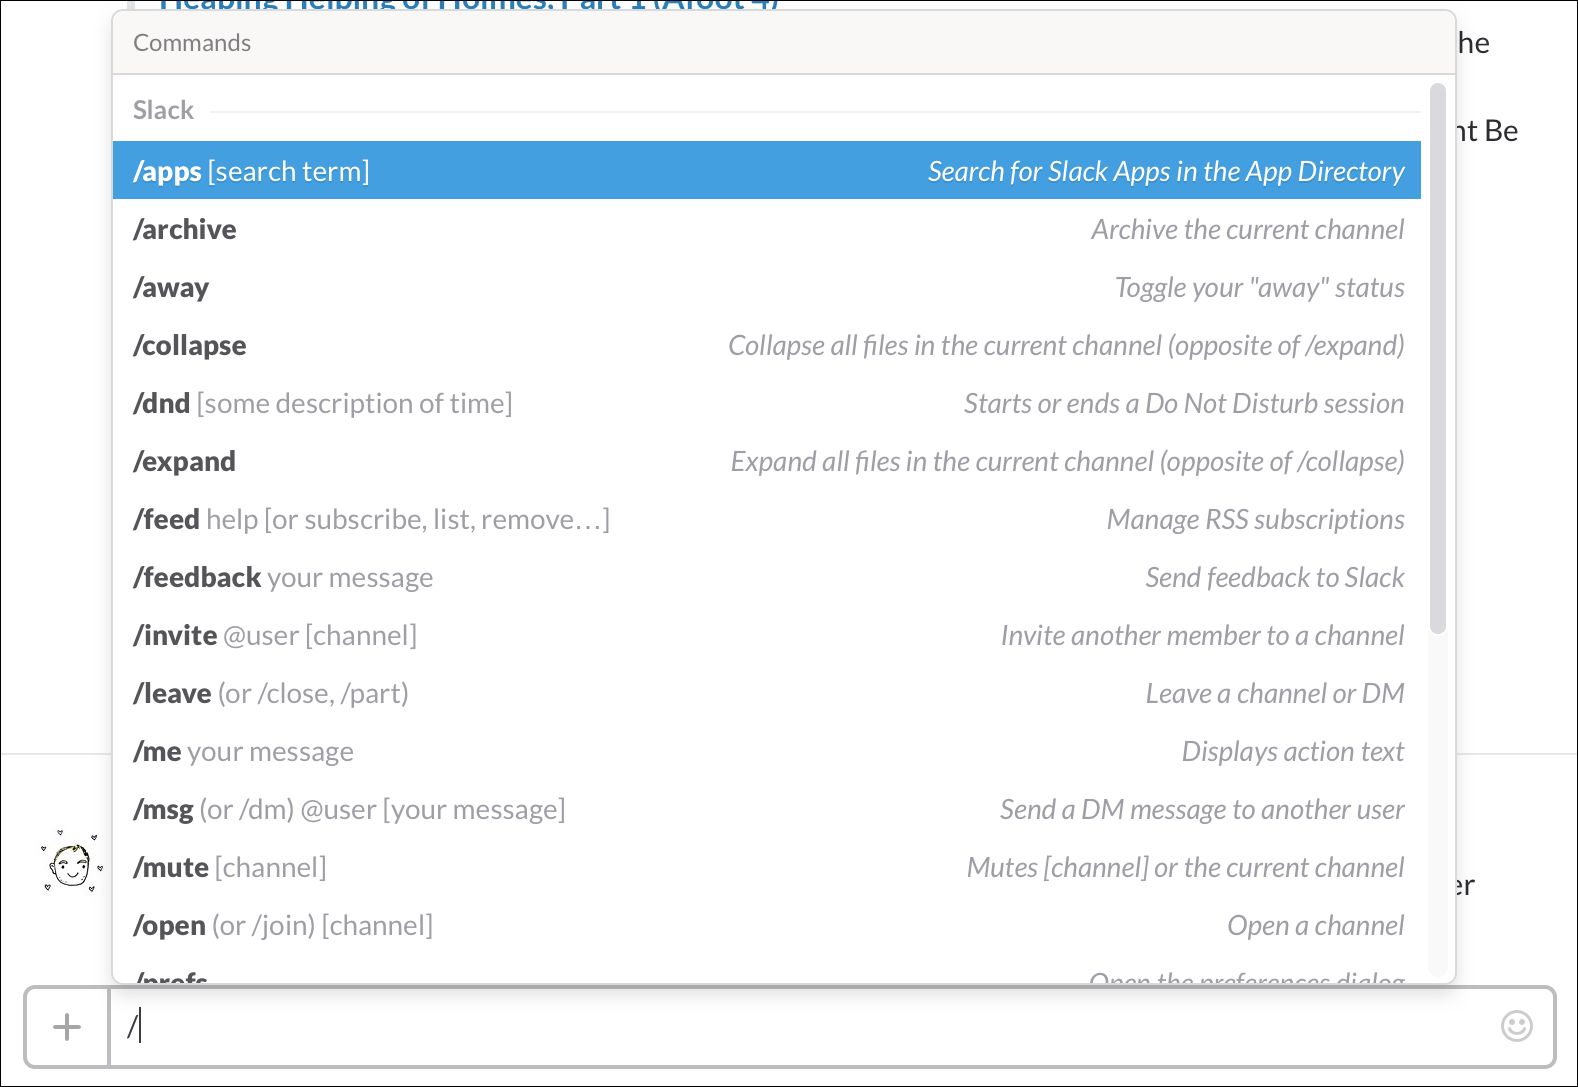
This list contains a grab bag of commands. Many revolve around the channel (listing users, muting, expanding and collapsing files, and archiving and unarchiving), but other commands let you switch channels, send a direct message to someone, open the preferences dialog, search the app integration directory, and set reminders. There’s even a command to insert a shrug ¯\(ツ)/¯ emoticon.
To issue a command, either keep typing, using the list as a reference, or select the command from the list to insert it into the Message field, and then press Return.
Most app integrations provide their own slash commands—in fact, a lot of integrations can be used only via slash options, such as /giphy, which brings up a matching GIF from a huge archive of nonsense, or the command /zoom, which creates a teleconferencing session on the Zoom system. (Some integrations use bot-based interaction in which you talk with a non-player character—I mean, a non-human member!)
For the most part, slash commands are optional—learn and use them if they work well for you, but you can ignore them almost entirely.
Use Keyboard Shortcuts
Keyboard shortcuts provide a valuable way to navigate Slack’s interfaces, and you can even use a smaller set of them with a mobile app if you connect a keyboard via Bluetooth or USB.
Press Command-/ (Mac app or browser), Control-/ (Windows app or browser), or hold down Command (iOS) or Control (Android) for a few seconds and a large dialog appears, showing keystrokes for common commands (Figure 27).
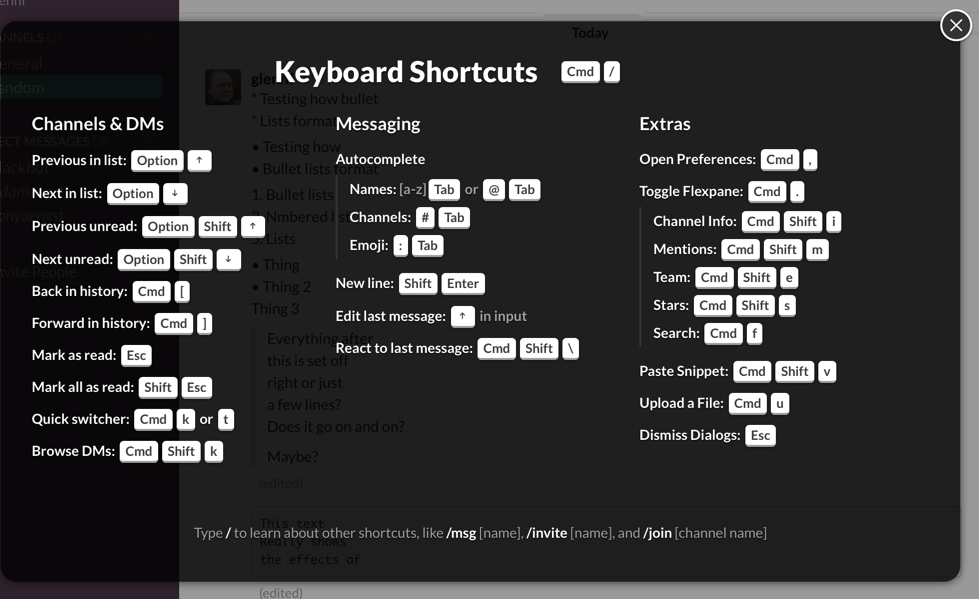
Keyboard shortcuts are the only way to use some of these features in a desktop app or the Web app (mobile apps use gestures for a few of them), and this dialog is the only way outside of reading the online help files to discover many of the commands. My favorites are:
- Command-K to bring up the Quick Switcher
- Up arrow to edit the last message (damn those typos!); focus has to be in the Message field on mobile
- Command-Shift-\ (desktop only) to react to the last message with an emoji—this is a great way to avoid making yet another “me too” message expressing approval
Quick Messaging FAQs for Beginners
Because you may want to learn a few basics before the deep dive into messaging in the next chapter, let’s start here with a brief tutorial.
How Do I Post a Message?
You start messaging in Slack by selecting a channel in the sidebar and then typing something in the Message field (Figure 28). A simple press of the Return or Enter key (or tap of a button in iOS or Android), and the message has been sent!

#general channel.How Do I Subscribe to a Public Channel?
In Slack, it’s not immediately obvious how you go about subscribing to channels—but never fear! Here’s how to find what you’re looking for:
-
Desktop and Web apps: In the sidebar, click the Channels category header to bring up a list of available public channels. Click one to preview its past message history, and click the Join Channel button to subscribe and add it to your sidebar.
Also in the desktop and Web apps, click the Quick Switcher
 icon at the bottom of the main sidebar. Then start typing to find matches for channels, conversations, and people.
 -
Mobile apps: Tap the Slack
 icon to view the sidebar, and then start typing the name of a channel in the Jump field at the top.
Also in a mobile app’s sidebar, tap the Add
 button to the right of the Channels category heading and then select a channel from the scrolling list or tap in the Search field to search for one.
How Can I Start a Conversation?
Although this may seem like a different action from subscribing to a channel, it’s actually quite similar:
-
Desktop and Web apps: Click the Direct Messages sidebar header to select an existing conversation or start a new one. To start a conversation with multiple people, type their names in the field at the top of the pane.
Or at the bottom of the main sidebar, click the Quick Switcher
 icon at the bottom of the main sidebar. Then start typing to find matches for conversations and people.
 -
Mobile apps: Tap the Slack
 icon to view the sidebar, and then start typing the name of a person in the Jump field at the top.
Or in the sidebar, tap the Add
 button to the right of the Direct Messages category header and then scroll through people or use the Search field at the top to search for people’s names.
How Do I Find New Activity?
Slack informs you of activity in a channel or conversation in which you’re a participant in a variety of ways:
- In the sidebar, channels that have unread posts since your last visit are indicated in bold. If any of these messages also contain your handle or name, or any of your highlight words, a red badge also appears. (I explain highlight words in Control Slack Notifications.)
- Also in the sidebar, conversations with unread messages have a number indicating how many you’ve missed.
- In Slack apps that work with a full keyboard on any platform, you can type Shift-Option (or Shift-Alt) plus Up arrow or Down arrow to move among channels and conversations with unread messages.
- To see your most recent direct messages in iOS, open the main sidebar and then swipe left.
Where Can I See Mentions and Reactions?
People can refer to you by entering your handle in a message and they can react to you with emoji. You can also create highlight words that result in notifications. (I’ll go into detail about these features later.) It’s possible to see all these things in your message list, but it can be difficult to find them efficiently. Instead, you can see a chronological summary in one pane, labeled Mentions & Replies in the desktop and Web clients and Recent Mentions in the mobile apps (Figure 29).

To access this pane, click the Mentions & Reactions  button on the toolbar. If your toolbar doesn’t have an
  button, use the More Items
  button and pick Recent Mentions (this button is sideways
  in iOS).
In desktop and Web apps, you can click the Include label and then include or exclude @channel mentions (all teams) or mentions of any user group you’re in (paid teams) by checking or unchecking the appropriate box.