Chapter 15. Going Further
In this chapter, we look at some possible additions to the final projects, potential ways to develop them, and where to find the information on how to do so. Both Blender and GIMP have many uses beyond those discussed in this book. But as a full 3D animation suite, Blender has a number of features that we haven’t had time to examine, so I’ll concentrate on how we can use Blender to take our projects further.
For example, one Blender feature we can use to expand the projects is the Armature object, which gives models a kind of skeleton that allows them to be moved or posed. The process of creating an armature for a model and setting up the connections that make the armature control the mesh is known as rigging, and the resulting armature is known as a rig. Rigging can be complex. Covering it in full is well beyond the scope of this book, but I will briefly review the principles of rigging the Spider Bot. Once you have rigged your creations, you can animate them using Blender’s animation tools. Like rigging, animation is a topic that would take a book of its own to cover, so I’ll just suggest some ideas, as well as resources for further reading.
But first, let’s look at some simple ways to add extra details to the projects.
Embellishments
It’s often difficult to find the point where you’re finally ready to call a project finished. Sometimes a project is just missing something—certain details or additional objects that would allow you to get extra mileage out of your creation. To that end, here are some ideas for extras we could add to the projects.
Adding to the Jungle Temple
The Jungle Temple scene already has a lot going on, but the color scheme is pretty simple. One way to dress it up would be to create a few flowering plants to add a splash of color here and there. I used face duplication (a way to duplicate one object over the faces of another) to add some flowers to the IvyGen mesh, and I increased the number of leaves to make the plant life more interesting. I created a new “branch” object consisting of a few leaves and flowers and then replaced the faces in the original leaf mesh with an instance of this object. Conveniently, this branch object also renders quickly: Cycles recognizes that each instance of the duplicated branch shares the same mesh data, so it stores the object only once, keeping the memory requirements for rendering reasonably low.
Creating the Branch Object
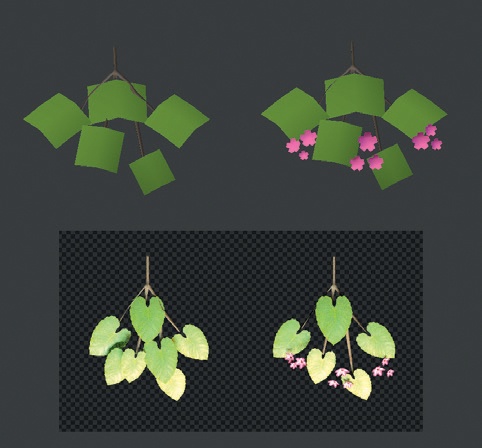
To create a branch, I began by subdividing a plane and giving it a slightly curved shape. This formed the basis of my leaf, which I duplicated a few times and arranged in an arching group of five leaves. I created a flower using a five-vertex circle, which I then filled in and extruded out to create the petals. Next, I unwrapped the flower and the leaf. I used the same texture and material for the leaves of the branch as before. For the flower, I used a flower photo from CGTextures. I created a texture and material from it as I had done for the leaves. I also modeled some basic twigs for the new leaves to attach to by creating a cube and extruding from it to roughly line up with the leaves. In the end, I created two branch objects: one with flowers and one without, as shown in Figure 15-1.
Duplicating with Face Duplication
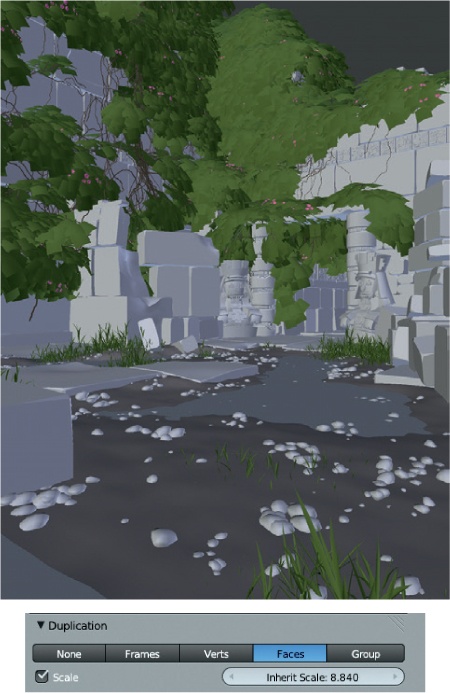
To use the branch object to create some extra foliage, I turned on Face Duplication in the Duplication panel, which you can find in the Object tab of the Properties editor. To duplicate a branch, I parented it (selecting the branch, then the IvyGen mesh, and hitting CTRL-P) to the IvyGen leaf mesh. Then, I set the duplication type to Faces in the Duplication panel. This created a duplicate of the branch object for each face of the IvyGen mesh.
The objects must have the same origin or the duplicates will be offset from the parent mesh, so I selected my branch object and snapped my cursor to it (SHIFT-S▸Cursor to Selection). Next, I selected the IvyGen leaf mesh, clicked Origin operator in the 3D Viewport Tool Shelf, and selected Origin to 3D Cursor, giving the two objects the same origin.
Face duplication allows each duplicate to inherit the scale of the face it is duplicated from. I took advantage of this by enabling Scale in the Duplication panel and then adding some random variation to the scale of the IvyGen faces. To do so, I used Select▸Random in Edit mode to select a random sample of the faces in the mesh. Next, I scaled them down slightly with the Pivot Point set to Individual Faces in the 3D Viewport header (so the faces would scale down toward their centers). This scaled down a random selection of the faces. Then, I repeated the process—this time selecting different faces—and scaled them up a bit.
To create a mix between the two branch objects, I split the IvyGen mesh by selecting it, switching to Edit mode, and setting the selection method to Faces from the 3D Viewport header. Then, I used Select▸Random—again choosing 20 percent of the faces in the mesh (you can adjust the percentage in the Tool Options panel of the Tool Shelf)—and pressed P to part them from the mesh and turn them into their own object. Next, I parented the branch without flowers to the original IvyGen object and the branch with flowers to the new one, creating some branches with flowers and some without. The result is shown in Figure 15-2.
Creating Pebbles
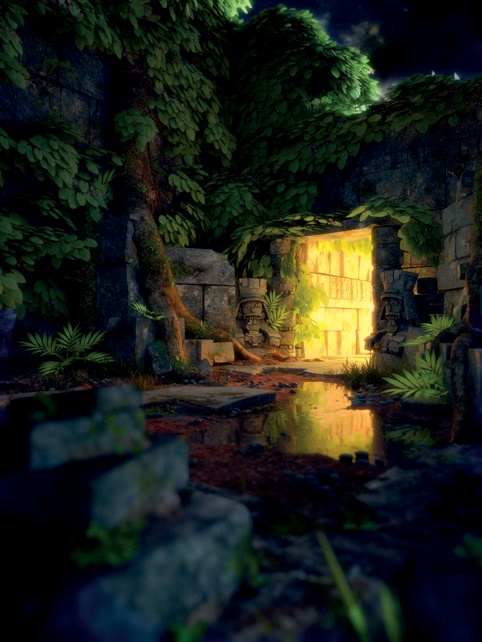
To give the ground in the scene a little more variation, I used another particle system to scatter pebbles on the ground. I created a group of pebble objects, as I did for the grass. Then, I added a new particle system to the ground, setting it up similarly to the grass system. This time, though, I used Simple Child particles to scatter the pebbles in small clusters around the scene. Figure 15-3 shows a render of the scene with the addition of the extra foliage and the pebbles.
Adding to the Bat Creature
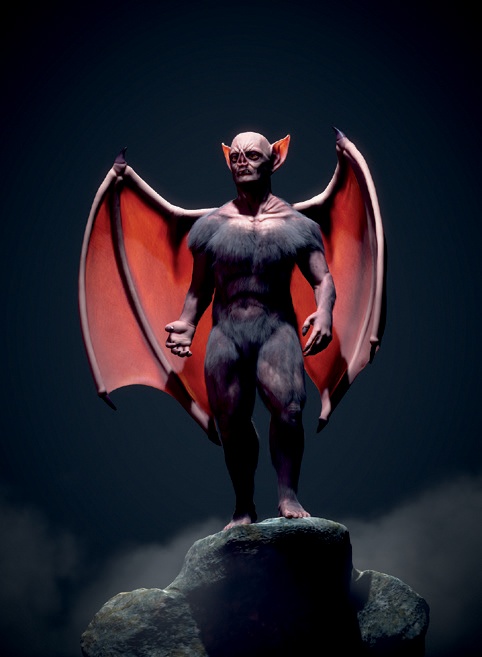
I decided that the Bat Creature might benefit from having something to stand on, so I created a rocky plinth to give him a platform. I also experimented with adding a wispy cloud around his feet.
Creating the Rock
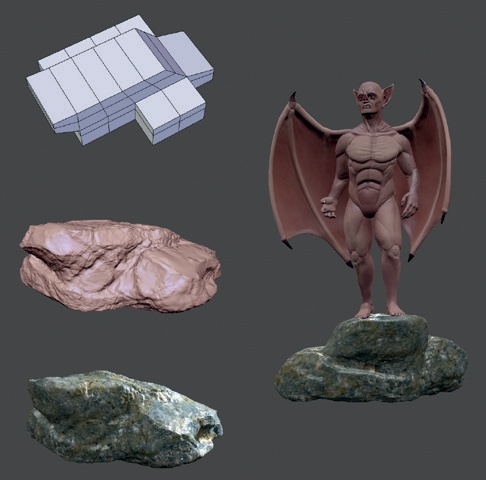
To create the platform (a rock), I first modeled a rough shape by scaling and extruding out from a cube. Next, I used Blender’s sculpt tools and a Multiresolution modifier to sculpt this rough shape into a rocky one. The Clay Tubes and Scrape Flat brush from Chapter 6 were particularly useful for this purpose (see Figure 15-4). I used the seamless rock texture from Chapter 11 (that I created for the Jungle Temple project) on top of the sculpted details as a displacement map.
I made a material for the rock using the same rock textures I created in Chapter 11, and I added another light behind the rock to light up its top rim from the camera’s perspective. I set this light to This Layer Only in the Lamps settings so that it would light only the rock, which was on its own layer along with the lamp. I then shifted the camera down slightly and angled it up to give a different perspective on the Bat Creature, and I adjusted the positions of his feet to make him stand on the rock correctly.
Adding Clouds
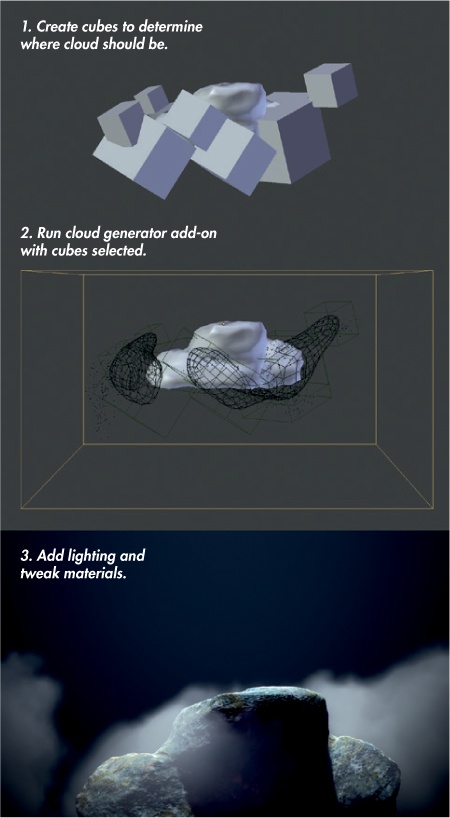
To complement the mood of the image, I added some clouds around the rock. Blender has some fantastic tools for rendering volumetric materials like clouds. A full discussion would require its own chapter, but thankfully for our purposes, it’s simple enough to say that a terrific add-on called Cloud Generator will do most of the work. Enable the addon from the User Preferences editor.
To use the Cloud Generator script, I first sketched the rough volume of my cloud using cubes. Then, I used the Generate Cloud button, which can be found in the Tool Shelf, to automatically generate cloud objects with the rough shape of the cube objects selected and to set up appropriate materials (see Figure 15-5).
I left the generated material almost as it was made by the add-on, except that I turned on External Shadows in the Lighting panel of the Materials tab and set the scale of the clouds texture belonging to the material a bit lower to give the cloud some more detail. I rendered the cloud on its own render layer and composited it into my image after adding the background in my comp setup (before the bloom and color grading were applied). The results are shown in Figure 15-6.
Different Looks
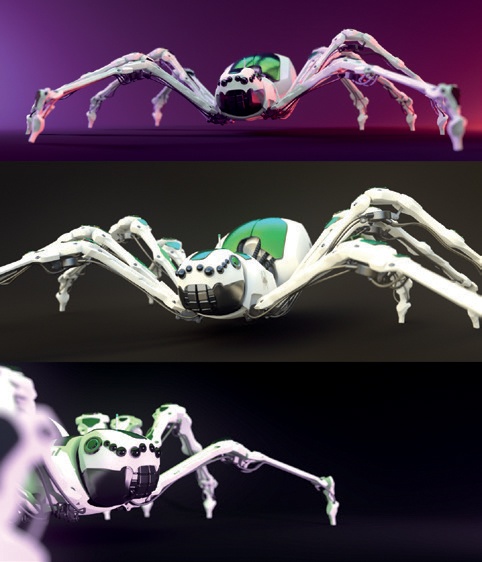
Another way to get more out of a project is to consider some different looks for your final renders. This might involve finding new camera angles or trying different lighting schemes. I experimented with some different looks for lighting the Spider Bot, as well as different camera angles, as shown in Figure 15-7.
Rigging and Animation
Of course, the most dramatic way to take your projects further is to animate them. One simple way to animate a scene is to render a turntable by rotating the camera around the subject and keying its position and rotation as it moves in a circle. Another way is to render a fly-through, with your camera moving around the scene to show different points of interest. More complex animation—for example, animating your character’s movements—involves creating rigs for any moving elements and then keying, or storing, the different properties and positions of these elements through time.
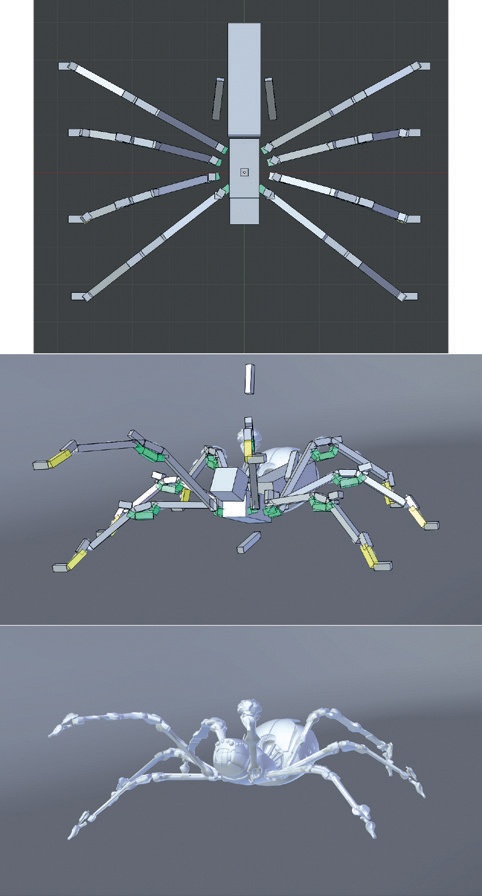
Rigging requires adding an armature object to your scene and editing it to create a “skeleton” for your model. Next, you must bind your model to the armature, either by parenting the model’s objects to specific bones or, preferably, by using the Armature modifier to assign different vertex groups within objects to the different bones of the armature. Once you’ve completed these steps, you can switch to Pose mode with the armature selected to begin moving and posing your model (see Figure 15-8).
In addition to creating bones to directly control parts of your model, you can also create constraints and helper bones to form a kind of user interface for your rig. These could include controls to make sure that limbs reach for a specific point automatically or controls to make the model perform certain actions. For example, in Figure 15-8, the bones shown highlighted in yellow and green are those that have had constraints applied to make posing the legs easier. This is a complex process, though. To learn more about rigging, look at the resources available from the Blender Foundation Shop and on the Blender wiki.
Once your model is rigged, you can begin animating your creation. By keying the transformations of the bones in your rigs, or storing their poses, and then moving through Blender’s timeline, changing the rig’s pose, and keying it again, you can build up a sequence of positions and poses for your rig to move through. When played back, your model will then perform the sequence of movements defined by the poses you created.
In Review
Over the course of this book, we have progressed from the initial inspiration for our projects to final images and beyond. After introducing Blender and GIMP in Chapter 1 and Chapter 2, we looked at how to gather, create, and use reference and concept art in Chapter 3, and moved on to blocking in the fundamentals of our scenes in the form of rough geometry and base meshes in Chapter 4. In Chapter 5, Chapter 6, and Chapter 7, we expanded upon these rough forms with further geometry and with Blender’s sculpting and retopology tools. In Chapter 8, we unwrapped the models for texturing.
With the models laid out, we added further details with particle systems in Chapter 9 and textures in Chapter 10 and Chapter 11. In Chapter 12 and Chapter 13, we began turning our collection of models and textures into a renderable scene with materials and lighting, and in Chapter 14, we turned our .blend files into finished renders.
I hope that this chapter has given you a few ideas for ways you can enhance the finished projects in this book or your own projects. I’ve covered adding extra details to scenes and producing extra renders with different scenery or moods. I’ve also touched on the idea of animating and rigging projects, moving from the realm of still images into moving pictures.
Throughout this book, I’ve used my three projects to illustrate what powerful tools Blender and GIMP are and how their diverse range of functions can be used. Each tool has tremendous depth and can be daunting at first, but once you get to know the tools, they’re fantastic for bringing your ideas to life. I hope you’ll enjoy using the skills you’ve learned in this book to do just that.
