Icon view is the perfect structure for a chapter that describes each Control Panel applet, since it’s organized in alphabetical order. The rest of this chapter assumes that you’re looking at the Control Panel in one of the two Icon views. (You may see additional applets, depending on the features of your particular computer.)
Here’s the Action Center: a single, consolidated window listing every security- and maintenance-related concern that Windows has at the moment. Be grateful: These all used to be separate balloons harassing you from the right end of the taskbar. For details, see Chapter 21.
This is the humble successor to what used to be called Anytime Upgrade. It lets you upgrade to a fancier version of Windows 8.1 by paying the price difference.
For example, if you have the standard version of Windows 8.1, you can upgrade to Windows 8.1 Pro without disturbing any of your files or programs. And if you already have Pro, you can pay $10 to download Windows Media Center.
This icon is actually a folder containing a suite of technical administrative utilities. Many of these tools, intended for serious technowizards only, are explained in Chapters Chapter 21 and Chapter 23.
What do you want to happen when you insert a CD? Do you want to see a window of what’s on it? Do you want the music on it to start playing? Do you want to auto-run whatever software installer is on it? Do you want whatever photos it contains to get copied to your Pictures library?
The answer, of course, is “Depends on what kind of CD it is,” and also “That should be up to me.” That’s the purpose of the AutoPlay feature. It differentiates among different kinds of audio CDs and DVDs, video CDs and DVDs, programs (like software and games), pictures, video and audio files, and blank CDs and DVDs. A Tale of Two Formats tells all.
BitLocker encrypts the data on your drives to keep them from being accessed by the bad guys who might steal your laptop. For details, see Chapter 23.
Microsoft created this applet in conjunction with Canon in an effort to make colors more consistent from screen to printer. Details are on Printer Troubleshooting.
Credential Manager (formerly Windows Vault) is designed to memorize your name/password combinations, of the sort that you use to log into things. The panel offers two tabs: Web Credentials (stores your Web-site passwords) and Windows Credentials (passwords for shared network drives and corporate-intranet Web sites).
When you click the  next to an item’s name, you see details about
the stored item; a Remove button; and a Show button, which (if you
correctly enter your Windows login password to prove your worth)
reveals the actual stored password for that item.
next to an item’s name, you see details about
the stored item; a Remove button; and a Show button, which (if you
correctly enter your Windows login password to prove your worth)
reveals the actual stored password for that item.
At the top of the window, “Back up Credentials” and “Restore Credentials” offer you the chance to back up your entire array of memorized passwords.
You don’t need to bother, though, if you log in with a Microsoft account (Local Accounts vs. Microsoft Accounts); in that case, your passwords are backed up automatically online—and any time you log into another Windows 8 computer, your passwords are already stored and ready to use.
Your PC’s concept of what time it is can be very important. Every file you create or save is stamped with this time, and every email you send or receive is marked with it. When you drag a document into a folder that contains a different draft of the same thing, Windows warns that you’re about to replace an older version with a newer one (or vice versa)—but only if your clock is set correctly.
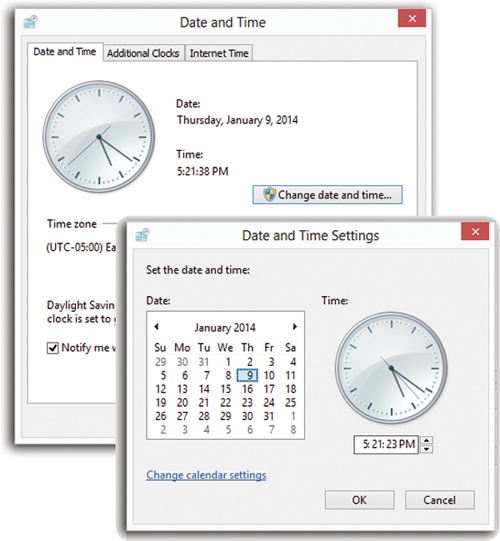
Figure 12-3. Top: The Date and Time tab has a lovely analog clock
displaying the time. You can’t actually use it to set the time,
but it looks nice. To make a change to the date or time of the
computer, click “Change date and time.” Bottom: At that
point, select the correct date by using the calendar. Specify the
correct time by typing in the hour, minute, and seconds. Yes, type
it; the  and
and  next to the time field are too inefficient,
except when you’re changing AM to PM or vice versa.
next to the time field are too inefficient,
except when you’re changing AM to PM or vice versa.
This program offers three tabs:
Date and Time. Here’s where you can change the time, date, and time zone for the computer (Figure 12-3)—if, that is, you’d rather not have the computer set its own clock (read on).
Tip
In the “Time zone” section of the Date and Time tab, you can find exactly when Windows thinks daylight saving time is going to start (or end, depending on what time of year it is). In addition, there’s an option to remind you a week before the time change occurs, so you don’t wind up unexpectedly sleep-deprived on the day of your big TV appearance.
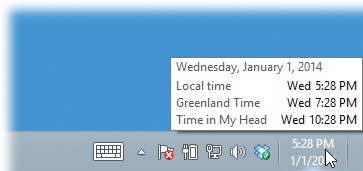
Additional Clocks. If you work overseas, or if you have friends, relatives, or clients in different time zones, you’ll like this one; it’s the only thing that stands between you and waking them up at three in the morning because you forgot what time it is where they live.
This feature shows you, at a glance, what time it is in other parts of the world. You can give them any display name you want, like “Paris” or “Mother-in-Law time.” Note that the additional clocks’ times are based on the PC’s own local time. So if the computer’s main clock is wrong, the other clocks will be wrong, too.
Figure 12-4 shows how to check one of your additional clocks.
Tip
If you click the time on the taskbar instead of just pointing to it (Figure 12-4), you get three large, beautiful analog clocks in a pop-up window.
Internet Time. This option has nothing to do with Swatch Internet Time, a 1998 concept of time that was designed to eliminate the complications of time zones. (Then again, it introduced complications of its own, like dividing up the 24-hour day into 1,000 parts called “beats,” each one being 1 minute and 26.4 seconds long.)
Instead, this tab teaches your PC to set its own clock by consulting one of the highly accurate scientific clocks on the Internet. To turn the feature on or off, or to specify which atomic Internet clock you want to use as the master clock, click Change Settings. (No need to worry about daylight saving time, either; the time servers take that into account).
Note
Your PC resets its clock once a week—if it’s connected to the Internet at the time. If not, it gives up until the following week. If you have a dial-up modem, in other words, you might consider connecting to the Internet every now and then and using the “Update now” button to compensate for all the times your PC unsuccessfully tried to set its own clock.
In an age when Microsoft is often accused of leveraging Windows to take over other realms of software, like Web browsing and graphics, the company created this command center. It’s where you choose your preferred Web browser, music-playing program, email program, and so on—which may or may not be the ones provided by Microsoft.
You’re offered four links:
Set your default programs. Here’s where you teach Windows that you want your own programs to replace the Microsoft versions. For instance, you can say that, when you double-click a music file, you want to open iTunes and not Windows Media Player. For details, see Default Programs.
Associate a file type or protocol. This window lets you specify exactly what kind of file you want to have opened by what program. (That’s essentially what happens in the background when you set a default program.) File associations are covered in more depth on Filename Extensions and File Associations.
Change AutoPlay Settings. This option opens the AutoPlay applet described on A Tale of Two Formats.
Set program access and computer defaults. Here you can not only manage what programs are used by default, like browsing with Internet Explorer or getting email with Windows Mail, but also disable certain programs so they can’t be used at all. It’s organized in rather combative schemes: You can choose to prefer Microsoft products (disabling access to the non-Microsoft interlopers), non-Microsoft products (pro–third party, anti-Microsoft), or create a custom scheme, in which you can specifically choose a mix of both. See Method 1: Start with the document for more information.
The Device Manager console shows you where all your hardware money was spent. Here you or your tech-support person can troubleshoot a flaky device, disable and enable devices, and manage device drivers. If you’re comfortable handling these more advanced tasks, then Chapter 20 is for you.
Tip
Device Manager is listed in the secret Start menu for quick access; see The Secret Start Menu.
Double-click to open the Devices and Printers window, where everything you’ve attached to your PC—Webcam, printer, scanner, mouse, whatever—appears with its own picture and details screen. Chapter 20 has the details.
This one opens the “Make it easier to read what’s on your screen” window. The task pane on the left side offers links to other screen-related controls, like “Adjust resolution,” “Change display settings,” and so on.
The Ease of Access Center is designed to make computing easier for people with disabilities, although some of the options here can benefit anyone. See Ease of Access for details.
This applet lets you, the wise parent, control what your inexperienced or out-of-control loved one (usually a child, but sometimes a spouse) can and cannot do on (or with) the computer. For more information, see Family Safety (Parental Controls).
Here’s the on/off switch for File History, Windows’ new automated file-backup feature. Specify which kinds of files you want included and, when disaster strikes, bring your files back from the dead. Details in Chapter 22.
This box appears when you click Options on the Ribbon’s View tab in an Explorer window. Its three tabs (General, View, Search) are described beginning on Share Tab.
This icon is a shortcut to a folder; it’s not an applet. It opens into a window that reveals all the typefaces installed on your machine, as described in Chapter 19.
The Homegroup icon opens the “Change homegroup settings” screen, where you can change the password or perform other administrative tasks related to your Homegroup (home file-sharing network). HomeGroups are described in Chapter 27.
The Start menu’s search box is so magnificently fast because it doesn’t actually root through all your files. Instead, it roots through an index of your files, an invisible, compact database file that Windows maintains in the background.
This dialog box lets you manage indexing functions and change what gets indexed, and it lets you know how many items have been indexed. To learn more about the particulars of indexing and how to use it, see Chapter 7.
A better name for this program would have been “Web Browser Options,” since all its settings apply to Web browsing—and, specifically, to Internet Explorer. As a matter of fact, this is the same dialog box that opens from the Tools→Internet Options menu command within Internet Explorer. Its tabs break down like this:
General, Security, Privacy, and Content. These tabs control your home page, cache files, search-field defaults, and History list. They also let you define certain Web pages as off-limits for your kids, and manage RSS feeds, as well as block pop-up windows. Details on these options are in Chapter 14.
Connections. Controls when your PC modem dials, and lets you set up VPN (virtual private networking) connections.
Programs. Use this tab to manage browser add-ons, decide whether or not Internet Explorer should warn you whenever it is not the default browser (for your protection, of course), or choose the default programs that open when you click a link to email someone, to open a media file, or to view the HTML source of a Web page (View→Source).
Advanced. On this tab, you find dozens of checkboxes, most of which are useful only in rare circumstances and affect your Web experience only in minor ways. For example, “Enable personalized favorites menu” shortens your list of bookmarks over time, as Internet Explorer hides the names of Web sites you haven’t visited in a while. (A click on the arrow at the bottom of the Favorites menu makes them reappear.)
Similarly, turning off the “Show Go button in Address bar” checkbox hides the Go button at the right of the address bar. After you’ve typed a Web address (URL), you must press Enter to open the corresponding Web page instead of clicking the Go button on the screen. And so on.
You’re probably too young to remember the antique known as a typewriter. On some electric versions of this machine, you could hold down the letter X key to type a series of XXXXXXX’s—ideal for crossing something out in a contract, for example.
On a PC, every key behaves this way. Hold down any key long enough, and it starts spitting out repetitions, making it easy to type, “No WAAAAAY!” or “You go, grrrrrl!” for example. (The same rule applies when you hold down the arrow keys to scroll through a text document, hold down the = key to build a separator line between paragraphs, hold down Backspace to eliminate a word, and so on.) The Speed tab of this dialog box (Figure 12-5) governs the settings:
Repeat delay. This slider determines how long you must hold down the key before it starts repeating (to prevent triggering repetitions accidentally).
Repeat rate. The second slider governs how fast each key spits out letters once the spitting has begun.
After making these adjustments, click the “Click here and hold down a key” test box to try out the new settings.
Cursor blink rate. The “Cursor blink rate” slider actually has nothing to do with the cursor, the little arrow that you move around with the mouse. Instead, it governs the blinking rate of the insertion point, the blinking marker that indicates where typing will begin when you’re word processing, for example. A blink rate that’s too slow makes it more difficult to find your insertion point in a window filled with data. A blink rate that’s too rapid can be distracting.

Here you can install multiple input language kits on your computer and switch among them when the mood strikes. The key term here is default input language; the language for the operating system doesn’t change. If you installed Windows in English, you still see the menus and dialog boxes in English.

Figure 12-6. Top: Although all languages that you choose are technically input languages, there can be only one base, default input language. From there you can add new languages (and see what you already have) by clicking “Add a language.” Bottom: Talk about a polyglot! Windows knows more languages than you’ve even heard of.
But when you switch the input language, your keyboard can type the characters necessary for the selected language.
The “Add a language” button lets you install additional language packs to your computer (Figure 12-6, top); the Options button lets you download them from Microsoft’s Web site (Figure 12-6, bottom).
If you click “Advanced settings,” you can specify how you switch languages as you work. For example, you can turn on the Language bar, which either floats on the desktop or sits nestled in your system tray. It’s a toolbar that lets you switch input languages on the fly.
Click Options to see the possible settings. For example, you can make the Language bar transparent, display text labels, and even add additional Language bar icons in the taskbar.
If you click “Change language bar hot keys,” you can set up a keyboard combination to use to switch between layouts. The factory setting is the left Alt key+Shift, which scrolls through your layouts sequentially with each press, but you can also assign a combination to each specific layout.
These days, tablets and some laptops can tell where they are. They might have GPS sensors, for example, or they might use WiFi hotspot triangulation to figure out where you are.
This, of course, is a hot-button issue for privacy advocates. This panel is the master on/off switch for desktop programs’ ability to use your location. (A movie-listings program, for example, might suggest theaters near you.)
Even if you’ve turned on “Turn on the Windows Location platform” here, however, you still have to turn on “Use my location” in each individual program that wants to use this information.
(There’s a separate Location Settings switch in TileWorld’s “PC settings” panel, too; it governs TileWorld apps.)
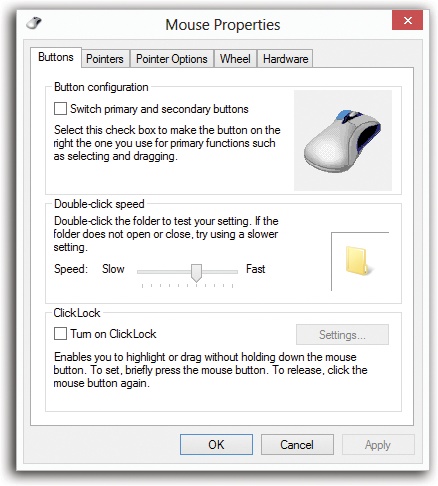
All the icons, buttons, and menus in Windows make the mouse a very important tool. And the Mouse dialog box is its configuration headquarters (Figure 12-7).
This tab offers three useful controls: “Button configuration,” “Double-click speed,” and “ClickLock.”
Button configuration. This checkbox is for people who are left-handed and keep their mouse on the left side of the keyboard. Turning on this checkbox lets you switch the functions of the right and left mouse buttons so that your index finger naturally rests on the primary button (the one that selects and drags).
Double-click speed. Double-clicking isn’t a very natural maneuver. If you double-click too slowly, the icon you’re trying to open remains stubbornly closed. Or worse, if you accidentally double-click an icon’s name instead of its picture, Windows sees your double-click as two single-clicks, which tells it that you’re trying to rename the icon.
The difference in time between a double-click and two single-clicks is usually well under a second. That’s an extremely narrow window, so let Windows know what you consider to be a double-click by adjusting this slider. The left end of the slider bar represents 0.9 seconds, and the right end represents 0.1 seconds. If you need more time between clicks, move the slider to the left; if your reflexes are highly tuned (or you drink a lot of coffee), try moving the slider to the right.
Figure 12-7. If you’re a southpaw, you’ve probably realized that the advantages of being left-handed when you play tennis or baseball were lost on the folks who designed the computer mouse. It’s no surprise, then, that most mice are shaped poorly for lefties—but at least you can correct the way the buttons work.
Each time you adjust the slider, remember to test your adjustment by double-clicking the little folder to the right of the Speed slider. If the folder opens, you’ve successfully double-clicked. If not, adjust the slider again.
ClickLock. ClickLock is for people blessed with large monitors or laptop trackpads who, when dragging icons onscreen, get tired of keeping the mouse button pressed continually. Instead, you can make Windows “hold down” the button automatically, avoiding years of unpleasant finger cramps and messy litigation.
When ClickLock is turned on, you can drag objects on the screen like this: First, point to the item you want to drag, such as an icon. Press the left mouse or trackpad button for the ClickLock interval. (You can specify this interval by clicking the Settings button in this dialog box.)
When you release the mouse button, it acts as though it’s still pressed. Now you can drag the icon across the screen by moving the mouse (or stroking the trackpad) without holding any button down.
To release the button, hold it down again for your specified time interval.
See Mouse Makeover for details on changing the shape of your cursor.
See Pointer Options for a rundown of these cursor-related functions.
The scroll wheel on the top of your mouse may be the greatest mouse enhancement since they got rid of the dust-collecting ball on the bottom. It lets you zoom through Web pages, email lists, and documents with a twitch of your index finger.
Use these controls to specify just how much each wheel notch scrolls. (You may not see this tab at all if your mouse doesn’t have a wheel.)
This network command center offers, among other things, a handy map that shows exactly how your PC is connected to the Internet. It also contains a tidy list of all networking-related features (file sharing, printer sharing, and so on), complete with on/off switches. See Chapter 27 for details.
Double-click to open up a screen where you can hide or show specific icons in your system tray (at the right end of your taskbar), as described in Chapter 2.
Windows 8.1 needs a fast computer. Just how fast is yours? This control panel breaks it down for you, even going so far as to give your PC a grade for speed.
In addition, this window has convenient links to tabs of several other applets (like Power Options, Indexing Service, and System Performance), as well as access to the old Disk Cleanup utility. For power users, there’s even a kickin’ Advanced Tools window stocked with speed-related goodies, logs, and reports. For details, see Chapters Chapter 21 and Chapter 23.
Have you ever admired the family photo or space shuttle picture plastered across a coworker’s PC desktop? Wished your cursor was bigger? Been annoyed that you have to log in again every time your screen saver kicks in?
All these are aspects of the Personalization applet. It’s such a big topic, it gets its own chapter: Chapter 8.

Figure 12-8. Top: The factory setting power plan, reasonably enough, is
the Balanced plan. To take a look at the settings, click “Change
plan settings.” Middle: At first glance, it looks like you
can change only a couple of settings, like when the computer
sleeps and when the display turns off. Bottom: But if you
click the “Change advanced power settings” link, you can see that
the dialog box has more settings. Now you’ve got the full range of
control over your screen, hard drive, wireless antenna, processor,
installed PCI cards, and other power-related elements. Click the
 to expand a topic, and then twiddle with
the settings.
to expand a topic, and then twiddle with
the settings.
You’ll probably need to access these settings only once: the first time you set up your PC or laptop to dial out. Details in Chapter 13.
The Power Options program (Figure 12-8) manages the power consumption of your computer. That’s a big deal when you’re running off a tablet or laptop battery, of course, but it’s also important if you’d like to save money (and the environment) by cutting down on the juice consumed by your desktop PC.
The options you see depend on your PC’s particular features. Figure 12-8 displays the Power Options for a typical computer.
A power plan dictates things like how soon the computer goes to sleep, how bright the screen is, what speed the processor cranks at, and so on. This panel presents you right up front with three premade power plans:
Balanced, which is meant to strike a balance between energy savings and performance. When you’re working hard, you get all the speed your PC can deliver; when you’re thinking or resting, the processor slows down to save juice.
Power saver slows down your computer, but saves power—a handy one for laptop luggers who aren’t doing anything more strenuous than word processing.
High performance (click “Show additional plans” to see it) sucks power like a black hole but grants you the computer’s highest speed possible.
Tip
You don’t have to open the Control Panel to change among these canned plans. On a laptop, for example, you can just click the battery icon in your notification area and choose from the pop-up menu.
But adding to Microsoft’s three starter plans can be useful, not only because you gain more control, but also because you get to see exactly what a plan is made of. You create a new plan by modifying one of Microsoft’s three starter plans.
Start by clicking “Create a power plan” (left side of the window). On the next screen, click the plan you want to modify, type a name for your plan (say, PowerPoint Mode), and then click Next.
The “Change settings” dialog box now appears. Yeah, yeah, you can use the pop-up menus to specify how soon your PC sleeps and turns off its monitor; if you’re using a laptop, you can even specify different timings depending on whether you’re running on battery power or plugged into the wall. Boring!
The real fun begins when you click “Change advanced power
settings” (Figure 12-8, bottom).
Lots of these subsettings are technical and tweaky, but a few are
amazingly useful (click the button next to each one to see your
options):
Require a password on wakeup. Nice security feature if you’re worried about other people in your home or office seeing what you were working on before your machine went to sleep to save power.
Hard disk. Making it stop spinning after a few minutes of inactivity saves a lot of juice. The downside: The PC takes longer to report in for work when you return to it and wake it up.
Wireless Adapter Settings. If you’re not using your computer, you can tell it to throttle back on its WiFi wireless networking signals to save juice.
Sleep. How soon should the machine enter low-power sleep state after you’ve left it idle? And should it sleep or hibernate?
Power buttons and lid. What should happen when you close the lid of your laptop or press its Power or Sleep button (if it has one)?
PCI Express. If you’ve got any adapter cards installed, and they’re modern and Windows 7/8–aware, then they, too, can save you power by sleeping when not in use.
Processor power management. When you’re running on battery power, just how much are you willing to let your processor slow down to save juice?
Display. These controls govern how fast your monitor turns off to save power.
Multimedia settings. These controls have little to do with electricity and everything to do with not ruining your big PowerPoint pitch. They let you specify that the computer should not sleep if you’re in the middle of playing a song, a movie, or a PowerPoint deck.
Battery. “Critical battery action” dictates what the laptop should do when the battery’s all out: hibernate, sleep, or shut down. The other settings here let you govern when Windows’ two low-battery warnings appear (that is, at what percentage-remaining levels).
Some of these options also appear in the task pane at the left side of the Power Options control panel, for your convenience. They affect whatever plan is currently selected.
In any case, click OK to close the “Advanced settings” box. Click “Save changes” to immortalize your newly created power plan. From now on, you can choose its name from the Battery icon on the system tray (if you have a laptop), or switch to it right in the control panel (if you have a desktop).
Programs and Features is about managing the software you have installed, managing updates, and buying software online. It replaces the old Add/Remove Programs program. (“Add” was dropped from the name because it was unnecessary; all programs these days come with their own installer. When was the last time you installed a program through Add/Remove Programs?)
This window is useful for fixing (which might simply mean reinstalling), changing, or uninstalling existing programs, and it’s the only place you can go to turn on (or off) Windows features like Fax and Scan, Telnet Client, and more.
Tip
Programs and Features is listed in the secret Start menu for quick access; see The Start Button.

The Recovery icon is nothing more than a trio of links: “Create a recovery drive” lets you turn a flash drive into an emergency startup disk. Open System Restore and Configure System Restore are both part of the System Restore feature that rewinds your computer to an earlier, better-behaved state (System Restore). There’s also a link here to the new PC Refresh feature (Removing Updates).
Windows can accommodate any conceivable arrangement of date, currency, and number formats (Figure 12-9); comes with fonts for dozens of Asian languages; lets you remap your keyboard to type non-English symbols of every ilk; and so on.
If you think that 7/4 means July 4 and that 1.000 is the number of heads you have, then skip this section.
But in some countries, 7/4 means April 7, and 1.000 means one thousand. If your PC isn’t showing numbers, times, currency symbols, or dates in a familiar way, choose your country from the “Current format” pop-up menu. (Or, if you’re a little weird, use the “Customize this format” button to rearrange the sequence of date elements; see Figure 12-9.)
Tip
The Customize Format box (Figure 12-9) is where you can specify whether you prefer a 12-hour clock (“3:05 PM”) or a military or European-style, 24-hour clock (“1505”).
This tab identifies your computer’s location. (If it has GPS, you don’t have to tell it manually where you are.) The point is so that when you go online to check local news and weather, you get the right local news and weather—a handy feature if you’re traveling with a tablet or a laptop.
The “Change system locale” button on this tab lets you specify which language handles error messages and the occasional dialog box. (Just changing your input language may not do the trick.)
The “Copy settings” button lets the newly configured language settings apply to new user accounts, so anyone who gets a new account on this computer will have your language, format, and keyboard settings conveniently available to them.
With Windows 8, Microsoft continues its service to the world’s corporate IT nerds. As in the past, these corporate system administrators can “publish” certain programs, or even entire computers, at the company headquarters—and you, using your laptop or home computer, can use them as though you were there.
But in Windows 8, these “published” resources behave even more like programs right on your PC. They’re listed on your Start screen, for heaven’s sake, and you can search for them as you’d search for any app.
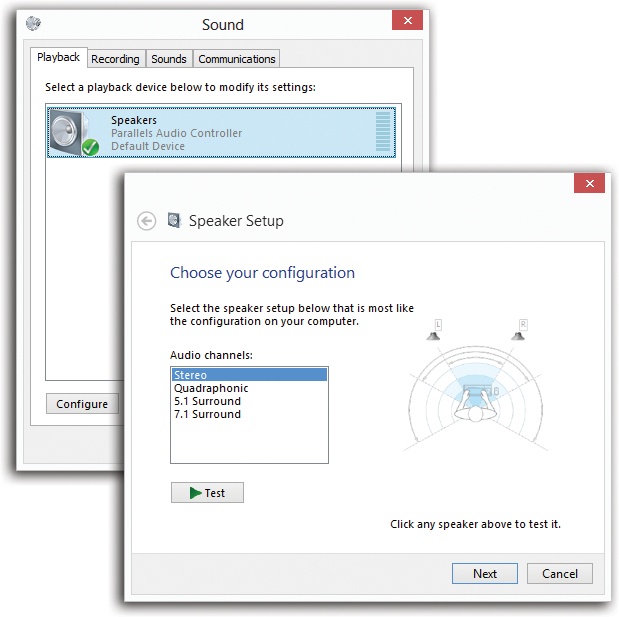
Figure 12-10. Top: The Playback and Recording tabs display the devices your computer has for playing or recording sounds. If you select the device, you can see its properties or configure it. Bottom: Here are some of the configurations you can set from the Playback tab, from simple stereo to 7.1 surround sound. Your setup may vary.
The whole cycle begins when your company’s network nerd provides you with the URL (Internet address) of the published program. Once you’ve got that, open the RemoteApp and Desktop Connections control panel, and then click “Set up a new connection with RemoteApp and Desktop Connections.”
A wizard now appears; its screens guide you through pasting in that URL and typing in your corporate network name and password.
When it’s all over, you see a confirmation screen, and your new “connection” is listed in the control panel.
This box contains four tabs that control every aspect of your microphone and speakers: Playback, Recording, Sounds, and Communications. See Figure 12-10.
These tabs simply contain the icons for each attached sound device. To change a device’s settings, select it, and then click Configure.
If you’re configuring an output (“playback”) device like a speaker or a headset, then you get a quick wizard that lets you set the speaker configuration (stereo or quadraphonic, for example). If you’re configuring a microphone (“recording”), then you’re taken to the Speech Recognition page, where you can set up your microphone.
Windows comes with a tidy suite of little sound effects—beeps, musical ripples, and chords—that play when you turn on the PC, trigger an error message, empty the Recycle Bin, and so on. This tab lets you specify which sound effect plays for which situation; see Sounds for details.
This little program sets up all the speech-related features of Windows. See Export/Import for complete details.
Storage Spaces is a new Windows feature that lets you use two or more hard drives as a super-safe, super-redundant backup system. Even if one dies, your files are still protected. Details are on Storage Spaces.
The Sync Center used to be where you managed connected devices (like smartphones or palmtops) and synchronized them with your calendar and address book. In Windows 8.1, it’s strictly for syncing your files with folders elsewhere on your corporate network, so you’ll always be up to date. For details, see Reconnecting to the Network.
This advanced control panel window is the same one that appears when
you right-click your Computer icon and choose Properties from the
shortcut menu (or press  +Break key). It contains the various settings
that identify every shred of circuitry and equipment inside, or
attached to, your PC.
+Break key). It contains the various settings
that identify every shred of circuitry and equipment inside, or
attached to, your PC.
When you open the System icon in Control Panel, you’re taken to the System window (Figure 12-11). Here you can find out:
What edition of Windows is installed on your computer. As you know, Windows 8 comes in several editions. Not all editions are made equal; if you’re flailing to find some feature that you could have sworn you were supposed to have, it’s good to check here. You might find out that the feature you want is available only on higher-priced versions.
Your PC’s performance rating—a statistic for establishing your superiority over lesser PC owners.
The model name and speed of your PC’s processor (such as Intel Core i7, 2.0 GHz).
How much memory your PC has. That’s a very helpful number to know, particularly if you need to improve your computer’s speed.
Your computer’s name, domain, or workgroup, which can be modified with the “Change settings” button. Remember, your computer name and description are primarily useful on a network, since that’s how other people will identify your computer. Unless you tell it otherwise, Windows names your computer after your login name, something like Casey Robbins-PC.
Whether or not your operating system is activated. For more on Activation, check Appendix A.
What the Product ID key is for your system. Every legal copy of Windows has a Product ID key—a long serial number that’s required to activate Microsoft software. For more information about Product ID keys, see Appendix A.

Figure 12-11. The System window is a one-stop shop for all things computer-related. From your hardware (and what Windows thinks of it) to your product ID key, System’s got you covered.
Tip
In the Windows Activation section, you can do something unprecedented (and this is a really good thing): You can change your Product ID simply by clicking “Change product key” in the System window without having to reinstall your operating system. That’s progress.
At the left side of the window, you’ll find a few links:
Device Manager. This very powerful console lists every component of your PC: CD-ROM, Modem, Mouse, and so on. Double-clicking a component’s name (or clicking the
symbol) discloses the brand and model of
that component. For more on the Device Manager, see Chapter 20.Remote settings. To read about Remote Assistance—the feature that lets a technical help person connect to your PC (via the Internet) to help you troubleshoot—turn to Remote Assistance.
System Protection. This link takes you to the System Protection tab in the System dialog box. Here you can keep track of the automatic system restores (snapshot backups of a system) or even create a new restore point. And if your computer has begun to act like it’s possessed, you can go here to restore it to a previous restore point’s state. Check out Chapter 22 for more details.
Advanced system settings. Clicking this link opens the Advanced tab of the System Properties dialog box. This tab is nothing more than a nesting place for four buttons that open other dialog boxes—some of which aren’t “advanced” in the least.
The first Settings button opens the Performance Options dialog box, described on Shutting Off Bells and Whistles. The second Settings button opens the User Profiles box, which is covered in Chapter 24. The third Settings button opens a Startup and Recovery window. It contains advanced options related to dual-booting (Appendix A) and what happens when the system crashes.
Finally, the Environment Variables button opens a dialog box that will get technically minded people excited. It identifies, for example, the path to your Windows folder and the number of processors your PC has. If you’re not in the computer-administration business, avoid making changes here.
This program controls every conceivable behavior of the taskbar. You can read all about these options—the same ones that appear when you right-click the taskbar or the Start button and choose Properties from the shortcut menu—in Chapter 6.
Here’s a list of Windows’ troubleshooters—step-by-step interview screens that walk you through fixing various problems. [Insert your own joke here about Windows’ need for an entire program dedicated to troubleshooting.]
Anyway, you can find links here for running older programs under Windows 8.1, getting online, figuring out why your speakers aren’t working, sleuthing out why your PC is getting so slow, and so on.
This control panel is the master switch and control center for the user-accounts feature described in Chapter 24. If you’re the only one who uses your PC, you can (and should) ignore it.
If you’ve used the backup feature described in Chapter 22, and something goes wrong, this is where you go to recover files from the backup. (Why is it called “Windows 7” when this is Windows 8.1? Because Microsoft doesn’t want you using this backup feature anymore. You have better tools, like File History. But this is here in case you upgraded a machine to Windows 8.1 after having used Windows 7 to make a backup.)
Windows Defender is Microsoft’s free anti-spyware/antivirus program, built into Windows. For an extensive look at what it can do for you, see Chapter 14.
In this age of digital technology, when most people’s computers are connected at all times to the Internet (and therefore always vulnerable to the Internet), it’s a good and reasonable idea to have a firewall protecting your computer from possible attacks and exploitation. To learn more about Windows Firewall, see Chapter 14.
Here’s a one-stop shopping center for the most important laptop features: battery, wireless networking, external projector connection, and so on. You can read all about it at the beginning of the Road Warrior’s Handbook (Chapter 28).
Because Windows is a constant work in progress, Microsoft frequently releases updates, fixes, patches, and drivers, in hopes of constantly (or at least one Tuesday a month) improving your computer’s speed and security. Windows Update is the tool used to acquire, install, and track those useful fixes. For a more in-depth look at Windows Update, see Chapter 21.