Introduction
Welcome! This book is designed to teach you how to create models and environments in 3D, using two pieces of software: Blender, for 3D design and animation, and GIMP, for 2D image editing. In each chapter I take you through a part of the process of creating three complete 3D scenes. You’ll learn how to block out and create models, sculpt and detail them, texture and create materials, use lighting, and render finished images. In the course of the book, I discuss the wide array of tools that Blender and GIMP offer and how to use them in real projects.
My goal is to teach you how to approach and finish your own projects in Blender, using three of my own projects to provide the narrative and examples of the tasks required. By the end of this book, you should be able to create your own projects from scratch using the principles demonstrated in the three example projects.
Topics Covered
Here’s a brief summary of each chapter in the book.
Chapter 1 and Chapter 2 offer an introduction to Blender and GIMP. You learn what they are, where you can get them, and what you can do with them. I also introduce you to their user interfaces and the basics of working with them. Chapter 1 focuses on Blender. We look at adding and manipulating objects, saving and loading, and best practices when working on a project. In Chapter 2 we examine creating images in GIMP using its various brushes and filters, as well as how to work with layers and selections.
Chapter 3 covers gathering reference material, creating concept art and using these materials in Blender to make it easier to bring your ideas to life in 3D. I discuss using orthographic references, creating reference sheets, and importing reference images into Blender’s 3D Viewport to use while modeling.
In Chapter 4 and Chapter 5 we move on to blocking in the most important aspects of a scene with simple geometry and then fleshing out these basic forms with more detailed models. We look in-depth at Blender’s 3D modeling tools and how to create models with simple, efficient geometry.
Chapter 6 covers Blender’s sculpting tools and how to combine them with Blender’s Multiresolution modifier to produce a model that can be sculpted like clay—perfect for creating detailed, organic models.
Chapter 7 looks at how to modify the high-resolution, sculpted geometry from Chapter 6 to create simpler geometry. We look at a few of the different methods Blender offers for retopology and how they can be applied to turn our sculpted meshes into final models.
Chapter 8 looks at Blender’s UV unwrapping tools that allow you to map 2D images onto the surface of your models. This lets you paint on them and give them colors and textures.
Chapter 9 covers creating strand particle systems with Blender’s particle tools. These can be used to generate hair and fur, and Blender’s particle mode brushes allow you to comb and cut that hair or fur into many shapes and styles. We look at the various settings for particle systems and how to use Blender’s child particles to generate vast numbers of particles from relatively few parents in order to create complex, thick hair and fur with minimum input.
Chapter 10 looks at texture baking, the process of automatically generating textures based on the geometry of a mesh, while Chapter 11 covers texture painting, which combines the baked textures from Chapter 10 with hand-painted details and photographs using Blender’s texture painting tools and GIMP.
Chapter 12 and Chapter 13 cover Blender’s materials and lighting options. We look at the Blender Internal renderer and the Cycles render engine, and how each impacts the way we set up our lights and materials. In Chapter 12 we learn how to use the textures created in Chapter 10 and Chapter 11 to create materials that give realistic results when rendered. Chapter 13 covers creating lights and how to set them up for both the Blender Internal and Cycles engines to get attractive lighting and shadows that render quickly.
In Chapter 14 we bring together all of the components created in previous chapters, including models, lights, materials, and textures, to render our final images. We discuss the most important render settings for the Blender Internal and Cycles engines, along with how to get the best results quickly. We also examine Blender’s node-based compositor and how to use it to further post-process your final renders. Finally, we use GIMP for some extra touch-ups and for painting backgrounds for our images.
In Chapter 15 we take a final look at the projects covered, and think about what could be done to take things further. I cover adding a few embellishments to the projects and look at them from some different perspectives, before examining ways to take our still images and make them move with Blender’s rigging and animation tools.
What Isn’t Covered
Blender is an extremely powerful 3D design and animation package. It has tools for modeling, texturing, creating materials, and particle systems, as well as tools for rigging and animation, compositing, and scripting; a full-featured game engine; a non-linear video editor; and some advanced fluid, cloth, and rigid body-simulation tools. This book attempts to deal only with the aspects of Blender that are needed to create, texture, and render models as still images. It doesn’t cover Blender’s rigging and animation tools, simulation tools, or the game engine. There are a wealth of other resources out there on such topics. If you’re interested in finding them, try http://www.blender.org/education-help/.
Requirements
To make the most of this book, you will need a reasonably current computer, running a recent version of Microsoft Windows, Mac OS X, or Linux. In particular, when it comes to the sculpting portions of the book, some extra RAM (8GB is good) and a reasonably fast graphics card will prove useful. A pressure sensitive pen tablet (for example a Wacom Bamboo or Intuos) will be really helpful when you reach the texturing and sculpting sections of the book, but it isn’t an absolute necessity.
The Projects
In order to provide a common thread as we progress through this book, I’ve chosen to center the discussion on three projects. Each was chosen to provide different challenges and thus provide you with broad, practical knowledge of the tools and options in Blender and GIMP.
The Bat Creature
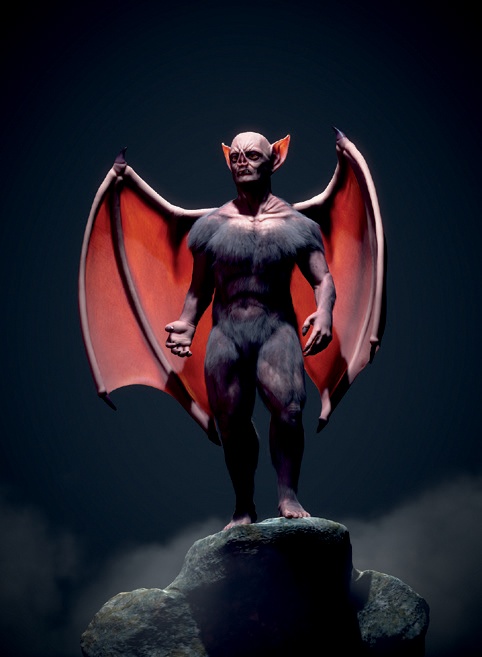
The Bat Creature project focuses on organic modeling to create a humanoid, if monstrous, creature (Figure 1). For this project we first create a simple base mesh and then sculpt the more complex, organic forms of the body with Blender’s sculpt tools. We complement this by creating fur with Blender’s particle systems. We move on to unwrapping and texturing our creature and then create realistic materials for the skin and fur, which feature subsurface scattering and realistic hair. We render this project with the Blender Internal engine in order to use its highly customizable materials and fast, efficient rendering of hair and fur. Finally we create some dramatic lighting in Chapter 13, where you learn how to get the best results from Blender’s lights and how to achieve realistic shadows when working with fur.
The Spider Bot
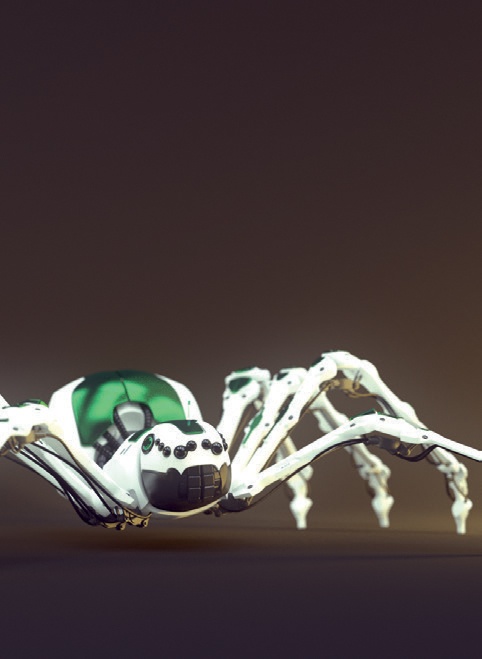
In contrast to the organic forms of the Bat Creature project, the Spider Bot project will show you how to create a mechanical-looking, hard-surface model of a robotic spider (Figure 2). This task requires a different approach at each stage of the project when compared with the Bat Creature. We begin by blocking in basic forms with simple geometry, but we use duplication to create the repeated parts of the model, such as the legs. When sculpting we use Blender’s hard-surface brushes to arrive at a smoother, less organic final result. Then we use Blender’s retopology tools to refine the model into something smooth and sleek. Finally, we render this project with the Cycles render engine because it offers realistic rendering of shiny materials and complex lighting.
The Jungle Temple
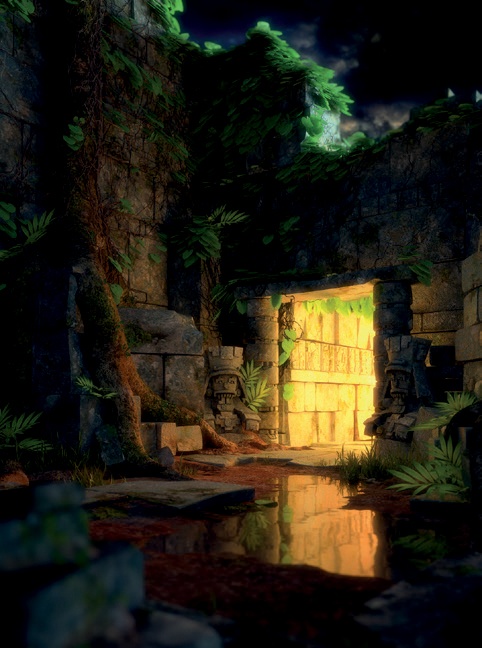
The Jungle Temple project centers on an environment instead of a character: a ruined temple deep in the jungle (Figure 3). We look at blocking in a scene and keeping its composition tailored to the camera. We use duplication, particle systems, and Blender add-ons to create varied vegetation. When texturing, we focus on creating multiple seamless textures using GIMP, which can be tiled and repeated across multiple objects to allow a wide variety of materials to be created using only a few unique textures. We render this scene with the Cycles engine (which allows for the quick creation of realistic lighting) in Chapter 14, and then use Blender’s compositor to add some post-processing. Finally, we use GIMP to paint a background for the scene.
How to Follow the Projects
While the projects form the main narrative of this book, I don’t cover every step of creating them. Instead, I focus on the most important or difficult aspects of creating each project at each stage of its development and leave the rest as an exercise for you should you wish to produce a similar result. I hope that this approach will show you how to go about creating all kinds of 3D images with Blender and the thought processes and challenges involved. To help with this goal, most of the chapters in this book also feature supplementary information and tips that offer more general guidance that you should find useful in a wide range of projects.
Resources Accompanying This Book
The DVD accompanying this book contains all the files for the projects in this book, including separate .blend files for each project (corresponding to each chapter in the book) and each project in its final state at the end of each chapter (where relevant). These resources should allow you to look in-depth at the workings of each project and to examine how each one takes shape. Creating 3D art is a complex process, and the end product is often a result of some amount of experimentation. These project files are not a literal snapshot of the projects as they progressed; instead, they are an idealized, tidied-up version of what each project would look like at a given stage.
Also included are the textures used for each project, .blend files with some useful brushes for sculpting and MatCap materials (see Chapter 6 for more on sculpting and MatCap materials), and the GIMP brush created in Chapter 11 that you can use in your own projects.
You can use these files any way that you like. All are licensed under the Creative Commons noncommercial attribution (CC-BY-NC) license, with the exception of the textures, which are included with the kind permission of CGTextures (http://www.cgtextures.com/), a fantastic online resource for finding textures. These may not be distributed unmodified without permission from CGTextures.
Let’s Begin
This introduction has hopefully let you know what this book is about and where in the book you can look for the information you need. I’ve outlined the projects we will be working through and what you can hopefully expect to learn from them. Now we can start getting acquainted with Blender and GIMP, before diving into the projects. If you’re already comfortable with the basics of Blender and GIMP, you can skip to Chapter 3. Otherwise, the next two chapters should provide a basic introduction to the workings of the software we will be using in this book.


