
There’s been a resurgence in the popularity of ponchos and capes and other unstructured garments that hug or drape the body. Collectively called wraps, these garments are particularly attractive to knitters and crocheters. Given that there are usually no sleeves or armholes to fit or shape, a wrap can be quite easy to knit, and given that they can be easy to put on and easy to rearrange, they can be enormously satisfying to wear.
A shawl is conventionally thought of as a square, oblong, or triangular garment that wraps around the head or shoulders. It is, in essence, a large scarf. A stole is a long, wide scarf that is usually worn across the shoulders (but not over the head). By common usage, the word “stole” is always used to refer to ecclesiastic garments and never used to describe a triangular shape or something that may be worn over the head. If you sew together parts of the long edges of a rectangular shawl or stole, you’ve got a shrug, a woman’s small jacket formed by two sleeves that extend across the back. Take a wide shawl (or blanket), cut a hole in the center for the head, and you’ve got a sleeveless garment, called a poncho, that drapes over the shoulders and covers the upper body. Cut a poncho open in the front and refine the shape by making it fit closely at the neck and loosely around the shoulders, and you’ve got a cape, or a capelet if the garment falls above the elbows. Beyond these general distinctions, though, there are a host of shaping and decorative details that can set off any type of wrap. The eighteen designers whose designs appear in this book have followed convention, made modifications, and taken liberties with the ways that knitted fabric can be wrapped around the body.
A wrap can be as simple as a wide knitted strip sewn together to form a poncho, or as thought-out as a fitted capelet shaped to follow the contours of the neck and shoulders. If you’re a beginning knitter who’s uncomfortable working increases and decreases, begin with a wrap that’s made up of one or more rectangles. As you develop confidence in your skills and begin to feel adventurous, work one of the shaped pieces, try a stitch or color pattern, or add beads or embroidery to embellish a finished piece. Follow the instructions for one of the wraps step by step (pages 12–125), or venture out on a design of your own (pages 132–143). Whatever you’re looking for, you’ll find solid instruction and inspiration throughout the pages of this book.
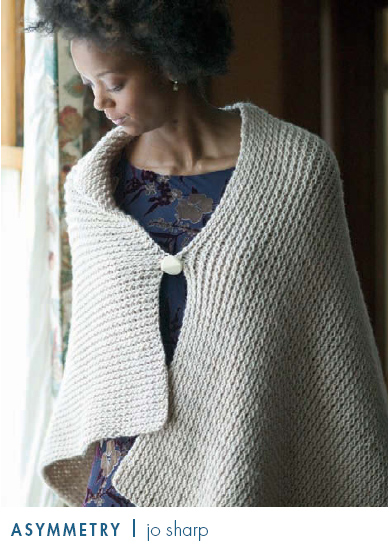
The simplest wrap, a shawl or stole, consists of a single rectangular strip that can be folded around the shoulders. To make a more structured garment from a rectangle, sew one short end to the side edge of the opposite end as shown at right. The rectangle becomes a tube of sorts with a neck opening, and it can be worn as a poncho. For more visual interest, work two identical rectangles and sew them together. Jo Sharp has used this technique in Asymmetry (page 12), but she’s sewed only one seam and used a decorative button to hold the pieces together at the neck. Her placement of the button allows one side to fold over into a gentle collar. Whether you work with one rectangle or two, you can adjust the way you wear the piece so that the straight sides are parallel to the floor or so that the corners are centered at the front and/or back.
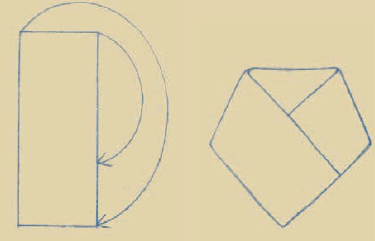
Sew one short end to the long side of a single rectangle.
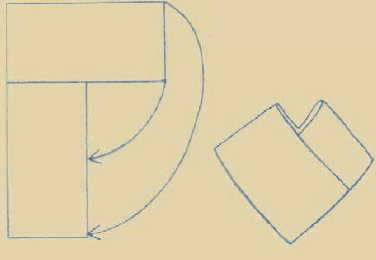
Sew two rectangles together, joining the short end of one to the long side of the other.
A knitted rectangle can also be the foundation for a shrug. Fold each long edge to the center and sew the edges together from the selvedges toward the center to form “sleeves,” leaving the center portion open for the neck and shoulders as shown below. Teva Durham’s Green Sleeves (page 28), Annie Modesitt’s Victorian Velvet (page 120), and Leigh Radford’s Enchanté (page 112) are variations of the shrug concept whose sleeves extend into scarves that wrap around the neck and shoulders.

Fold the long sides of a rectangle to the center and sew them together for a short distance.
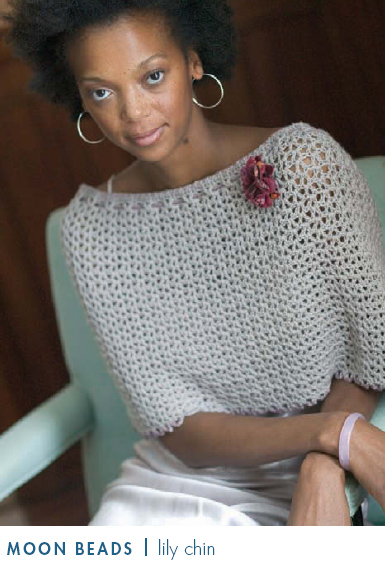
A tube that hugs the shoulders is another popular design for a wrap. The simplest tube is made by sewing together the short ends of a rectangle. But you can also work a tube circularly (i.e., knit in the round). Deborah Newton has worked her Spiral Shell (page 20) in the round using a diagonal lace stitch pattern designed specifically for circular knitting. Lily Chin has modified the circular tube design in Moon Beads (page 24). She’s crocheted a tube for the upper few inches, then worked back and forth to create a slit on the lower portion (just right to reveal a bit of arm) and added a beaded drawstring at the shoulders for a secure fit and a touch of fancy. You can work a tube from the “neck” down or from the bottom up—because there is no shaping; only a stitch or color pattern will indicate which way is “up.” Whether your tube is a seamed rectangle or worked in the round, the stretch of the fabric is ideally all that’s needed to hold the piece in place. To ensure that the tube stays put, though, consider drawing in the upper circumference by adding an inch or so of ribbing or a bit of shaping, or by using progressively smaller needles as you approach the neck.

Sew the short ends of a rectangle together to form a tube.
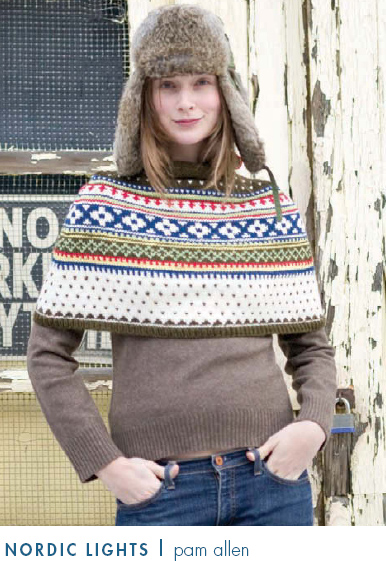
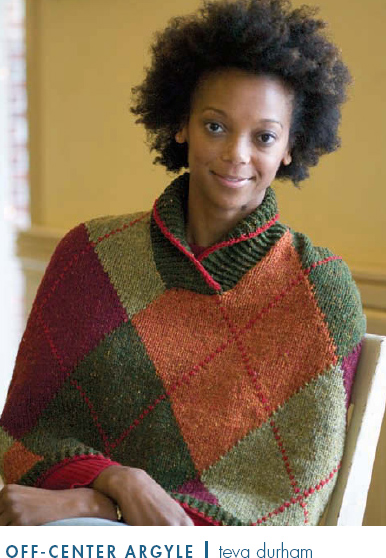
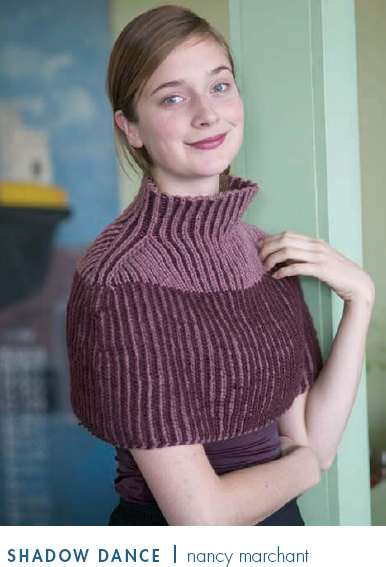
Many different looks (and fits) are possible if the basic tube is shaped to follow the lines of shoulders and neck, as in the traditional poncho illustrated below. The shaping (increases if the piece is worked from the neck down; decreases if it’s worked from the bottom up) can be positioned in various ways, depending on whether you want them to stand out as a prominent part of the overall design or to be inconspicuously incorporated into a stitch or color pattern. In Nordic Lights (page 60), Pam Allen has formed a shaped tube from the bottom up by working decreases several stitches in from markers placed at the side “seams.” To shape the shoulders, she switches to working back and forth on the front and back and later seams the two together. For Shadow Dance (page 106), Nancy Marchant has worked a “tube” in the round from the neck down and placed increases along the shoulder lines to highlight the prominent vertical ribs of the brioche stitch pattern. Teva Durham (Off-Center Argyle, page 68) and Nicky Epstein (Tapestry Garden, page 72) have worked their “tubes” in two or three pieces—a back and one or two front(s)—that taper from the wide lower edge to the neck, then get seamed together along the sides. The pieces are shaped with decreases worked along the side seams—at longer intervals from the lower edge to the shoulder, then closer together to create a nearly horizontal line to the neck.

Add increases (if working from the top down) or decreases (if working from the bottom up), to form a shaped tube.
The classic chevron shape characteristic of many ponchos is made by working the shaping along the center front and center back. In Viva la Poncha (page 86), Deborah Newton has modified this approach by working the shaping on each side of a large cable centered on the front and back. In Rap on Stripes (page 16), Véronik Avery has worked the shaping on just one side for a single chevron that can be worn centered in the front or back, or over one shoulder.
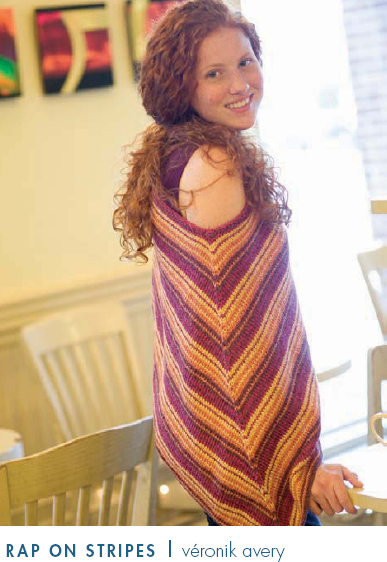
Another way to taper a tube is to place the increases or decreases along four raglan lines that radiate out from the neck; the lines visually divide the piece into a front, back, and two “sleeves.” You can choose from a number of different increase and decrease techniques to create an unobtrusive or decorative look. Ann Budd has used raglan shaping in Grand Plan Top-Down Capelets (page 48), which demonstrate several types of increases. Keep in mind that this type of shaping does interrupt a stitch or color pattern along the four raglan lines. But you can use these interruptions to add interest to horizontal stripes (as in Véronik Avery’s Rap on Stripes on page 16) or to create other kinds of decorative enhancements.

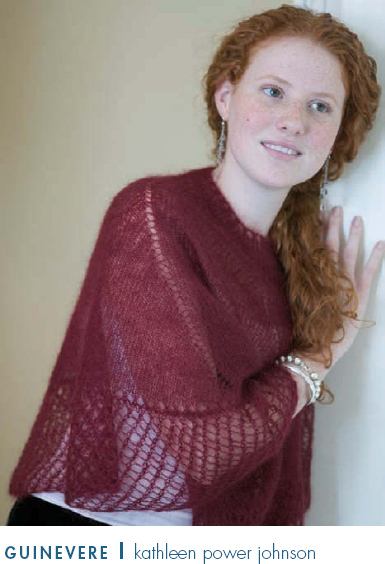
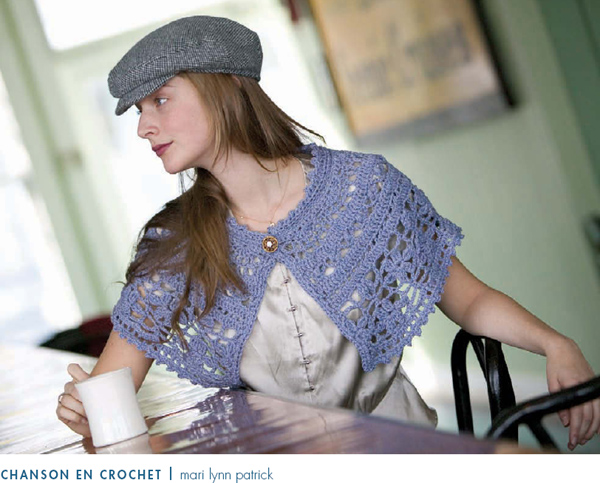
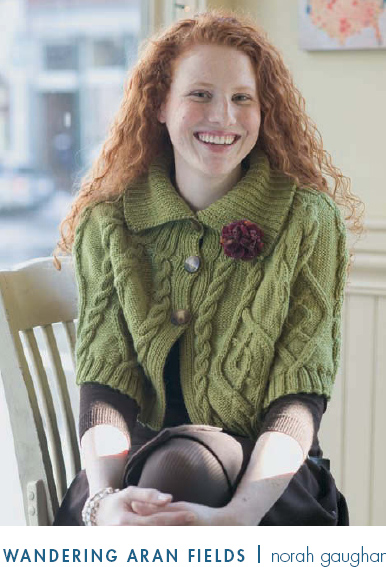
Many designers choose to spread the increases or decreases evenly around the entire circumference of the piece. This is the same type of shaping that’s used in classic Icelandic or Fair Isle circular-yoke sweaters. Norah Gaughan has used this approach for Wandering Aran Fields (page 64) by working the cape from the bottom up and cleverly concealing the decreases in the reverse-stockinette sections that separate the cables. Shirley Paden has used a similar technique in Wrapped in Tradition (page 90), where she places evenly spaced decreases between the bands of lace to simultaneously taper the fit and adjust the stitch count to accommodate full repeats of each successive lace pattern. In Guinevere (page 102), Kathleen Power Johnson has used decorative yarnover increases to form curved, radiating lines in her almost-a-circle stole. This type of circular shaping is also ideal for crochet patterns, such as Mari Lynn Patrick’s Chanson en Crochet (page 38). Mari Lynn has worked the cape from the neck down, placing evenly spaced increases within the bands of crochet patterns to give a gentle flair to the lower circumference of the capelet.
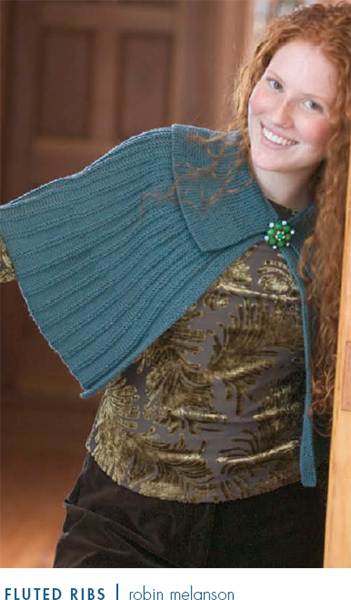
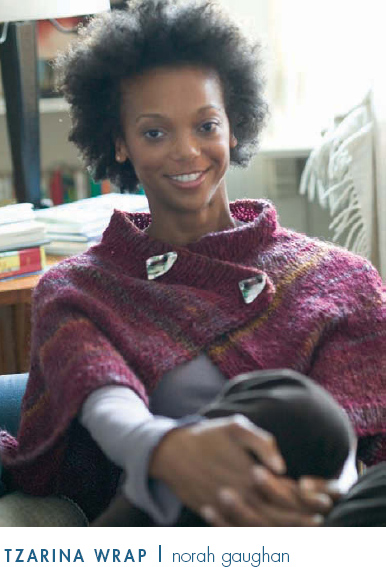
Of course, not all designers follow a standard template and not all designs fit a mold. Take Mari Lynn Patrick’s Tailored Froth (page 116)—here’s a shaped tube with a front opening to which the designer has added miniature “cuffs” at the lower side edges to make the wrap fit more like a small jacket than a capelet. For her Shoulder Cozy (page 78), Mari Lynn begins with a few stitches at the lower center back, then, working back and forth, she increases a few stitches at the end of each row until the sides are long enough to reach around and button in the front. The gradual increases give a gentle, flattering curve to the back. Norah Gaughan’s Tzarina Wrap (page 34) is a cross between a classic poncho and cape—it has a rectangular shape and is open at the sides like a traditional poncho, but it opens in the front like a traditional cape. For an off-center flourish, Norah has made the two fronts extra wide and fastened them with two buttons just below the neck. Robin Melanson has taken a completely different approach. In Fluted Ribs (page 94), Robin works sideways, from center front to center front, and uses a series of short rows placed uniformly around the circumference to taper the capelet from hem to neck.
A wrap is a good project for beginning designers. There are rarely more than two pieces—a front and a back—and because a wrap doesn’t have to fit “like a glove,” there can be some leeway in the finished size. All you have to do is pick a yarn and knit a swatch to determine your gauge, then choose from one of the shapes and sizes provided here, and you’re on your way.
As with most knitting projects, you’ll want to start by knitting a gauge swatch. Otherwise, you won’t know how the yarn you’ve chosen will knit up with the stitch pattern and needles you’re using. The bigger the swatch, the better idea you’ll have of the look and drape of the finished fabric. Most knitting books advise a 4" (10 cm) square, but 6" (15 cm)—or more—is even better. If you’re working a stitch pattern, you’ll want to make sure to work at least two full repeats, both horizontally and vertically, so that you can see how the repeats fit together.
Once you’ve finished knitting the swatch, bind off loosely and remove it from the needles. Lay it flat on a table and steam it gently. Say you’re working in inches. Use a ruler to measure the number of stitches (including partial stitches) across 4" in both width and length (see Glossary, page 151). Divide these numbers by 4 to determine the number of stitches in 1" of width and the number of rows in 1" of length. After that, it’s a simple matter to multiply the number of stitches per inch of knitting by the desired dimension in inches (e.g., the width of the lower edge), to come up with the number of stitches to cast on. For example, let’s say that you get 18 stitches in 4" of width and 24 rows in 4" of length. Divide 18 by 4 to get the number of stitches per inch (4.5) and divide 24 by 4 to get the number of rows per inch (6). Now let’s say that you want to make a rectangular shawl that’s 18" wide and 60" long. Based on your gauge swatch, you’ll know that you need to cast on 18 × 4.5 stitches (81 stitches) and knit for 60 × 6 rows (360 rows). However, if you’re really working a simple rectangle, you needn’t bother with the row gauge, just cast on and work until your piece measures the desired length.
Once you know the gauge, you can use the following templates to design your own wrap. After you become familiar with the shaping techniques, you can use the basic plans as a starting place and add refinements in shape and size to suit your own sense of style.
Dimensions can vary, but in general, to distinguish a shawl or stole from a scarf, the rectangle should measure between 14" (35.5 cm) and 24" (61 cm) wide and between 32" (81.5 cm) and 60" (152.5 cm) long. Let practicality be your guide—you don’t want the piece so long that you risk tripping over it. To prevent the piece from curling on the edges, work a border in a noncurling stitch such as ribbing or garter stitch (see page 139–140 for more edging options). The wider the border, the smoother the edges will be.
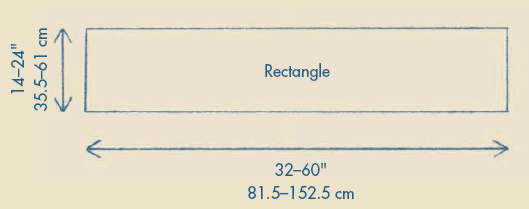
Cast on the appropriate number of stitches to give the desired width or short dimension of the rectangle (add a few extra stitches for noncurling borders if you’d like), work the pattern until the piece measures the desired length (working the edge stitches in a noncurling stitch), then bind off all the stitches. Working in this direction, you will have a relatively small number of stitches, but you will work them for a relatively large number of rows.
Cast on the appropriate number of stitches to give the desired length or long dimension of the rectangle (you’ll probably need a circular needle to hold all the stitches), and work in your pattern (working the edge stitches in a noncurling pattern if desired) until the piece measures the desired width. This option requires a large number of stitches, but you’ll work them for a relatively small number of rows.
If you want to make the rectangle into a seamed poncho, work the rectangle about 18" (45.5 cm) wide and about 60" (152.5 cm) long, then sew one short end to one long side as shown below. If you want to make a rectangle into a traditional blanket-like poncho, work the rectangle about 30" (76 cm) to 50" (127 cm) wide and about 32" (81.5 cm) to 60" (152.5 cm) long, leaving a slit about 9" (23 cm) to 10" (25.5 cm) long at the center of the piece. Whether you’re working the rectangle sideways or lengthwise, work across all stitches to the beginning of the neck opening, join a new ball of yarn and bind off the desired number of stitches for the width (if you work sideways) or length (if you work lengthwise) of the neck, then work to the end of the row. Work the stitches on each side of the slit with separate balls of yarn until the slit is the desired length, then drop one ball of yarn and continue working across all the stitches with a single ball of yarn until the piece measures the desired finished length. Make sure that the neck opening is at least 18" (45.5 cm) in circumference so that it will slide easily on and off over the head. To make a rectangle into a shrug as shown, begin with a strip that’s between 20" (51 cm) and 40" (101.5 cm) wide and between 52" (132 cm) and 68" (172.5 cm) long. Fold the rectangle in half lengthwise and sew the long edges together from each short end toward the center to form sleeves, leaving about 28" (71 cm) to 42" (106.5 cm) open for the neck and shoulders.
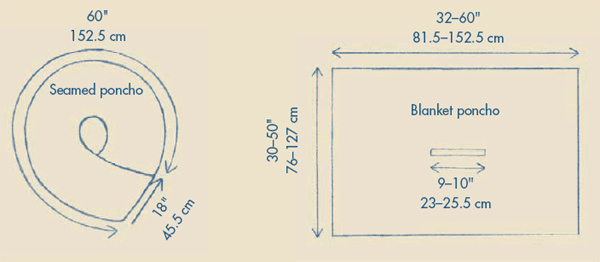

If you know your gauge (number of stitches per inch of knitting), you can knit any size or shape with any yarn.
In general, a triangular shawl is worn with the wide base of the triangle across the shoulders and the point hanging down in the back. The wide base of the triangle forms the “wingspan” and extends from elbow to elbow, or wrist to wrist, depending on the overall dimensions. Most triangular shawls measure from 48" (122 cm) to 68" (172.5 cm) wide at the base and about 20" (51 cm) to 36" (91.5 cm) long, measured in a straight line from base to point. The length of the shawl ultimately depends on the width of the wingspan and the rate of the increases or decreases.
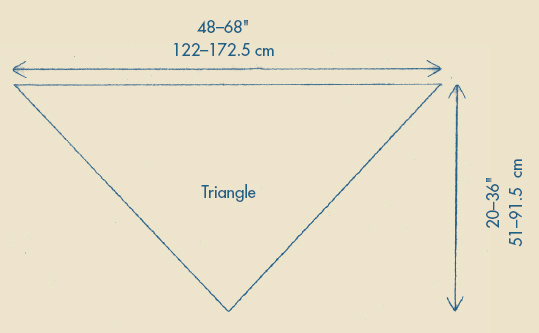
The simplest way to knit a triangular shawl is to cast on a few stitches (usually three) for the point, then increase one stitch at each end of the needle every other row until the desired width is achieved (or you run out of yarn). Bind off all the stitches. A flatter, wider triangle can be made by increasing at both ends of the needle on every row.
To work a triangle from the top down, cast on the appropriate number of stitches to produce the desired total width for the base (wingspan), then decrease one stitch at each end of the needle every other row until about three stitches remain. Again, for a shorter, wider triangle, work the decreases on every row.
It is also possible to work a triangle from one side to the other (called tip-to-tip shaping by some designers). Begin by casting on one to three stitches, then increase one stitch along the same side of the triangle every other row until the desired total length is reached, then decrease one stitch at the same side of every other row until just one to three stitches remain. The unshaped selvedge edge will be straight, and the shaped edge will form the other two sides of the triangle.
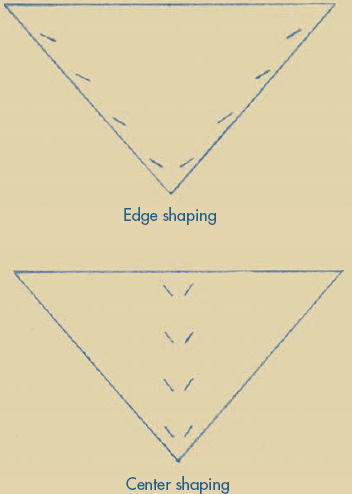
Place the increases/decreases along the sides of a triangle, or close together at the center.
Think of a tube as a rectangle in which the two short edges have been seamed together. Generally the piece should be about 12" (30.5 cm) to 14" (35.5 cm) deep and just long enough to fit snugly around the shoulders—about 34" (86.5 cm) to 54" (137 cm) in circumference. No matter which direction a tube is worked, you can choose to have a closed tube (for a pullover or poncho), or an open tube (for a cardigan or cape). Keep in mind, though, that if there is a front opening, you’ll want to work a noncurling stitch along the opening and plan for some way to fasten the two edges together (see pages 139–141 for more on edge stitches and closures).
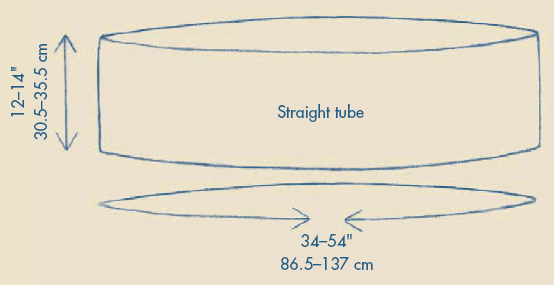
Cast on the appropriate number of stitches to accommodate the desired finished length of the piece, then knit until the piece is long enough to wrap around the torso. Bind off all the stitches, then seam the cast-on edge to the bind-off edge. If you begin with a provisional cast-on (see Glossary, page 147), you can use a three-needle bind-off (see Glossary, page 145) to join the two short ends instead of sewing a seam.
Using a circular needle, cast on the appropriate number of stitches to accommodate the desired finished circumference of the piece, join the stitches for working in the round, and work the desired pattern until the piece measures the desired finished length from top to bottom. The instructions are the same whether you work from the bottom up or from the top down; however, some texture or color patterns will look best when worn in one direction or the other. Try the tube on both ways and decide which you like best.
The longer you make a poncho, the larger the lower circumference should be.
A cape or poncho worked as a tapered tube fits relatively closely at the neck and loosely around the shoulders. For the best fit, the piece should narrow gradually from the elbows to the shoulders, then narrow sharply between the shoulders and neck. The lower edge should measure at least 40" (101.5 cm) in circumference and can be as much as 60" (152.5 cm) or more. The neck opening should measure between 16" (40.5) and 24" (63.5 cm) in circumference—be sure it’s large or stretchy enough to slip over the head if it’s to be a pullover. The length can be anywhere from a short 12" (30.5 cm) to 25" (635 cm), or longer! The shaping is achieved through increases if the piece is worked from the neck down, and through decreases if it’s worked from the bottom up. The type of increases or decreases worked (see the Glossary for options) and their placement (see pages 130–131) can add to your design choices.
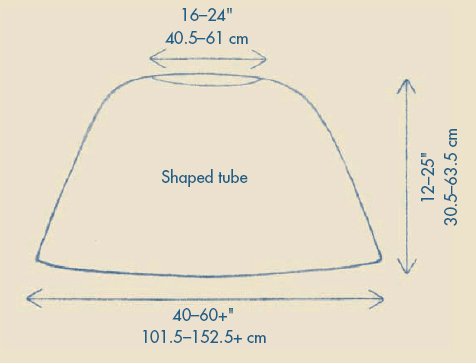
To work from the top down, cast on the appropriate number of stitches for the neck opening, then increase every other row until the shoulder circumference is reached, then increase every fourth row until the desired finished circumference is reached. Some designers like to continue for a few inches without additional increases, others like to continue increasing every fourth or sixth row until the piece measures the desired finished length. Depending on the look you want, there are a number of places where you can place the increases. Work the increases along the side “seams” if you want the pattern on the front and back uninterrupted as in Pam Allen’s Nordic Lights (page 60). Work the increases along raglan lines, as in Ann Budd’s Grand Plan Capelets (page 48), to produce decorative diagonal lines radiating outward from the neck. Work the increases at the center front and center back for a pointed, chevron look, as in Deborah Newton’s Viva la Poncha (page 86).
If you choose to work from the bottom up, cast on the appropriate number of stitches for the desired finished circumference at the bottom edge, then work decreases to taper the upper body. Work the decreases every four rows until the desired shoulder circumference is reached (about where the base of the armhole would fall on a sweater), then every other row to the neck. As with working from the top down, you can place the decreases along the side seams or along raglan lines. You can also center the decreases at the center front and/or center back for a chevron effect, as in Véronik Avery’s Rap on Stripes (page 16).
Another option when you work from the bottom up is to do the decreases in concentric circles as Elizabeth Zimmermann does for sweaters worked in the round according to her EPS system (first published in issue #26 of Wool Gathering, 1982). Elizabeth’s daughter Meg Swansen later updated the technique in issue #65 of Wool Gathering (2001). The upper body is shaped between the armhole and neck by decreases worked in four separate rounds spaced at equal intervals. In the first decrease round, twenty percent of the stitches are decreased; in the second decrease round, twenty-five percent of the stitches are decreased; in each of the final two decrease rounds thirty-three percent of the stitches are decreased.
In general, stitch patterns that combine equal numbers of knit and purl stitches will not curl.
To prevent the edges of a capelet from rolling, you’ll want to add some type of noncurling border stitch to the lower edge, neck, and front opening (if there is one). Choose one of the stitches presented here or consult a book on stitch patterns (see Bibliography, page 156) for other options.
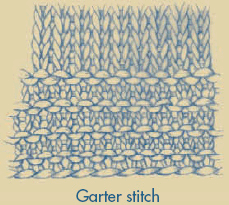
Worked by knitting every stitch in every row, garter stitch forms horizontal bands of “bumps” that are identical on the right and wrong sides of the work. Garter stitch can be worked on any number of stitches.
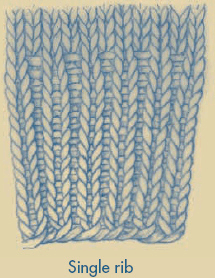
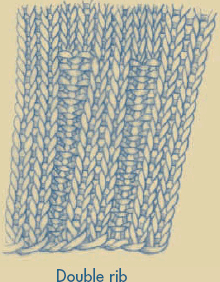
A variety of ribbings can be used to edge your garment, the most common of which are single rib (alternating one knit stitch with one purl stitch) and double rib (alternating two knit stitches with two purl stitches). Single rib is worked on a multiple of two stitches, double rib on a multiple of four. You’ll find dozens of other ribbing options in books of stitch patterns. Because it alternates columns of knit and purl stitches, ribbing tends to pull in and narrow the width of the knitting. For a ribbed border that doesn’t pull in, cast on more stitches for the edging and decrease the extra stitches when you switch to the stitch pattern used for the body of the garment. Or work the rib on a larger needle. Be sure to knit a swatch of the ribbing along with your main stitch pattern to see how they work together.
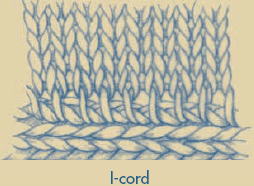
Knit-cord makes a tidy, rounded edge that is sophisticated in its simplicity. It is worked on two double-pointed needles in such a way that a tube is formed (see Glossary, page 152). As an edging, it can be worked separately and sewn in place or attached directly to the edge of the piece as it is knitted. Knit-cord is generally worked on three stitches, but you can work it on four, five, or even six stitches to increase the tube diameter.
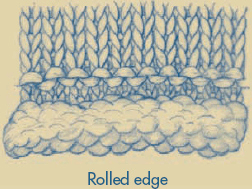
A rolled edge looks like a relaxed knit-cord. A rolled edge can be worked on any number of stitches. Simply work stockinette stitch (with the knit side on the right side) until the curling edge is as deep as you’d like. Then, to mark the end of the roll, work a row of reverse stockinette stitch or a few rows of single or double rib (adjusting the stitch number if necessary to accommodate the pattern repeat) between the roll and the garment body.
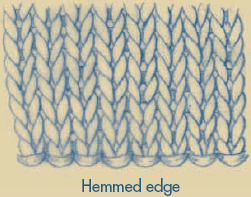
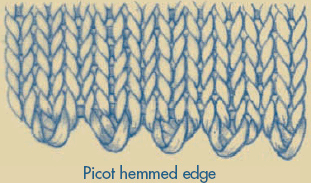
A hem gives a clean, straight line without interruption to the garment body. Begin with needles a size smaller than those you used in your gauge swatch. Work stockinette stitch for the length of the facing, then work a turning row (purl one right-side row, or knit one wrong-side row). Change to the larger needles and work stockinette stitch for the same length as the facing. Join the facing to the body on the next (right-side) row as follows: Fold the facing to the inside and knit each stitch on the needle together with the edge loop of the corresponding stitch of the cast-on row. You can also stitch the facing in place after the knitting is completed. A hemmed edge can be worked on any number of stitches. For a delicate picot variation, work the turning row as follows: * Knit two stitches together, yarnover; repeat from *, ending with “knit two” if you have an even number of stitches, or ending with “knit one” if you have an odd number.
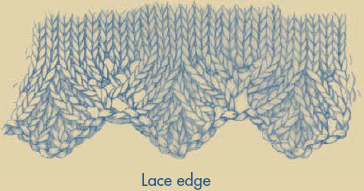
There are hundreds of stitch patterns involving yarnovers paired with decreases that result in lacy patterns that can be used to edge a wrap. Again, look to the many reference books of stitch patterns (page 156) for ideas. Remember, you may have to adjust your overall stitch count to accommodate full pattern repeats of the stitch pattern you choose. Unless the lace pattern has close to the same number of knit stitches as purl stitches, it may require firm blocking to counteract the tendency to curl.
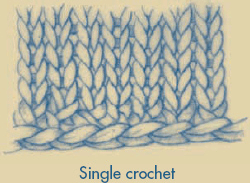
Sometimes you may want an inconspicuous edging—just enough to control curling and even out the edge stitches without adding length or disrupting the pattern in the body. In these situations, consider using a simple row of single crochet (see Glossary, page 149) for a tidy finish that can be worked on any number of stitches.
Unless a wrap is long enough to fling over the shoulder and stay there (such as a shawl or stole), or it’s one that pulls over your head (such as a poncho), you may want to add a closure to keep it in place. The most common choices are shawl pins, clasps or frogs, buttons, and zippers.
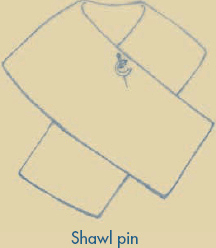
A SHAWL PIN is a decorative brooch that can hold the two sides of a shawl or stole in place around the body. Almost anything that can weave in and out of knitted fabric can be used—a safety pin, a decorative chopstick, even a wooden double-pointed needle—but pins designed specifically for this purpose can be especially nice. Whatever you choose, be sure that its size and weight are appropriate for your fabric. Lightweight mohair will need a lightweight pin; heavier, denser fabrics can accommodate weightier pins.
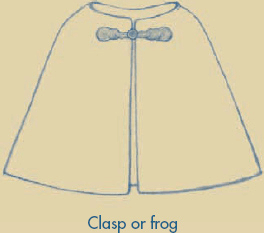
Use a CLASP OR FROG to hold together the two fronts of a cape or capelet. Clasps are typically made of metal (predominantly pewter) and frogs are made of fiber, commonly fine thread wrapped around a cord that is then spiraled into an interesting shape. Clasps and frogs consist of two pieces that hook or button together. Sew one piece on each front, then hook or button them to hold the fronts together. To prevent the front edges from curling, you’ll want to plan ahead and work some type of noncurling edging stitch (see page 139), but unlike a button closure, you don’t have to decide exactly where to position the clasps or frogs until you’re ready to attach them.
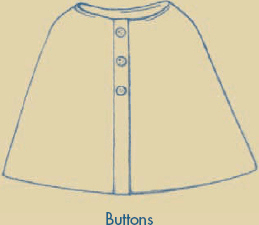
If you use BUTTONS, you’ll need to make buttonholes. The simplest method for a creating a button closure is to crochet a chain loop and sew the loop to the wrap opposite each button position. If you want to make full-fledged buttonholes, you’ll need to plan for them in the knitting. Generally, the topmost button should be about ½" (1.3 cm) below the neck opening. The lowest button can be positioned at any point, depending on the look you want. In most cases, you’ll want to knit button and buttonhole bands in a noncurling stitch. You can knit the bands as you work the body, work them separately and sew them onto the garment, or pick up stitches from the front edges and work the bands directly from there. If possible, work the button band first and mark the places where you want the buttons to go. Then work the buttonhole band, making buttonholes (see Glossary, page 146) to correspond to the position of the buttons. In general, it’s a good idea to make the buttonholes first, then choose buttons that fit the holes.
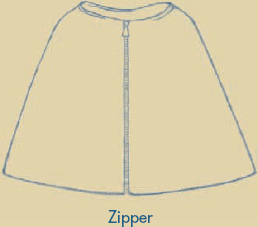
A ZIPPER can provide a nearly invisible closure so that the stitch or color pattern appears continuous across the two fronts. To ensure a straight edge to sew the zipper to, work a single selvedge stitch at each front edge. If you want the cape or capelet to open all the way from neck to lower edge, be sure to purchase a “separating” or “jacket” zipper—one that opens completely. Add a decorative zipper pull for a bit of whimsy. Don’t be put off by the idea that a zipper is difficult to insert—the instructions in the Glossary (page 155) make it quite easy.
There are a number of ways to finish off the neck of a poncho or cape. Below are some of the most common. In general, stitches are picked up around the neck opening, usually with the right side facing. For a cape (cardigan), begin picking up stitches at the right front neck edge and work around to the left front neck edge. For a poncho (pullover), begin picking up stitches at one shoulder. To make sure that the bind-off stitches aren’t too tight, use a larger needle for the bind-off row or use a sewn bind-off (see Glossary, page 145).
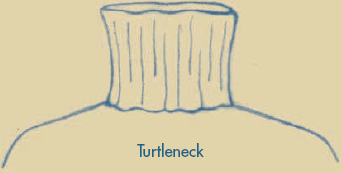
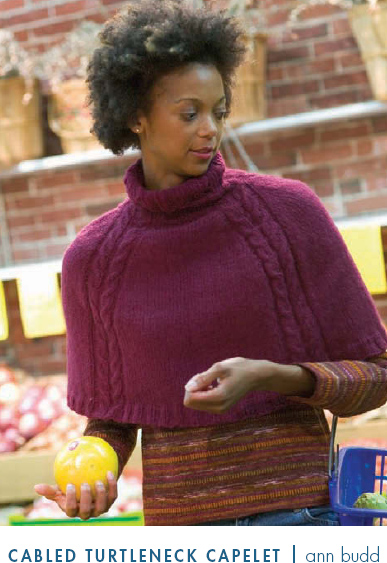
A turtleneck is worked by picking up stitches along the edge of the neck opening and working these stitches until the collar is deep enough to fold down. Many knitters change to larger needles when they get to the halfway point so that the outer layer (the one that folds over to the outside) is slightly larger in circumference. Doing so prevents the neck from fitting too tightly. A turtleneck is used on the Cabled Turtleneck Capelet (page 54).
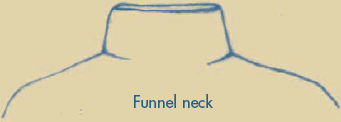
Funnel necks are basically crewnecks that incorporate continuations of the stitch pattern used in the front and/or back. Stitches from the center front and back may be placed on holders and worked later for the neck, or they can be picked up from a bound-off edge as in a regular crewneck sweater. Instead of using a separate border pattern, a funnel neck is usually worked in the same stitch as the body of the sweater (a cable or color pattern, for example). A funnel neck can be any length from an inch or more, but it stands up like a mock turtleneck instead of folding over. Nordic Lights (page 60) and Shadow Dance (page 106) both have funnel necks.
A collar is very easy to work. Simply pick up stitches around the neckline beginning and ending where you want the split in the collar to be. Do not join the stitches, but work them back and forth in rows. To prevent curling, work the collar in a ribbed or other noncurling stitch. Lace-Edged Cardigan with Collar (page 57), Wandering Aran Fields (page 64), Viva La Pancha (page 86) and Fluted Ribs (page 94) all have basic collars.

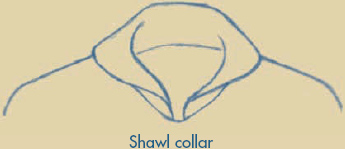
A shawl collar can be added to a V-shaped neckline. Use a circular needle to pick up and knit stitches around the entire neck opening, beginning and ending at the center front. Do not join into a round. Work your edging of choice (usually a single or double rib) around to the shoulder and across the back neck to the other shoulder. Work short rows (see Glossary, page 154) back and forth from shoulder to shoulder, always working one or two more stitches past the previous turning point, until all the stitches have been worked. Work across all stitches for a couple of rows, if desired, then bind off all stitches and block the collar in place. The Off-Center Argyle (page 68) has a modified shawl collar that incorporates a crossover V-neck.
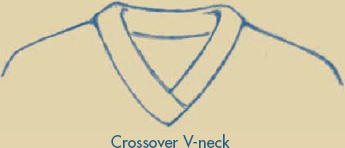
As the name implies, a crossover V-neck finish is worked on a neck that has a V shape. Beginning at the center front point of the V, pick up and knit stitches around the entire neck opening. Do not join the stitches into a round. Instead, work your chosen edging back and forth in rows for the desired length, then bind off all the stitches. Tack the selvedges of the edging to the garment in line with the V shape.
Like any project, a wrap can be enlivened with a bit of embroidery, beads, tassels, or fringe. Nicky Epstein has embellished the intarsia flowers in her felted capelet, Tapestry Garden (page 72) with some simple embroidery stitches. Beads can be added by sewing them on after the knitting is complete, or by stringing them on the knitting yarn and slipping them into place as they’re needed—see Lily Chin’s Moon Beads (page 24). For more ideas and embellishment techniques, see the Bibliography on page 156.